kgg
Contributing Member-
Posts
3,371 -
Joined
-
Last visited
Content Type
Profiles
Forums
Events
Blogs
Gallery
Store
Everything posted by kgg
-
Yes, the right machine would. This machine in my opinion would be a waste time, effort, money and probably would put you off from purchasing another machine. kgg
-
I would pass on this machine. This machine is a domestic drop feed machine made for fabric which means the movement of the item under the presser foot is moved rearward by the feed dog only. Being a domestic machine the max size of thread it was rated for was V69 but can probably handle V92. The machine has a Class 15 bobbin which has a small capacity. Someone did do a nice job on doing a custom speed reducer for this machine to give the machine more torque (punching power). kgg
-
If I were looking for a 341/1341 class machine I would pass on this one even though it maybe a great machine. I would give serious consideration to purchasing a new clone machine similar to the Cowboy CB341( $2400 USD), Cobra Class 26 ($3400 USD) and being in Canada the Kobe LS-1341 ($2500 CAD $1900 USD). The machine is actually to parts body and base. The base is hindged to the body and and held in place by the silver lever. Release the lever and the body will tilt backward and you will be able to see the timing belt. As far as slop it depends on the location but a quick check would be to push the handwheel towards the body if there is slop in that bearing there will be movement. kgg
-
A couple of thoughts: i) The color of the machine indicates to me the machine was made prior to 1996 so the machine is plus 25 years old. With this age of machine you need to tilt the machine away from the base and inspect the rubber timing belt for dry rot/ cracking and also check for side slop in the bearings. ii) Top thread pin is missing. Not a big deal cost wise but it needs one. iii) Top thread felt is missing in the horizontal square guide just before the needle. This keeps tension on the thread as the thread take-up arm cycles. Not a big deal just put a new piece of felt in. How much are they asking for the machine? In Ontario, Canada you can get a used Juki LS-1341with table and servo motor for around $1500 - $2000 CAD ($1200 - $1500 USD) depending on condition so a LS-341 should be cheaper. kgg
-
I do agree. It can be very confusing particularly for first time buyers trying to compare clone machines from different suppliers let alone what they have named their machine or their capability or what brand name model they are close to. The difference mostly is who will give you the best before and after sales service. A trend I am seeing is "fresh off the boat" sales where the dealer doesn't even open the box before selling and passing over the machine which isn't a bad thing as long as the price is reflective. kgg
-
They appear to be sort of clones of the LS-1341 (front throat plate assembly) with the "hump jumper" installed. They should handle V138 for the top thread and in the bobbin. However keep in mind the Juki LS-1340 series is rated to take a #24 (180) needle and V138 on top and bottom in it's max sewing thickness. Some clones rate their machines on what is the max size of thread that can be stuffed through the needle. In the case of the Wilcox & Gibb according to the link you referenced it is rated to take a #26 (220) which can handle V346 thread yet it is only rated to handle a max size thread of #8 (V138). The Thor link only referenced Tex 207 (V210) thread not the needle size. The Techsew website for the 4800 lists it can handle V277 with a #24 needle. I think this maybe an error as if I'm not mistaken a #24 can handle only handle V207 thread. What size of thread are you wanting to use? When you go to see a machine bring the thickest thread you want along with the thickest / toughest material you want to sew. That will be the tell tale. Remember Buy Once, Cry Once. kgg
-
If it was my decision the Singer 136 being plus 75 years old for about £800 ( $1000 USD ) needing TLC and upgrades or a more up to date new clone machine for £1200 ($1500 USD). If the clone machine has a good reputation I would go with the new one. kgg
-
Yes the hook and bobbin areas are the same whether it is a LS-1341 or 1342. Clones maybe different. The main differences are: i) LS-1341 has a longer feed dog area thus larger gauge ii) LS-1342 has a smaller feed dog area which is probably better for smaller items like bags iii) LS-1342 has what you call the "hump jumper". Only you can say if the hump jumper will be worth the extra cost for your items. I think if you are going to be sewing at close to 9.5 or slightly over thick material the LS series of machine may not be the best option. How thick including the thickness of the seam are you planning on sewing? kgg
-
The nameplate should say where it is made or email Juki to confirm that it is made in Japan to be 100 percent sure. The "hump jumper" as you call it is only available on the Juki LS-1342. I would ask if the timing belt has been changed or a photo of the timing belt condition. Is the seller close to you so you could see it running? kgg
-
Santa is coming soon. I would like to wish everyone a very Merry Christmas and a Happy New Year. kgg
-
Ferdco Pro 440r threading - manual’s diagram no help
kgg replied to PasoLargo's topic in Leather Sewing Machines
If I'm not mistaken the Ferdco 440 R is a GA5-1 or GA5-1R if it has reverse should be the same for threading. Here is a youtube video on threading. kgg -
LS-2342 uses the 134 x 35 system of needles where as the LS-1341 uses 135 x 16 / 17 system needles. LS-2342H and the ls-2342H-7-0B rated to handle V266 which is the same as metric Tkt 10, 3 cord not the Tkt 10, 4 cord. What are you planning on using the machine for that would require going above the capacity of the Juki LS-1341??? kgg
-
My understanding is: i) The Maine Thread Company located in Maine makes their own thread in the USA. ii) Mandala Crafts located in Texas appears to be a reseller of thread made by some other company. They don't list the thread as being made anywhere in particular. iii) Thread typically with "no branding" is more then likely from China. My experience with Chinese made thread has never been good. You maybe lucky and get good quality thread or not. iv) Darker threads like Black are stiffer the lighter colors as it has to do with the thread dying process. v) There generally is slight differences between batches of thread from the same manufacturer or if the manufacturer has more then one factory. With brand name threads this should be minimal but with the Chinese stuff all bets are off as to quality or consistency let alone from different manufacturers. vi) From the information I have seen Nylon 66 is supposed to be slightly stronger and better with dealing with some chemicals however it absorbs more moisture and is weaker in dry environments. I would suggest you go with threads made in North America like Maine Thread Company (made in USA) there website is https://mainethread.com/ or American & Efird (made in Canada ( http://www.amefird.ca/home/ ) and USA ( https://www.amefird.com/ )). You will be guaranteed to get consistency and quality regardless of thread size or spool size when you buy brand name thread. Yes they are going to be more expensive then the Chinese no name threads which in my experience is just frustration. kgg
-
Personally I think the #22 needle is to small and really is meant for V92 in thick materials. Who is the manufacturer of the needle? A lot of times thread fraying is cause by a burr in the top thread path, too small a needle for the thread size, needle inserted incorrectly, timing off. Did you do a drop test for the bobbin tension? Hold the bobbin case with the bobbin threaded in the palm one hand and the thread coming out tensioner. Make sure the bobbin is installed correctly and unwinds in the correct direction in the bobbin case for your machine when you pull on the end of the thread. Hold the end of the thread and lift it straight up. If the bobbin thread unwinds and the case is still in your hand tighten the tension screw. If the bobbin case lifts easily off your hand loosen the tension screw. You should be able to lift the bobbin case off your hand and with a little jerk the bobbin thread should unwind slightly and fall back into the palm of your hand. The thread tension screw probably should be adjusted in or out by about a 1/16 of a turn. I would get the bobbin tension set correctly first then i) remove the top thread from the machine right back to the spool ii) rethread the top thread iii) start adjusting the top tension. The Cobra 26 is a clone of the old Juki LS-341 so I would follow those threading instructions. It does differ from that of the what Cobra does on the top thread path. Refer to Section 9 THREADING THE MACHINE HEAD. I have attached a pdf of the manual. A few photo's of your thread path from the spool to the tip of the needle would help. kgg Juki LS-341N Instruction Manual-3.pdf
-
Capable 138 thread sewing machine options?
kgg replied to DieselTech's topic in Leather Sewing Machines
The Consew appears to be a decent clone machine at a decent price point. Remember no one machine is going to be able to do everything. I think the main factors in selecting a machine is dependent on what you are planning on sewing, the size of thread you want to use and the thickness of material being sewn. If most of your items are going to be close to or above 3/8" thick or you want to use above V207 then a class 441 machine probably would be a better investment. If the majority of your items can be handled by a Class 1341 machine with a flatbed attachment I would select it over a flatbed just because of the versatility. The flatbed attachment will give you the ability to do flat or cylinder work without having to have a second machine. I would also suggest if most of your items will work well on a Class 1341 like a Juki LS-1341 or clone get the best you can afford and wait for a good second hand Class 441 or vise versa. Also chances are at some point down the road you will sell you machine and keep in mind a brand name machine like Juki / PFAFF /Alder will be easier to sell and command a higher resale price then a clone. Decisions Decisions. Typically the 135 x 16 or 135 x 17 needles as well as the 134 needles are for upholstery class machines both flatbed like Juki 1181N (and respective clones) and Juki 1541 (and respective clones) and cylinder arm Class 1341 like Juki LS-1341(and respective clones) while the Class 441 like the Juki TSC441 (and respective clones) uses the much large 793 needles. Buy Once, Cry Once. kgg -
Capable 138 thread sewing machine options?
kgg replied to DieselTech's topic in Leather Sewing Machines
If you go to Toledo sewing machine website for the Consew 206RB-5 ( https://www.tolindsewmach.com/consew-206rb.html ) the machine is rated for a #25 needle and V207 thread. Note that a #25 needle will handle V277 thread. From that I would assume it can handle V207 thread to the max sewing thickness as you sometimes have to go up a needle size up for the thread size being used when sewing in thick items. In your case V207 thread with a #25 needle rather then a #24 needle. kgg -
It may fit just depends on the servo motor you get, how far it hangs down from the bottom of the table and the size of pulley it has or you are placing on the servo motor shaft. If you have to get a new belt a lot of people just use the 3L V belts you can get at hardware / auto supply stores. Yes there can be quite a difference in quality of servo motors. There are basically to versions of servo motors. Depending on what continent you live on one or both versions maybe available. i) One is a servo motor that uses brushes inside the motor and speed is typically set by a simple turn dial. A 550 watt should work find with the Singer 111W. ii) The other version is a brushless servo motor which has a box of electronics that controls the speed. If you decide to go this route then the more internal coils the servo motor has the better the servo motor. The cheap Chinese ones typically have 6 coils while the better ones like the Reliable 6000sm or Sailrite Workhorse have 12 coils. A lot of the brushless servo motors have or have the ability to install needle positioning. The problem with that is that if you install a speed reducer chances are the needle positioning will not work. Another point to note is the startup rpm's on the some are in the 200 range while others are in the 500 range. A speed reducer will help to smooth out any noticeable jump on startup. My attitude is the less electronics the better. kgg
-
Capable 138 thread sewing machine options?
kgg replied to DieselTech's topic in Leather Sewing Machines
The Artisan 797, Cowboy 797, Weaver 303 appear to be very similar / clone of the Juki 1181N. The Sailrite Leatherworker is just a portable walking foot Sailrite LS painted green thrown into a small table with a very good servo motor. It is rated for 1/4 " thick (maybe) with V92 thread in a class 15 bobbin (very small). Depending what you want to sew and the thickness they maybe OK but I would consider all of them really better for fabric applications. As has been suggested a Consew 206RB-5 would be a far better choice amongst the clones. kgg -
That was interesting as to what an old Landis 16 can do. Pure punching power. kgg
-
Bottom thread is good, but top thread is wrong
kgg replied to Jamesgentry270's topic in Leather Sewing Machines
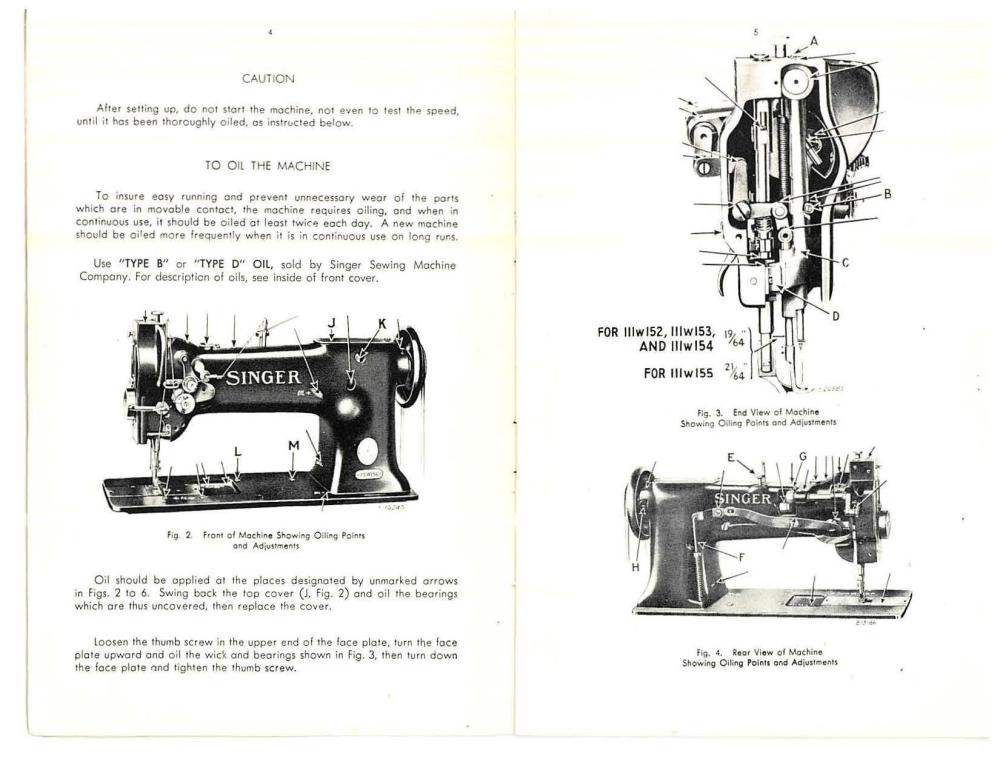
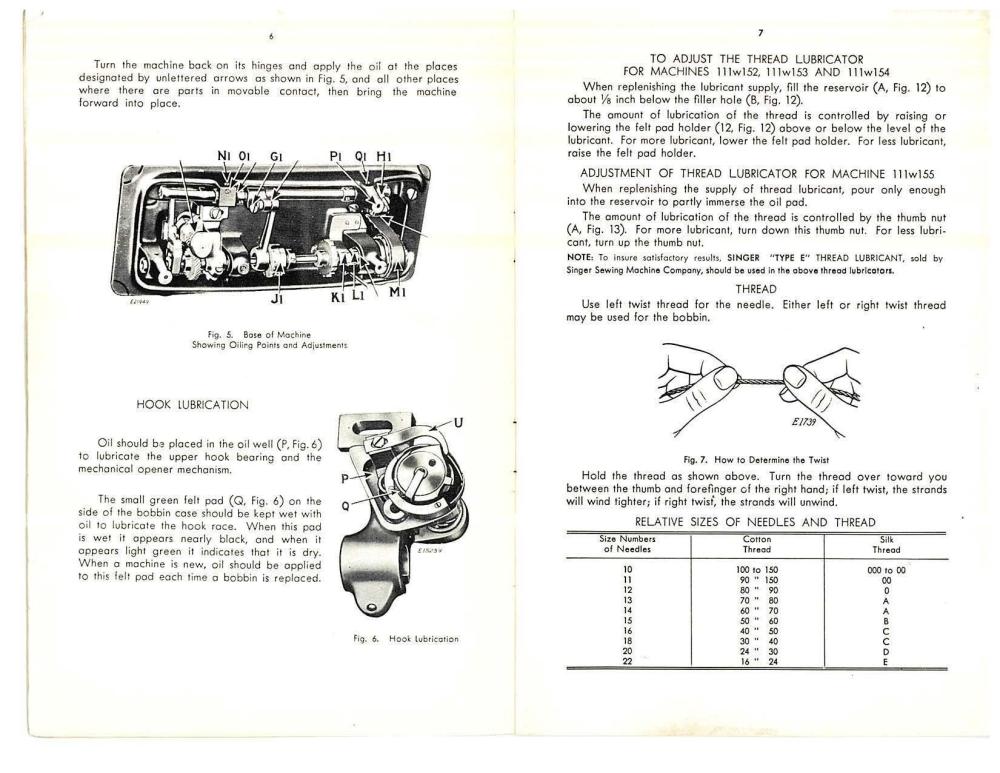
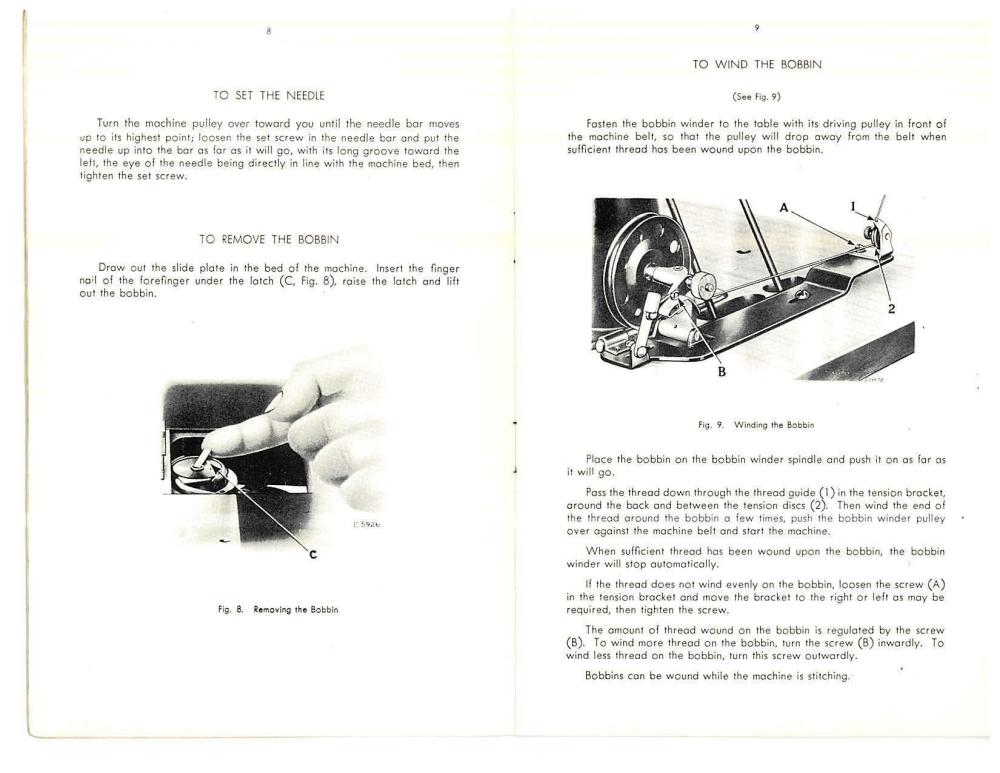
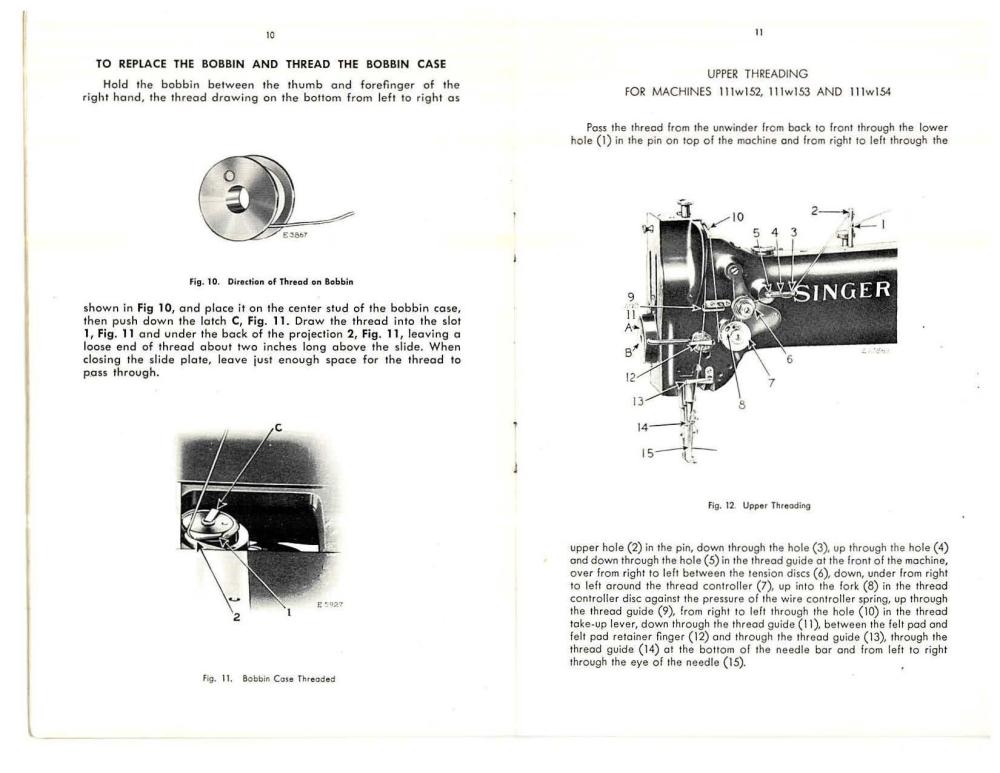
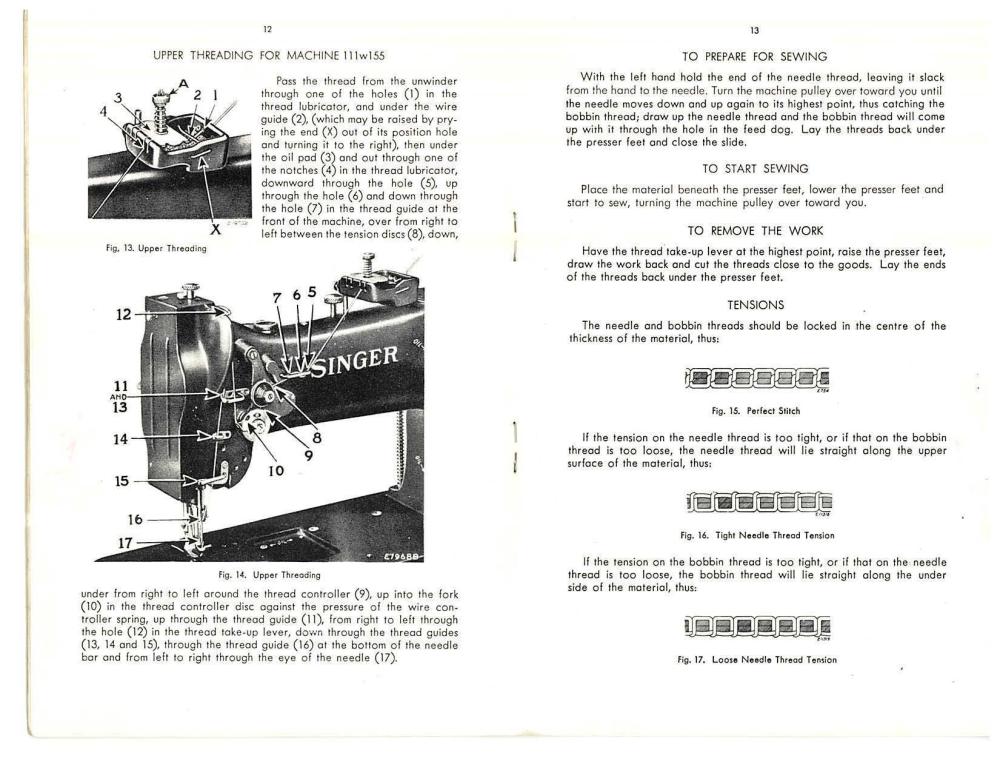
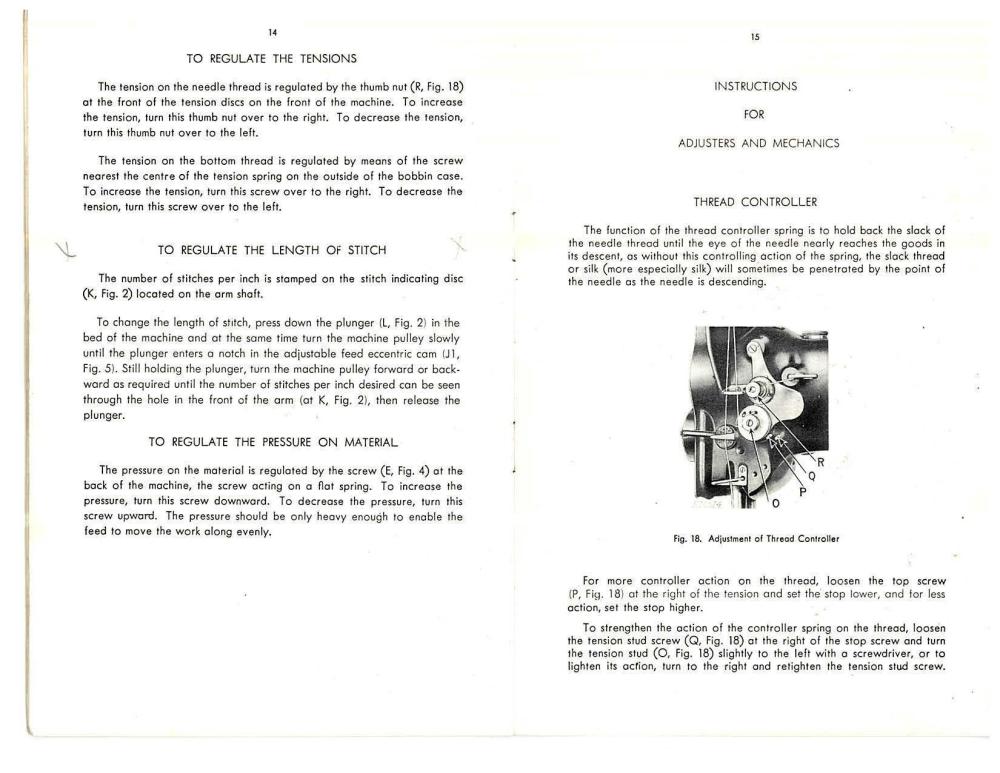
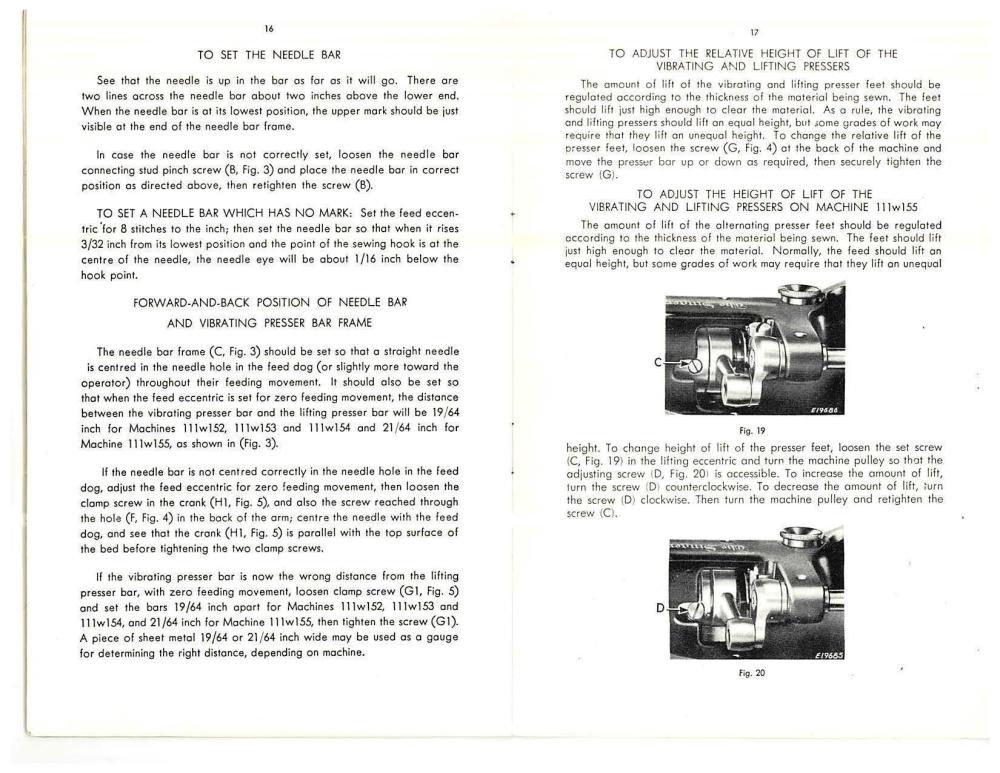
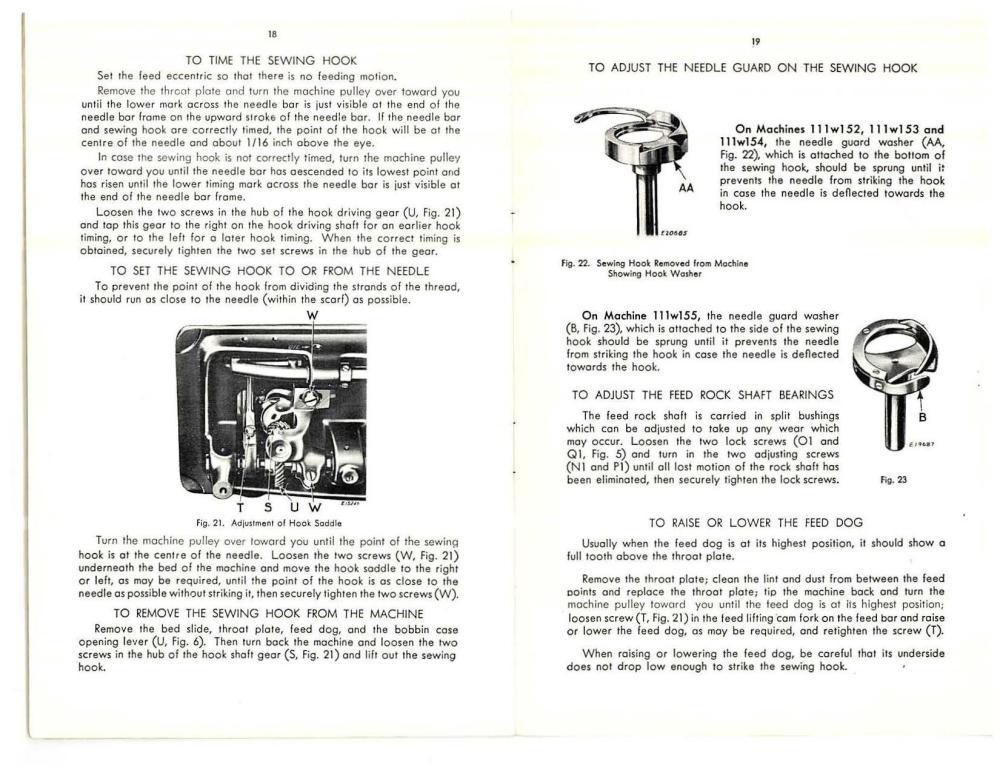
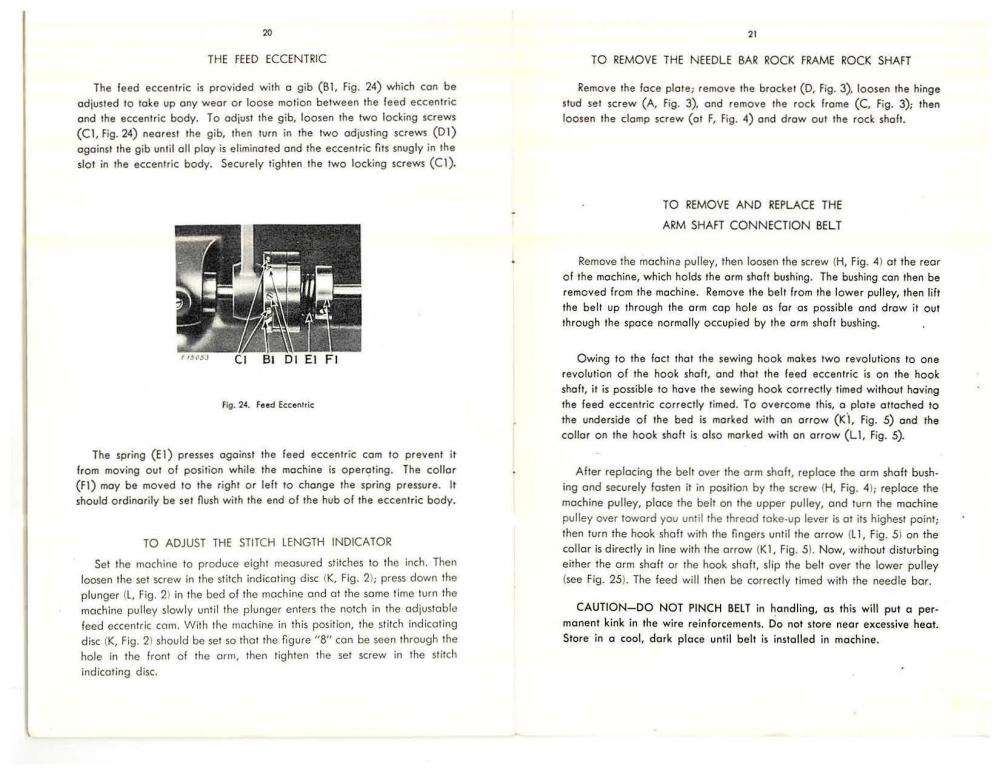
I think you have a Singer 111w 153 machine according to one of your previous posts. Go to your manual page 14 it will explain how to adjust the bobbin tension. If you don't have a manual I have attached a pdf. of the manual as well as better / clearer images of those pages from that manual. Also here is a link for a needle to thread size chart: https://www.tolindsewmach.com/thread-chart.html A #22 and #23 needle are for V138 in thinner items or with V92 in thicker materials. You would probably have to move to a #24 for thicker materials with V138 thread. kgg 111w152.pdf 111w152.pdf -
Bottom thread is good, but top thread is wrong
kgg replied to Jamesgentry270's topic in Leather Sewing Machines
A couple of basic questions: i) what size of thread is the new thread? Often times thread from the same manufacturer can have slight variations from batch to batch or comes from a different factory so it is important to check tensions for the top and in the bobbin thread. If you changed to a Chinese made thread all bets are off. I've even seen where they run out of thread while loading the spool and just tied the two ends together to complete the spool. ii) what size of needle are you using? If the size of the hole that the needle makes is to large for the size of thread being used it will cause the bobbin thread to come to the surface. iii) did you do a drop test to help with setting the bobbin tension? iv) are you sure you threaded the top thread correctly? Sometimes when you are in hurry or tired it can happen that you missed something. How I re-thread the top thread is I cut the old thread off close to the top spool guide and tie the ends of the old to the new thread. Then I remove the old thread from the eye of the needle and pull the old thread out from the needle end. That way the new thread follows the threading path of the old thread. kgg -
The Juki LU-1508 is a different series of machine with 7 variants then the Juki DNU-1541 series which has 3 variants. Both series look very similar but the main visual difference is the bed size and weight. Bed size : LU-1508 series bed is 517mm long versus the 1541 series being 477mm long Weight: LU-1508 series weights vary depending on the variant between 42.5 kg (~94 lbs) and 48kg(~106 lbs) while the DNU-1541 series eights depending on the variant between 36.5 kg (~79 lbs) to 42.5 (~94 lbs) kgg
-
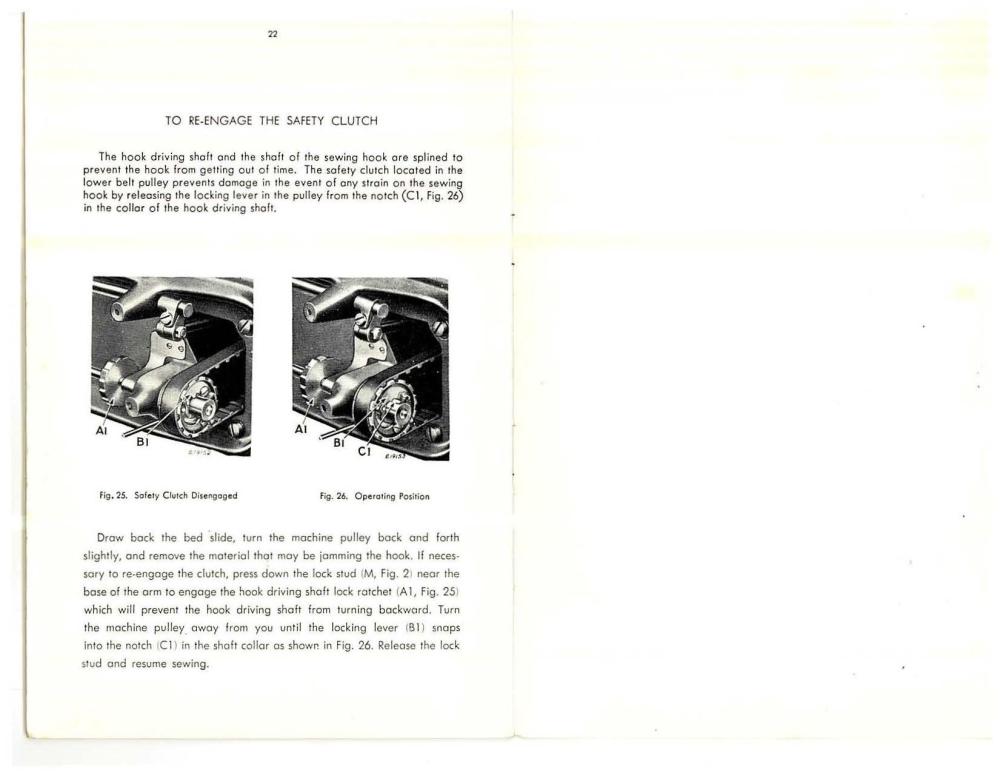
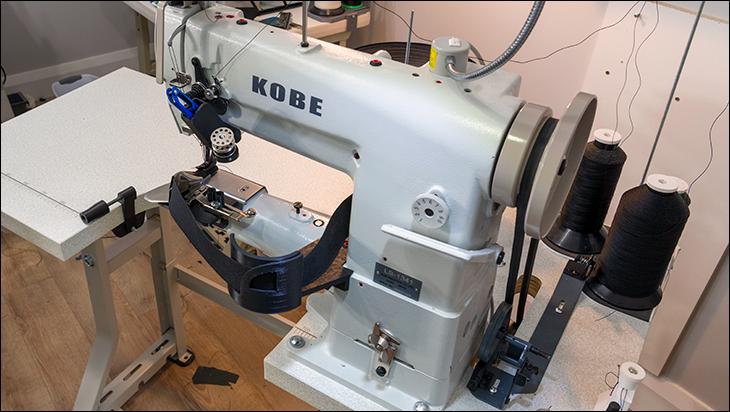
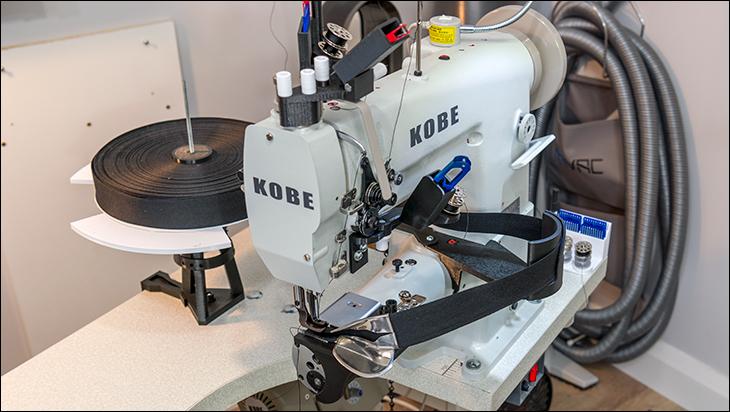
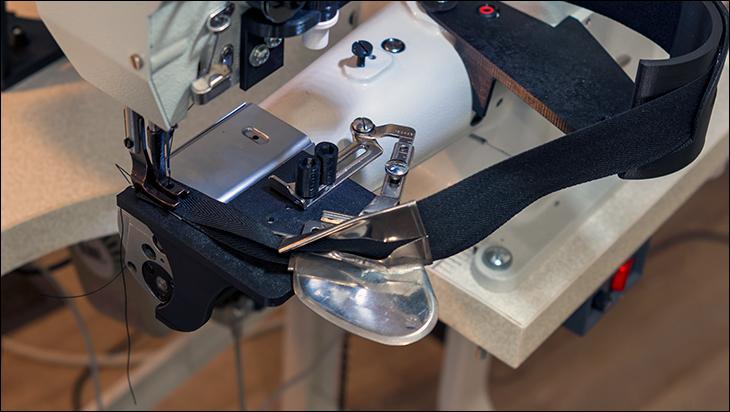
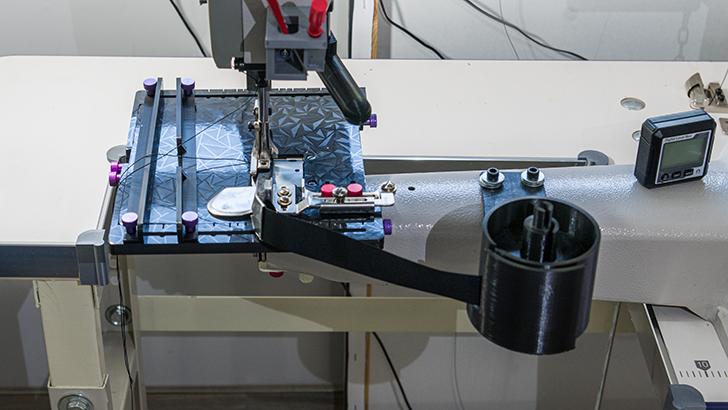
I think the cylinder arm Juki Ls-1341 or a clone is probably as close to a "one trick pony" as you are going to get. Add a table attachment and you sort of got a flatbed machine. I turned my Kobe LS-1341 into a binding machine. I do a fair bit of binding. When it comes to binding you can use the expensive 90 degree style of binding attachments and they well allow for doing binding around tighter corners. For my situation as I had flatbed machines before I got a cylinder I wanted to be able to use the same binding attachments that I use on the Juki 1181N or the 1541S and use them on the LS-1341 clone or the TSC-441 clone. So to that end I designed up some attachments and printed them to allow for this. There is also quite a bit of difference cost wise between the standard inline and the 90 degree binding attachments, $100 versus $20 per tape size. If you are planning on visiting a vendor call them a couple of days before hand to set up a time and tell them what machines you are interested in so they can set one up for you to test drive. If they don't or can't set a machine up for you then they maybe they are just selling you an untested "fresh off the boat machine". If they are selling "fresh off the boat machines" you probably can get the same / similar machine with that same level of service from a lot of online vendors. Here is some photo's of older versions of what I came up for binding using standard inline binding attachments for my LS-1341 (first three photo's) and TSC-441 clones. kgg
-
Think of the "S" version as cheap insurance. The cost difference between the 1541 and the 1541"S" is about $100. The safety clutch when it kicks in protects a lot of internal parts from getting damaged. Depending on how badly you fool up usually it is just a matter of resetting the safety and you are sewing again. Without the safety clutch timing issues could be the least of your worries should a problem occur. As a side note my Juki DNU -1541"S" hates items less then 5mm thick and much prefers thicker items with V92 thread as a minimum top and bobbin thread size. Since you are doing bags have you considered looking at a Class 341/ 1341 machine like a Juki LS-1341 or clone coupled with a table top attachment? kgg
-
Help on Rex 345-3L Industrial Sewing machine
kgg replied to ChristinaC's topic in Leather Sewing Machines
No, the length of the 16x231 needles is 33.9mm with a shank diameter of 1.63mm while the length of the 135 x 16 or the 135x17 is 38.9mm and the diameter of the shank is 2mm. This machine is not going to be able to sew gun holsters or belts. It probably will only be able to sew very thin leather. kgg


