MtlBiker
-
Posts
850 -
Joined
-
Last visited
Content Type
Profiles
Forums
Events
Blogs
Gallery
Everything posted by MtlBiker
-
Thanks. I deal with Wawak.CA (there's a Canadian specific site) regularly. They're pretty good. And I have a bunch of that tape. But it's not going to work for me in this case... I need (at least I think I do) a way of attaching the foam INSIDE of the stitch line so that the seam allowance and perhaps 1/4" inside of that stitch line remains thin, without the foam. And I doubt very much that even if I plaster the inner area of the pattern with that tape, it would stand up over time and keep the foam from shifting. I'd need a way to keep the foam in position over time. The foam I'm using I get from JT's Outdoor Fabrics... https://www.jtsoutdoorfabrics.com/.25_Inch_Sewing_Foam Maybe I should be using something else?
-
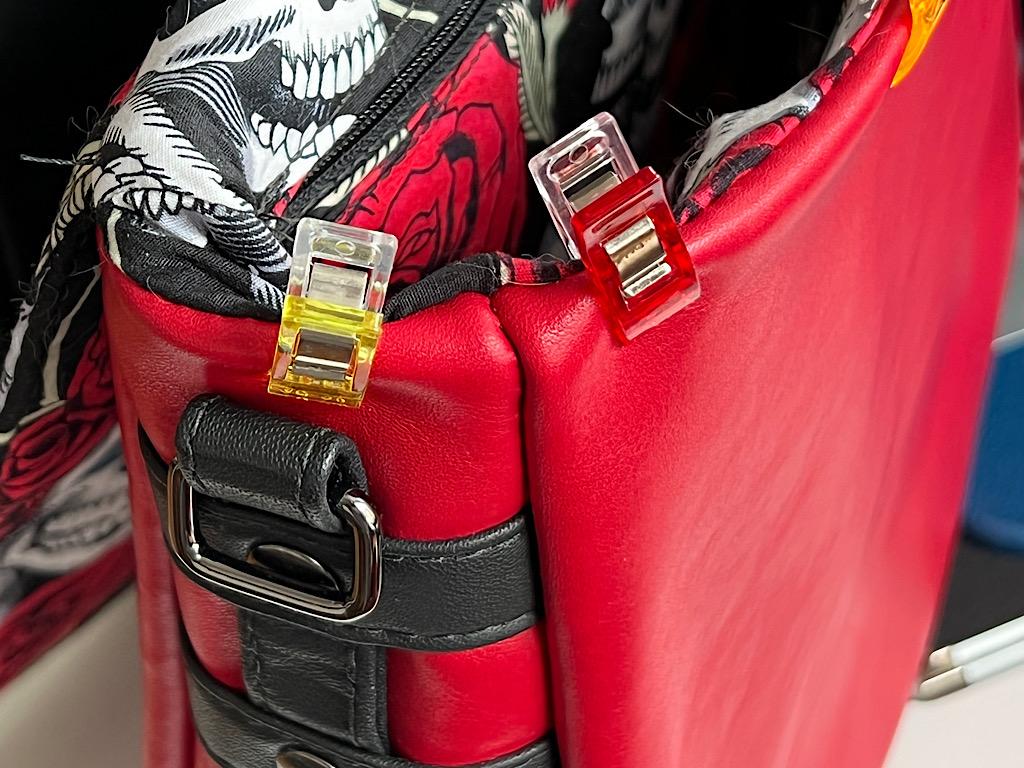
I'm wondering if you guys can suggest a better technique for me than what I've been doing to interface leather for making bags/purses. What I've been doing when using different fabrics is to first apply a fusible woven interfacing and then for the outer pieces that need more stiffness or form, ironing on Decovil Light. That's been working just fine. And for materials which I don't want to use heat with, I've been baste stitching a 1/4" foam in the stitch allowance. And when I put the pieces together, it's always been just fine without being too thick. But now with 4oz chrome tan leather for the outer bag when I sew on (baste) the foam interfacing I end up with too much bulk in parts of the bag which I can just manage to sew on my machine (just under 1/2" thick). (The thickest part is where the gusset meets the front of the bag and the lining attaches and also where the bag flap attaches to the back of the bag.) It works, but I'd really like to end up with less bulk along the edges. What do you suggest for giving leather a better form / stiffening it? If I cut my foam smaller so that my seam allowance would only be the thickness of the leather layers, that would be a big improvement, but I can't stitch the foam in place or the stitching would show. Does it make any sense to glue the foam in place? I probably wouldn't have to glue the whole piece of foam... just enough to hold it in place for the finished bag. Suggestions?
-
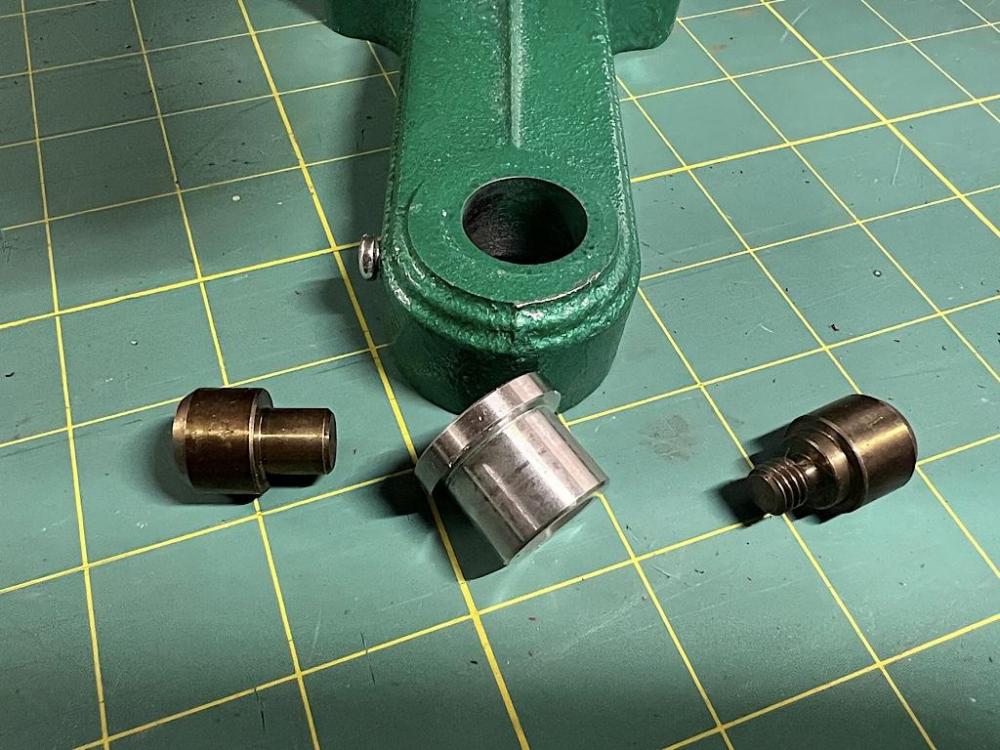
Darn, I see I'm too late as you've already bought. But in case it is of help to anyone else, here's some info... I own two Kamsnaps presses (I keep a hole puncher in one and rivet press dies in the other for when I'm doing a bigger production). I've been buying snaps from Judy at Kamsnaps and want to say that the service she provides is exceptional. (I'm sure Buckleguy is great also.) I buy various sizes of rivets, snaps, magnetic snaps etc from them. The press has an adapter that inserts into the bottom part. That adapter is 18.94mm in diameter (the part that inserts) and than a little set screw on the side is tightened to hold it in place. I've never had to remove it for anything. But having the dimensions might help you and others figure out what else might fit. Then the die that fits in the bottom just drops into the hole in the adapter and it has an outside diameter of 10mm. The top die is threaded and as near as I can measure it's 7.85mm outside threads. Here's a photo of the pieces. Hope it helps someone.
-
Costco (Canada) is currently running a special promotion on the Cricut Maker... I'd never heard of this thing before and after taking a closer look, must say it looks interesting. I also found out that the Costco special is on the older model of this, not the newest Cricut Maker3. But the device certainly does look interesting, especially the newer one. Does anyone here use one or have experience with one? How do you use it? The blurb on the website says it can also cut matboard... does anyone know if that includes cutting mat openings (windows) on a bevel like a proper picture framing mat? I'm thinking it might be great for cutting leather and various fabrics accurately. Maybe also for producing templates on some kind of plastic. Opinions?
-

Latest bag commission
MtlBiker replied to Bogwot's topic in Purses, Wallets, Belts and Miscellaneous Pocket Items
Beautiful! I'll bet the client was thrilled. -
I made a few test pieces for straps and other than for the roughness of the result, for a first attempt I'm encouraged. I need to work more carefully on the edges but I think that both options mentioned (two straps glued together and one strap folded back under by 1/4 the width) would work. I didn't try (yet) just a single thickness of the leather for decorative trim areas but if I do well on the edges that too should work well. The only thing I don't like is that when the strap is doubled over like for a length adjusting buckle, or folded under to hide the strap end and then riveted the leather I have might be too thick. I'm figuring it's just shy of being 5 oz leather (1.49-1.97mm) and doubled it measures 3.5mm and the folded over version is about 4.25mm. Should I be using a thinner leather, like maybe 2-3 oz for the straps? The finished product is simply a bag/purse as I showed at the beginning of the thread so supporting heavy loads isn't going to be an issue.

-
I guess I'm going to have to try both methods. I just wanted to make sure I wasn't overlooking a better method than what I'd thought of. I think what you are suggesting would work better (perhaps) for the trim pieces where they're attached to the bag so the underneath join/seam isn't visible. But the edges, top stitched, would look very good. For the shoulder strap and maybe the handle, it might be better with the two piece strap glued together and stitched and then the edges burnished. SIGH What I don't know about working with leather would fill a book!
-
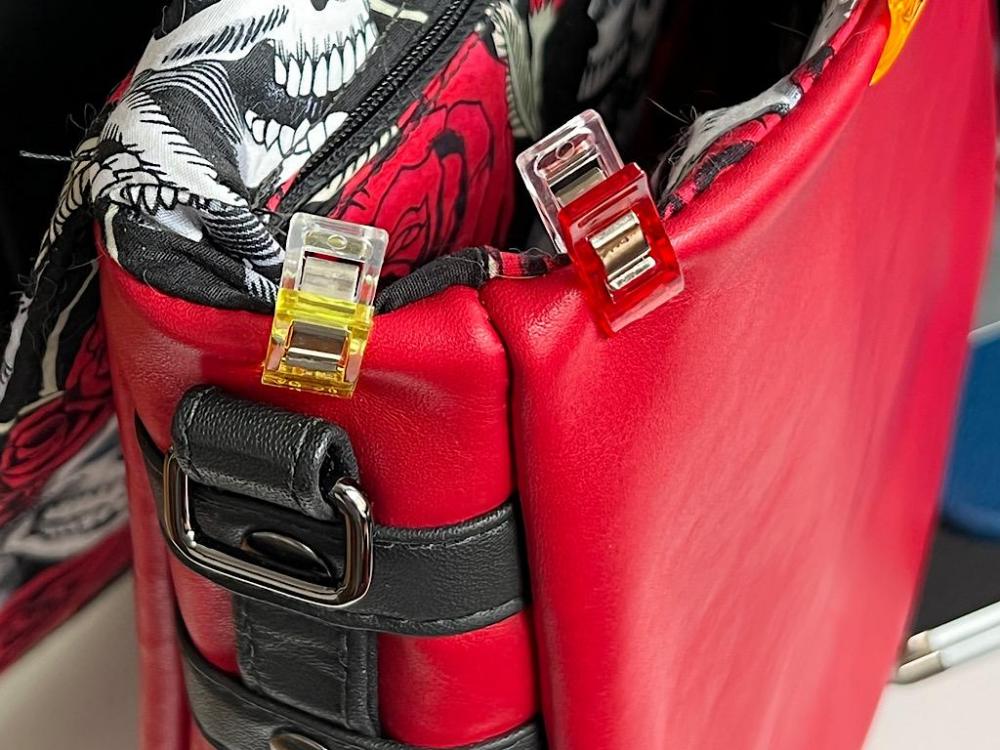
Thanks. Since I've never done this before, I guess the right thing to do would be to try both ways. I'll make a couple of sample pieces. I was asking, in case I was missing a better method. I have LePage's heavy duty contact cement... any reason that shouldn't work well? There are parts of that bag that are trim (not shoulder strap or handle parts)... I'm wondering if a single thickness of leather with the edges burnished would look alright. Or if the double layer with the join hidden underneath and the edges top stitched would look better. That might just be personal taste, or...? You can see the trim pieces in my above photo. And about burnishing the edges... this does work with chrome tan leather, right? I've only so far done this with veg tan that I've dyed.
-
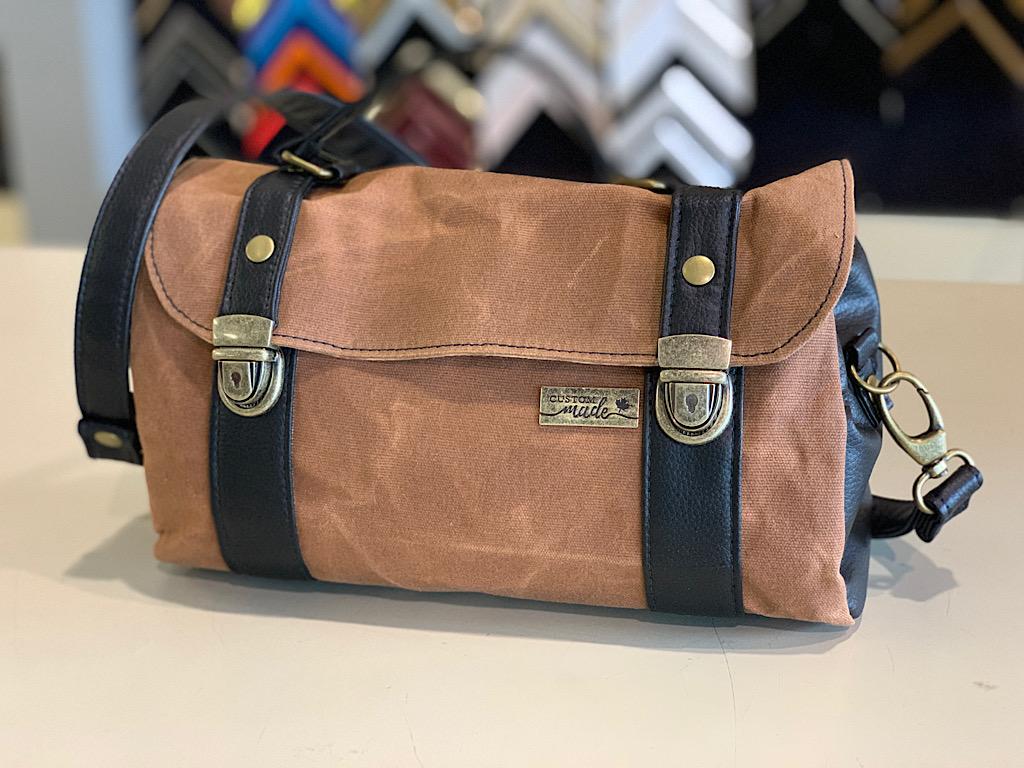
I'm really a novice with leather (only started doing any sewing since Covid) and other than for a couple of wet moulded belt pouches with veg tan, all my (little) sewing experience has been with fabrics, canvas, Cordura and vinyl. I just returned from a leather supplier where I bought a bunch of chrome tan leather for a project. I'm a little stumped about how to make the shoulder straps with the leather. Using vinyl fake leather, my straps started off being 2" wide. Then I folded each edge into the middle, making the strap 2" wide. Then folded in half again making the finished width 1" and stitched both edges. I doubt if this would work well with the leather as it would be too thick. So I'm wondering how I should make the straps. Does it make sense to start with 2" wide and fold the ends in to the middle to make the final 1", with the join visible on the bottom? Should I start with two 1" straps and glue them together and stitch the edges? And then burnish the edges? Is there a better way? I haven't measured the leather I bought but the seller said it was about 3.5oz. Four layers of that would probably be too thick. Here is a photo of the bag I made using waxed canvas and vinyl... I'm planning on the same but using leather instead of vinyl. You can see part of the shoulder strap. Thanks for any suggestions.

-
The only rivets I've used (so far) are double cap. And only one time did I flatten the inside cap (the inside of a small leather pouch where I was sliding in a "SECRID" credit card holder and didn't want it to snag on the rivet cap. But for all my other uses (mostly bags) I use the double cap. How strong are they? No idea, except I really cannot imagine them pulling loose. And I often use them as a decorative touch on straps which I've stitched together. I get my rivets (and snaps, including magnetic as well as rivet presses) from Kamsnaps. Excellent service and competitive prices. I actually have two of their presses because I find it more convenient to have one set up to punch holes and the other to press the rivet or snap closed. What are you making that the strength of a rivet would be of concern?
-
What part of that bag says to you, "post" bed machine? Is it the side seam which might be hard to reach near the bottom with a flatbed? I make a similar bag using both flatbed and cylinder arm machines (for different parts) but I'm drooling over getting myself a post machine. Please... give me more reasons to get one! (I'm actually thinking of the Techsew 860 or equivalent, as it uses the same needle system as my other machines plus has a compound walking foot, and takes thread up to 138 and needles up to size 24.)
-
Geez, that looks really professional! Good job! You're lucky, not only that you have the knowledge to do such things, but also to have the equipment and time to play around. The burnisher wheel... you 3D printed that? I'd bought a set of about a dozen different burnishing wheels from Amazon that fit into my Dremel tool. But I probably don't do as much of that as you do. And your setup is super as the burnisher/sander stays put and you can hold your assembly with both hands. Okay, I'll admit to a bit of envy.
-
Ontario is a big province. Where abouts? @kgg who also replied to you is in Ontario also. Before you go with the Techsew motor, check out Japan Sewing in Toronto... their website is meager, but Chris at 905-764-0100 is very helpful and has great prices. I bought my last servo motor from him (and I'm in Montreal). I also have a Techsew machine with their servo. Both are good options.
-
I've been using Wawak's super strong tape for many months now. I find it very strong but it does gum up the needle a bit. That hasn't been a problem for me and generally I've just kept using the needle without cleaning it until the needle had to be replaced. But I've also cleaned the needle from time to time using an alcohol wipe. The tape works well on fabric and leather and it does work on the back side of Cordura but not as well. If I use Cordura I need to also clip it in place and sew it quickly. I often make straps using one layer of canvas and the other of Cordura, with each folded in to the middle (so a 2" wide strip becomes 1"). I have to clip the Cordura every 5-6 inches or the tape lets go before I can sew it. I've also tried the tapes from JT's Outdoor Fabrics and Pacanna (both here in Canada) and the Wawak tape is the best of them I've found.
-
Thank you! I'd watched the video twice and still didn't understand what the game changing "it" was. Maybe I'm the only newbie here who didn't catch on right away, but it would have been helpful if he (or someone) had first outlined the problem/issue and then explained the solution. This newbie thanks you.
-
Well, I look forward to your clarification. I'm just not sure what "IT" is. What have you done/changed to make it a game changer?
-
Rocky, please forgive a question from a relative newbie... What exactly are you showing that you're calling a "game changer"?
-
Very nice! They look great. I'm doing a lot of work with waxed canvas but haven't yet added leather to them. Are your bags lined? Are you using some kind of reinforcement behind the rivets? Are the straps only attached via the rivets or are they sewn also? Where did you get your waxed canvas? I've been using the "heavy waxed" canvas that Sailrite sells. Also some from BigDuckCanvas. I don't know if you've seen or heard of Adam Savage's EDC One and EDC Two bags? I've made them with waxed canvas with Cordura for the base. They look sort of like old fashioned doctor bags and almost as soon as I finish one and put it on display it's sold. I'm also making some women's purses with it. But I really like the looks of your bags.
-
Geez, is there anything you DON'T know about sewing machines? Seriously, thanks for the explanation.
-
Very nice! There's something very cool about using such modern technology (3D printer) to make accessories for such a classic, dare I say, "antique", machine. You're certainly very creative and skilled at making things. Never having seen one of those machines before, I might not appreciate how your thread stands improved the original. For someone like me (newbie) does that machine not have a bobbin like most machines? Does the bottom thread feed through the machine directly from one of your large spools? From the photos the thread looks very thick... what is it? And you're using the machine via the hand wheel without a motor, right? Does that not make it more challenging to hold your material assembly in place with one hand? You refer to photos 5 and 6, but there are only 4 photos in your post.
-
Looks like you did a lovely job in cleaning up and adjusting that machine! What are your plans with the machine? Will you be keeping it for some specific task or selling it?
-
Sailrite Ultrafeed LSZ-1 w/WorkerB motor
MtlBiker replied to MtlBiker's topic in Leather Sewing Machines
This is very strange. I uploaded the video here directly... it wasn't a link. I've done this before (on this site) without problem. I don't know what the issue is... could it perhaps be a site issue rather than something with that video? In any case, I've now uploaded it to Smugmug and have posted a link in my last message. For anyone having trouble with the embedded video here, please try the link. As far as the stitch speed goes, my understanding is that with the Monster II wheel (the very big and heavy wheel that's optional) you'd get the slowest speed. Slower than with the wheel that comes with the WorkerB or the standard wheel. Since I have the Monster II, that's the only wheel I've tried it with. And I'm thrilled with the low speed performance. With the sewing I'm doing I am much more concerned with slow speed control than I am about top speed. I think my hand cranking days are over. But I'll be giving it a full workout over the coming weekend, and maybe evenings before if I have the chance. -
Sailrite Ultrafeed LSZ-1 w/WorkerB motor
MtlBiker replied to MtlBiker's topic in Leather Sewing Machines
Very strange... I've uploaded video here before and there never was a problem. In any case, this was an upload directly here and not a link. I've now uploaded the video to SmugMug and will try to link it here. I wonder if the problem with this video is a site issue rather than a problem with the video. SHRUG Here's a link... Ultrafeed LSZ-1 w/WorkerB servo -
Sailrite Ultrafeed LSZ-1 w/WorkerB motor
MtlBiker replied to MtlBiker's topic in Leather Sewing Machines
Anyone, does the video not work for you? I've had reports that it doesn't work. On my computer it works just fine. I just tried from a different machine and it looked like the video was frozen, but clicking on the play button a second time got it working again. Please let me know if you have any problems. -
My first industrial sewing machine was a Consew 206RB-5, about two years ago. I later added a Techsew 2750 Pro (cylinder arm) machine. But ever since I started sewing I've been drooling over the Ultrafeed LSZ-1. Not that I really needed such portability nor did I have a real need for a zig-zag stitch. I came close a couple of times to buying a cheap clone, and I'm really glad I didn't. About 6 months ago I finally splurged and bought the LSZ-1 Premium package. I later added their folding table. I must say that I really am extremely happy with that machine, even though I have two other more "industrial" machines. I find that with the Monster II handwheel, I can hand crank my stitches through almost anything, and as slow as I want/need to. I didn't really have a need for the zig-zag stitching but I could have never imagined how useful that would actually be. My sewing consists mostly of bags (totes, purses, even wallets) and there are a lot of zippers involved. Having the ability to set the needle position to left, center or right is incredibly useful! Just by changing the needle position I avoid having to switch to a different foot in all my cases (so far). I do have the full variety of feet Sailrite offers, but I've yet to have needed to change. Oh, one thing I did change early on, was the presser foot and feed dog which came with the machine. It was a sawtooth type and too aggressive for sewing leather without leaving marks. I changed to their "knurled" presser foot and feed dog set, and haven't had to change anything else. I only had/have two nits about the machine... First, the small domestic-size bobbin. I'm used to size "M" bobbins which hold a lot more thread. So I'm often running out of bobbin thread. The second nit was that with the clutch motor that's part of the machine, I wasn't able to get the really slow stitching that I sometimes needed. So I used the hand wheel. But the problem with doing that is sometimes it's hard to hold my thick assemblies in position with my left hand while turning the crank with my right. (Not to mention needing a third hand to hold my threads at the start. So about a month or so ago, Sailrite announced a new servo motor for the Ultrafeed machines. Called the WorkerB. And some "influencers" on YouTube got early test units to play with. Watching those videos and reading the reviews blew me away and I wanted a WorkerB! Luckily I found out that Sailrite was going to offer the WorkerB as an upgrade for existing Ultrafeed owners. And they just released that upgrade last week. Needless to say, I was one of the first in line to order it. I just installed it on my LSZ-1 with Monster II wheel. Piece of cake! I went slowly and carefully, but the job took no more than 20 minutes. Everything fit like a swiss watch. And I'm sure you know how terrific the videos are that Sailrite produces... the video on retrofitting the new motor was equally well done. Piece of cake! The new motor is more powerful than the original, plus it's supposed to have some kind of sensing feature that supplies more power (torque?) if it detects something thicker or harder to sew. Anyway, there's now an on/off switch also, which the original motor didn't have (I used to switch off my power bar). There is a speed control knob at the top which lets you set the maximum sewing speed. Meaning no matter if you press the foot pedal to the floor, it will only sew at the maximum set speed. It's amazing! So I made a short video to show how slowly the machine can stitch (with the Monster II wheel it can stitch slower than with any other wheel). In the video I have the speed control dial set to the minimum speed, and I start off just feathering the foot pedal (holding it in my hands). Stitch by stitch slow! And then when I fully depress the foot pedal it speeds up stitching to the maximum set by the speed control dial (set to minimum speed). I'm lucky that as a serious hobbyist I have three machines, but I'd say that if I could only have one machine, it would be the Ultrafeed LSZ-1 with WorkerB motor. My experience with Sailrite so far has been top notch. The service and support (and their videos!) are I believe the best in the industry. The Sailrite folks are a class act. E7E9E86D-AAC7-4A45-9ADD-BF597A6AD865.MOV