

All Activity
- Past hour
-
Even on very dry leather it is easy to use too much oil. I usually apply just a light coat of NFO to the grain side and give it time to soak in. If it's still too dry, a 2nd light coat may be in ordre. Time to absorb is almost as important as quantity. Remember, you can add more oil if you need to, but it's pretty tough to remove it, and oil-soaked leather is just nasty. That said, I had a cetain piece of veg that was dryer than a math lecture. I brushed a bit of NFO on the flesh side and it definitely helped.
-
Well Ill be damned, less than 24 hours and you have helped me troubleshooting an issue ive had for over a year. The drive shaft is now turning. Ill keep you updated on any issues that may follow... do I use it manually to ensure that all blockages are removed for the time being?
-
Spot on, I'll go and try to reset it now. Thank you
-
I’m a complete beginner who’s just about to start the journey into leathercraft. I have a few questions about tools and my first project. Please excuse any misuse of terminology—I’m still learning and doing my best to explain what I mean. Tools From what I’ve learned so far, to start I’ll need the following: a burnisher, edge beveler, wing divider, metal ruler, self-healing mat, stitching chisels, rubber mallet, stitching needles, scratch awl, and craft knife. Is this a good basic setup or am I missing something important? Project My first project will be a motorcycle seat cover made from sheepskin hide. I know this might be too ambitious for a beginner, but it’s something I actually need and it motivates me to learn properly. That’s why I’m carefully planning each step to avoid mistakes. Here’s how I imagine the process: Cut the hide to fit the seat area I need. On the back side, glue a nylon strap (in 2-3 places) with a stretch (elastic) strap sewn in the middle. The goal is to have enough slack to go under the seat. Basically, I want to create small “waves” in the nylon strap and sew it onto a straight stretch strap—so the nylon will limit how much the elastic can stretch, just enough to go over the seat. The nylon strap will go between the sheepskin and the outer layer (next step). Or will just use a side release buckle. Here I’ve hit a problem. The sheepskin is quite stretchy, thin, and soft. I’m worried it might tear. I’d like to glue something to the back that repels water (to protect the skin from moisture) but still allows it to breathe. A bit of padding would be fine too. Do you have recommendations for what material and glue would work best? I also plan to leave a few centimetres of material as a “flap” around the edge of the bottom layer from step 3 (except at the front and back). How should I treat or finish the underside of the skin? I’ve read that Tokonole can be used to burnish edges—can it also be used to protect the bottom surface from the elements? And finally, what should I use to clean and maintain the sheepskin over time? Any other advice or suggestions are warmly welcomed! Photos as examples, not exactly how I see it, but somewhat similar.
-
You may need to engage the safety clutch manually, with a screwdriver. Here is a video that shows how the safety clutch mechanism works, and how to disengage/engage using a screwdriver.
- Today
-
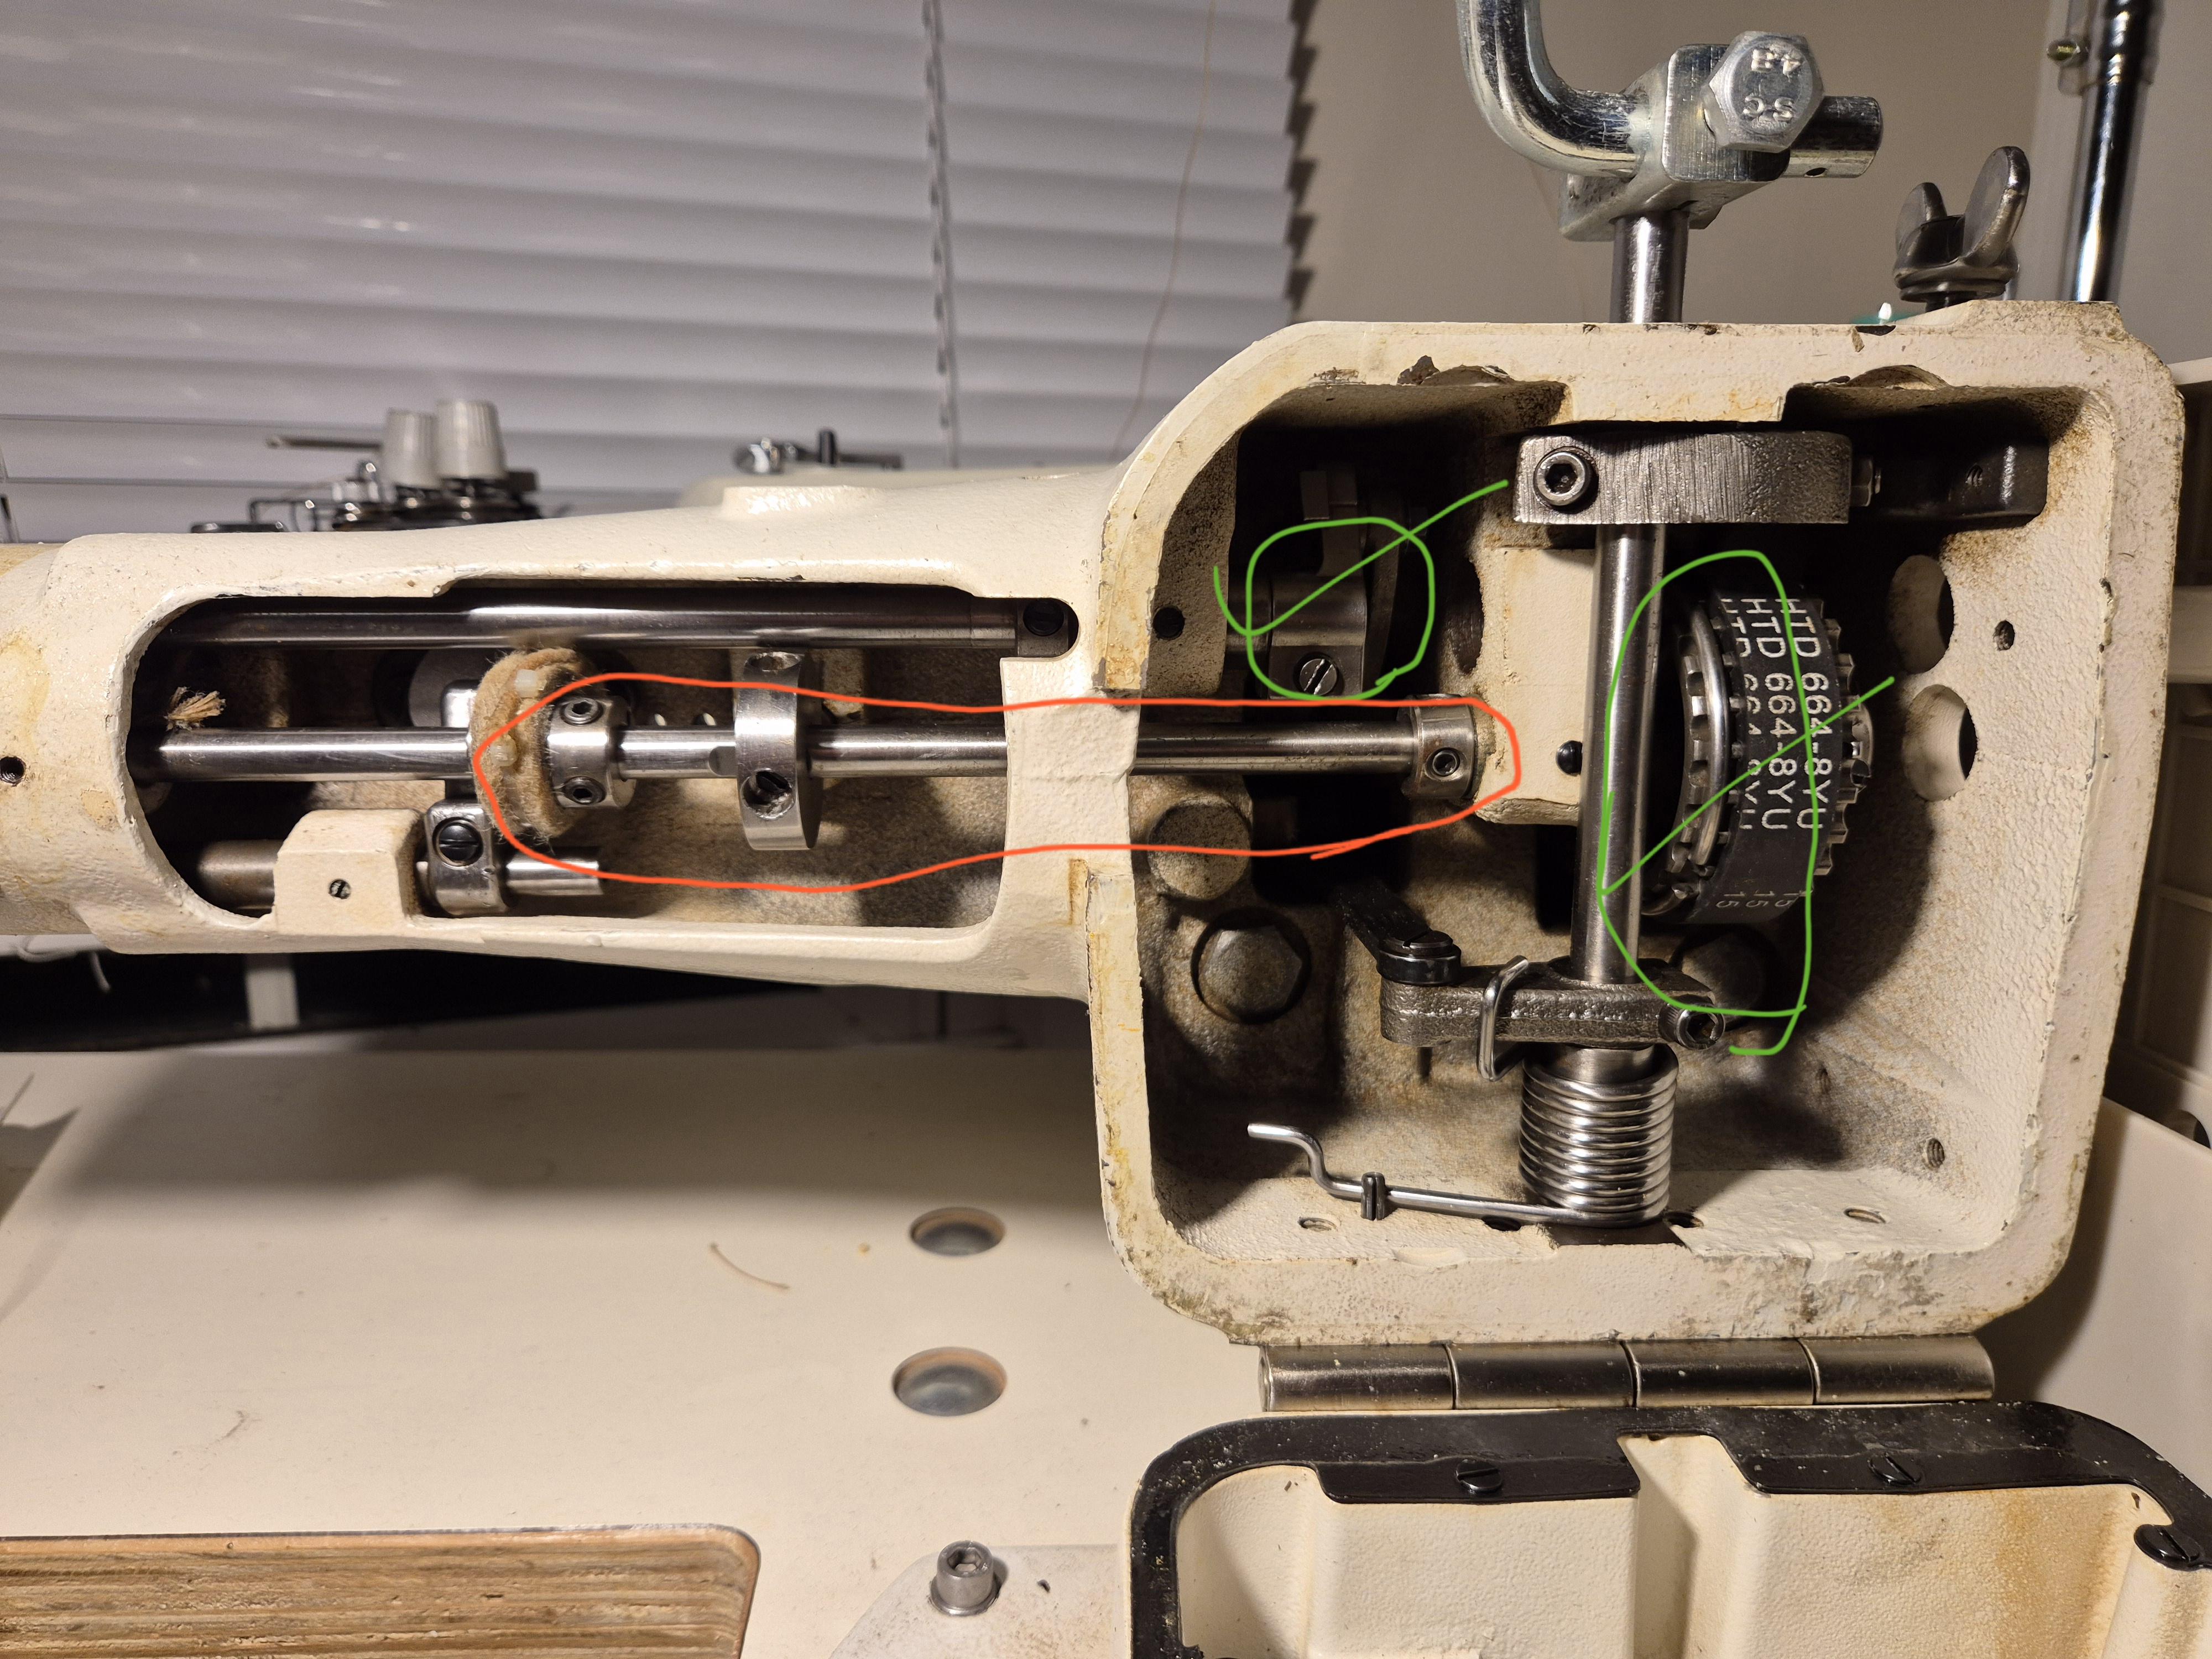
Hi Wizcrafts, I remember reading a lot of your posts when choosing this machine in the first place, you were very informative. Please find attached a photo (hopefully) and see if this would make sense regarding those diagnoses. The area circled in red (I believe is the hook drive shaft) is not turning with the areas circled in green. Thank you very much, Merrick
-
Either the safety clutch has tripped due to a thread jam (most likely), or the driving gears have loosened on the drive shafts.
-
Ah okay, ill try to find a suitable file format. Thank you for letting me know. Basically, the handwheeel turns but the drive shaft for the hook is not turning with the rest of the mechanism when viewed from the underside of the machine. Everything else seems in order! Cheers, Merrick
-
Nice job on that, Dwight, especially the basket weave and color.
-
Can't see the video's with a message of unspported format and MIME type found. kgg
-
Depends. I use JoJoba rather then neatsfoot oil. What I do is oil the flesh side first using an airbrush to get constancy over the area, let sit, maybe re-oil, then airbrush dye on, let sit and airbrush oil on again. If I'm dying the other side I will follow the same process. I found the grain side will suck up more oil or dye much faster and suck then the flesh side. kgg
-

Internship and maybe a new start
BlackDragon replied to Tove09Tilda's topic in All About Us and Off Topic
Not sure why I didn't see this thread until today. I've been in the work force since about the age of 15, I started out in a company that made sails for all types of sail boats. I sewed banner flags and bags for the sails, then slowly worked up to laying out the sails on hardwood floors to later on sewing them together. It was great and it taught me a lot and still carry much of that experience to this day. I understand completely the frustration about getting a degree and not having that degree produce a job. I got a degree in advertising design in Florida and after graduation I applied to a lot of companies to try to find work, I even tried Disney & Warner Brothers (Bugs Bunny). Most of those companies were very small roles and they all had similar statements "You don't have enough experience". Which didn't make much sense to me because they were jobs for starting out. I couple companies actually stole some of my ideas during the interview process. I did a few small odd jobs here and there as a freelance artist but not enough to pay for fuel, lol. I went to work in various manufacturing companies over the years and most of those companies are not for people that want to express their artistic talents. This would include a company that manufactures saddlery. They have a set way to make a saddle and unless you get into a company that actually wants to change the way it used to be done you're not going to have much say in how to change it. When I worked in manufacturing I've seen the dead look in peoples eyes as they did the same repetitive jobs over and over, every day, for years. I've even had that look myself. I learned to balance my time outside of work to counter that feeling. I was a bit of an adrenaline junky, jumping out of planes, became a dive master, cave diver, deep diver, and did beta testing for various companies. If you can't find something you love to do as your career it's not the end of the world. Do your passion while you're in the job you need to survive. You can still follow your passion without it being your career, just balance your life. Even if you're following your passion as a career you'll have to do the things you hate in order to do that career. Like taxes! LOL -
Thank you so much for your guidance.. I have tried to reengage the safety clutch but nothing is happening to the button as I push the hand wheel back, I can feel a very small amount of feedback but nothing past that, it certainly isn't dropping down as I believe it should? This is my first industrial machine (actually my first machine altogether), it might take me a bit of time to troubleshoot, please bear with me! Thank you very much again for your help so far. 20260120_182522.mp4 20260120_182905.mp4
-
 The DSC -246 is basically a Pfaff 335 clone with very similar capabilities. So if the 335 didn't fit your type of work, you should expect the same for the 246...
 -
Do you oil both the flesh side and the grain side before applying dye? I usually just oil the grain side but was wondering what most of you do.
-
Thank you so much for your guidance.. I have tried to reengage the safety clutch but nothing is happening to the button as I push the hand wheel back, I can feel a very small amount of feedback but nothing past that, it certainly isn't dropping down as I believe it should? This is my first industrial machine (actually my first machine altogether), it might take me a bit of time to troubleshoot, please bear with me! Thank you very much again for your help so far.
-
The broken links I was referring to are actually from the post that Chuck linked to above. They’re working fine for me when I follow the link he posted, but for some reason when I tried them yesterday they said location not found. Must’ve been a problem on my end. Thanks!
-
These look like horse saddle bags to me. Just something that showed up in my utube notifications.
-
 For me since both were used in a production environment I would pass as I have see a couple that looked in very good shape exterior wise but the internals were on there last legs needing almost a complete rebuild. I find that Juki machines built in Japan have a better build quality then those that are made in China. If you are going to get the use out of a machine take some of your stuff to a Juki dealer. Test ride the LS-1341 and the DSC-246. That said you really can't compare a used machine against a new one, just to many possible variables. When it comes to binding I am presently using a Techsew 2750 Pro and previous to that a KOBE 1341. I stupidly sold the KOBE but the Techsew does work. However I 3D printed table tops that allow me to use standard inline attachments so I can use all flatbeds attachments on my cylinder arm machines (class 314/1341 and 441). kgg
 -
 i bought a clone 1341 from techsew and it was not great. it had little flaws, like the half length bobbin spring lever that i could never open without a tool. the binder attachment didn't fit well. didn't sew well compared my flatbed juki machines, 2810, 1541s, 1540. i used a new juki 246-7 this spring and was blown away by the difference in sewing quality and ease of use compared to my techsew clone. i am not knocking techsew, many people seem to love them but mine wasn't what i expected.
 -
the 1341 is $1600, the 246 is $2600. new motors. both used in production. new 246 is around $6000.
-
The Juki DSC-246: i) dsc-246 hand lift is 9mm and by knee is 15mm vs Juki LS-1341 hand lift is 9mm and by knee is 16mm ii) the thread ranges on the dsc-246 uses needles sized from 90 to 160 (#14 to #23) so that means it should handle V46 to V138 in thinner items vs Juki L-1341 needle size of 100 to 180 (#16 to #24) which means it can handle V69 to V138 in heavier stuff or V207 in thin. iii) the max stitch length is 6mm for both machines iv) use a "M" style bobbin for both machines dsc-246 loads from the cylinder arm front vs ls-1341 loads from the cylinder arm top v) cylinder arm diameter is smaller on the dsc-246 then the LS-1341 vi) Since we all jam up a machine at some point in time the LS-1341 has a safety clutch while I don't think the DSC-246 has one. In a nut shell if you need / want to use with thicker thread and with heavier / thicker items or seams buy a LS-1341. If you want a binding machine buy the DSC-246. Parts / accessories for the DSC-246 are not as common as for the LS-1341. I sort think of the LS-1341 as the cylinder bed version of the DNU-1541S flatbed. How much are they asking for the machines?? Keep in mind you may want to consider a new LS-1341 clone for about $2700. I would like to know if these machines were used in a commercial environment or by a hobbyist. If they were used in a commercial environment then I would be very wary as they would more then likely have been rode hard and put away wet. kgg
-
If you would be so kind as to give us the location of the post, we may be able to fix it or at least to take the links out so it doesn't cause upset or confusion to others.
-
 OctoberLeatherCo. joined the community
 -
 I'm no expert but at first glance it looks like the 246 has a moving plate on the arm which is usually found on binding machines. possibly the feed dog movement is side to side rather than an oval movement which gives more control over more types of material.
 -

spring flowers and good food
Darren8306 replied to chuck123wapati's topic in All About Us and Off Topic
Weird. My parents said they found me in a cabbage patch, in the prairies, near a wrecked airstream with Wyoming plates. They gave me some clothes, and here we are.


.thumb.jpg.6e903dd66163ad5672f00f144058c571.jpg)