

All Activity
- Past hour
-

Adventures in watch strap making
dikman replied to dirk87's topic in Purses, Wallets, Belts and Miscellaneous Pocket Items
That's some very nice work you do. I recently bought a sort-of-smart watch real cheap and needed a watchband for it so naturally it was going to be leather, after all, how hard could it be? Turns out it's easier making holsters!! These are fiddly little beggars to make. -
In studying knots and rope, the strength of a rope is greatest with no knots at all. Adding a knot puts kinks in the rope, and the rope is weaker with the knots/kinks. I think of it as a stress concentration factor, as cutting a notch in a board would be. For knots and rope, each particular knot has a strength rating, some percentage of the original rope strength that remains when the rope is tied with that knot. But thread being as thin as it is, I don't know if it's subject to the same rules about kinks. A few months ago I tried out a force tester that would record the maximum strength, and I broke a few threads with it before i sent it back. I wasn't really studying the effect of the knots at the time so I don't have any data on that front. 🤷♀️
-
Thanks Al, this has obviously been gnawing away at you for a while. I reckon ease of handwheeling with a speed reducer depends on the size of the handwheel. The smaller handwheel on many of the older machines might require more effort but my 4500 has a large handwheel and it can overcome the speed reducer pulleys without much trouble. I've replaced the small handwheel on older machines with a large pulley and found it much easier to handwheel.
-
Ock! My sympathies. Try stimming with a piece of veg tanned leather. 🙂 Texture, smell all help.
-

Need to sew patches . . . help!!
Cumberland Highpower replied to Dwight's topic in Leather Sewing Machines
Are you wanting a machine to sew patches onto jackets or whatever, or are you looking for a cnc machine to sew/make patches? If you're sewin them onto jackets, a shoe patcher or a high post machine (or both) would be great. -
Landis No. 16 Stitcher Made A Table Top
Cumberland Highpower replied to BattleAx's topic in Show Off!!
I like it. Seems like it worked out pretty well. -
Someone knew you needed a vacation!! Go have a good time while you have the excuse, er chance.
-

Option B: Universal Motor with Triac Speed Control
friquant posted a blog entry in State of the Servo Motor
Option B: Universal Motor with Triac Speed Control See the parent article: Choosing a Motor A common type of motor for industrial sewing machines is a universal motor with triac speed control. These motors, when sold for powering an industrial sewing machines, are predominantly labeled “servo motors” because it is hip and trendy to do so. But they are distinct in operation from a true servo motor. It actually drives a lot like an older domestic sewing machine. 1. What is a Universal Motor In a nutshell: it’s a motor that can run on AC or DC voltage, and whose speed and torque can be varied together by varying the input voltage. See this page on wikipedia: https://en.wikipedia.org/wiki/Universal_motor 2. What is a Triac Speed Controller See this page on wikipedia: https://en.wikipedia.org/wiki/TRIAC#Application In a nutshell: it’s a speed controller that works in open-loop mode. Meaning there is no feedback loop. A motor driven with a triac speed controller will go faster with low load than it will with high load. You’ve probably experienced other devices that use a triac speed controller: Electric drill Newer Domestic sewing machine (but not digital) 3. Is a Universal Motor with Triac Speed Control the right Motor for me? The biggest difference I notice between the old school domestic sewing machine motors and this universal motor with triac speed control is the sound. And this one has more power. Choose a Universal Motor with Triac Speed Control if: - you want something dead simple that just works - you don’t want to have to read any manuals - you don’t mind the inconsistency in penetrating power based on speed - you are happy with the feel of traditional domestic sewing machine motors & gas pedals - you are going to be getting a speed reducer anyway. (These supposedly perform better with speed reducers) - You don’t want any surprises when you ease onto the gas pedal - You want something forgiving - You are NOT* interested in a needle position sensor - You do not need precision 4. Why I bought a Universal Motor with Triac Speed Control I bought this motor to see what I was missing out on. I’ve previously been running digital servos on both of my sewing machines, geared down via undersized motor pulley to either 1.5:1 or 2.2:1 depending on the machine. But the forum topic of “how to make the best servo motor” [Insert link] came up and I decided to broaden my horizons. I also wanted to set up my new Singer 31-15 to be tame enough that my girlfriend, long time sewer, would feel comfortable using it. 4.1 Where I bought it I purchased this from https://www.amazon.com/dp/B0DX28QPJS for $130 It has since gone down to $122 The brand on thisone is “Smudukkit”, but the photos look identical to other motors I’ve seen at other retailers and in youtube videos. So I’m conjecturing that this model is ubiquitous. 5. Good Features Simple interface No surprises 6. Physical Brake Shoe There is a physical brake shoe that activates any time you are not pressing on the treadle. This makes it harder to move the handwheel. You can either press just slightly on the treadle to release the brake every time you want to move the handwheel. Or for a permanent fix, you can remove the brake shoe. 7. Overall Impressions It behaves just like a traditional domestic sewing machine motor. That is, you press gently on the treadle to go slowly. But when you cross a seam, you have to press more on the treadle or it doesn’t go at all. So you press a lot to get past the seam, and then the motor zooms ahead. The good news is, there are few surprises with this motor. It does take some art to drive it well, to get just enough speed on it to perforate the fabric without stalling. 8. Ideal Universal Motor For those whose ambition it is to build better Universal Motors with Triac Speed Control, here are several categories that could use improvement. 8.1 Make the knob turn the other way Most electronic devices I am used to go faster when you turn the knob clockwise. 8.1 Add a switch for LOW / HIGH If your aim is to severaly limit the speed of the motor, you will find yourself at the fringes of adjustment on the potentiometer, with poor resolution. Adding a switch for LOW/HIGH (simply a resistor inline with the potentiometer) would provide much better resolution and repeatability for those of us who want to mainly use the slow end of this motor’s capabilities. This might also keep us from accidentally turning the motor up too high. 8.2 Move the Controls to a Separate Pod It’s hard to find the dial from a seated position, and I worry that I will get my fingers wrapped up in the belt when I go reaching under the table for it. Moving the control knob(s) to a separate pod would allow the user to see the knob and to reach it safely. - Today
-
Choosing a Motor for your Industrial Sewing Machine
friquant posted a blog entry in State of the Servo Motor
Here are the four main types of motors for industrial sewing machines that I am aware of. Any of these can be used with or without gear reduction. Option A : Digital Servo Motor Option B : Universal Motor with Triac Speed Control Option C : Clutch Motor Option D : 3-Phase AC gearmotor with VFD -
Option A: Digital Servo Motor See the parent article: Choosing a Motor While lots of motors are sold under the moniker “Servo motor”, the most obvious way to recognize a digital servo motor is that it has an LCD on the front of the panel. 1. What does “servo” really imply A true servo motor is one that has a feedback loop. You ask it to go 500rpm, and it has an encoder or some other feedback mechanism that it uses to go exactly 500rpm. Whether stitching through thick leather or thin fabric, it keeps going exactly the speed you asked for. 2. Is a Digital Servo the Right Motor for Me? Choose a digital servo if: - you want to use a needle position sensor - you’re OK with doing some basic setup in the LCD menu, - If you want the consistency of the needle always penetrating the fabric, without need to “get a run at it” - you want a motor that does exactly what you tell it - you don’t mind the surprise of instant start. (digital servos have a minimum speed) 3. What is a Needle Position Sensor? A needle position sensor allows a digital servo to stop at the same position every time you let off the gas. I like my needle position sensor configured to stop in the needle-down position. That is the position I use most often, since it allows me to turn corners while stopped in needle-down. So when I let off the gas, instead of stopping immediately, the motor actually proceeds to the needle down position and stops there. 3.1 Heel Tap When you have a needle position sensor, it will typically have heel-tap functionality. That is, when configured to always stop in the needle-down position, after it comes to a stop in the needle-down position, you can press the other end of the treadle (the end close to you) and the machine will move approximately a little more than half a rotation and stop in needle-up position. Now you don’t have to do nearly as much hankerin' with the handwheel, because the needle already knows how to stop in your two most desirable positions. 3.2 One Stitch Stopped prematurely? A little tap on the pedal and it will give you one more stitch and stop again in your preferred stop position. 3.3 Reverse Magic Reverse is convenient with needle positioners too, since you typically want to start reverse from the needle down position. Just allow the machine to stop before you move the stitch lever, and you’ll automatically be starting your reverse stitches in that “reverse magic” position (needle down) where moving the stitch lever does not move the feed dog at all. 4. What’s the Big Deal about Minimum Speed? When looking for a servo motor, the most important feature you should be looking for is a slow minimum speed. When the digital servo motor starts turning, it immediately goes from 0 to whatever the minimum speed is. Meanwhile you’ll be be holding the threads down so your seam locks, and trying to steer at the same time The lower the minimum speed, the less jarring this all will be when the motor starts. 4.1 Examples with 100rpm minimum speed As of August 2025, the lowest minimum speed I’m aware of in a Currently Available Inexpensive Digital Servo Motor (CAIDSM) is 100rpm, and it costs a little more than a hundred dollars. You will need to buy the needle positioner separately, which will cost you another 30. (Will post link as soon as mine arrives and I’ve tested it) 4.2 Examples with 200rpm minimum speed Previously I used these two models which have 200rpm minimum speed. I’ll put air quotes around the brands, since these are just labels and you can buy the same motor with a variety of labels on it. “Stitchman”: https://www.alibaba.com/product-detail/Energy-Saving-Servo-Motor-Industrial-Thick_60477748373.html “Consew C1000”: https://www.amazon.com/dp/B01N6IYMCZ 4.3 Gear Reduction You can lessen the minimum speed that your digital servo offers by gearing it down. The simplest way to gear it down is to buy the smallest motor pulley (the pulley that goes on the end of the motor) that you can. Ideally your digital servo will use a 15mm cylindrical-shaped shaft (no taper), because aftermarket pulleys are readily available in 45mm O.D. for about ten dollars. 3:1 belt reduction is commonly available and costs about $110. You may or may not decide you need that much. There are also examples here on the forum of custom built gear reducers using pulleys and pillow blocks. 6. What’s already Working Well Since this article does set out to name certain deficiencies in the CAIDSMs, I thought I would also give praise to the things that have already been ironed out, and are much appreciated! 6.1. The maximum speed can be set to something approachable instead of the default 3500rpm. 6.1. Setting the maximum and minimum speeds is a repeatable process. That is, if you want max speed for one project to be 1200 rpm (at the motor) and for another project you only want 700 rpm, you can select exactly those values in the menu. 6.1. The digital servo already runs well at consistent speed with great penetration power. 6.1. Needle position sensor has basic functionality. 6.1. The power switch is usually in easy reach of the operator. 6.1. The power switch lights up so we can see it’s powered on. 6.1. Digital servo motors are quiet! You won’t know it’s on if you’re not on the gas. 6.1. Digital servo motors come with an adjustable bracket for setting belt tension. 6.1. Digital servo motors come with a V-pulley. (I can’t believe I’m listing this as a feature!) It’s just a larger-than-ideal diameter. 6.1. Electric braking: When you let off the gas, the digital servo motor applies electric braking until the motor comes to a stop. (After coming to a stop, the brake is released so you can easily move the handwheel) 7. The Ideal Digital Servo Motor For those whose ambition it is to built better Digital Servo Motors, here are several categories that could use improvement. 7.1 Ideal Needle Positioner 7.1.1. When you tap the gas pedal to ask for one stitch, you should ALWAYS get exactly one stitch. If you give two stitches instead of one now there’s an extra hole in the leather that I hadn’t planned on. Also, giving more stitches than asked seems like a safety issue. 7.1.2. When you heel-tap to ask for the needle to come up, the needle should come up. It must not do a full turn and then come up. A full turn would put unwanted holes in the leather and is a safety issue. 7.1.3. Distance in degrees between needle-down and needle-up should be configurable. (My preference would be to set the needle-down position using the set screws on the needle positioner, and then have a single setting “distance from needle-down to needle-up” in the menu that has a range from 1 degree to 359 degrees (degrees of handwheel, not motor pulley), with a default of about 200 degrees. 7.1.4. If the belt slips such that the motor has to turn farther than it expected for the needle position sensor to register one complete cycle, the motor should stay in needle detection mode. 7.1.5. Ideally, the needle position sensor should have an LED that lights up when the positioner is in the needle-down position. (Makes for easier setup) One of my CAIDSMs has this, one does not. 7.1.6. Assuming this unit comes with a needle position sensor, the controller should have needle positioning enabled by default. 7.1.7. Needle positioner should work even if using considerable gear reduction, such as 3:1, 4:1, or 5:1. 7.1.8. Ideally, allow the user to easily toggle between stopping at needle-up, stopping at needle-down, or disabling the needle positioner. (One of my systems has this option, the other does not) 7.1.9. Ideally, after letting off of the treadle as the motor continues to turn to come into the desired position, this speed of this motion would be configurable. Some users will want this motion to happen at the minimum speed. Some users may want it to be somewhat faster than the minimum speed. (Of my two digital servos, both of which have 200rpm minimum speed, one comes to final position at 200rpm and the other comes to final position at about 250rpm. I did not see any way to adjust either.) 7.2 Ideal Included Pulley 7.2.1. Motor should come stock with a small motor pulley (35mm-45mm) to lessen the effects of the minimum speed. 7.2.2. If motor does not already come with a small motor pulley, motor should use standard 15mm cylindrical shafts with a key hole. After market pulleys are available for these shafts down to 45mm for about ten dollars. (In a pinch you can 3D print a small pulley for any style shaft, but it may not grip as well as the metal ones.) 7.3 Ideal Minimum Speed 7.3.1. Ideally, the minimum speed would be 30rpm. This would alleviate the need for a gear reducer for many people. If you’re going to tell me that you can’t keep the motor cool at 30rpm, then put a temperature sensor on the motor and let us run at 30rpm until the motor gets too hot, and then make us take a break. When I’m sewing, most of my time is spent getting the next seam ready, and not that much time actually stitching. So there’s little chance of me overheating a motor. 7.3.2. If you can’t offer a minimum speed of 30rpm, perhaps you can build in true soft-start functionality. By this I mean when you first press the treadle the motor would start at something very slow (like 10rpm) and would ramp up to the minimum speed over the course of say one second. This would give us more reaction time during that first stitch when we are both holding down the top thread and guiding the material and keeping our fingers out of the way. (By the way, the only feature similar to soft-start I have actually seen on CAIDSMs would be better described as “how long to wait before full speed is allowed” and was not a soft start the way I am imagining it.) 7.4 Ideal Gas Pedal 7.4.1. There should be a long range of travel in the foot pedal between slow and fast. CAIDSMs have a range of travel of less than one inch. If you can only offer one inch of travel, then how about providing instructions for drilling alternate holes in the treadle so that the amount of treadle rotation required for full actuation is still large (30-40 degrees). 7.4.2. When the maximum speed is set to something slow such as “900 rpm”, the range of pedal travel should be spread across the entire usable range. Meaning you should have to push the pedal all the way to get to 900rpm if 900 rpm is your max. 7.4.3. If the gas pedal is pressed down while the power button is turned on, the motor should not start. (Safety) Rather, the motor should wait until the gas pedal is released and then pressed anew before motor starting. 7.5 Ideal Physical Layout 7.5.1. The menu should be accessible from the standard seated user position. (Some CAIDSMs have the menu hard-mounted with the motor, which is hard to reach, hard to see.) 7.6 Ideal Safety 7.6.1. Pressing the gas pedal after the power switch has been turned off should have no effect. CAIDSMs do not have this yet. Rather, it takes about 12 seconds after turning off the power switch before the LCD goes blank. And until the LCD goes blank, the motor has full power. This is a safety issue because it takes patience to turn off the motor and then wait for the LCD to go blank before performing maintenance issues like threading the needle, replacing the bobbin, replacing the needle, etc. And we want to make sure users can perform maintenance without the risk of accidentally engaging the motor. 7.6.2. When the power switch is turned off, the motor should immediately stop. CAIDSMs currently keep running after power is switched off, until they bleed off the internal capacitors. 7.6.3. Ideally one could limit the amount of torque through the control settings. Another way to limit torque is to run your belt on the loose side. One of my CAIDSMs shows an option to limit torque, but the option doesn’t actually work. 7.7 Ideal Menu Design and Factory Defaults 7.7.1. There should be no settings visible in the menus that don’t do anything. 7.7.2. The settings in the menu should be numbered incrementally. No skipping numbers, as this is confusing. 7.7.3. Instructions for operating the manual should be provided in clear language. 7.7.4. The factory default maximum speed should be something medium slow like 1000rpm. Let the user increase it through the menu if they need it faster. 7.7.5. Ideally the documentation would include an email address or website where users can ask questions and get clarifications about features. (CAIDSMs don’t even say who the actual manufacturer is.)
-
I ordered the same one you did. I couldn't find one for a 3L belt. If it's a problem, I'll just throw a round leather belt on it. I ran that machine for several months on one.. They work fine. I think the narrow pulleys are intended for those round rubber belts you melt together. PU, maybe? There are also narrower V belts. I'll make it work.
-
Workers are coming to install a completely new heating system in my flat/apartment so all my furniture has been moved about to give access to all the radiators. My spare bedroom which is my leatherwork room is chock-full of items from the other rooms. Its been like this for over a month now. The workers tried to install on the 26th May but the surveyor made a mistake so they couldn't do it. Another team are supposed to it on Thursday 30th, this week. I've not been able to do any leatherwork since about May 20th and several projects are mid-finish. Might not be able to get back to leatherwork until about August 8th or so. I'm having severe 'withdrawal' symptoms!
-
Far too nice for groceries m'thinks, By far too nice
-
Depending on the style of edger; rub a lot of compound an a length of string. Tie one end of the string to something, hold t'other end and pull it tight. Rub the blade up & down the length of string
-
Can you post a link to the 30mm pulley you bought? I ordered one but it arrived today and it's narrower than I expected. Only a 7mm gap for the belt, and my belts are 6.5mm wide on the inside edge, 9.5mm on the outside edge. Once you get it set up I'm curious to hear how it is to move the handwheel manually. I've been wondering what is the optimal motor size and gear reduction that gives plenty of torque but is still easy enough to manipulate at the handwheel. I've got a 1-hp 3-phase gearmotor (4.5:1 gear reduction) on the way, it will be my first VFD setup and my first system that is geared down more than just putting a small motor pulley on it.
-

Lacing or Thonging a Mitered Box Corner
DoogMeister replied to MikeF's topic in Leatherwork Conversation
very nice work! -
I've wondered how much torque increase we get from speed reducers. Is it inverse to the speed reduction? Turns out it is. If your speed reducer provides 1:3 speed reduction, you're getting a 3:1 torque increase. (The following assumes a start up speed of 100 rpm at the motor) But, even though you can put a 30MM (basically 1.18 inch) pulley on your motor against a 3" hand wheel and end up with a final decrease of 1:2.5 (39 rpm) and corresponding torque increase, you're still better off throwing a 1:3 speed reducer in the middle. Adding the typical 2"/6" speed reducer to the above gives you a speed reduction and torque increase factor of a whopping 7.58. Most of what I've read indicates that servos want to run at or above 300 rpm for cooling. The setup imagined above with the speed reducer would be around 40 stitches per minute at a 300 rpm motor speed. (it's not only imagined, it's bolted onto my 111W153, patiently awaiting the 30MM pulley) duck.ai provided confirmation about the torque increase. Now properly credited, here's what it had to say: Understanding Torque and Speed in Pulley Systems Torque and Speed Relationship In a pulley reduction system, torque and speed have an inverse relationship. When the speed of the driven pulley decreases, the torque increases. This is due to the mechanical advantage provided by the pulley system. How It Works Larger Driven Pulley: If the driven pulley is larger than the driver pulley, it will turn more slowly. This results in increased torque at the output. Smaller Driven Pulley: Conversely, if the driven pulley is smaller, it will turn faster but produce less torque. Calculation of Torque The torque available at the driven pulley can be calculated using the following principles: Torque Multiplication: The torque at the driven pulley is multiplied by the ratio of the diameters of the pulleys. For example, if the driven pulley is twice the diameter of the driver pulley, the torque is effectively doubled, while the speed is halved. Practical Implications This principle is commonly used in various applications, such as: Automobiles: In low gear, the engine speed is high, but the wheels turn slowly, providing more torque for acceleration. Conveyor Systems: Slower speeds can help manage heavy loads without slipping. In summary, in a pulley reduction system, as speed decreases, torque increases, allowing for greater force to be applied at lower speeds. Sciencing aimsindustrial.com.au So, until someone comes up with a servo offering 7X more torque than current offerings and running at a minimum 50 to 100 rpm, torque increasing speed reducers are king.
-

Edge beveling 101
ThisIsMyFirstRodeo replied to ThisIsMyFirstRodeo's topic in Leatherwork Conversation
I have started taking my edger to my buffing wheel, which did have an immediate (positive) effect, but as I can only get the back/bottom side, how do I sharpen the cutting blade itself? -
Edge beveling 101
ThisIsMyFirstRodeo replied to ThisIsMyFirstRodeo's topic in Leatherwork Conversation
Thank you, it’s been puzzling me. I also noticed about the flesh being a little easier to work, so I guess I’m on track, but thank you for clarifying. AZR ps Your Stan Lee is amazing! -
Landis No. 16 Installing The Head Of Machine
Cumberland Highpower replied to BattleAx's topic in Show Off!!
Sometimes I wonder things like that. Sometimes thoughts like that are a bit off though. We always think in terms of ourselves, family run shops, etc. Truth is allot of these machines went into big production shops/factories. Nobody wants to dream of their personal machine being one of 20+ operated by punch clock, floor workers for 60+ years and then sold off at an auction in 1990..... My 16 has a brass tag on it that a factory installed on it generations ago. (not the factory tag) probably an inventory/property number. Of course nowadays that those machines are essentially "out to pasture" in small shops/hobby shops that would fit pretty well. -

Need to sew patches . . . help!!
chuck123wapati replied to Dwight's topic in Leather Sewing Machines
If you didn't think of this already. Call him and buy his machines if you can. -
I would suggest a long arm in a used machine Singer 29k-72 or 73 the only difference being the end of the cylinder bed are slightly different. As for new there are to many clones available so just go with who gives the best price and after support. You might also want to contact the person who just up and quit and see what equipment they have that maybe for sale. @Wizcrafts should be able to provide good sound guidance. kgg
-
Moved your post to leather sewing machines. You are looking for a patcher. @Wizcrafts has lots of experience with sewing patches and can tell you about it (and of course, lots about sewing machines).
-
I am looking to get into the patch business as the last one in this area just up and quit. I need suggestions for a patch machine . . . and a quick couple of paragraphs on how they work. Thanks, may God bless, Dwight
-
 Thank you, that would be great. These are the parts that go to the stitch length regulator.
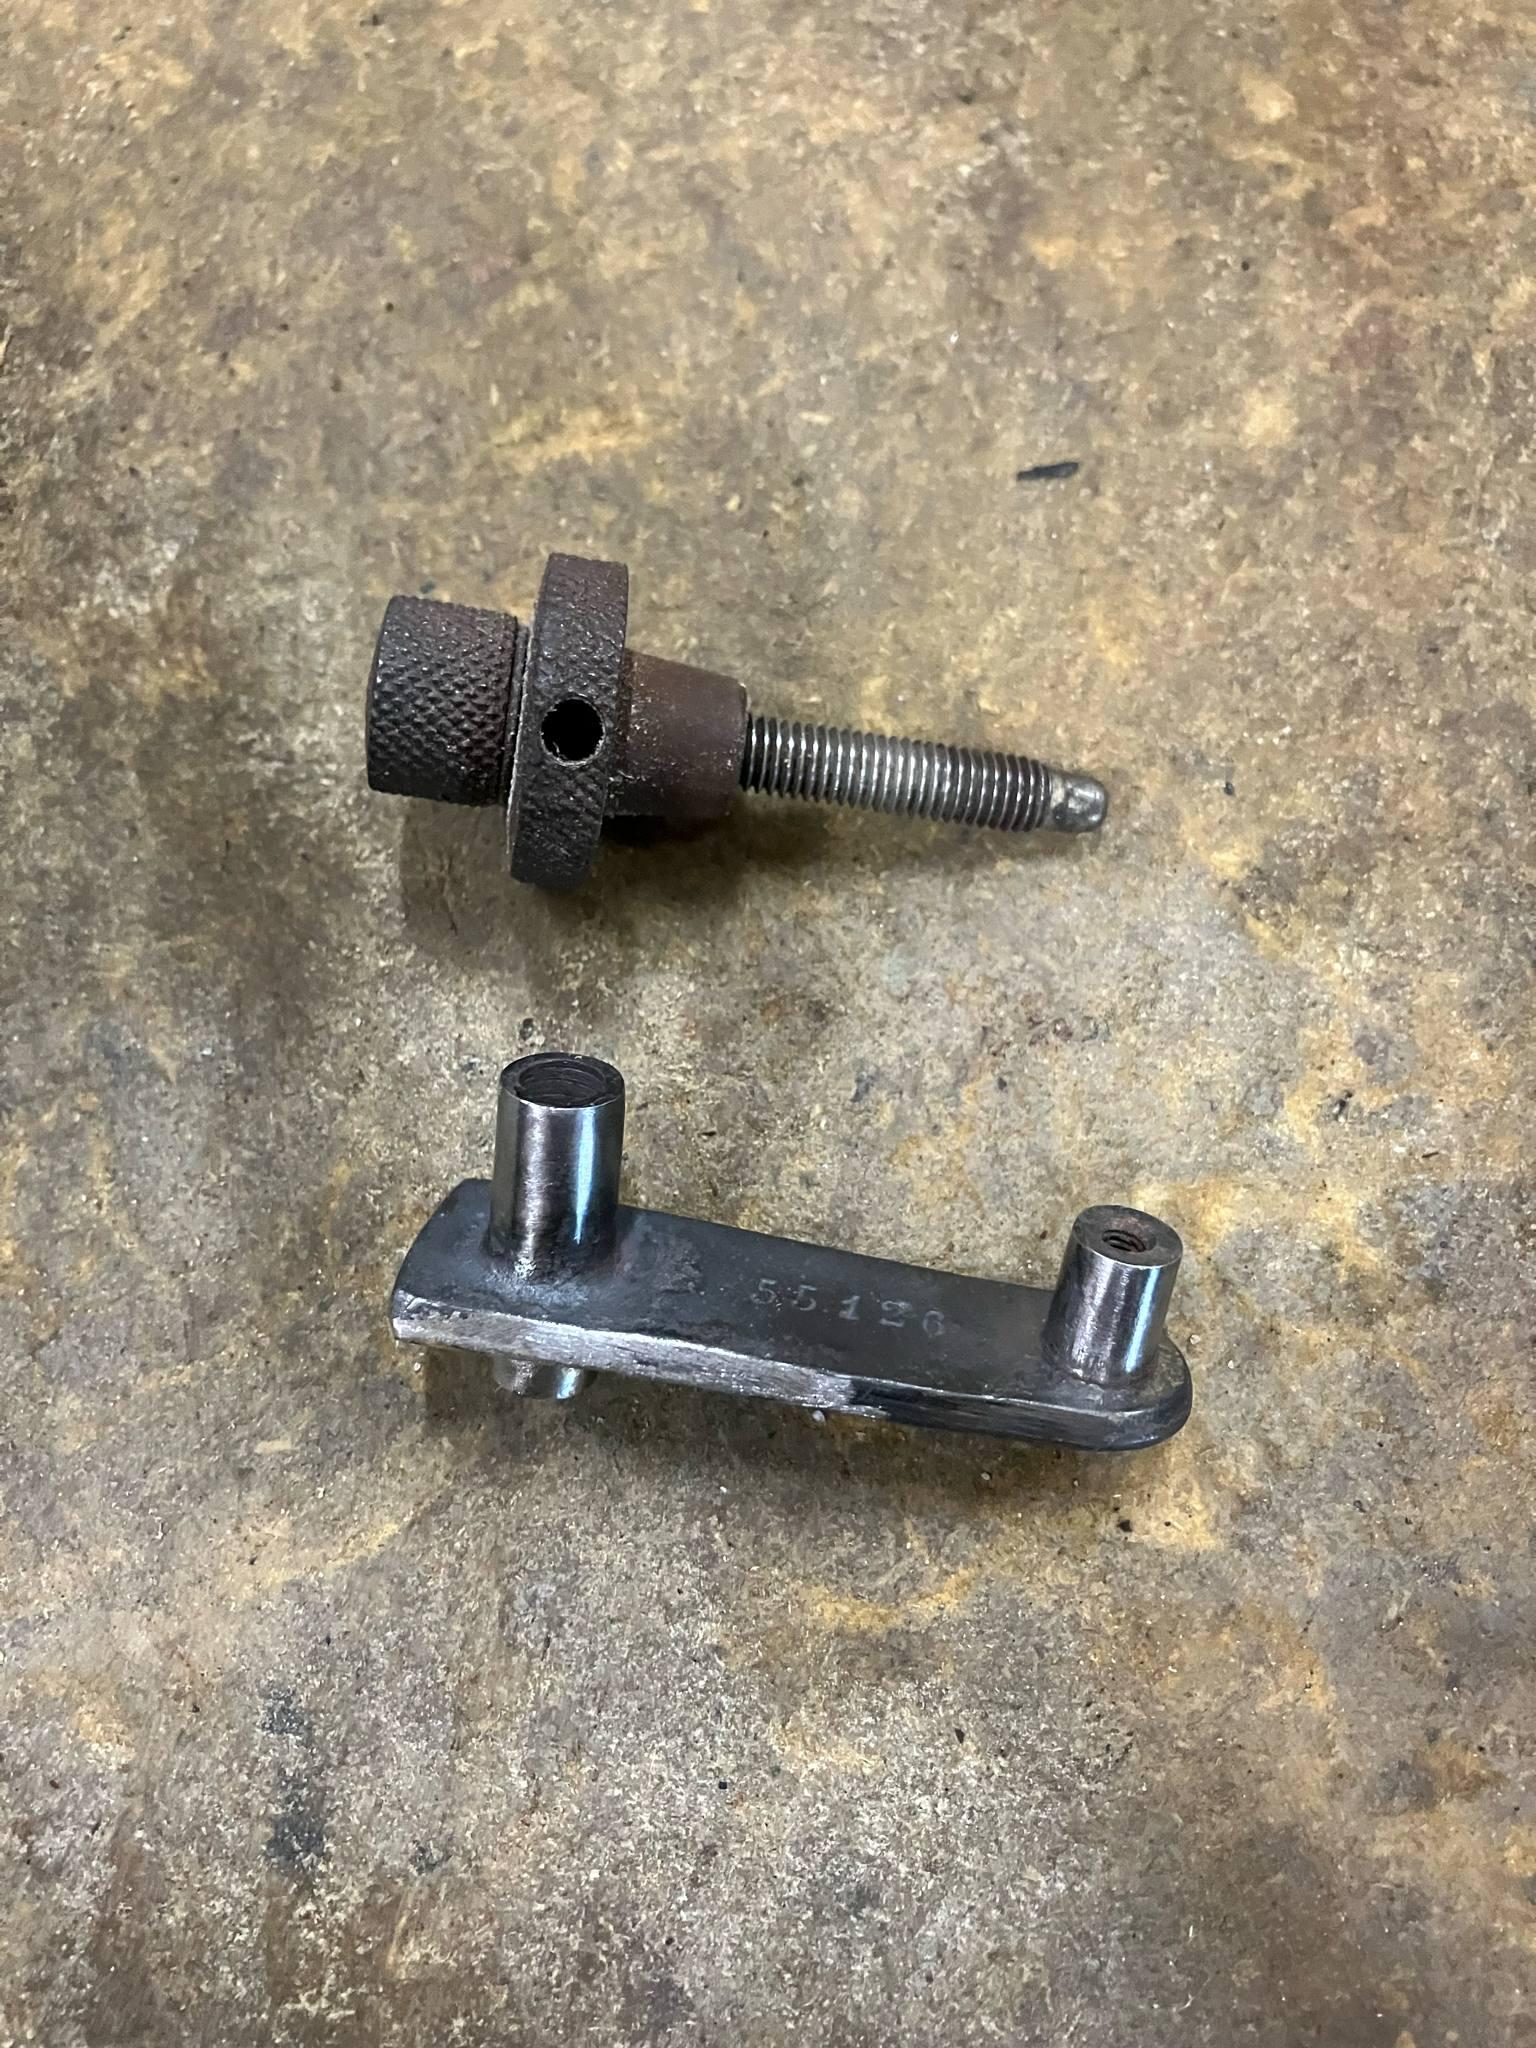


.thumb.jpg.6e903dd66163ad5672f00f144058c571.jpg)
