ConradPark
-
Posts
195 -
Joined
-
Last visited
Content Type
Profiles
Forums
Events
Blogs
Gallery
Store
Everything posted by ConradPark
-
I'm looking to buy a stitching horse similar to the one in the picture, new or old doesn't matter as long as the jaws are in good condition. Weavers version is not up to scratch for me. Must be willing to ship to London, UK with tracked USPD or similar. PayPal preferred. Only serious and reasonable offers including the shipping cost, thanks.
-
Techniques For Multi-Layering Thin Leather?
ConradPark replied to Jimdad's topic in How Do I Do That?
I often see random questions like yours on this forum that never gets any answer. While I understand why that might be, maybe you don't. Basically it is hard to give an answer when there is no pictures. Pictures helps! Also your question is kind of too general. Unless you show an example and want specific feedback on that project, everything else stays hypothetical. Also, if you actually do the project first, a few of your questions might answer them self. Besides, people will always have different tastes. Unless it is a critical technical issue, it is really only up to you or the customer to decide what suits you. So go ahead, make your project and come back for feedback when you have some pictures to show! Good luck. -
Nice work. Yes, there might be a few things to nitpick about on a skill/design level but everyone has their own personal preference. You have to remember that most people here are enthusiasts and not professional craftsmen and the latter can sometimes be a bit on the conservative and closed mind... I think you should first look to yourself and then your target audience and what they might think. Give your wallet away and ask for feedback a month later. Always strive to make your next work better then the last, and so on. And remember to have fun. Good luck!
-
The first two pictures shows clearly that the lid and base is made from one single leather piece each. The sides are simply folded and edge painted to give a more uniform look. However, this craftsmanship is anything but simple. Excellent work as usual from a Korean master.
-
Been Looking For This Hardware Everywhere And Can't Find It
ConradPark replied to bylinesupplyco's topic in How Do I Do That?
CS Osborne do a line of high quality solid brass snaps. The flat top is achieved by having a custom made press that is less domed. You could probably find a metal worker making one/customize one for you. -
So, the leather on the picture is Bridle leather, A veg tanned leather stuffed with wax and oil and generally very expensive. While many tanneries are doing it, the British and Japanese tanneries are regarded as the best in the world. Most famous is probably J & E Sedgwick in UK. Unless you buy a lot in wholesale, you can in general not buy from the tanneries directly in small quantities, so you have to go through resellers. There are threads on this forum that covers, leather suppliers. The White stuff on the leather is animal fat/tallow that have been applied by hand and gives this look that is typical for ALL Bridle leather (In UK most makers polish the surface of the leather to get a very high shoe polish like shine, while in Japan it is more popular to leave it). Even when polished away, the leather will bleed or bloom with time and the surface will get white and cloudy again. There are a few Japanese resellers that sometimes sell brightly colored bridle leather in small quantities, but I have never seen anything else than earth colors in UK or US. The picture you are showing is from a Japanese leather maker so he is a bit more fortunate to be able to easier get hold of Japanese brightly colored Bridle leather. Always check with your supplier. Bridle butt are always (as far as I know) sold non polished so it will have that streaky white look. Bridle sides/shoulders sometimes comes pre polished so again, check with your supplier before buying.
-
"police" Long Wallet
ConradPark replied to pzarkov's topic in Purses, Wallets, Belts and Miscellaneous Pocket Items
Nice, just a question, your card pockets, have you glued any 'hidden' pockets behind to prevent the top cards from falling to the bottom or is it just cut out slots? -
Getting A Feel For Clicker Services Needed.
ConradPark replied to DoubleC's topic in Leatherwork Conversation
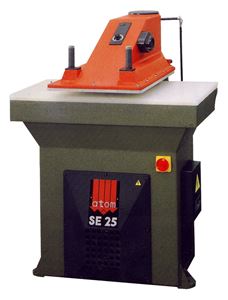
Double C, I think it's my mistake, I was talking about industrial clicker presses like this one, You place the hide, place all your dies at once (4-6 dies per wallet and I normally do a couple or more at the time), swing the arm, click, swing off the arm, move the dies (you can normally click a couple, three times before needing to separate the leather - depending on what type of dies), swing back the arm, click, repeat, one hide done. Less than 3-4 min, max. So with this kind of clicker it is very much possible to make it in this time frame. But obviously this is not the kind of clicker you are talking about. And no, I don't own one of these (cost more than £3500 - I rent them per hour, so it wouldn't make sense to me to be a reseller, besides I am a firm believer that one has to choose what kind of business one wants to do - personally I make and sell leather goods only, if I owned the machinery and only manufactured for others I might have done so, but now that's not the case.) Anyway, I feel I might have offended you, considering the tone in your answer and that wasn't my intention. Just do what you feel like doing and good luck.
-
Getting A Feel For Clicker Services Needed.
ConradPark replied to DoubleC's topic in Leatherwork Conversation
Double C, if your idea works for you, all the best. However around where I live (London), the studios that have clicker presses earn some extra money in the way that they rent them out hourly to whomever wants to drop by with their own leather and dies. Standard rate everywhere here is £10 an hour (clicking out wallets from five average hides doesn't even take 15min). Also, would you send your dies to someone else to keep? Anyway, as I said, if it works for you, all the best. Good Luck. -
No problem to do that, you'll need some foil and maybe a temperature controller if you don't already have that. There are several bookbinding forums and YouTube videos that already explain this in detail, much better than would be explained in a few sentences here. Also actual trial and error, helps. Google and you'll find your answer.
-
A lot of European military clothing including gloves was not rarely made of horse leather up to the 50s. Not saying that Horse Leather is the best, but it does have some advantages over cow/steer hide as it is more abrasion resistant. However, not many tanneries do it anymore and Horween in the USA are probably the most known. Remember that there are many different variations of horse leather and what you'll need is the garment horse leather (horse front), not the shell or strip. However, there are many high quality cow hides from other tanneries today, thanks to modern techniques, that gives exceptional properties too. In the end, it's in the eye of the beholder. There are specialist leather suppliers that only do leather for the automotive industry so they are flame retardant, doesn't crack in frost etc. Anyway, seems like you know what you don't want so good luck.
-
Difference between Craftools and "more expensive" tools
ConradPark replied to Sal's topic in Leather Tools
Don't forget to look at ebay for tools, with a little patience you can get stamping tools there for a fraction of the price of a new one. This is also basically the only way to get hold of a larger number of older pre -63 Craftools. I have over 200 tools that I got for an average of a dollar and half each on ebay. Even with the shipping costs overseas, I have saved hundreds of dollars compared with buying the new and inferior Craftools. Just remember to buy them in bulk and resell the ones you don't want/duplicates. Also, I want to point out an underlying risk called "tool craze". That's when you basically start to try to collect all the tools you don't have, always looking for the better or rarer ones. The truth is that you can do 80% of general tooling with only a handful basic stamping tool. Everything else is either variations or specialist. The fact is that very few people explore all the possibilities with the tools they have at hand, instead fooling them self believing that another new tool will help them doing better. So unless money isn't an issue - I would just get some basic cheap Craftools or Ivans, and then tool away for all my worth. With time you'll learn and realize where and how certain stamps are limiting your progress and when that time arrives, you're able to seek out and purchase just the right tools for you. I might have hundreds of stamping tools, but I probably only use 20% of them for 80% of my tooling work. The rest just sits there looking pretty 'just in case I need them'... -
That's one fly flask.
-
As with so many issues there is rarely one item that is the best. It's all in the eye of the beholder. Generally speaking the leather that is used will be what is called garment leather, regardless of what animal the origin might be. This is referred to in the way the tannery has produced the skin to be supple (and it will most certainly be some kind of chrome tanning). It also depends on what you are after. A glove with a lot of man made material, plastic knuckles, Kevlar etc. can get away with lamb skin. A period WWII all leather glove might better be done in horse leather. And not to sound too harsh, but you're probably better off going to your local MC shop and talk to the people there about their preferences. Second, you should go to a reputable leather only supplier (not Tandy..) to tell them what you're after and they will help you, that's why they exist. Also online there are so many MC forums. Do your research. While this forum is great, one need to remember that it is mostly enthusiasts and hobbyist that lurk here, so specialist questions, especially those that harbor to the professional side or manufacture/business side seems to be better answered elsewhere. Actually, I wondered for a long time why so few of all those thousands of leather workers that work for all the big brands in fashion or upholstery or interior never go to sites like this. Maybe because a lot of them either just see it as a job or they are like the tattooist - everyone has to learn the hard way. The one constant exception seems to be people working in the saddle business. Maybe Cowboys are more laid back...
-
This will depend on so many factors, foremost depending on how detailed your design/carving will be. While I'm sure it can work if it's a simple design and the leather is veg tanned and damp enough, you should ask yourself if it's worth the work, considering how cheap it is to have an embossing plate made today. A small square inch zinc, or magnesium plate will hardly cost you much more than a few dollars and will last you for hundreds of stamping sessions. Another way, if you want to copy an existing pattern is to use Plasticine. Make a quarter inch thick square, press the pattern into the dough on one side and harden the plasticine in the oven. The pattern will be negative, so if you want a positive pattern you need to use the first mold as a master for a second imprint. If cured correctly the Plasticine will last surprisingly long, mind you that it's brittle, so smaller sizes (2 inch) and an arbor press, instead of pounding it with a hammer, works best. Good Luck.
-
I originally posted a similar answer elsewhere, but the same answer applies here. Most professional manufacture of bags and small leather goods do use some kind of stiffener (a sheet of firm synthetic material that comes in different thicknesses) . Stiffeners come in many different brands and shapes. In the US I believe most common brands are the like of Bontex or Tandy's Terraflex or Texon. In Europe you've got Vilene Decovil as the cheapest and most readily available (while not regarded professional, it works really well). You want the pliable/softer cellulose based, not the stiff compressed boards - unless you're making travel trunks or shoes. There are other brands of course. While it's unfortunately common that especially many leather crafters loathe the use of this, it doesn't take away the fact that it's a common practice in professional manufacturing. There is no way to otherwise use exotic skins, thinner and softer leather to do items that needs to be rigid. Actually in some cases it prolongs life by preventing the stretching and tear. Basically, if an item is not unlined, it will most likely have some form of stiffener. The whole technique with making rolled edges actually came about as a way of hiding the stiffener in a nice way. There is a popular video on YouTube that show how Ettinger are making their wallets and the clearly show the use of laminating the leather with stiffener and then rolling the edges to hide this. Of course you can use a firm veg tan leather as a lining - mind you, that this is a more expensive solution in the long run. So go ahead, do what suits you best and good luck.
-
Have to agree with Andrew Chee on this one. Most likely done with a custom made stamp that 'flattens' the edges all at once, probably as well as cutting it at the same time. Based on how even and identical everything seems. The way to do it by hand (and much, much slower) is to skive the flesh side (paring knife or with a skiving machine) and wet the edge, then on the top side, crease a marking line and with a bone folder manually flatten out the area between the crease and the edge until that area is flat and smooth (and thinner). I have no experience using the glazing irons for this and I'm a bit curious to if it actually works. Normally shoe makers use it to wax and smooth the sides of the soles/heels, but I heard about saddle makers using it for edge finishing too. Would like to see if someone makes it work.
-
Help Restoring Hd Police Solo Seat
ConradPark replied to LuckyRabbitsFootLeather's topic in How Do I Do That?
Truly a marvelous first time job! -
Question For Those That Have Used Garment Leather
ConradPark replied to Windrider30's topic in How Do I Do That?
There are no hard set rules, but in general using linen thread is not the best idea with garment leather. You could use 'ordinary' sewing machine thread, but it's better to use thread for hand sewing as it's slightly stronger (but not as thick as most linen threads). Avoid saddle stitching, just use normal back stitching or similar techniques as when you sew garments. Use glover needles, hand sewing needles that have a sharp pointy triangular shape. Avoid both ordinary needles and saddle needles, no pricking irons as the holes will be too large. Basically, garment leather is soft and thin so you can sew it as any normal garment. Good Luck. -
Well, for that size 4.5 - 5 cm or 1 inch, you probably need to google what's called ' fittings for barrier rope'. Some call it end caps, some call it decorative fittings. They all look the same though. There are too many suppliers to link here but just google 'Barrier rope end fittings' and use picture search and you shouldn't have any problems to find a supplier near you. Good Luck
-
Another way, and this is how most commercial bag/accessories manufacturers are doing it, is to use a professional leather stiffener glued in between layers, often the outer but sometimes all layers. Even when the edges are skived to be thin for rolled edges or other reasons, there's usually enough material left for making it more rigid than the 'flimsy' leather. Sometimes, thin veg tan leather can substitute. When I thin larger pieces of leather, I always keep the flesh side off cuts, just for reasons like this, and also to use for prototype making so I save on wasting expensive leather. Also, while it takes some experience, it's fully possible to saddle stitch thin layers of flimsy chrome leather or skins - even without stiffener. A slow and light approach, pulling both threads at the same time, and also using the thinnest thread and a small stitch count. Good Luck.
-
Quick answer; Dying leather is a skill, and how well it covers the leather is more due to how it's done than what brand you're using. There are plenty of threads on this forum and on YouTube that show how it's done. Always experiment on some scrap leather at first! When it comes protecting the leather it's down to personal preference. Resolene works very well (but again, it can be difficult to apply if you're not used to it), so does all the other different brands. Just try and see what you like. I normally only buff with a little Carnauba cream after dying as I like the result and it's easier than applying Resolene. So basically, to answer your question; yes - go ahead, but you might have to try a few times before you get a satisfactory end result. Good Luck.
-
As the leather is two separate pieces I would suggest that you unzip the zipper and sew the two sides separate from each other. This way you minimize the risk of undoing the leather from the zipper. If you're using a pricking iron, use the widest you have, I wouldn't be afraid of having 5mm or 1/5 inch between stitches. This helps too. Also, don't worry about pulling every stitch so tight. A light 'pull' after each one is sufficient enough. You could also try a normal 'back stitch' as well. You only need one needle and goes a lot faster too. There are plenty of YouTube videos that show how to do that. The stitch looks like a saddle stitch from above, but under it over locks itself and actually help keep the zipper garment in place better than a saddle stitch. Just practice on some scrap first. Good Luck
-
Never underestimate the power of advertising and branding is just that! However, as you noticed everyone have their own opinions and you will never be able to please everyone so at least you should please yourself. And don't worry about others copy your work. First of all, unless you have a world distribution of thousand of goods on an annual basis, I'm pretty sure that you will never be economically affected in a negative way if someone would copy your design. Secondly, I'm sure you have noticed that most people and companies are actually using more or less the same designs anyway, what sets them apart is normally - you guessed it, branding. Then sometimes you have a difference in workmanship as well, but not as often as one as a consumer could hope for. Anyway, you should brand all your items, but it doesn't have to be on the front if you don't want to. A makers mark stamped with ink on the flesh side inside a pocket would definitely be fine. Many brands do it this way already. Good Luck and remember to have fun!
-
Help Restoring Hd Police Solo Seat
ConradPark replied to LuckyRabbitsFootLeather's topic in How Do I Do That?
Looks awesome, can't wait to see pics of the final restored seat!