


ConradPark
-
Posts
195 -
Joined
-
Last visited
Content Type
Profiles
Forums
Events
Blogs
Gallery
Store
Everything posted by ConradPark
-
Google exist for a reason.
-
I agree with Troy I. What I find most amusing is how those that claims to have least interest, shows the most need to voice their criticism - sometimes repeatedly. The obvious sexism (gender discrimination and prejudice - in case anyone mistook the meaning for something else) is sad too, even though I'm certain that those people involved are oblivious to that fact. I made a comment a while back on another thread about something I didn't like (the first and only time) and most answers I got was basically to get over it or beat it. Now I'll repeat that here - for those that of some reason have a problem with Aika's good humored thread, just beat it. While I'm not interested myself, I still wish Aika good luck and keep doing what you're doing - regardless what other peoples opinions are. Always look forward.
-
Kul grejor som du har gjort. Ser fram emot att se vad du kommer upp med i framtiden. Lycka till!
-
How Do I Achieve This Distressed Leather Technique?
ConradPark replied to Chad Von Lind's topic in How Do I Do That?
moved subject to the correct forum -
So it's accepted to brandish the 'southern flag' on this forum? I'm just wondering if it's then ok to brandish the German WW2 flag too, if my great grandpa fought for the motherland? Or any other racist political side that eventually lost their conflict - just for people, generations later, to complain about it - even though they clearly benefited from it - growing up in a safe conflict free environment, so they could voice their freedom of speech and god given right to idolize a movement that values ignorance and narrow mind views. Wish the admin would dare to make a more modern and up to date stance on what is racist or fascist symbols - regardless if the people behind putting them up as their banners think so or not. Regardless if I'm fine with nakedness, I can't expect everyone else to be fine with me having a banner that shows my BLEEP, so why does everyone on this forum have to put up with peoples racist and fascist banners? Be aware that I am not accusing anyone or any certain member for being racist or fascist, nor do I even believe that all those people are (well, I do have seen a few white supremacist banners). But it still doesn't answer my question. Is this a forum that tolerates these symbols and flags in all the forms or just the ones from American history?
-
Gold Initials Without Embossing Machine
ConradPark replied to AndersenLeather's topic in How Do I Do That?
There are plenty of info if you google or youtube it. Traditional bookbinding techniques for hot foiling. You still need tools though, and it's a steep learning curve. In many cases people find it cheaper and easier to go to a printer/bookbinder to have it done, especially if it's only for a individual piece or a small run. -
Sandwiching Zippers Between 2 Layers Of Leather
ConradPark replied to gndy's topic in How Do I Do That?
One way to do it, is to pre-stab the stitching holes with an awl or pricking iron on both the outer leather piece and the inner leather piece (and to make sure that holes match). Have the zipper already glued in place on one of the leather peices. That way you can 'see' the stitching holes from the other side afterwards. Then when you start sewing the two leather pieces together, it's fairly easy to see and aim where to sew with the needles. A stitching clam is almost definitely required for this. -
Here in the UK, Clayton of Chesterfield produces a top quality Shell Cordovan of traditional Horse Rump leather. They ship worldwide, and while not as famous as some other tanneries, they are indeed of top quality, delivering their skins to most of the top shoe manufacturers in England.
-
Not regarding to your effort, but what a shame to not resole the loafers! They were obviously well made and seem to have (had) plenty of life left. However on your behalf I understand that you only did a job. But still...
-
Why Some Vintage French Edgers' Blade Lean To One Side?
ConradPark replied to Cyis's topic in Leather Tools
I stand corrected, as I mistook the picture for a 'creaser'. Simontuneelder - Glazing irons are used for melting wax into the leather sole and to smooth out the surface, especially around the heel area - different tool and use from creasers, but no worries, we all do mistakes . I do agree that creasers are hardly used by shoemakers today, just happens that in the way past in the olden days it was indeed different. I share a studio with a group of shoemakers that still make and continue the tradition of making shoes by hand and we are all lucky to have amassed a small collection of vintage creaser tools, all of them from makers of shoe making tools. Unfortunately most of the makers doesn't exist anymore. -
Why Some Vintage French Edgers' Blade Lean To One Side?
ConradPark replied to Cyis's topic in Leather Tools
It's not a bad sharpening job, it's a different style - very common among old European tools, especially in the clobber trade, however the style is getting common among Japanese and Korean high end leather tools too. When you do heat edging - draw a fancy line between the stitch and end of the edge, the longer side of the tool helps the tool to not slip over the edge as you push (or pull) the tool. The shorter side is the one that marks the line. As with everything else, its always down to preference, no such thing as right or wrong. What I have noticed though, is that the style is more suited for fine work ( 0.5mm - 2mm), any larger and there is no longer much benefit with having one side taller/longer. The stitch line is 3mm and the 'fancy' line is made with a 1.5mm French edger, like the one you showed in the picture. -
Hi, the site you refer to is giving a nice pattern away for free, with very clear instructions for a very simple project, maybe I am missing something here, but what exactly is it you're wondering about?
-
For larger areas I always use the pro, as the regular black leaves a purple tint that is visible from certain angles. However for smaller areas or rough areas that needs color in - like when coloring hand tooled patterns, I use the ordinary one as it dries almost instant. The pro oil needs to be left to dry properly, preferably over night, to give proper lasting results. Don't forget to buff the surface when it's dry, to pick up all the residue dye that is coating the surface as a fine powder, as this will color clothes and everything else it gets in contact with.
-
An alternative would be to take a high resolution picture that is taken straight from the top, trace the outlines and vectorize them in Illustrator or similar software and then have a debossing stamp made from the pattern. That way you would get a exact duplicate. A white metal plate shouldn't cost you much more than 20-30 dollars for that size, maybe even less.
-
To be honest, you could most likely use any available drawing software and there are so many - it's only down to personal preference. It's not very complex patterns. However if you're not used to it, it will be a bit of a frustrating learning curve, even with the simplest free ones. My suggestion is that you start with a free one, preferable a vector based (then you can enlarge your drawings without having to redraw them), and check youtube for all your inquiries, as on this forum you are more likely to get arguments or silence, rather than answers.
-
Every one has different tricks to achieve a good end result. However everything takes training and experience and more training. Even using automatic edge color machines, as they use for bag manufacturing, you need an experienced operator to achieve good end result. My own experience - doing it by hand, is to have as good burnished and polished edge before applying the edge paint and make sure that everything is straight. Correct 'wobbly' side lines with long angled light strokes with sandpaper. My experience is also that it generally works better with a more flat edge than a rounded one. Another thing to keep in mind, is that rarely - even when machines are used - a good finish is achieved with one or two coats. Often several, sometimes even a two digit number of times, letting it dry and sanded with fine grit sandpaper in between, is needed until a desired look is achieved. One of the great urban myths in leather work is that it's faster and cheaper to use edge paint or that it's only cheap knock off brands that are doing it. You mainly use it with non vegetable leather to get a professional look. It always rub me up the wrong way when I see hipster leather workers/brand claim that they don't want to hide the leather by burnishing/edge paint it. Great lie, only to save time on producing. But I guess that's business sense today. Sorry for the rant and good luck!
-
Interesting to hear your answer. Everything you mention seems to be common sense, I guess that there are far more failed kickstarter campaigns than successful, even though it's in general the latter we and other see (and envy...) and it's better to wait until all the variables are covered, before attempting to do one. It would definitely be devastating if one couldn't keep up the time frame to manufacture after a potential successful campaign. I guess this is also the main reason why we see so many established brands doing successful campaigns as they have both the staff and investment to back it up. Business really is a 'bigger beast' in all the senses, as the turnover increases. Anyway, thanks for giving an insight from another perspective. Cheers.
-
N star leather, just out of interest, you seem to have a larger established company, it's definitely not your average one man hobby store, you're running. How come that you haven't done a kickstarter campaign? Certainly you would benefit and have the means to back up a larger order. More so than any one man production team. Have your tried and run into problems or are you just happy with your business as it is? Hope you don't take any offense, I'm just interested to hear from the perspective from someone that is running a larger business.
-
Hand Stitching Beginner - Minimum Tools Required?
ConradPark replied to makiba's topic in Getting Started
-
Hand Stitching Beginner - Minimum Tools Required?
ConradPark replied to makiba's topic in Getting Started
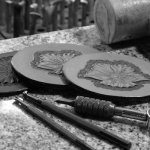
Hi, while I do think most things already been said in one way or another about this topic over the years, I wish to repeat some things said by others and myself again - for your benefit, hopefully Basically, my humble and very personal opinion is; (please, no remarks about the correctness of this article, this is only my own two pennies of thoughts. Not an attempt to a rule book of any kind, so for anyone that disagrees - and are inclined to be argumentative, as there undoubtedly are - leave any arguments for another topic, another day, elsewhere. Thanks for your cooperation beforehand.) You only need some thread, one diamond/sewing awl, scratch awl (round), some beeswax (some white candles can substitute - even if the paraffin is a bit harder - I sometimes use tea candles when I've been too lazy to stock up with beeswax), saddle/stitching needles, a couple of forks, wet&dry sandpaper (recommend 400,600,1000,2000 grit), a carpet knife or similar hobby knife, a lint free towel, piece of canvas or denim (but don't use a piece from a pair of new or selvedge as they rub of color), some thick paper and a pencil and a ruler. And here in the UK you could get this for under £20 from different hardware stores. Well, you need the leather as well of course! A kind of glue might seem preferable here, but one can be without it. Cumbersome, but possible and that's why I have left it out from the basics. Everything else is either luxury because you can afford it or because you feel lazy or you need it to produce special items or a special look or have a time constraint of some reason - and need to speed things up, like if you sell things on a regular basis, i.e. a professional. There are other things to get that makes things a lot easier, however, it's very arguable and very personal what this would be and in what order, personally I would start to get or make a stitching pony (two pieces of waist long wood and some kind of clamp goes a long way if you're on a budget). A pair of pliers is also very under rated - especially when your fingers are sore after hand stitching an hour or so (however that need does disappear after a few weeks if you hand stitch every day and avoid hand moisturiser...) and the third thing I would get is some white glue/wood glue/PVA, as this is a great and very adequate to bond leather together and much cheaper than buying branded leather glue. However, it has to be said, for larger items and for a long lasting items, nothing beats traditional lethal neoprene rubber adhesive, also called contact cement. The trick to using white glue successfully with leather is to dilute it slightly with water - a thick creamy consistence is fine, thick like yogurt is not. Like milk is also way too much watery. After spreading it as thin as possible on both surfaces that are going to be bonded, wait those minutes it takes for the glue to be sticky when touching it, instead of wet. And after pressing it together, you need to put weight on and wipe away any excess glue with a slightly wet cloth. And wait for it to dry well, probably an hour, but preferable over night if you're going to stitch it (this takes time. That's why using contact cement is much quicker, more expensive and more dangerous for your health and the environment). And most likely it will separate in places when you stitch. Don't worry, this is how it is for everyone. A thread is a personal preference and will take some time and experience to get the hang of what you need or want. Start with a basic linen thread. Thickness is of course very personal but I would start with something like size 4/18 as this is a good size for all round projects. I also recommend getting a natural or off white/bone colored thread as I noticed that most beginners have difficulties to keep bleach white thread - white, for long, as they tend to dirty their hands quickly. While it's not economical in the long run I would still get smaller samples/length of thread, that will last only a couple of projects than to spend money on full big spool/rolls as there is a big risk that you will still have them in a drawer somewhere a few years later. Better to wait until you know that you will use a specific kind of thread in a specific kind of size and color, over and over again (an 8 ounce spool - which seems to be a common size - literally last for hundreds of wallets, so think about it). You need one diamond shaped awl for the stitching and needles that fits the size of thread and the size of the awl - bigger/thicker with all or smaller/thinner with them all. The scratch awl, you use for general pattern marking in leather and to make stitching holes larger when necessary. Never use the diamond awl for this as the tip is much, much easier to dull than on a scratch awl (not to mention that a scratch awl only cost a quid in the pound store) and the diamond awl will also cut the thread like a knife if you try to make a stitching hole larger while the thread is still there). The 2000 grit wet&dry sandpaper is to sharpen your diamond awl, as with knives - this is of the greatest importance to have as trouble free stitching as possible - plenty of YouTube tutorials to show you how to best do this. While I know that a sharpening stone and leather with a polishing compound is the correct way to sharpen things, that will cost more money and takes more skill. My point is to point out how you can achieve great result with minimal tools and substitute special trade tools with more every day items or common hardware store ware for as little cost as possible. The 400/600/1000 grit is to use for sanding down the edges prior to and between burnish the edges when your project is finished. Here, one sheet of sandpaper cost around 20 pence. Also, always use them dry! Beeswax is to smooth the thread - regardless if your thread is already waxed or not, you need to keep waxing it as the wax get scraped of the thread after a few stitches and after that it starts to fray and discolor and split really quickly. You avoid this by waxing your thread often. No need to wax your stitching awl if you keep the thread constantly waxed. If you find it troublesome where there are several layers, use the scratch awl to widen instead. If you always find it troublesome to pull the needle and thread through, you either need to use a larger diamond awl or a smaller/thinner needle and thread. Also use the wax for some old school finishing on your burnished edges. Here is where you also need the canvas or denim to make burnished edges after you sandpaper them and wet the edges with water - old school style. Rub away to your heart's content. Friction is the key. Again, this is the simplest and most basic way and can yield great result. If it's the "best" way is up for discussion - again, elsewhere on this forum. While there always will be an endless discussion about pricking irons and stitching wheels, the good and bad, the need or no need and how to use them and so on, one universal fact is that it's a huge strain on your hard earned money. The more expensive stuff like Dixon and VB is something you should end with - if deemed necessary and not something you should start with. Even the cheaper stuff (the cheap is by no means meant as something of poor quality - Seiwa, Craft sha and several of ebays pricking irons are very cost effective and still of great quality) quickly add up cost wise, if you're gonna collect all the different sizes and shapes. I also want to point out that many traditional and professional leather artisans don't use pricking irons to punch through the leather (while Japanese style stitching irons and Tandy's are made for this, Dixons and VB is not - even if many do it anyways - but that debate is also ongoing elsewhere on this forum...) and still only mark the leather and then use an awl to make every stitch individually - old school style! A great example is several of the artisans working for Hermés or Ettinger or the artisans of Swainy Brigg, not to forget all the great saddle makers on this forum. While I, myself, do use all kinds of pricking irons for different kind of projects - I also use the one-stitch-at-the-time-with-only-a-awl method from time to time, especially on personal projects. Partly to prove to myself that I still have the basic skill - I am of the belief that this is a bit like walking and running, no point to do the latter if one can't do the former. Partly because it does greatly to improve your stitching skill overall and speed to do saddle stitching. Do believe me on this one. The cheapest option (instead of using a real pricking iron or wheel) is to use your scratch awl and a ruler to mark where every stitch is going to be. A bit tiresome, though. A budget version and about in general four times as quick is to use an ordinary fork of suitable size. It's cheap, easy to find in different sizes, easily bends to a bit bigger size or/and to make a two or three prong version. The two prong fork version is also very usable instead of a creaser to mark out the stitch line from the edge (that's why I recommended a pair of forks). Knife - well, you do need to cut the leather and thread with something. Lint free towel to wipe the goods, tools and hands clean from time to time - without leaving a trace of small cotton bits and thread everywhere. Also trust me on this one, especially when you work with natural colored veg tan leather. Paper, pencil and ruler again - you do need to make patterns for your goods, don't you? If you ever manage to "freestyle" the cutting of leather for all your projects, I will throw all my equipment away and start a new career! Hands down. The pictures show some wallets I made in a basic and simple way a few years back. Hand cut from a paper pattern. I only marked the leather lightly where the stitches were going to be and then, using an awl - I made every single hole, one by one. However, I didn't do this the western traditional way or the "Al Stohlman" way, rather I kind of pre stabbed each hole like the last picture is showing, before I started to sew. This is for me a much quicker way. The common argument from the traditional minded is that the holes are pressed together again if you pre stab the holes and therefore there is a need to open them up again when stitching. In my experience this only gets to be a problem in any way, when the stitching is either less than 2mm-2.5mm between the holes or the leather thickness altogether get to be greater than 9mm-10mm. I doubt that anyone would be able to distinguish that the holes have been done this way instead of the more traditional - one stab, one stitch, one stab, one stitch - method. Holding the awl this way gives much control in keeping the angle consistent through the whole process. You can angle it western style, European style or Japanese style with only the slightest turn of your wrist - for free! Another thing I want to point out is the piece of natural veg tan leather I keep underneath the leather goods as I'm stabbing the stitching holes. The reason for this is that the "pounding board" or rubber square (similar to Tandy's) is too soft, so the sharp awl sinks too far through the leather. Not only does this slow down the process, the awl gets easily stuck in the leather and will need the use of both hands to pull out to prevent cutting up the hole (if your diamond awl doesn't cut like an knife, it's dull) and ruining your project. The cutting mat in the bottom, under everything, is too hard for the tip of the awl and would quickly break the tip with the force from using a stabbing motion. But, the veg tan leather (a piece of natural veg tan leather that's been dried out on an radiator over a night) has proven to give the right resistance so the awl stops after it just gone through the leather a few mm, without dulling or breaking the tip in any noticeable way, even after extensive use. This is also the reason why I have not included these mats on the basic list. The edges are first sandpapered from 400 grit and then 600 grit, dyed with spirit based dye, wet with water and burnished with a piece of canvas. Sanded with the 1000 grit and the dyed again, repeated a few times until satisfied, rubbed with some beeswax that been warmed up in my hand until soft and polished with lint free cloth. The leather is 2mm veg tan. The thread is flat polymer resin thread, also known as polyester thread, and in leather work circles known as an artificial Sinew thread. Stitching is saddle stitching, 4 mm apart. I used a thin awl, not wider than 2mm at its widest point. The line along the stitching and the edge is not done with any expensive electrical tool, but rather a cheap creasing iron that has been heated over a gas stove (don't use candles to heat your iron as the give away smoke that will transfer to the leather and discolor it, even black leather. It will make the leather look wet in places permanent). While not included in my list, however, I didn't feel like making a new leather item just for this post, so I used some old pictures and this wallets happened to have a decorative fancy line. At least it shows what difference small details can make. Also the leather gasket around the snap is cut out with a hole punch, punches are only necessary if you're having snaps and such. Are you going to do card billfold wallets (easily one of the most common and popular beginner projects) there is no need for this. Anyway, sorry for the long post. Hopefully there are some informative and helpful tips though! A final note, it's easy to think if you fail with a leather project, that it will be easier or better if you just get more/better/other/more expensive tools/materials/equipment/machinery. Lots of novices and professionals make this mistake and end up with a truck full of unused stuff. Better to save your money and just practice. Remember; Sometimes when you fail, it's not because you've done something wrong, but because you haven't done it enough. Nothing beats practice. Good Luck! -
Maybe I missunderstood the reason why you posted on my thread in the first place, if you're not willing to sell that's fine but I would appreciate if people actually took the time to read what someone is writing as that saves everyones time in the end. Good holidays. For anyone else out there, If you actually have a stitching horse to sell, for a set price including shipping to London UK do PRIVATE MESSAGE to me thanks. I'm after more than one so even if you see this thread at a later date, don't hesitate to contact me. Also, even if it's a nice gesture, I don't need any more advice on how to either build one or have a local carpender to make one. Sometimes you guys just have to take things at face value. I'm after already build/made stitching horses in workable condition that looks like the model I've posted the first time. "New" is fine but I don't mind vintage and slightly tatty old ones either. SO NO MORE TIMEWASTERS, THANKS!
-
Hey, would you consider selling one without the legs? (just the clam + base + seat) If you would, PM me with a quote including shipping to London UK, Thanks.
-
Hi, yes, this is what I'm looking for. Haven't looked at this thread for a while since I never got any real valid replies until now. PM for what you want for it including shipping to London UK. I've bought several things including other stitching horses from the US and a few items from fellow leatherworkers on this forum if you need any references. Anyway, I have looked in to having a UK carpenter to make a new one and trust me, it's better to wait until one comes up here or on ebay. There is one in good shape for around $300 on ebay now but that's way more than I'm willing to pay so if you thought of something in that price range, sorry, I'm not a newbee. However if you want something that's reasonable. PM and we sort it out ASAP, thanks.
-
8" Splitter W/spare Blade - Osborne 84 Clone - Almost New
ConradPark replied to Madebynick's topic in Old/Sold
Hi, I sent you a PM yesterday. Look forward to an answer soon, thanks. -
Thanks, I always check ebay and I bought some before from the states. Sometimes it can be expensive, sometimes its ok. For the moment there is no one on ebay and I'm actually originally from Sweden but I'm after the model on the picture on behalf of a mate. The last option is to have one made but it's actually not that much cheaper considering the time involved to make one. Any way thanks for the thought. People that actually have a stitching horse to sell, please get in touch by P.M thanks.