BigRiverLeather
-
Posts
320 -
Joined
-
Last visited
Content Type
Profiles
Forums
Events
Blogs
Gallery
Store
Everything posted by BigRiverLeather
-

Stitching Around Holster Mouth Reinforcement
BigRiverLeather replied to BigRiverLeather's topic in How Do I Do That?
Thanks for your reply desertw0lf. Can I ask for some specifics then? What are you using for reinforcement, steel (type and thickness), kydex or? With either of these materials, how are you forming it then. Is it wrapping all the way around the slide? They problem I foresee with forming steel is getting it to form up to the gun on the top of the slide, in the area I have circled in the image above. I would think when one compresses it (I use a book binding press) it would push the steel away from the top of the slide. I would have no idea how to form this with kydex inside it not being able to heat it enough. -
Well, now you have me stumped. Not sure of the difference between the motor and servo motor
-
I'll paste the email I sent to David. Hoping for some help ASAP as I have orders sitting waiting to be stitched. I replaced the belt on my 3000 with the 3L 34" belt (this is what appeared to be written on the bad one). It went on albeit quite tight. I loosened the adjustment screw on the motor allowing it to give a little. This seemed to be acceptable. When I turned the flywheel it was VERY difficult to turn by hand, but it went. I'm only telling you this in case it is relevant to the next part. I then unplugged the machine and removed the board in the motor and replaced it with the one you sent me (the motor that was in it would sometimes either chatter/hesitate or sometime nothing at all unless I turned the flywheel a little to get it started). I was careful to replace each connection as I removed it from the old board so I am sure all of the connections are in the proper place. I plugged the machine back in and turned it on. I depressed the pedal and nothing happened. I turned the wheel by hand hoping that would "jump start" it (this is what I would occasionally have to do before) but that did not do anything. I looked underneath and the light on the motor was blinking. It seems I saw somewhere that if the light was blinking to shut it off and wait and it will reset, so I did that. Nothing. I unplugged the machine for a while and this did not work. I repeated these steps several times with no results. The fuse is good. Any suggestions???
-
Holster Edge Seam?
BigRiverLeather replied to GrampaJoel's topic in Gun Holsters, Rifle Slings and Knife Sheathes
I sand on a sanding drum in my drill press first, then I sand with 340 grit until all signs of the seam are gone, or at least I can't feel them. Then I rub some spit on the seam and sand it more with the same 340 grit. After sanding burnishing fast for about 30 seconds it all of a sudden will turn to glass. Then I put it on the burnishing tool in my drill press with some saddle soap smeared on the edge. No seams. My customers do care and appreciate it. -
Contour Stitch Line
BigRiverLeather replied to cstephens's topic in Gun Holsters, Rifle Slings and Knife Sheathes
I don't have the capabilities to make this visual at this time, but I have rolls of plastic sheeting (about the thickness of file folder paper) that I cut all of my patterns from. This is great because it is see through. I also draw an outline for each model gun mold I have. Then, similar to JeffGC I meauser the thickness of the gun and go a little OVER half the thickness way from the gun. for glocks I go 14 mm on each side, 1911s 12 mm on each side and the others somewhere inbetween depending on their thickness. I draw another outline around the gun with these measurements and cut it out there. Then I can just lay it out on my holster pattern and trace my stitch lines. When suing the pattern for an avenger holster, I fold the leather over and line up the topside of the gun on my outline then trace the trigger guard side of the pattern for my stitch line. I hope that makes sense. -
My biggest challenge with the finish coat is getting something that will prevent ANY bleedoff of the dye onto clothes, especially on IWB holsters. I have found the resolene gives the best results for this but I'm still searching for something better. What I don't like is the Tacky finish it leaves as well as the plastic look. Sometimes the hard shell look is ok, but I'd be happier if I could find something with a more natural finsih. My first finish was Stain Sheen from Feibings. I like the look and feel a lot, but when applying with a sponge, Ithe dye would lift and would still bleed off onto clothes, especially in hot weather (sweat). I've almost come full circle back to that. Right now I airbrush my Resolene on with a cheap harbor freight air brush. I like this because it is very low maintenance and forgiving. Sometimes I mix the resolene 50/50 with water, sometimes I use it straight. The airbrush doesn't seem to care. Now I've been trying to get the Satin Sheen to work. When I can, I REALLY like the finsh much better, not as shiny, little or no tacky feel. The problem is the airbrush does not like it. The Satin Sheen has small platelets in it that break up the shine. These particles clog my airbrush. I might have to find a way to drill out the tiny hole in my airbrush and see if that helps. I don't like applying anything with a spnge or brush anymore. It is just to easy to get inconsistent. For me, airbrushing is the only way to go. This goes for dyes as well, unless I am diping them or dying black which I use a foam bruash. I've tried the 1/2 neatsfoot oil / 1/2 beeswax. Not sure this would work for me on a full holster. I can still buff out a lot of color. I want to SEAL it in. I do use it on my edges when burnishing, very nice.
-
Mailing Holsters
BigRiverLeather replied to steelhawk's topic in Gun Holsters, Rifle Slings and Knife Sheathes
I found a gold mine at the dollar stores. You can get gallon ziplocs, usually 15 or 20 to a box for $1. I stocked up but am know out. I use a lot of them because each holster that goes in my press goes in a bag to prevent foam pattern transfer and any dye transfer. the bag is shot after this from the stitching on the holster and / or the grips. The damn shopper papers that show up in my mailbox 3 times a week cushion the ride to anywhereville, USA. -
Hand Pattern Cutting Help
BigRiverLeather replied to cstephens's topic in Gun Holsters, Rifle Slings and Knife Sheathes
I've been using #11 Xacto blades mostly, that is if I'm not using my shears. I bought a couple of head knifes, one from jcookblades.com which was superb, except after my first few cuts that went through leather like soft butter, it lost it's ultra fine edge and became difficult to work with. I have a lot of work to do on stropping. I ordered it in a 3" with one swept wing and one straight wing. Being my first knife, I had know Idea what I was doing . I told Jeff about my sharpening woes and mentioned I wished I had not ordered the swept wing on one side. He said send it back to him and he would make me another to my liking. This was 4 months later! So, I upgraded to a 4" and am waiting for that. The same day I ordered that one for $230 (!) I also ordered one from Duey Peters for $65. 4 months later I still have not seen it. He told me it would be ready in two weeks. I've heard that same thing about 3 or 4 times since then. I was anxious to compare the two blades. Last week I bought a Stohlman #70 4" from Tandy for $50. I knew right off the bat this thing was going to need an edge tuneup. I have some 800, 1,500 and 2,000 grit sandpaper I plan on working on a convex edge for it. With the Xacto blade, I use a new blade for jsut about every holster, maybe 2. I am now getting used to the fact that on the curves the tip is likely to break off. The Shears I got from Tandy, the best ones they had that run about $40, worth every penny. -
Removing Waxy Buildup
BigRiverLeather replied to steelhawk's topic in Gun Holsters, Rifle Slings and Knife Sheathes
Here is what I did from day one. I never had an issue nor did I know there was potential for an issue. first I dye my leather. When I string the thread into the needle, I pull the thread all the way through the needle, at an angle so the eye of the needle scrapes off excess thread. I do this 3 or 4 times at least. Then I take a piece of denim or canvas and burnish the thread, pulling it through the denim I am pinching down on the thread with, VERY quickly, pinching hard, so that it creates heat and sets the wax. I do this 4 or 5 times too. This should solve your problem. -
My First Inlay
BigRiverLeather replied to electrathon's topic in Gun Holsters, Rifle Slings and Knife Sheathes
I like the "distressed" look a lot. Very nice. -
Let's See Your Maker's Mark
BigRiverLeather replied to gregintenn's topic in Gun Holsters, Rifle Slings and Knife Sheathes
-
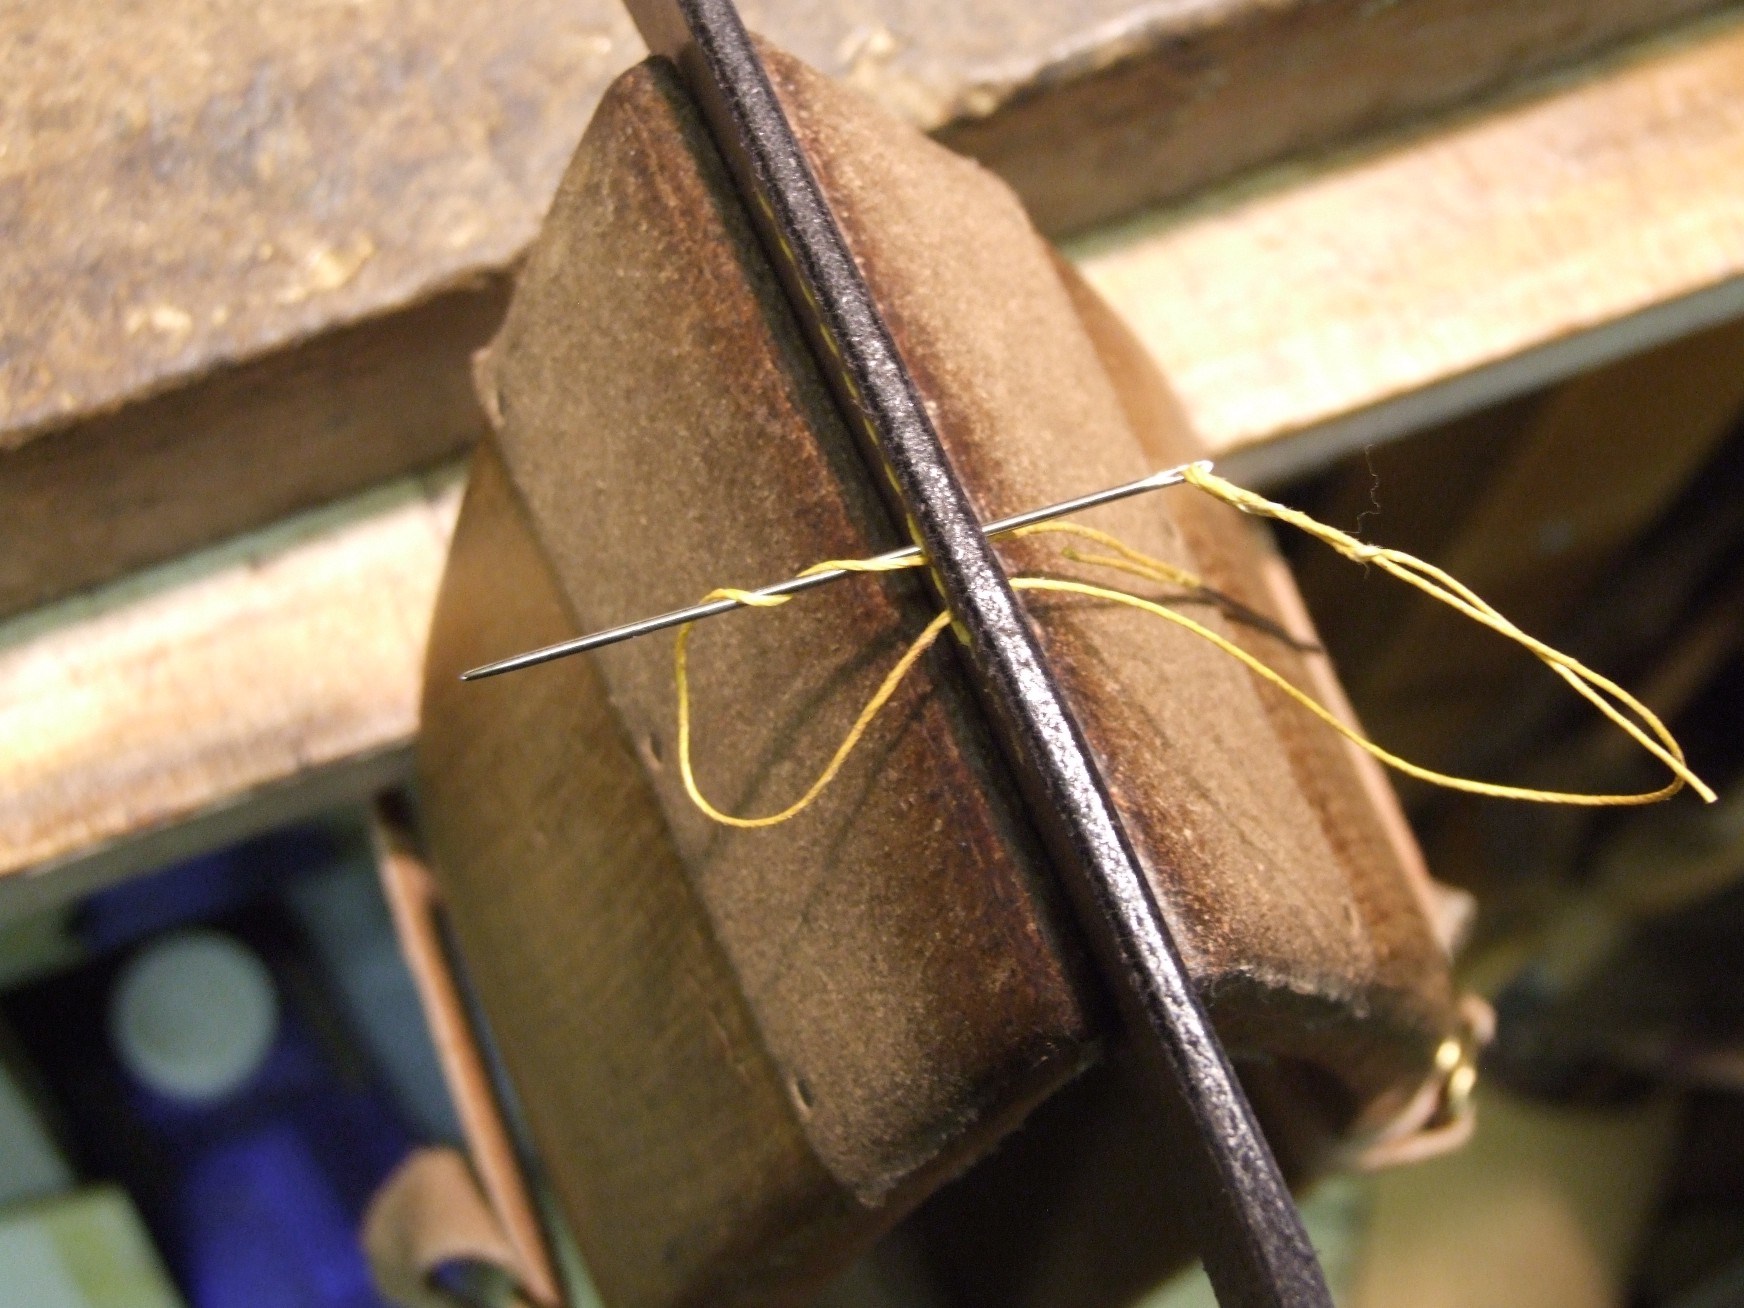
I use a lighter. I've used a mini propane torch before and that worked better, just faster. What I don't like about burning it is it leaves a very hard, sharp spot. I'm afraid that it will be an irritant on a holster, especially if it is IWB. I keep meaning to try this, but have not yet. Here is a picture of how to make a stitching not. Leave your ends long, put a needle on both ends, make a couple saddle stitches and cinch it up like this. I need to try that this weekend.

-
That's a beautiful holster Ray. I can see why the orders have been coming in for that one. A couple of questions if you don't mind - What is your method of dyeing - dip, dauber or spray? When I've used cordovan it sure seems to come out much darker than that. I've been dip dyeing. You said you use Bag Kote as a finish after the acrylic. IIRC Bag Kote can be very hard to come by, correct? Is Tan Kote nearly the same? One more, does the Bag Kote mellow the high gloss that Acrylic leaves or is there another purpose it serves for you?
-
Concealed Carry Platforms
BigRiverLeather replied to rdb's topic in Gun Holsters, Rifle Slings and Knife Sheathes
Looks nice! Do you skive the end where it folds over the buckle at all? -
New Cigar Case
BigRiverLeather replied to Daniel Tyack's topic in Purses, Wallets, Belts and Miscellaneous Pocket Items
I love it! Did you create the pattern or get it somewhere. I'm trying to think if I saw that in a Stohlman book. What weight leather did you use on the outside and the lining? Stitching in the top and bottom would be a first for me, as well as the lacing. I think I could do the lacing better than the ends, they look tricky. -
There are a few holster makers out there that provide reinforcement for the mouths of their holsters either with kydex or steel. The two I will be referencing today are Garrity Gunleather and Milt Sparks, the difference in the construction is that the Milt Sparks stitches all the way around their reinforcement which seems to compound the problem. Here is a picture of a Garrity Gunleather 2C1 Holster. You can see the kydex reinforcement sewn into it, only sewn on the top, I presume glued in to keep it stable. Kydex will only form with heat and I know for a fact this is pre-formed. The leather and stitching would burn with the 300 degrees required to form it. Because it is preformed it would be necessary to stitch around that tight corner, probably not being able to get it close enough to the needle with the throat plate in the way, even if stitching sideways. Is hand stitching my only option on this part or am I missing a specific technique? I do know the maker is using an Adler 205 in this case to stitch it. I am using a Toro 3000 which is, as far as I can tell, not that much different in and around the throat plate. Here is a picture of the Milt Sparks VMII. This is steel reinforced and is QUITE rigid. They manage to stitch all the way around the reinforcement. The only way I can think of this being done, other than by hand, is if there is a small enough throat plate that would enable me to get it inside the holster and rotate it around it or stitch the bottom portion, slide the steel reinforcement in then finish up the stitching, still having to rotate around the throat. This would mean the bobbin would have to be located elsewhere. VMII Also, I realize that "If you build a holster properly, it does not require any reinforcement" However, I want to build what the market asks for and frankly, this is a nice feature.
-
Very, Very cool. I love the name you've dubbed it as well. I often get that effect with brown holsters without even trying
-
Holster Press Question
BigRiverLeather replied to rgepting's topic in Gun Holsters, Rifle Slings and Knife Sheathes
I use a book binding press with two 12x12x1 sheets of gum rubber. 1" thick will be plenty thick. If your smashing that down you're pressing to hard. I thought the stuff would be to firm for my liking going from using exercise pads from Wally World. Turns out it's perfetct. I'm actuall going to pick up 1 sheet of 3/4". My book binding press I use is limited on it's opening, just over 3 " I think. I've had trouble getting some guns in there. I think 3/4" on the bottom would work good. -
Latest Holster And Sheath
BigRiverLeather replied to DCKNIVES's topic in Gun Holsters, Rifle Slings and Knife Sheathes
Very nice Dave! That is the kind of Gator I'd like to get from Henry. Everything I've received from him so far has been backstraps with the skutes. Really limits my applications. What cut of gator is that? -
I'm a little late getting back to this one. Good input here. It does make sense that HO and WC hides are coming from feedlot finished steerhides. I ordered both 6-7 HO form Springfield and 7-8 (closer to 7 oz) from Zack White. I've not yet made a belt from the "bullhide" yet but here are my impressions. The HO is a LOT more consitent in appearance, stretch and back marks etc. than the bullhide. I was told that ZW's hides were very consistent as far as that goes but I'm a bit underwhelmed. I might make a go of it this weekend and make a couple from the ZW hide and see if those natural marks show through when finishing it. Even the HO I used which appeared very "clean" had some marks showing after dying it. Not a big deal and not noticeable in the grand scheme of things.
-
I made a holster that I used Pink Cova on on part of and it just does not want to set up. After blamestorming with the guys at Tandy who I think make it up as they go along as much as anything I decided to mix in some resolene and some water to thin it a bit to prevent brush strokes being left behind. It didn't prevent it but it was better. I don't know if that is part of my problem, but I cannot get rid of the tacky feel. Sometimes with resolene I hit it with Kiwi Nuetral shoe polish and that will get rid of the tacky feel. That did not work in this case, if anything, it made it worse. What can I do to get a coat on top that will harden and not have the taky feel?
-
Ok Im Fed Up
BigRiverLeather replied to bitone40's topic in Gun Holsters, Rifle Slings and Knife Sheathes
Yes, I am airbrushing it with my cheap Harbor frieght air brush cut 50/50 with water. works great without any streaking for me. Multiple thin coats, or as much as my lack of patience will allow me to get to thin without it pooling up and or running. I have a hard time with patience between coats, too. I don't know that I would use leather balm for a final finish on holsters. As nice as a look as it it, I'm not convinced it will seal it good enough to prevent bleedoff on the hot sweaty days. -
I logged on today to put up a post about getting the steel in a reinforced mouth, then I saw the OP beat me to it. Nobody has answered his question yet, other than you don't need it. I agree, a well built holster with the proper weight of leather and construction should stay open. However, the market demands this feature. There are many buyers out there who insist on having this. If you have ever seen and felt a Summer Special or a VMII, the steel used inside of those holsters is VERY rigid. I'm confounded on how they acomplish this. DOes MS have some special sewing rigs that allow them to sew inside a small radius like there is in the mouth of a holster? I find it hard to believe they bend it after they stitch it in flat. They are all to consistent without any damage to the leather. MS is not the only one. TT does it, Brigade does it, Del Fatti does it. 4 of the biggest names in the biz are doing it. I've done it on one of my holsters, the DLC which is similar to the VMII. I have a customer who owns a steel fab shop and I asked him for his thoughts. He gave me a variety of different spring steel materials and some not tempered, different thickness and withds etc. Some of what I had was steel banding amterial for banding things to pallets. I used something similar to this though it was not rigid enough for what I wanted to accomplish so I epoxied 2 of these pieces together. I stitched it in after it was bent by hand. What a PIA! I want to know how that heavier steel rieinforcement is placed into the mouth of the holster. Not interested in hearing about how it is necessary though. Anyone?
-
Chinks For My Wife
BigRiverLeather replied to Tkleather1's topic in Clothing, Jackets, Vests and Chaps
Absolutely Beautiful work. She's a lucky gal! -
Well I guess I've learned that the acrylic, in my application on a holster which gets a lot of handling, pressing etc, sucks to work with. Very sticky, easily absorbs other colors it touches, just doesn't work for me as a solution. I'm scratching that plan of attack for a finish and have to find a different pink dye.