ClayB
-
Posts
2,063 -
Joined
-
Last visited
Content Type
Profiles
Forums
Events
Blogs
Gallery
Store
Everything posted by ClayB
-
 Hi Regis, Finishes over acrylic paint can be tricky. Acrylic is water based. It can be thinned with water, clean brushes with water. Sometimes when you are trying to blend colors on your leather with acrylics, the wet paint can remove the paint you already have on. Once dry it is really hard to remove it from leather but a sealer is still a good idea. I sprayed a sealer on after the white to make sure that it didn't mess things up when I put the antique on. I think spraying the sealer on is safer than wiping it on with a sponge or brush. I think Fiebings antique is acrylic too. Not positive about that but it does clean up with water. I think you could apply anything acrylic over alcohol (spirit) dyes without any problems. The alcohol dyes will pretty much stay where you put them. I don't think it would be a good idea to try putting alcohol based products over acrylic. Hope this isn't more confusing. Clay
 -
Fiebing's leather dye, Feibing's Professional Oil Dye, Tandy Pro Dye can all be diluted with rubbing alcohol. I use alcohol to clean brushes after using alcohol (spirit) based dyes too. I have been using the oil dye and I like it. I think it covers better. Clay
-
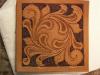
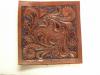
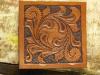
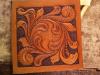
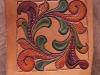
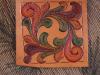
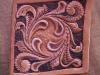
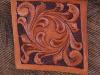
I decided to play around a little with some different coloring techniques this weekend I carved the same pattern several times and colored it a few different ways. This picture shows it with the background dyed with medium brown spirit dye Then I oiled the piece with pure Neatsfoot oil. This picture shows what it looks like right after the oil has been added. This will soak in and even out in time. After the oil even out, I then applied Neat Lac to the piece and let it dry. This piece of leather was a pretty dark color to start with. After the Neat Lac dried, I applied tan antique with a piece of sheepskin. This antique was mixed with a little Tan Kote to thin it out a little. It makes it easier to work with than the really pasty stuff (I think) I left the antique on for a minute or two, and then wipe it off with another piece of clean sheepskin. I colored the next one a little different. Again I dyed the background with medium brown spirit dye. I didn't oil this piece. Then I used Neat Lac as a resist on the turn backs, the buds, and for a little highlight in the center of the scroll. When the Neat Lac dried, I applied the tan antique again, wiping it off right after applying it. This give a little different effect by adding one more color to the finished project. The next piece is the same pattern again, but this time I carved the design inverted (beveled inside the lines instead of outside) I should have left off the border line because with inverted carving, the the background area isn't stamped. Since this is just practice, it really isn't a big deal. I colored this piece with spirit dyes. I used 3 shades each of green, brown, yellow, and red. The shades were made by adding rubbing alcohol to the dyes. I had one full strength, one half dye/half alcohol, and one about 3 parts alcohol to one part dye. By having several shades of each color, it is easier to blend from one color to the next. Then I went over the whole piece with Neat Lac. When that dried, I added a coat of the tan antique. The antique seems to blend the bright colors a little. On the last piece, I carved it the same as the first two. This piece of leather was from the belly of the hide and kind of stretchy. You can see how when I carved on it, it stretched out of shape. Again, this was just practice so it wasn't a big deal. If it was for an actual project, it would have not been good. I did the background with med brown spirit dye. I like the spirit dye for the background because once you figure out how to work with it, you can get it to spread to the cut lines. This takes some practice but if you load the brush fairly heavily and then touch it to the center of the area to be dyed, it will spread out to the cut lines and usually will stop. If you have too much dye on the brush, it will jump the cut lines so you need to practice this. I colored the rest of the design with acrylics paints. I used a dark brown color in the shadow areas, a medium brown in areas like the pear shaded impressions, and a white mixed with a little light brown for highlights. Straight white is too bright and is almost never used. I water the dye down fairly thin and do a lot of dry brush work to try and blend the colors. I wasn't real happy with the blending of the highlights (white) so I sprayed this with an acrylic sealer and then applied tan antique again. I think it helped blend the colors together fairly well. The idea of this was to show the effects different coloring techniques can give you on the same carved pattern. Clay
-
Delrin swivel knife blade?
ClayB replied to Regis's topic in Purses, Wallets, Belts and Miscellaneous Pocket Items
Tandy used to sell those. Kind of speed beveler for long straight cuts like borders on belts etc. Stick the straight edge in the cut and pull or push it to bevel the line. Can also be used to smooth out rough beveling. -
It's really pretty easy to do. Just go down to the middle of the page when you are writting a message to where it says file attachments and hit the browse button. Then find the place where you save pictures on your computer, open the file, and hit the add this attachment button. Your picture will then be attached to your message. I'd like to see your work too. Clay
-
Hi David, Guess I missed seeing these somehow. I really like some of your swivel knife work. The short cuts followed by the long decorative cuts on the leaves are pretty neat. The knife work border looks good too. It's a nice added touch. Clay
-
Hi Jim, Not Johanna (she's better looking) but there is an article on book binding in the Jan issue of the Rawhide Gazette. There is a link to the Rawhide Gazette at the bottom of the page here on this site. Go to the public index and then the January issue. There is always some interesting stuff in each issue. Clay
-
CHAZ WELDON NOVICE LEATHER CLASS MAR. 3RD 2007, SATURDAY 10-2PM PRESENTED BY MONTANA LEATHER CO. LEARN FROM AWARD WINNING BILLINGS SADDLEMAKER CHAZ WELDON, THE BASICS OF SET STAMPING AND SWIVEL KNIFE USE. STUDENTS WILL CREATE THEIR OWN LEATHER BELT IN CLASS. COST $50 STUDENT NEED TO PROVIDE THE FOLLOWING: MALLET BASKET STAMP BORDER STAMP SWIVEL KNIFE BELT BLANK CALL EARLY FOR YOUR RESEVERVATION, LIMITED SEATING. ADVANCED CLASS COMING IN APRIL PHONE 406 259 7066 FOR MORE DETAILS.
-
I got a letter in the mail today from the LCSJ updating some of the workshops for the Wickenburg show. They have extended the deadline to sign up for the John Bianchi holster class and saddle week to Feb 20. Time has been changed on Allan Scheiderer's lacing class to Satuday March 10, 1:00-3:30 PM They have cancelled the rawhide bosal class with Bill and Teresa Black and the leather covered picture frame class with Dale Grabowski. It also says there is still room in all 35 classes for more students. I also got an email from Bruce Johnson correcting me on the dates for Ferdco's show in Elko, Nevada. The correct dates are April 20-21. The dates listed in the LCSJ are not correct. I think I have it right on the calendar on this site now. Thanks Bruce for straightening me out. Bruce also gave me the following info on that show. "Also they are having a saddle class - 3 days/two evenings by Joe Benner and Alan Dewey. I talked to Joe Benner today too. They are going to be building a Wade, and showing some variations of ground seats and laying in a seat. Some of the techniques from the old Hamley and Severe shop that are a bit different than most. That is tentatively scheduled to start on Wed the 18th and go through Friday. Talking of starting the class a bit later on Fri to allow the class participants to hit the trade show first, and not miss out on the "deals". Cost for the class is $300. Deposit due by April 3rd or something like that. The Elko ranch rodeo is that weekend too. Capriola's will be hosting a social Friday evening too, kind of like Kings do in Sheridan. "
-
untilNevada's Boot and Saddle Trade show will be held April 20-21, 2007 at the Elko Convention Center in Elko Nevada. Exhibitors will be showing machines, leather, leather tools, silver, jewelry, horsehair, stirrups, pads, blankets, tack, buckles, hardware, horse care products and more. Public is welcome. Bruce Johnson supplied me with the correct dates and some more info on the show. Also they are having a saddle class - 3 days/two evenings by Joe Benner and Alan Dewey. I talked to Joe Benner today too. They are going to be building a Wade, and showing some variations of ground seats and laying in a seat. Some of the techniques from the old Hamley and Severe shop that are a bit different than most. That is tentatively scheduled to start on Wed the 18th and go through Friday. Talking of starting the class a bit later on Fri to allow the class participants to hit the trade show first, and not miss out on the "deals". Cost for the class is $300. Deposit due by April 3rd or something like that. The Elko ranch rodeo is that weekend too. Capriola's will be hosting a social Friday evening too, kind of like Kings do in Sheridan. For more information see www.ferdco.com or call Ron at 1 800 645 0197
-
I got an email today from the ND Council for the Arts. This is the time of year to start working on applications for grants from them. Here in ND, they have a program titled the Traditional Arts Apprenticeship Program. The purpose of this program is to help keep certain traditional arts alive in our state. These can includes lots of different art forms. Some of what has been funded in North Dakota are Dakotah storytelling, Vietnamese embroidery, Czech Easter egg decorating, Armenian copper bas relief work, blacksmithing, saddle making, German-Russian willow basketry, Hidatsa quillwork, Sudanese music etc. In the past few years I was awarded two of these grants to help me learn saddlemaking. There are quite a few states that have similar programs to this. If you google your state's Council for the Arts or Traditional Arts Program, you can find out what may be available in your state. Here in ND, grants are issued for up to $2000. When I applied, half of that money went to paying for materials, and the other half went towards paying a master craftsman for teaching the apprentice. Not only did I learn how to build saddles from an experienced saddlemaker through this program, I got to keep both of the saddles I made. The National Endowment for the Arts has always been a controvesial issue. This is one program that they sponser that I found useful. I would encourage others to check into what is available in your state and possibly recieve some help to learn something new (or old) Clay
-
Siegel of CA has Osborn bag punches from 1/4 inch to 2 inch. The 7/8 inch punch is listed on thier site for $34.50. https://www.siegelofca.com/itemdetail.asp?prodid=402 Also found one on ebay right now by searching for oblong punch. (didnt get any match when I typed in 7/8 but there is one) There is a cheaper made oblong punch if it's not something you are going to use much. I have one that says Rampart tool co on it, but I don't know if anyone sells them anymore. Clay
-
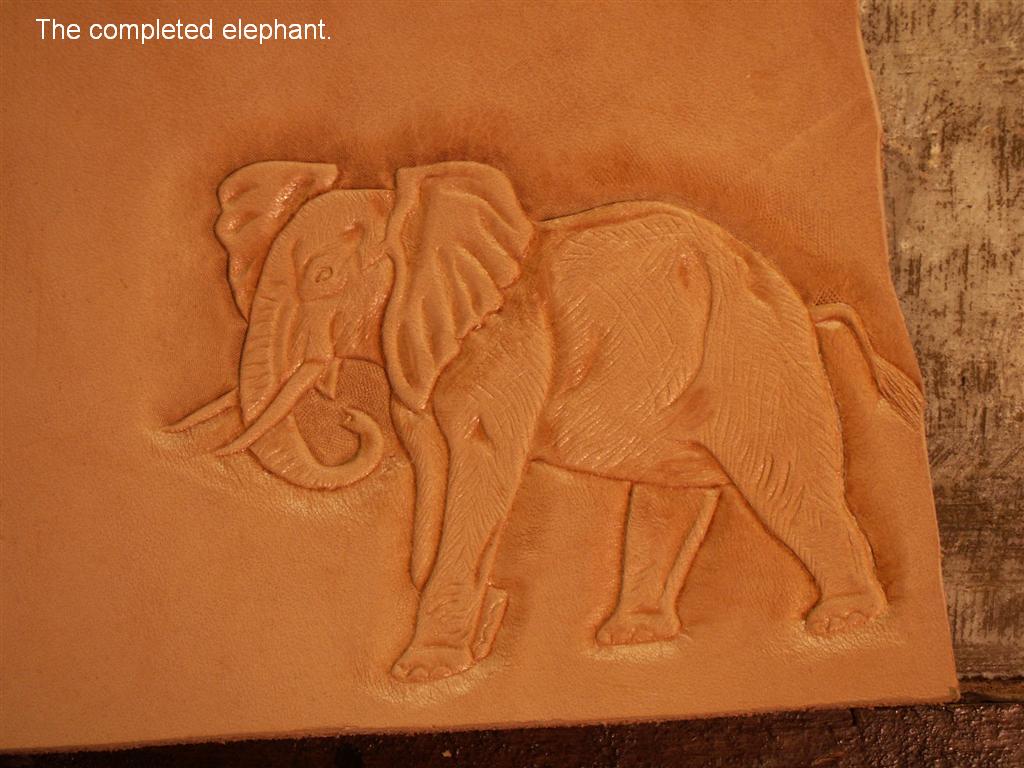
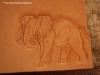
Here is the finished elephant carving. Step by step photos will follow. Hopefully they will give you some hints as to how to use the modeling tool also. By the way, I agree with Holly. Peter Main makes a really great modeling tool. I use mine on everything I carve. Clay
-
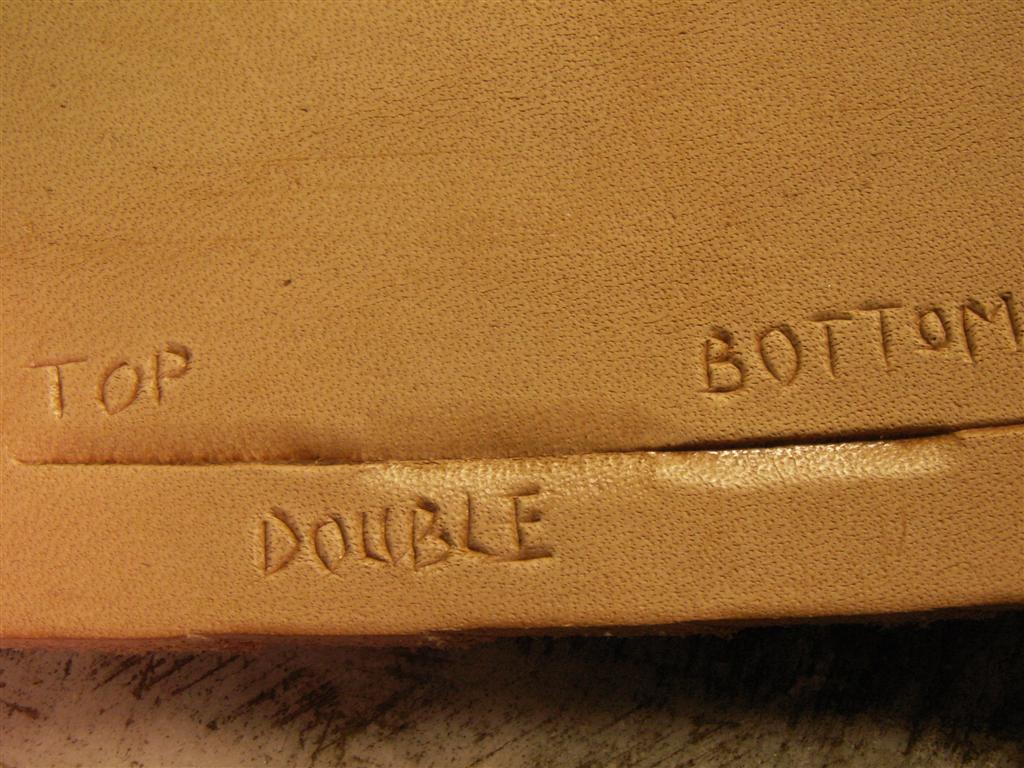
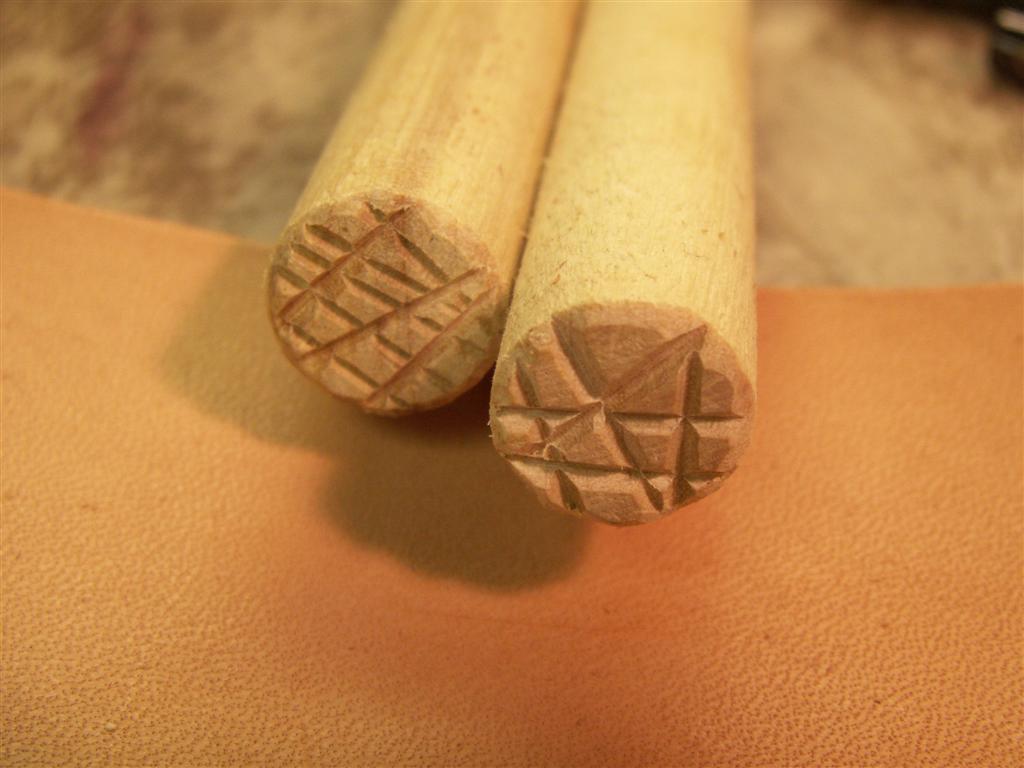
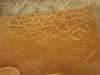
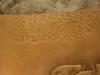
[quote I don't understand the double beveling you mentioned where the feet hit the ground??? Here is a picture to try and show what I meant by double beveling. It is kind of hard to explain, but you will get a different effect depending on which side of the line you bevel. If you bevel the bottom of the line, it may look like the foot is above the ground, floating instead of standing on it. If you bevel the top of the line, it will look like the foot is in the ground, as if it were standing in soft dirt, sand or mud. If you double bevel, it should make it look like the foot is touching the ground. I also took a couple pictures of the home made wooden background tools and the impressions they make. They really work nice on a bigger picture where you have a lot of background to cover. And finally, I decided that if I was going to try and tell you how to carve an elephant, maybe I should try one myself. I looked in the FIgure Carving Finesse book that I mentioned before and Al had several elephants in there. I picked one and carved it. I took a series of pictures as I was going. I will send thess off to Johanna and maybe she can post them for me. I did most of the work on the elephant I carved with just a modeling tool I think that it is probably the most important tool you can have if you are doing figures, and also is pretty important with any other carving. It has so many uses and one of the biggest is to smooth everything out. I think you will find that your second elephant will be a lot easier, and you will be able to add more detail as you go. Figure carving just takes practice, and I think that you will do well at it. Clay

-
Hi Regis, You are doing pretty good with the elephant. Here are a few suggestions that can consider trying. When beveling away from the animal, you should try to fade the bevel back until it blends into the background. This takes some practice. On the fore ground, usually you will use smooth figure carving bevelers. If you tilt them away from the flat edge, it helps to avoid leaving tool marks. Where your figure meets the sky area, you usually use a checkered figure carving matt tool. You could make this work with any beveler but the bigger, flatter tool you use, the less chance of getting a lot of tool marks. Always be careful when tracing your pattern. It looks like the hind leg is narrower than the front. Small things like that are important when trying to carve animals. The line of the belly should continue a forward across the far side leg to the near side front leg. It looks like you used a seeder to put in the eye. That works, but be careful not to hit it too hard. Where the feet touch the ground, you might try double beveling the lines. This means to bevel the line on both side (top and bottom). This will make it look more like the animal is stepping on the ground and not floating. I hope you don't think I am being too critical about your carving because I am not trying to be. Just trying to pass on some of the things people have shared with me about making realistic looking animals. Al Stohlman did a really good book called Figure Carving Finesse. Probably the best book I have seen on carving animals. Al demonstrated how to carve a multitude of different animals and textures. Clay
-
My first thoughts would be to try some matting tools. Tandy has some numbered M655, M656, M657 or Hidecrafter has similar tools numbered E281, E282, and E283. These might give a texture similar to the elephant skin. My next thought was to see if Jan Schoonover ever did an elephant. He did, and you can see it here. http://www.sculpturedleather.com/site/4599...age/138654/site His pose is different so I don't know if that will help you out a lot. In one of the classes that I took with him, he showed us how to make simple background tools out of wooden dowels. He just takes a piece of wooden dowel about 3 inches long and cuts random lines in the end with a small file. This would be a fairly inexpensive way to make your own texture tool and if you don't like the impression it makes, just cut it shorter and try again. I don't think I would cut the texture in with a knife. One other thing you could try is just to "draw" the texture in with a modeling tool. Those are some ideas, someone else will probably have some others that you could try. Clay
-
Hi Whinewine, I didn't realize that ruby could be grown in a lab. I googled it and that was interesting. Only time I used a ruby blade was when I bought one off the internet for Jan Schoonover. I tried it out before sending it to him to make sure it worked. He prefers the ruby blade over all the blades he has, and he has several including a few from Robert Beard. The one I found him, and the last one he found himself both chipped soon after he started using them. Last time I talked to him he was looking for another. If I had that much trouble with a certain blade I think I would switch, but there must be something about them he really likes. Robert Beard said he could sharpen the ruby blades if they aren't damaged to badly. Clay
-
I think to be safe you should wait several hours, or overnight. Give the oil time to soak in and even out. I haven't used super shene over oil. If you haven't used it before, I would be sure to try it on scrap first to see how it works. Surprises at this point aren't usually much fun. Clay
-
Hi Marilyn, The ruby blades aren't really ruby, exept in color. I think they are some sort of man made substance. From what I have heard, they tend to chip VERY easily if dropped, and sometimes the ruby tip just falls out of them. They are also about impossible to sharpen without special tools. But, if they aren't damaged, they were supposed to stay really sharp with just normal maintenance, using a strop as you would any blade. I know one master leather carver that likes them better than any of the blades he has from custom tool makers. They are also gaining value as collector items. You can use it, and will probably like it, but just be careful not to drop it. Clay
-
Art, You are right about that. Even the videos with Robb Barr and Robert Beard are a little dry. I never met Robb but everyone always talks about what a character he was. I have taken classes from Bob Beard and they are anything but boring. Not sure why they can't be a little more themselves in the videos. I guess they aren't made for entertainment value. But when it comes to educational value, they do that well. Clay
-
I really like these video lessons and am glad that Hidecrafter has made so many of them on different subjects. Sometimes it is so much easier to understand something when you see it done than when you are trying to figure out written instructions. This really is a good deal if there is something you are interested in learning. Clay
-
Thanks Carl (and glad you are back), I used all acrylics. I don't know how well it shows in the pictures, but I used some irredescent (sp) powders mixed with super sheen over the green and purple. It is really kind of neat how it makes the colors shimmer. I took a class last spring in Sheridan on coloring with spirit dyes, and did learn a little about how to use them. They say they will fade over time and that kind of scares me. I have a few more of Robb's pictures in different stages of completion. Once I get them all finished up, I am going to start working on something different for awhile. These have been kind of "safe" for me because Robb did the patterns, and walks you through it step by step on the videos. I have learned a lot doing them but I think it's time I see what I can do on my own. Clay
-
Robb has a pattern book and some pattern packs that are just that, patterns. If you get any of the videos, you get a pattern and the video takes you step by step through the process of creating all the textures. He tells you what tools to use, what color paints you will need etc. Most of the videos do a pretty good job of walking you through the project. You can get any of his patterns or videos from Hidecrafter.com I have asked them to come up with a tool list and paint color list to go along with each video. The way they are now, you have to watch the videos first to find out what tools and paints you need, which may mean you have to order more things before you start the project. If you have a project in mind that you want to try, let me know and I can help you figure out which tools you need. I will also try to answer any questions you might have if you start one of these projects and get stuck. Clay
-
[quote I used the plastic bag to keep it for a day but was concerned when I opened it because the leather was pretty 'mushy'. When I tooled along the edges that I had cut, the water would slightly oooz up. Obviously I got it toooo wet. I left it out last night and now it is nice and dry BUT, the tooling I did is now very shallow. Can I start over and case it and tool over the same area? Or, will that fail or simply cause new problems? I do appreciate the help. Regis Yes, that was WAY too wet. Casing is a learning experience to figure out what is just right. They used to describe the right condition as "when the leather begins to look dry, but still feels cool when you touch it to your cheeck". If it is too wet, it will be mushy and your impressions won't be sharp and clear and as the leather dries, they may just disappear. Too dry and it will also be hard to get a good clear impression. Just right and it will be easy to carve and stamp, and you will get "burnish" when stamping. Burnish is a nice brown color that the leather will turn in the stamped impressions. I think you can try again to get the moisture right and save the project. The biggest problem is that you cut lines will probably have closed up and you might have a lot of trouble trying to re cut in the same lines. But, you have nothing to lose by trying. Hope this helps. Clay
-
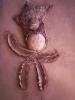
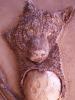
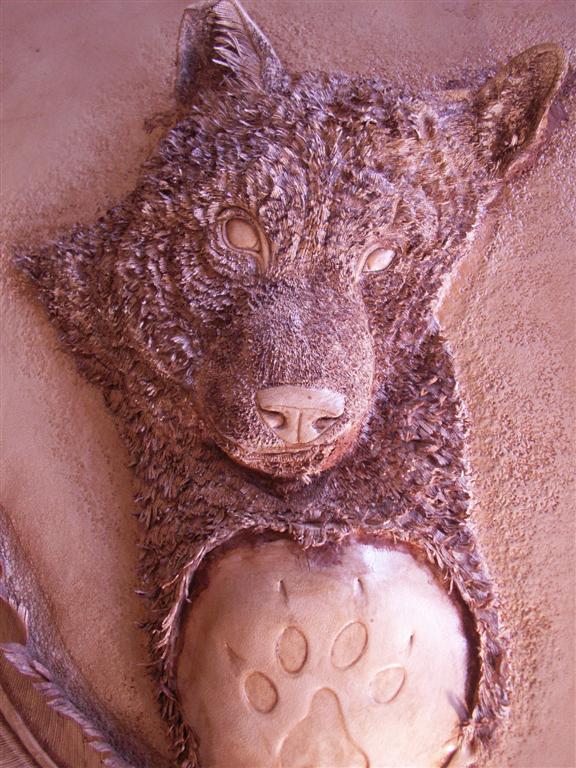
I started quite a few of these pictures a couple weeks ago when it was too cold to work outside. Here is Robb's wolf puppy, ready to get painted. Clay