ClayB
-
Posts
2,063 -
Joined
-
Last visited
Content Type
Profiles
Forums
Events
Blogs
Gallery
Store
Everything posted by ClayB
-
untilLearn to create an Anasazi Indian ruins diarama from master leather carver Robert Beard. June 15 -17th 2007 Cost: $250 Hide Crafter Leather Company Fort Worth, TX for more information contact Anne Newkold 817-878-5797 or 817-244-9119 -------------------------------------------------------------------------------- Indian Ruins Diorama Carved and Coloring is a 4 day class. ProSeries Tools: B1, B2, B3, B4, B5 Figure Bevelers M2, M3, M4, M5 Checkered Matters. GT4 Grass Tool BT1, BT2 Bush Tool F1, F2 Foliage Tool SP2 Pointed Beveler FC, CFC Filigree Chisels DB Double Beveler Smooth Common Tools: F890, F891, F895, F896 Figure Bevelers F898, F899, F900 Checkered Matters F916 Grass Tool F874, F989, F993, F994 Bush & Foliage Tools F902, F910, F941, F976 Pointed Bevelers General Equipment needed: Modeling Tool, Swivel Knife w Blade, Mallet or Maul, Stamping surface, Scalpel or X-acto knife, Water and Sponge, Tracing Film, Stylus, #4 Pointed Sable Brush, Tray for mixing Paints, Paper towels for wiping Brushes
-
Desert Scene and Scroll Checkbook June 24th 2007 K C Leatherwerks LLC 7127 Kingston Pike Knoxville, TN for more information contact: Diane Corey 865-584-0011 or 800-932-9782 Registration & Deposit Deadline June 15 RSVP Early Space is Limited
-

best stamp for the hamley swirl (crazy legs ) ?
ClayB replied to handcrafter's topic in Leather Tools
In the catalog that I have from Bob, he does carry a couple sizes of the swirl stamp. He calls them "windmills". The ones in the catalog measure about 1/4inch and 1/2 inch but I am sure he would make them any size you wanted. The catalog is pretty old but the price in it was $85 and $90 for the two that were shown. I was told that his prices have gone up and a new catalog is in the works but I haven't heard when it will be done. Guess I should check on that. I have a few of Bob's tools and they are really nice, really expensive, and it can take up to 6 months to get them, but they are worth it (in my opinion) -
untilMaking a Leather Covered Stirrup Lamp with George Hurst March 24-25, 2007 Location: Hidecrafter 7936 Camp Bowie West Blvd Fort Worth, Texas 76116 Cost: $100 For mor information: Telephone: 817-878-5797 Email: fortworth@hidecrafter.com
-
I ran across a website that I found interesting. http://www.western-saddle-guide.com/ Lots of information on western saddles. Lots of different things to look at: Saddle Choice Saddle Types Saddle Parts Saddle Fit Saddle Care Saddle Accessories Saddle Makers Saddle History Saddle Decoration Saddle How To's Saddle Buying Guide Tack Shop Used Saddles Saddle Gallery Saddle Library There are also links that can keep you busy for a long time, from saddle makers to tree making to......
-
WESTERN FLORAL AND SCROLL CARVING June 2nd DKG Leather 12016 La Crosse Ave. Grand Terrace, CA RSVP soon Class size is limited! for more information contact: George Mooers 888-DKG-9833 george@dkgleather.com
-
retractable key cases
ClayB replied to CitizenKate's topic in Purses, Wallets, Belts and Miscellaneous Pocket Items
-
When I was learning to build saddles someone suggested that I cut the handle off a safety skiver and solder it on the other side, cuz I am a lefty too I just learned to use it right (wrong) handed instead. Another thing I learned is that when the blade gets dull, change it or take it out and strop it, instead of trying to keep going. They work lots better with a sharp blade.
-
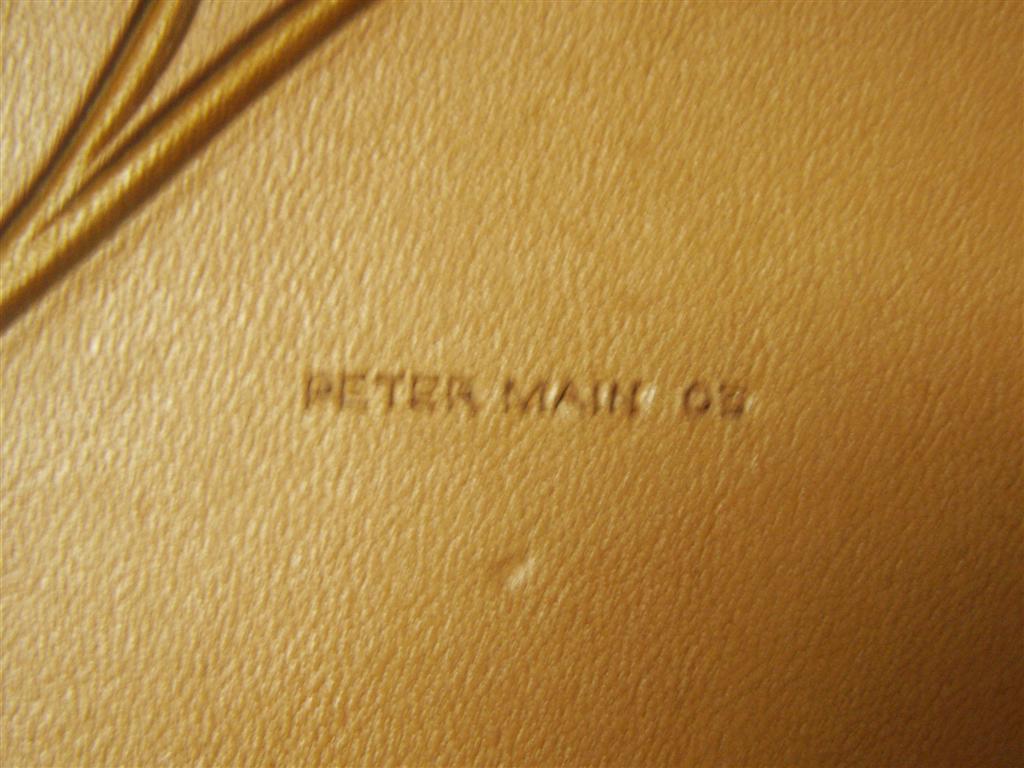
Another show open to anyone that wants to enter, guild member or not, is the World Leather Debut held in conjuction with the Rocky Mountain Leather Trade Show (Sheridan, WY). This show costs more to enter than the IFoLG show, $25 per entry vs. $2 per entry (pretty sure that is right). The World Leather Debut also pays fairly substantial cash prizes for best in each of 13 catagories. Runner ups and honorable mentions get ribbons and certificates. If you enter this show you have to be prepared to go up against the likes of Peter Main, Jim Jackson, Jan Schoonover just to name a few. There are no divisions like beginner, advanced and masters like the IFoLG. If you go to view the entries, you will see some really amazing stuff!! Clay
-
retractable key cases
ClayB replied to CitizenKate's topic in Purses, Wallets, Belts and Miscellaneous Pocket Items
[quote This just shows the cover after carving. I'm in "learning and experimenting mode" on this one, so if anyone has suggestions on the carving, feel free to speak up. Also, the coloring... I have some Createx pearlized colors (acrylic, I suppose). I'd like to see irridescent green on the head and down the back side, which blends into either yellow (spirit dye) or gold (pearlized gold Createx). This is my first time to play with Createx colors, and also my first chance to try some of Clay's tips on coloring with acrylic. Suggestions there are also welcome. Kate Hi Kate, When I colored my pheasant, I used regular acrylic paints first. Then went over them with irridescent colors afterwards to give that sheen. I think you could color your dragon the same way, with either acrylic or spirit dyes first. That way you could get some shading in the dragon with the regular colors, and wash the irridescents over the top to get the sheen. Putting acrylic over spirit dye isn't a problem. If you want to use spirit dyes, do it like Peter showed in his last book. Mix a few shades of green, light, medium and full strength, and a couple shades of yellow. Then you can gradually blend the green into yellow. Cant wait to see what you come up with. CLay -
Anybody can buy Herman Oak leather from one of their authorized dealers located around the country and not have to meet the 10 side minimum they have if you buy direct from the tannery. Bowden Leather Company El Paso, TX 915-877-1557 Goliger Leather Company Ventura, CA 800-423-2329 Hide Crafter Leather Company Ft. Worth, TX 817-878-5797 Montana Leather Company Billings, MT 406-245-1660 Oregon Leather Company Portland, OR 503-228-4105 Panhandle Leather Company Amarillo, TX 806-373-0535 Southern Leather Company Memphis, TN 901-774-0400 Stevenson-Paxton Sales Ignacio, CA 800-648-1622 Weaver Leather Inc, Mt Hope, OH 800-WEAVER-1 -------------------------------------------------------------------------------- Caledon Sales Ltd Calgary, AB, Canada 403-252-0232 -------------------------------------------------------------------------------- Birdsall Leather Botany, NSW, Australia 2-9316-6299 Toowoomba Saddlery Toowoomba, Qsld, Australia 7-4633-1855 -------------------------------------------------------------------------------- Craft & Company Ltd Suginam-ku, Tokyo, Japan 3-5698-5511 Kyoshin Elle & Company Ltd Taito-ku, Tokyo, Japan 3-3866-3221 -------------------------------------------------------------------------------- Circle L Saddlery Wenden, Germany 502-6394
-
Holly, Several years ago I had a similar experience. I had put a bottle of red dye on the top shelf in the kitchen to keep the kids out of it. Someone slammed the kitchen door, the bottle came off the shelf, hit the floor upright and the lid came off. Red dye splattered on the floor, the kitchen table and chairs, even hit the ceiling. It looked like someone took a blast from a shotgun in the kitchen! I am afraid you aren't going to find anything that is going to take the dye off easily. First thing I always try is rubbing alcohol as quick as possible to dilute the dye as much as possible. That made it less noticable on the table. Repainting the ceiling was the only way to fix that. I ended up using steel wool on the linoleum (which was almost new). To this day there is still red dye splatter on the bottom side of the chairs and table. The whole thing made for some really interesting conversation the next night when we had Bible study in our kitchen. I hope somebody else has had a better experience trying to remove dye. Clay
-
Thank you Pella, Yes I did make the saddles. I started learning how to make them a few years ago. I have made 5 so far. I don't think it's ever something I will do a lot of but I did want to know how it was done. I really enjoy carving most, and most people that want a saddle, want it without much tooling. What fun is that???? If you go to my photo site http://clayb.dotphoto.com/CPListAlbums.asp you can see pictures of all of the saddles, and the step be step photos I took as I was making them. Someday Johanna and I will get some of those pictures moved over to this site. Clay
-
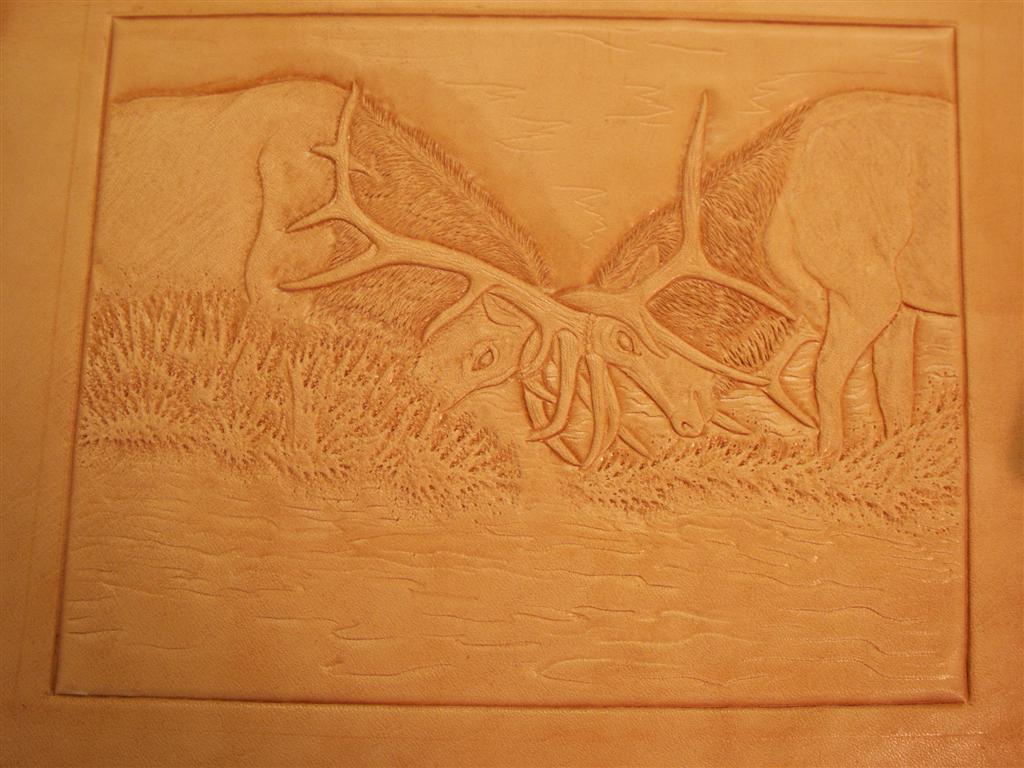
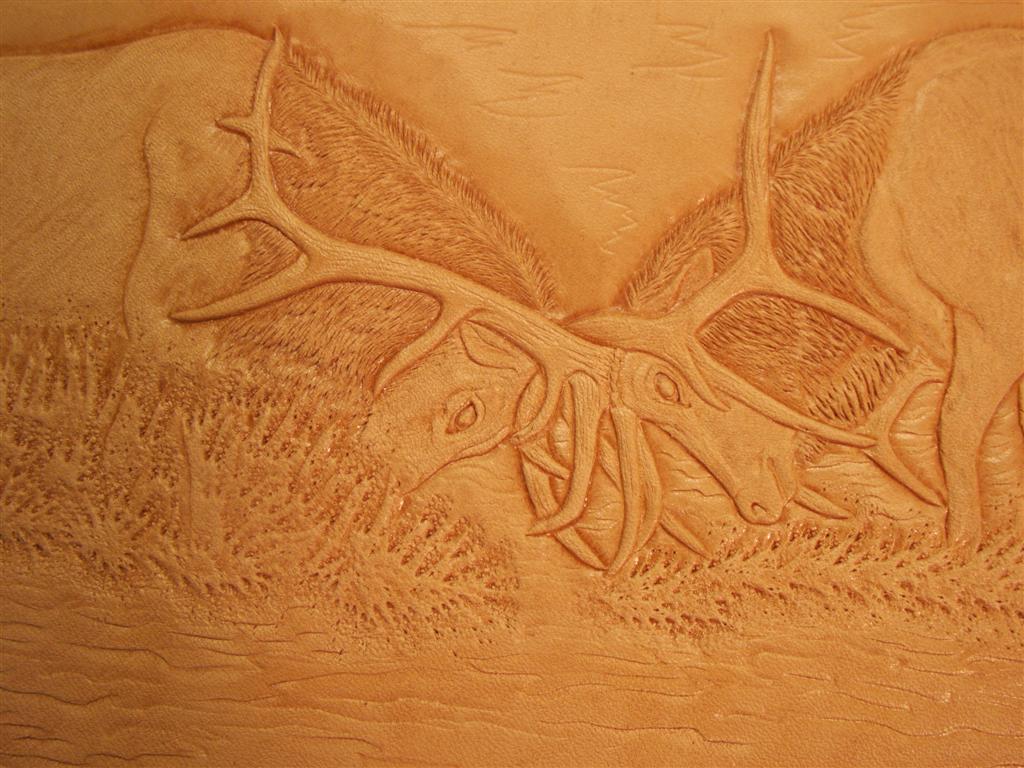
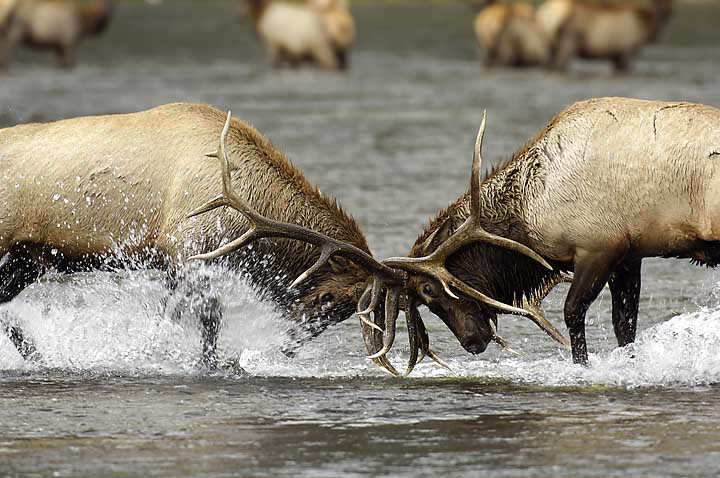
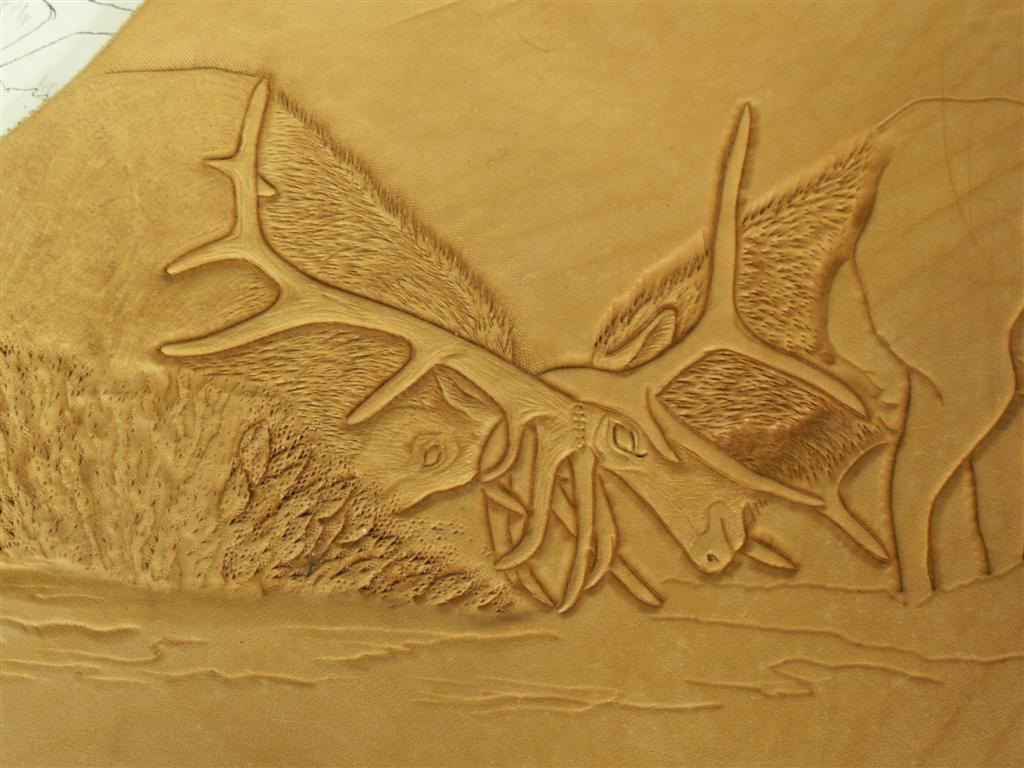
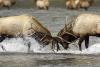
two big bull elk fighting in the middle of a shallow river
ClayB replied to ClayB's topic in Figure Carving
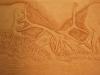
Dale, Thanks for taking the time to do this example for me (and for emailing me pictures I could see!) I like the idea of the elk showing through the water spray. I tried to do that too, but my tooling was a little too heavy handed. There are about 4 more pictures in the series of the elk fighting in the river and most of the rest of them have a lot more spray and the only way they might work on leather is if you could do them with the animals showing through the spray. I might give another one of them a try sometime. Thanks again Dale, I always appreciate your input! Clay -
Those are the same numbered tools. Problem is that a lot of the tools aren't exactly the same shape or quality as they used to be. There are a few options. You can look for older Craftools on Ebay. A lot of people feel the tools made without a letter prefix were better quality. You might also check the tools Hidecrafter sells. I am not sure if thiers are Craftool brand or not. Some tools can be modified yourself with files. If you really want tools that will do the job, and are willing to pay for them, then check out the custom tool makers. I have started to get a few figure carving tools each year from Bob Beard. These tools really give the sharp, clear impressions that they are supposed to make.
-
two big bull elk fighting in the middle of a shallow river
ClayB replied to ClayB's topic in Figure Carving
Dale, What you are saying makes sense and I can't wait to see the pictures. For some reason, when the pictures are too big, they wont open on my computer (Help Johanna!!!!) I re-did my picture a couple times, and came up with something I liked a lot better. I ended up using the pebble background tool instead of a checkered background tool. I think it looked a little more like water drops that way. I also did a lot less beveling. I like the idea of scattered drops instead of one big mass of water. Here is how latest one turned out. Hope I don't have to do it all over after seeing what you did. Clay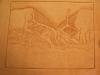
-
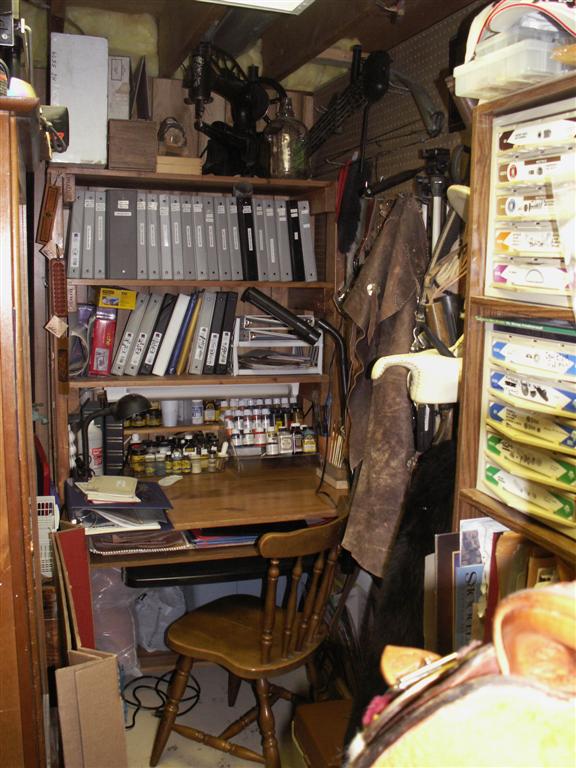
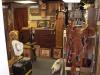
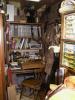
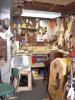
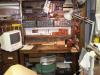
I spent about 3 days a couple weeks ago cleaning up and reorganizing my little workshop in the basement. Every nook and cranny has things stuffed into it but at least my benches are (or were) cleaned off. I took a few pictures because it may be a few more years before it looks like this again.
-
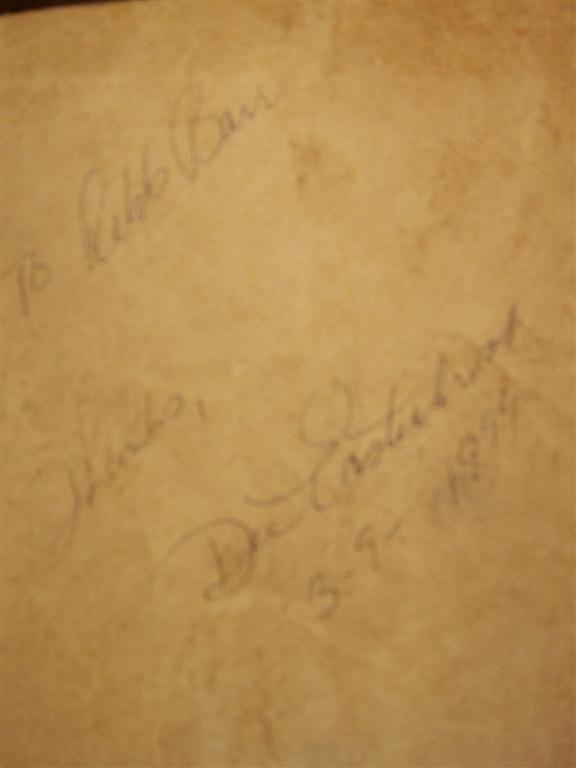
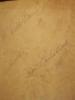
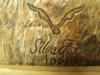
Here is the back side. It's hard to read but someone carved it and gave it to Robb Barr as a "thank you". I saw it at Dave's house and had to get a picture of it. Clay
-
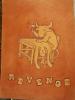
I'd tool that.... I am going to get a bumper sticker made with a picture of a cow, and it saying "Oooh, Baby! I'd tool that!" Hope ya dont mind! LOL Well if the cow could drive, and have a bumper sticker, it might look like this!
-
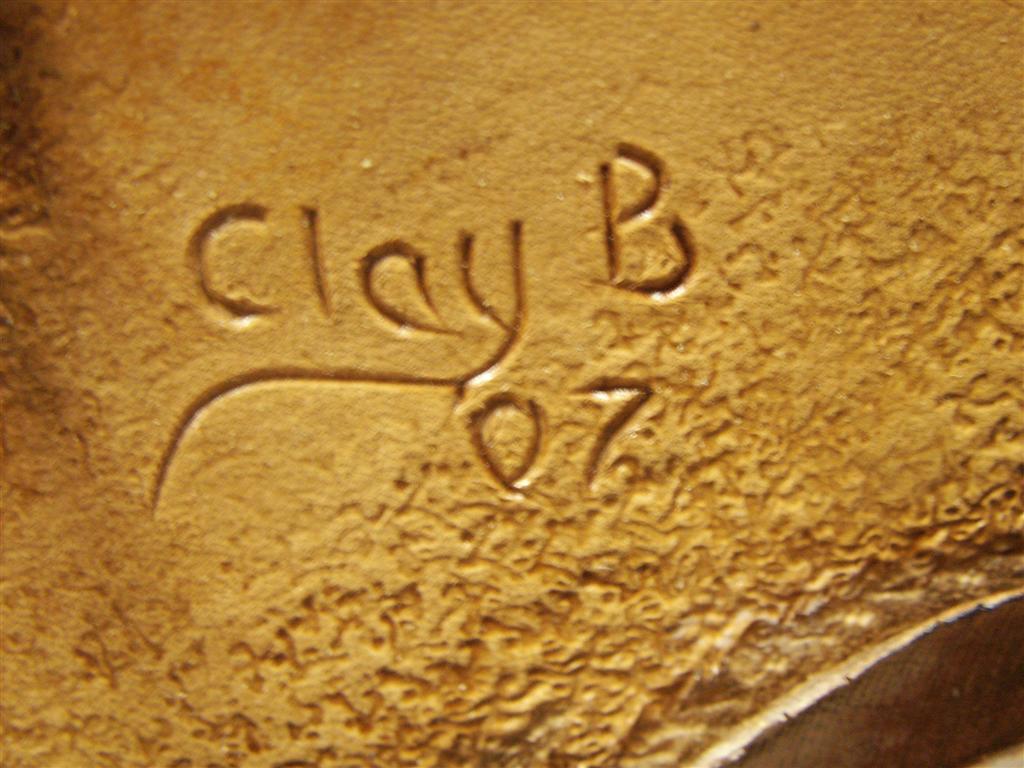
I agree with Alex. Deciding on how to mark you work can be a difficult decision. Heck, it still surprises me that people insist that I sign my work. When I started looking at makers stamps, I wanted it quite small. I didn't want it to look like a blaring advertisement. I ended up buying a delrin (plastic) maker stamp and they work really well, make a good impression and are reasonalby priced. I have used this stamp on a few saddles, but I don't care for it on much else. I usually just carve in ClayB with my swivel knife. That way it is marked in a more subtle way. Seems like that is the way several of the people that I have been learning from do it.


-
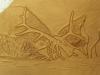
Seeing Gesa's cool picture yesterday inspired me to try something I have been thinking about for a while. About a year ago, someone emailed me a series of pictures of two big bull elk fighting in the middle of a shallow river. I think it would make a neat carving, but the water spray is giving me troubles. In the Pictoral Carving Finesse book, Al shows a few examples of how to do this but it isn't as easy to do as it looks (actually it doesn't even look easy) I'll attach the photo I am working on and my first practice attempt. I would appreciate anyone's comments or suggestions on how to make this better. Clay
-
Hi Freak, I did the same thing. Thought "WOW, that's a pretty neat carving, copied from a black and white photo" Then after looking some more, figured out that the "black and white" was the carving colored. Pretty dang neat coloring job. I can't imagine trying to mix paint to make it look like that! That lady has some major league talent. Definately worth the time to check it out. Clay
-
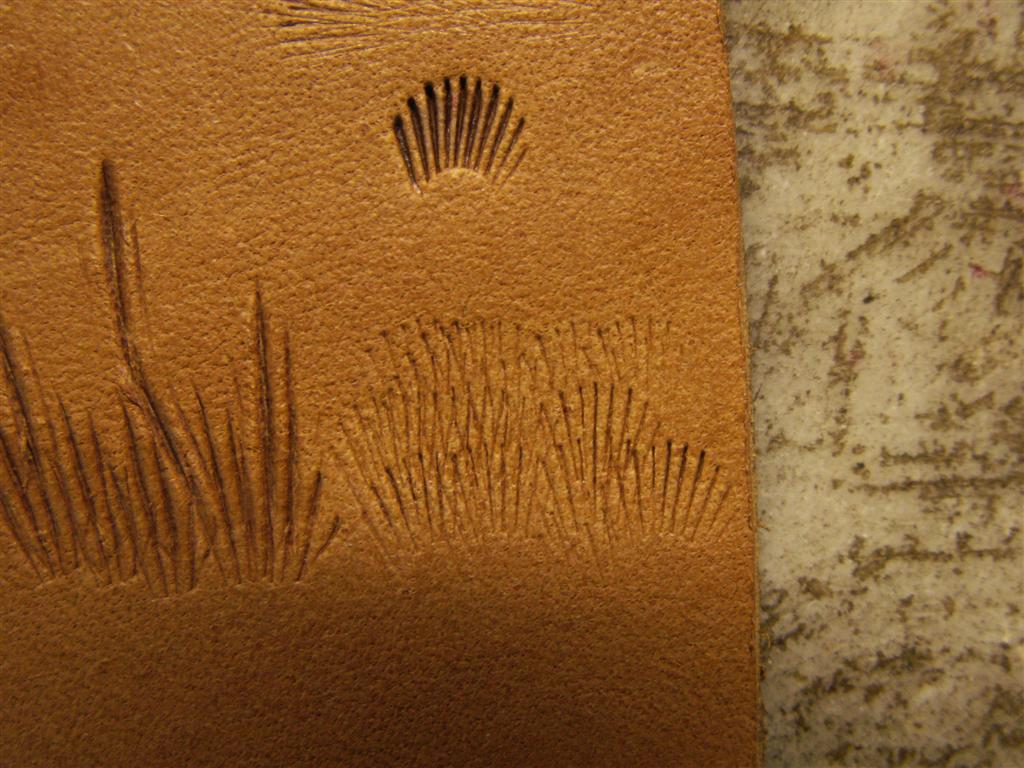
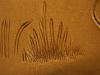
[ I have the 916 & 917 but, hadn't thought of draging them to make longer grass. ] I didn't think of that either. That tip is courtesy of Bob Beard. He not only makes cool tools, he knows how to make them work! Clay
-
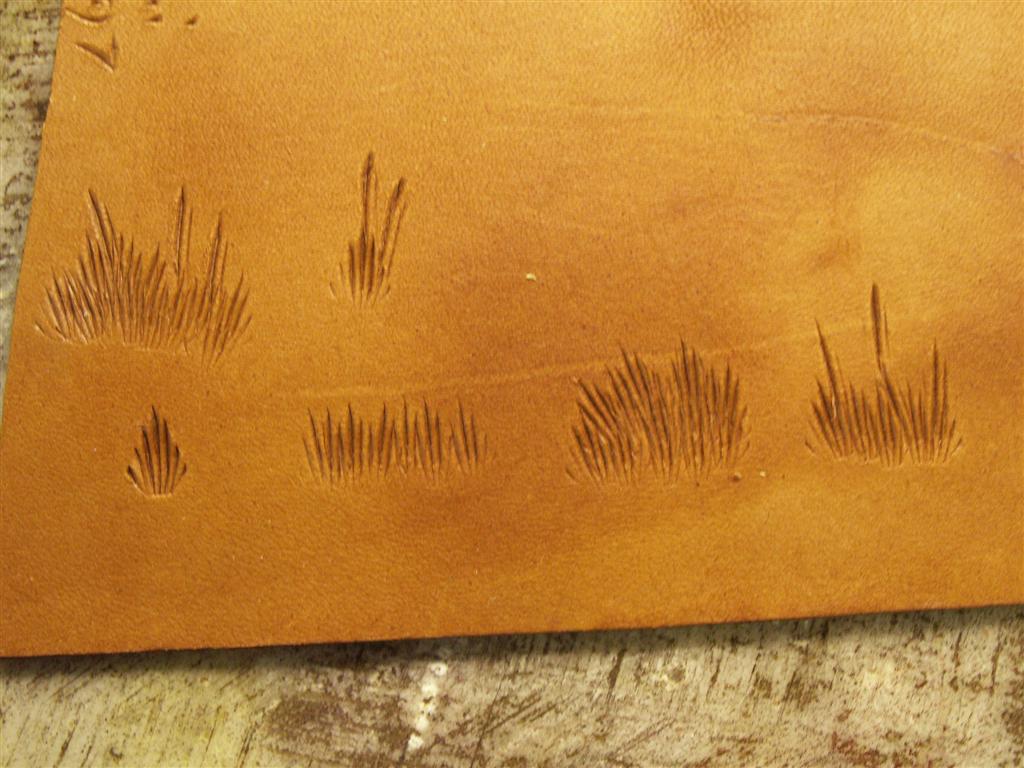
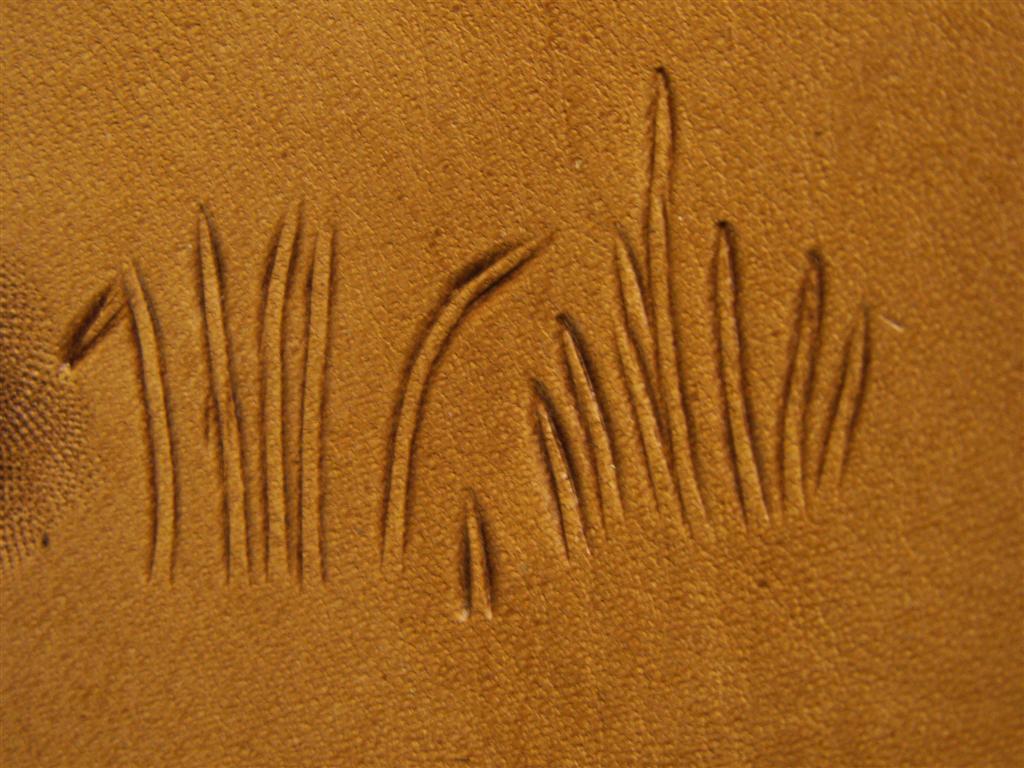
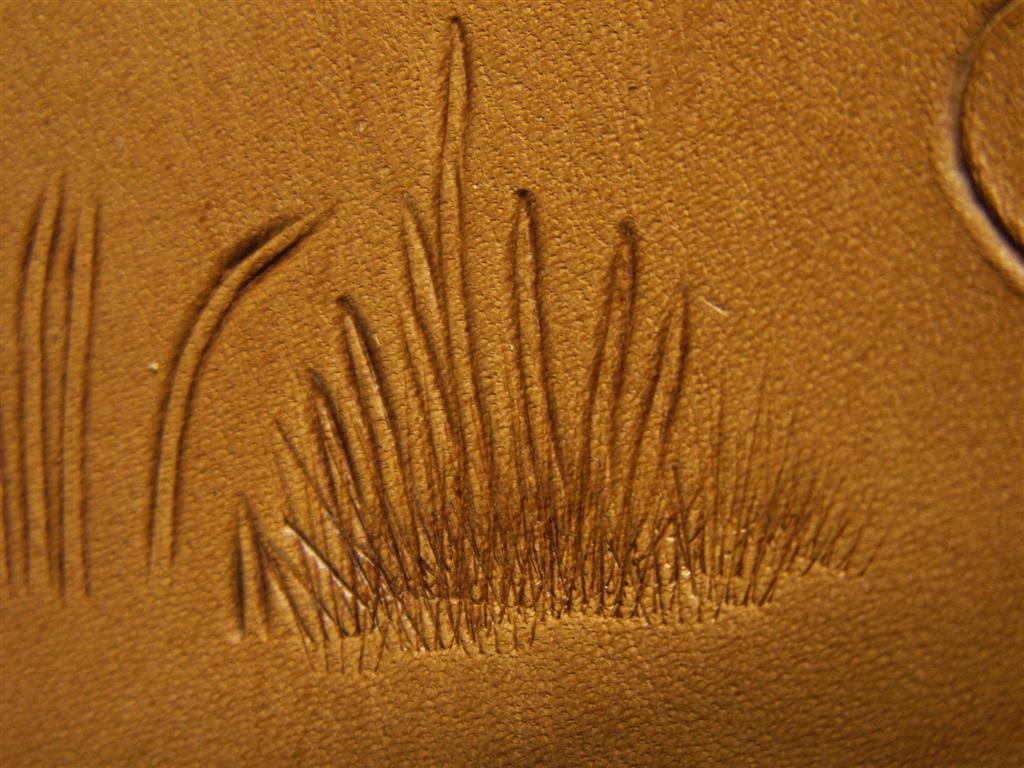
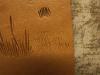
The tool that I think works best for close up grass is a F916. In the picture, the stamp impression is in the bottom left corner. If you "walk" the tool leaning it towards the heel (bottom) you can get shorter grass like that shown to the right of the single impression. By stamping the whole tool in a somewhat random pattern you can get longer grass. When doing this, you dont worry about overlapping impressions because you want random impressions. To the far right, are a few longer stragglers. These are done by just using the tip of the tool, starting at the top and dragging it towards the clump as you tap it (hope that makes sense) On the top row, the left picture shows a clump of grass of varying lengths. The right picture is supposed to show the longer shoots of grass with a seed head at the top. The seed head is made by tilting the tool all the way to the top and hitting it a little harder, making a slightly thicker impression. The F917 tool can be used to make shorter grass. This tool isn't nearly as versatile as the first one. There is another tool that I really like for large stems of single grass is Bob Beard's pine needle tool. With it, you can make long stems of straight, curved or bent grass. The only place you can get it is from Bob and his tools are expensive, but he makes some really neat tools for figure carving. If you combine the two tools, it gives an even better effect. You can tool these clumps right in where the feet or body of the animal would be if you want it to look like it is in front of parts of the animal. Clay

-
Tandy carries conchos like that with the hole in the center. They also sell the stones with rivet backs that fit into the center of the conchos and attach them to the leather. The conchos come in several different styles, the stones in several colors and sizes. I havent seen them as snaps, but maybe they have a way to use them as snaps too. Hope that gives you a place to start your search. Clay