


JLSleather
-
Posts
7,391 -
Joined
Content Type
Profiles
Forums
Events
Blogs
Gallery
Store
Everything posted by JLSleather
-
I'm guessing this was already cracked and just wasn't visible until the bending. The bend isn't that sharp, and even dry as a bone I can't see THAT bend causing a crack. Personally, I'd ask the store if this is the type of thing they want to advertise. Guy at the Tandy may not have even known about it himself, but they should be willing to replace it. With a replacement, you're still out the time invested. But that's the way I'd go, instead of being out that time, plus the time of repairing, and then still having the crack in the grain. I'd ask the store to replace it and start over. Just my OP.
-
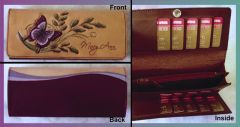
I still cut them from patterns I got somewhere in the 70's. Made to suit the standard wallet back. I usually cut them from 2 oz calf or goat. I'm including a photo of one of these 'installed'. This particular style is in brown goatskin with the removable photo case. Inexpensive to make. I usually just take a day every so often to cut and glue 10-20 of them so they're ready to go when needed. Send me a message if this is the style you were considering, and I'll send you the pattern. Oh, yeah .. it fits this type of wallet ...
-
Oil is not a "sealer" so it won't keep further treatments from penetrating. No problem. Some folks actually prefer to oil before dye.
-

I Really Like Airbrushing
JLSleather replied to Matt Alsaker's topic in Gun Holsters, Rifle Slings and Knife Sheathes
These bags were done to show colors available (seems it's easier for some to say 'I want mine this color red', or whatever), and to display the style of the bag. They are deliberately NOT so very detailed. For inspiration and some REAL leather coloring, I recommend Anet's work! -
I Really Like Airbrushing
JLSleather replied to Matt Alsaker's topic in Gun Holsters, Rifle Slings and Knife Sheathes
Looks like a pretty steady hand! Attaching a couple of designs that were painted [only], no tooling. These were done with a fairly inexpensive airbrush and some practice. -
Long as it's firm leather, you can use it for "plugs" for embossing leather. When I use it to test dye colors (which I do) I make a point of using a "scrap" from the same hide as the project is coming from (yeah, it matters). I always seem to end up with a bit much, though. Fella down the street came by about a week ago and picked up a box of scrap - probably 12-15 pounds - for free. While I use it, there's only so much room in my 12 x 26 shop, and eventually it's not worth the cost of the "scrap" to have it taking up space. That said, this guy makes knife sheaths, belt bags/pouches, small holsters, etc. Seems a bit wasteful (I'm still looking over my shoulder in case my wife has the broom) but I know if I get behind this [really decent] fella would stitch up some stuff for me if I asked, so it all works out.
-
Nice looking leather. Even more important, it's always good to see a fella DOING what he's SAYING (James 2:16)
-
This didn't need to be difficult, and I don't know why it got that way. At any rate, if you have already spoken for something and would still like to get it, feel free to send me a message. Beyond that, please consider this entire topic now closed and the remainder of the items in it no longer available.
-
Skirting and kangaroo lace gone. Still have 4/5 oz tooling, 6/7 oz tooling, some 3/32" calf lace, 1 1/2 -2 oz burgundy calf (chrome tanned), a couple more finished wallets, a couple of tooling leather handbags cut out but never done (so, basically the leather for a "kit"), ... still looking, and cleaning ....
-
I THINK I got back to everyone who messaged. If I missed you, just send me a borderline rude note as a reminder Got a few people deciding just what they need, so I'll give 'em some time. Then I'll just list some stuff, first come first served. I suppose I could have done that first, but I hate to cut leather and THEN find out they need a bit larger chunk! Also have some finished projects that will be listed for not much more than the material cost (i have a few - not enough to make it worth the craft show, and too many for my ONE brother in law). At $25 apiece, you can throw them on the counter at the craft fair, gift box them for your nephews, or use them to light your cigar The two below are available, and I have a few other small items that can go out of here. The leather I'm sending is the same leather that made the projects, so I think you can see that it carves and colors just fine ...
-
Yeah, I don't know RTC, either .. but tha's a nice lookin' belt
-
I'm off to dinner, but keep checking over the next few days ... this is only a start (considerably more). Got some duplicates of the NON-perishable, too ... books,buckles, that type of thing, so ask away.
-
HOping these pics make some sense ... the .093" is 3/32, and the .125 is 1/8" wide. The idea here is to have someone use this up instead of letting it lay around, so feel free to shoot me a SLIGHTLY unreasonable offer ... I'm pretty easy to get along with. With the lace, I'll send wax. With the leather, I'll send "scraps" that will fit in the package (from the SAME hide where possible). That type of thing ... The wallet "innards" are nearly complete ... all glued together. A few will need a "bar snap". Black and dark brown, inset shows the color a little better. I have two of the Paasche airbrushes - identical except one has the size #3 tip and needle and one has the size #5 tip and needle. My RECOMMENDATION is if this is your only brush, go with the #3. Middle of the road precision (down to like a pencil line, up to maybe 1 1/2" good solid coverage). If you change your mind, any such store will sell you just the other size needle, tip, and cap - so you can just interchange the tips. Questions? Feel free to ask! Oh, yeah .. skirting is about 13/14 oz. Measures 62-63" long. One piece is 8" wide, the other is 10" wide. The inset shows a scar on the edge of the wider piece, so let's just figure this is two pieces about 62" x 8", and somebody gets the last 62" x 2" for free.
-
Measurements coming shortly, and some pics. I know the skirting is easily belt length (I was making weightlifing belts for some young, HEALTHY fellas). More info in a few ...
-
Got some issues, going to keep me from working leather for the next few months. I'll be listing some of the "perishables" for sale - all great materials, but stuff I don't want sitting around for the next few months. I'll start it off here with a not that I have AT LEAST 20 spools of quality leather lace that I will be listing in the $10/spool range. ALL this lace is leather - mostly calf but a few spools of goat lace. Photos later today as I get a bit more organized. Will also be listing good quality tooling leather in 4/5, 6/7, 8/9, and a bit of 13 (skirting). All good leather, just don't want it siting for months. Yes, I could list all of this on Ebay, but I really don't LIKE that place. Much rather see it go to someone who can appreciate it, and i'd rather sell it for a bit less than to pay Ebay for ,... well, whatever it is they think they should get paid for. If you have specific items you are needing, DO ask, as I may have it. Oh, just an example, I know I have at least one TOO MANY Paasche VL airbrushes ...
-
General rule is half the thickness of the leather. This one is in 3/4, as are a good many small projects.
-
Not sure why a fork truck is not an option, unless it's in a spot the fork cant get to (?). Assuming there's a solid floor under it, I'd probably build a pallet to suit it. You still have to get it up on there, but I'd want to have the pallet anyway. Can you get a "cherry picker" up to it? Put casters on the pallet, with locking wheels on at least one end, and leave it on the pallet (?). Worst case ... I've heard guys talking about having to disassemble a machine to move it ...
-
This TYPE of thing has been discussed, well, certainly since before I was born! So, the attached pic shows 3 straps, I'll let them make their own point. All three straps carved with the SAME design, cut from the SAME piece of leather, and colored with shades of dye all from the SAME bottle. You decide which of these was done with the 1/4" angled blade, which with the 3/8" straight blade, and which with the 1/2" straight.
-
Guess I'm in the wrong business, or maybe I just read that wrong. You ordered TWICE, they were late both times, one back order and one sent wrong stuff, two appologies in two orders, ... and you're HAPPY? Well, okay ...
-
Airbrush Compressor Help
JLSleather replied to NewYorkerInSydney's topic in Leatherwork Conversation
Oh, and for moisture traps, I like the 'in-line" version. You can get a separator that will plug right into the compressor, but they tend to work better if they are a bit away from the compressor (the air is cooling as it gets away from the tank) and right on the gun causes you to have to paint while manuvering the weight of the filter. So, I have one that cuts right into the hose. Oh, yeah ... I think with either of these models you would need a voltage adaptor to use it upside down (in Sydney) but then this isn't intended to be an endorsment of a particular model, just to let you know the rating you'll want. -
Airbrush Compressor Help
JLSleather replied to NewYorkerInSydney's topic in Leatherwork Conversation
You need to be aware of a few things before you shop, and maybe the first thing to know is that you DON'T need to spend that much money. In fact, for $200 (U.S.) you should be able to get the compressor AND the airbrush. There are people LINED UP to sell you an "airbrush compressor" for $200. Good to remember, it's only $200 because it says "airbrush compressor". Translated into U.S. English, that means... a small (usually table-top) piece of cheap junk with a fitting on it that matches most airbrush hoses which will shake/rattle/roll for MAYBE a year before it disintegrates (though the 2nd 6 months will be a headache). Do yourself a big favor .. get a real compressor and spend the $4-5 to get a hose adaptor. So, what you ACTUALLY need is something that will blow: up to about 25-30 pounds (not sure what that is in Newtons, sorry). Most of your work you'll probably want about 15 lbs. This is how MUCH it compresses. 2-2.5 CFM at 30 lbs (which about any compressor will do). Cubic Feet per Minute is how FAST it compresses And you'll get better results (more even pressure) if you get one with a tank and a regulator. I bought this one on sale at Menard's ... for $150 it came with two finish nail guns. Extra $5 for the right hose connection. But I turn it on and it runs for like a few minutes, then set at just under 20 lbs it'll spray for an hour before it kicks on again for a few seconds. And it fits under the table. It's a bit loud, but like I said it runs for a few minutes an hour... -
Ladies purse with 16 card slots.
JLSleather commented on Anet du Toit's gallery image in Our Leatherwork Galleries
 [Yet another] very nice project, Anet!
 -
Oh, yeah ... FLAT on the stone, whatever you sharpen .. One more "tip" some folks use ... grind a flat spot on the handle of the awl (if there isn't one already) in line with one of the longer flat sides of the awl blade. Helps you keep it properly aligned when stitching, and helps keep it from rolling off the table when ya aint
-
Nothing to add about the knife beveler, don't believe I've ever used one. But the awl problem is one I'm familiar with. I'm old (ish) so I remember when you could use a tool right off the shelf. I guess now somebody's lawyer decided it's better to make you sharpen it yourself So, your diamond blade is just that ... 4-sided. You'll need SOME type of stone. You can probably pick up a stone that is "hard" on one side and "soft" on the other for 3-4 bucks ... almost anywhere. In any hardware store in your area, ask them about an "Arkansas" stone. I just replaced one I use (they're not indestructible). The "soft" side is for general sharpening, like your blade is damaged, and the "hard" side is finer, and for polishing and keeping an edge once it's sharp. Very simple to do, just make sure you have the flat side of the diamond down on the stone. If you allow it to "rock", you'll round the edge and defeat the purpose of the sharpening. Seriously, there are places that will HOPE you'll pay $60-100 for some fancy-looking setup, but all you need is a ROCK ... and you might get one large enough that once you're going you can use the same stone to care for straight knives, head knives, swivel knives, etc.... This one works good, and it helps further to find something to put it in ... like a tupperware bowl, or anything you can lay it in. Drop the stone in, put some honing oil about 1/4 of the way up the stone (so if you have a lid, that's good, too). The oil will keep the stone oiled, keep the steel "bits" from clogging the stone. This isn't necesssary (the stone will work without oil, or you can just put a few drops of oil on the stone when you're ready to use it) but it does help. http://www.use-enco.com/CGI/INSRIT?PMAKA=399-6790&PMPXNO=940515&PARTPG=INLMK3
-
It LOOKS like you're talkng about a gouge. Available in "V" or "U" shapes, for making tight folds. http://www.tandyleatherfactory.com/en-usd/search/searchresults/31811-00.aspx