


JLSleather
-
Posts
7,378 -
Joined
Content Type
Profiles
Forums
Events
Blogs
Gallery
Store
Everything posted by JLSleather
-

Basic Saddle Stitch Tutorial By Nigel Armitage
JLSleather replied to immiketoo's topic in Sewing Leather
Thanks for the instruction. But aren't you left handed? Sheesh! I hand stitch, but I wonder if those watching are grasping how difficult it it to 'switch hit' with an awl (in fact, for those reading this, try it!). Very USEFUL information -- thanks AGAIN. -
Sadly, this is the trend. Used to be, you got a tool that was already sharp. Burns my backside that so often you need to sharpen a brand new tool. The awl should glide through the leather with almost no force at all. When you sharpen it, use a fairly hard stone, and keep the flat sides of the awl flat on the stone (dont 'rock" it). I think your kit has some information on how to hold it. Check the book that came with that kit.
-
The Fiebing's dye is pretty good, lots of folks around here using it. The airbrush is a quality tool. It will work for small projects,but if you think you'll be doing larger projects in the future, you might consider a siphon feed model. The gravity feed will not hold much dye, and you may find yourself filling it more than you wanted to. Whichever way you decide to go, consider a strainer for the fiebing's dye -- you can spray without one, but it'll save you some headaches in the long run.
-
Paul, short answer, NO.
-
Welcome to the craft! It sounds like you have a plan; gather information and then use it! This is always a good approach in anything you might want to do. As with about anything else, you already know that there are some things you learn from asking/researching/reading, and some things you 'learn' by putting your hands in it and doing. Leather craft is not 'hard', and being a perfectionist is a good thing - if you want to get good at it, you likely will!
-
Oh, perhaps my last post wasn't helpful. My intent was to help you weed through some of the weeds that sometimes grow up around a thread Often enough, it's meant well but stated badly. That said, here's a couple clear thoughts... I will say this much about this "effect" and various airbrushes. If you can turn a screw and push a button, you can do this look. First time. I don't konw how old your son is, but I'd wager I can have him painting this 'effect' in less than a minute. Kids learn fast, mostly becuase they haven't been too long hearing some "pro" lying to them about how hard it is. My recommendation for an airbrush you're welcome to, but not included here. FOr now it's enough to say that a single-action, siphon feed airbrush will do this quite well. In fact, the first time I was actualy there and saw this done was in 1984 with a guy using a Paasche Model H airbrush. He did this to everything. It seemed after a while that was all he knew how to do with it (tho that may not be the case). This gun is still made, and you can get them - the entire set with hose, etc - for $50. This is not the gun I use, but I have seen some amazing art done with one of them. Interesting, that brush comes with a little booklet of lessons. The 'effect' here is like lesson #2 (the fist one is spraying a dot). So, here's what I do recommend. Do not 'take someones word for it", including mine. Maybe someone on here is from down yer way adn can show you this "technique" . Meanwhile, you could see a video of this kid painting a guitar with this "effect" ...
-
Not sure what kind of leather you bought, but a utility knife should go right through 5/6 ounce. I'd try swappin out the blade, cuz that shouldn't happen.
-
Armitage Leather Tool Tub
JLSleather commented on Dangerous Beans's gallery image in Gallery- Our Leatherwork
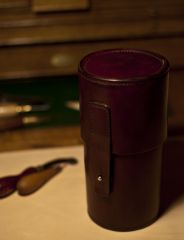 Trim and clean .. I like it!
 -
That kit (and others) may not include the tools listed on the individual projects in the box. Keep in mind, also, that the tools listed for stamping are 'suggested', you can use something else.
-
Zachary - With something this light-weight, it's probably easier to use a pair of shears. Cut the sides straight, then fold the leather in half (line up the sides) and cut the resulting "half pattern". The other side will match.
-
 OOPS, my mistake, i should have said these (plural) are NICE!
 -
This is NICE!
-
This is the 'sunburst' effect made popular by Gibson guitars - about 60-65 years ago. Quite easy to do, which is no doubt why it's been done to no end.
-
This one says comes with 4 designs, were you looking for a different one? https://www.leathercraftlibrary.com/p-1183-market-place-handbag-kit-pattern.aspx
-
Yep, you don't need to run the awl clear up to the haft. Just far enough to clear the needles. Using 6 tpi, a #2 awl blade should work just fine. Make sure you are angling the awl blade correctly and the holes will be fine.
-
About any hardware supplier should be able to get those to you, including many leather stores. You're looking for a "conway" buckle.
-
Backing On Veg Tanned Leather?
JLSleather replied to ProCreationz's topic in Leatherwork Conversation
What leather did you purchase? I saw some shoulders at a Tandy couple weeks ago that had a paste applied to the back, may be what you're referring to. I'm sure there is some marketing blahblah to it, but the bottom line is they treated the back of the leather because it was so 'fuzzy'. I didn't buy any. -
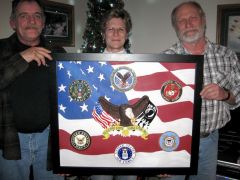 I second that opinion. Looks great, Grammy. And you be sure to thank the 'boys' from all of us!
 -
 Well, you asked for it ... Comment: This is very nice. I wouldnt change a thing. Suggestion: Begin telling everyone you know that I did that. Lovely work, Grammy .. keep it up
 -
Don't forget to consider the tools you already have. For cutting out leather, a $3 utility knife is as good as anything for puting a straight edge on a hide, and a $10 x-acto set cuts curves nicely.
-
CT -- The X-1 is a 'medium" brown leather stain, used to be put out by Drake's. Strange that they would use it in a video, but I don't see it listed on their site for sale??
-
Blockout?
JLSleather replied to stef73433's topic in Dyes, Antiques, Stains, Glues, Waxes, Finishes and Conditioners.
Tough to tell from such a small photo, but it looks like the design was cut [only] and painted black with a brush. The 'effect' you are seeing is from the residue in the black dye transferring to the natural (undyed) portion of the leather. Actually, this is quite rough, and likely the result of either inexperience or disregard. Likely incidental, not planned. You could do this, but the odds of duplicating it are astronomical. There's the critique. My own personal opinion, I think it looks 'dirty', and I don't like it. Someone else may, though, I mean, they sold a lot of pet rocks! -
Looking To Make My First Purse/bag - What Leather To Use?
JLSleather replied to Chavez's topic in How Do I Do That?
I think most of the old handbag patterns you'll find recommend - and many of those kits come with - 6/7 oz, but do not use a lining leather. I like to use 4/5 oz veg tanned for the smaller bags, lined with a 2 oz chrome tanned leather - resulting in about a 7 oz total. The large bags you might go a little heavier. These weights give you a bag that is flexible, but still stands on it's own and retains it's shape. The 4/5 will allow good deep tooling. -
Latch For Hoof Pick Holder (No Snaps)?
JLSleather replied to cowboy bill's topic in Saddle and Tack Accessory Items
Tuck-tite clasp? http://www.tandyleatherfactory.com/en-usd/home/department/hardware/11507-00.aspx -
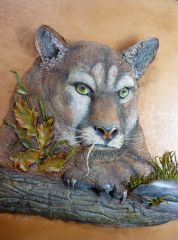
There are probably hundreds of ways to get that effect. But, from the photos, and a rough guess, I'd say that was done with at least two colors (and possibly a third) and applied with a sponge.