-
Content Count
255 -
Joined
-
Last visited
Content Type
Profiles
Forums
Calendar
Blogs
Gallery
Store
Everything posted by bison
-
I really like the idea of mixing leather and wood...they seem like a natural combination. How do you think it's going to hold up? I'm guessing you glued the bark to the leather? Dave
-
Finishing Gone Wrong!
bison replied to kates's topic in Dyes, Antiques, Stains, Glues, Waxes, Finishes and Conditioners.
I'm really sorry this happened to you. It is a tough spot to be in. I would try to remove the neat-lac before I did anything else. You can try deglazer, but I've used denatured alcohol in the past and had good luck with it. You can buy it at Lowes or Home Depot. Wipe it on with a clean soft cloth. and you should see the "sheen" coming off the leather. Wipe the WHOLE project, not just where you think you have NL. Once you think it's all off. let it dry well. Then go as dark as you can with the dye...I've used USMC black to do something similar. Mike may be right about it being toast, but as a last ditch effort, I'd try this. I hope it works for you. Good luck. Dave -
Casing Only Part Of The Leather, Or Entire Piece
bison replied to cbeatti2's topic in Leatherwork Conversation
I do the whole piece, because you're right...there will be staining. Plus, it's just harder to case only the ends of a piece. dave -
Barry has a list of stamps on his website that he recommends. I'd start with that. You'll love his tools! Dave
-
For me the Clear-Lac doesn't have the cheap plastic feel and you can still smell the leather after it dries. It protects well and looks good and my straps aren't stiff, but have a nice flexibility to them. It also doesn't crack or peel. You might try it...cut it 50/50 with the thinner and see if it does what your looking for. Good luck! Dave
-
My wife says, "The only way you learn is to make mistakes." That makes me Student of the Year!
-
Funny... when I bought this second
hand kit it had a wallet that had
been poorly worked by a novice. It
had the Initials RC and wonky stamps
around them. I used it as an
opportunity to practice back ground
work. I framed the "back ground" with
nice deep stamps over the previous
persons border. It turned out pretty
nice! Hubby never new. lol
-
Your post topic is "What would you have done?"...Well, what you did is what I would have wished I was quick enough to think of if I were in that situation. Brilliant!
-
Spur Straps From Shelly Ligget's Blanks
bison replied to bison's topic in Saddle & Tack Maker Gallery
Thanks for the kind words. yep, just PM her here or e-mail her. There is a thread you can look up where she has pics of the different styles. Just search for "clicker cut spur straps". Dave -
I've had these done for a while and am just getting around to posting them. I made these spur straps from russet and chestnut HO blanks I bought from Shelly Ligget. They're a nice thick leather with a very smooth flesh side. The clicker cut blanks were nice to work with and the leather was pretty even in color and quality. Of course, it was easy to tool, being Hermann Oak. I created and tooled the designs for these and just dyed the background and antiqued...finished with Clear-Lac. These are unlined. Shelly was great to work with, the blanks were reasonably priced, and arrived pretty quick. I'll be ordering more! Any critiques are always welcomed. Dave
-
I had an electric brand made with my logo (same as my avatar here). It works really great on soft leather like elk and deer. It's made out of aluminum, has a steel shank and wood handle and a rheostat so I can adjust the heat for the job at hand...I've even used it on wood and it works really well.
-
I'd ask Barry what he recommends based on what you are carving. He really knows leather and if he knows how you plan to use his tool he will make sure you get the right one to suit your needs. Dave
-
HI Ed, nice looking work and good looking photos! I don't know what kind of camera you're using, but most have several settings you can choose from when shooting in a variety os environments...indoor, outdoor, etc. I'd try the outdoor setting for the "daylight" bulbs to get rid of the blue tint. The outdoor setting counters the blue color of sunlight with an orange filter so you get truer whites. That way you spend less time trying to correct it in Photoshop later. I have always enjoyed your color pieces, by the way. You are a real artist. Dave
-
Case For 20 Credit Cards
bison replied to Schpacko's topic in Purses, Wallets, Belts and Miscellaneous Pocket Items
I did something like that a while back for a customer. Start with measuring the thickness of 20 credit cards if you can. The guy I was building this for wanted it to sit on his belt, sort of like a holster with the slots cut out for the belt to pass through and sort of like a wallet with a top flap with concho snap and a bottom flap that opened out about 30 degrees. I've posted a photo below if that helps. This would hold about 8 credit cards, and an ID/license. I uses 7-8 oz for the back, 5-6 oz for the tooled section and pigskin for the accordian sides so the bottom flap wouldn't come out too far. Sorry I only have the one photo. Good luck. Dave -
Ty, I'll echo what everyone else has said about the beauty of your leather work...BUT..I also want to compliment you on the quality of your photographs. I really like the variety of photos and angles, and the fact that you get in close to the work. And I have to say the last shot of the seat is perfect...sharp, stands out against the black and really showcases your great work. Thanks for posting these. Dave
-
Hi Oliver, I'll tell you from my own experience that Barry will be a great help to you too. Just e-mail him and tell him what you're wanting to do and ask him what he recommends. He really knows his stuff and will make sure you get exactly what you need to do the job at hand. Dave
-
Beautiful work Mike! And thanks for the tip. I love the idea of doing the old brands. We have a lot of them here in Oklahoma that would make some great additions to my work. Dave
-
I always brand before I dye or finish at all. Depending on the color of the dye, your brand just might "vanish". I have found it to be most useful on: 1) leather that can't be tooled (oil-tanned, deerskin, elkskin, etc 2) items that are left natural or dyed a light color. You can dye dark after branding and depending on the brand, you may have a cool "embossed" look. Practice, practice, practice...then test before doing it. I spent several days getting to know my branding iron by testing on various types and thicknesses of leather. I know I have to let it heat up for 15-20 minutes, use it at about 80% power, hold it for about a 5-count on 7-8 oz leather...usually. But before I commit, I use a piece of scrap from the piece of leather I am actually going to brand and test brand. Every piece of leather is different and will take the brand differently. I also try to make sure I give even downward pressure and just a bit of a "roll" as I press down. I hope that helps. Good luck! Dave
-
Hi OdinUK, Aside from Mark's advice, I would suggest holding off on the edge finishing until after I had tooled and finished the leather. I always do mine last so that the front of the piece is finished and sealed before I finish the edges. That way I can't make a mess on the tooling...most of the time! Good luck! Dave
-
full oakleaf i-pad cover 004-2.jpg
bison commented on leathercrafter's gallery image in Our Leatherwork Galleries
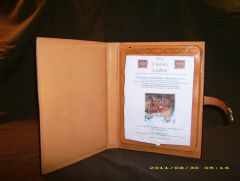
You do beautiful work, my friend! Your carving is excellent. And I really like the strap/buckle...it gives it that finished look. I struggle a bit with getting the liner to really lay flat in the grooves between the covers and the spine, but it looks like yours is spot on. What are you gluing it down with? Does it bunch up? Will the cover lay flat? Dave -
Hang in there man. I don't do holsters so I can't offer any advice, but I'm just finishing up a project that I had to start over three times...and I'm still not as happy with it as I'd like to be. Sometimes there are just those projects...but they eventually come together. Dave
-
You could try Tandy's #868 Universal Cement Thinner. I'd put some on a rough fabric like canvas and rub lightly at the area in a circular motion. It has worked for me on other things...never tried it on wool. It does have a strong odor and I don't know if you can was the pad or not, but if you can, I would afterwards. Good luck, Dave
-
Uneven Stain
bison replied to DepME's topic in Dyes, Antiques, Stains, Glues, Waxes, Finishes and Conditioners.
Depending on what you're making, dying before forming might be an option, like Aaron says. I have also found that some other things might help. Be sure to clean the piece carefully after tooling. I use wood bleach...about 1 tablespoon to a quart jar, soak your sponge in it, squeeze out the excess, and wipe the leather until it us uniformly damp looking. Don't soak it, just wipe it. If you oil before dying, be sure to let it sit a day or so after oiling to make sure it has soaked in well. If you can't afford an airbrush, consider picking up a couple of Preval sprayers. Dilute the dye at least 5:1 with denatured alcohol. Prop the piece against your spraying surface (the Preval's don't work well pointed down), and spray on several light coats. It usually gets lighter as it drys. Let is sit, flat, for a day or so after dying. Then apply the resit, let dry, and antique, let dry, then top coat. Lots of steps, but it has worked well for me. Good luck, Dave -
I agree with Kayak45...there is so much more to consider. I have settled on figuring that 2.5-3 times the materials cost is about where I need to be on big order...depending on their timeline. So for materials costing $1000, I'll charge $2500-3000. If it's a rush job and I have to put other things aside to get it done, I raise the price to about 4x the materials. Since I have another full time job, I'm ok if they say that's too high and want to look for a cheaper estimate. Dave
-
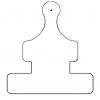
I've attached a template I created for a Blackberry curve 9300. It was for a lady who wanted something to protect it in her purse, so there's no clip.