-
Posts
1,907 -
Joined
-
Last visited
Content Type
Profiles
Forums
Events
Blogs
Gallery
Store
Everything posted by camano ridge
-
Also you can do multiple tannings, oiling tanning, then next day oil and tan again etc to try to get your desired darkness.
-
The two oils that are most commonly used are extra virgin olive oil, or pure Neatsfoot oil (not compound). The difference between the two tends to be personal preference. Do not use peteroleum products. The problem with trying to shoot for a specific color is the leather itself. No two pieces are going to color exactly the same. Some veg tan is russet it already has a little amber reddish hue to it and in most cases will tan darker then some thing that is so light that it almost looks white. etc. Don't expect the exact same result each time.
-

To Stitch Or Glue
camano ridge replied to Kanuist's topic in Gun Holsters, Rifle Slings and Knife Sheathes
If you are using a good glue like Barge or my prference Weld wood contact cement Glu alone will probably work. However I glue and stitch everything. If you groove your stitch line on the inside as well and pull the stitch tight and go over the stitches with an over stitch wheel or rubbing stick to flatten theom into the groove their should be little to no wear. I have stitch lines on the inside of my holsters all the time and have never had a failure. I owuld do the same rough side out or not. -

Modern Cowboy Lawman Rig
camano ridge replied to Jumpout's topic in Gun Holsters, Rifle Slings and Knife Sheathes
Nice build. I know more then a few LEOs that wish they could wear a rig like that. -
Most sword scabbards have a wood core and are covered with leather, I have seen some for Cosplay etc that had a PVC core. Your sword is going to be your pattern. Here is a link that will show you what is involved in making a sword scabbard there are also several decent you tube videos on making sword Scabbards. http://search.aol.com/aol/imageDetails?s_it=imageDetails&q=how+to+make+a+sword+scabbard&v_t=keyword_rollover&b=image%3Fq%3Dhow%2520to%2520make%2520a%2520sword%2520scabbard%26s_it%3Dkeyword_rollover%26ie%3DUTF-8%26VR%3D3430%26oreq%3Dda616c747ab44ea4b538a8bd6efe5668&img=http%3A%2F%2Fwww.yeoldegaffers.com%2Fprojects%2Fscabbard%2Fstep1.jpg&host=http%3A%2F%2Fwww.yeoldegaffers.com%2Fproject_scabbard.asp&width=51&height=89&thumbUrl=http%3A%2F%2Ft3.gstatic.com%2Fimages%3Fq%3Dtbn%3AANd9GcQdEiHQFSxMC9mgQA-YLv4GQcFrDTHUYaA7CmzapmwwSz0RcJuUgM-6kA&imgWidth=300&imgHeight=525&imgSize=30455&imgTitle=how+to+make+a+sword+scabbard If you are just making the scabbard for show you could take the sword blade and trace the outline of your blade then draw another out line about 1/2 in out from your blade the outer line will be the pattern for the front and back of your Scabbard, the area between the outline of your blade and the outer line is your welt. cut the back of the scabbard then cut the welt, glue the welt to the flesh side of the back then cut the front of the scabbard and glue it to the front of the welt then stitch together this is a very basic scabbard you can make a frog to hold it or a baldric. You can attch straps to the scabbard etc. Just depends on what you want to do.
-

What Price Would You Put On This Seat
camano ridge replied to Madhatterxlch's topic in Motorcycles and Biker Gear
Add the price of the pan, powder coating, padding, leather, shipping for those items. Decide how much you are willing to accept for an hour of your time and multiply that by the number of hours you have invested in it. Decide if you are going to add any mark up on the pan and powder coating since you have time investad in ordering them taking the pan to be powder coated etc. Now add all of that up. Ask your self if you are willing accept that for what you have put into it. Then ask your self if you would be willing to pay that much if you were the one buying it. Adjust your price accordingly. Also look around at shops and in magazines see what they are selling for. Overpricing is easy to correct if you create one attempt to sell it and the seat does not sell you can drop your price. On the other hand if you price yourself to low and your seat is sold it is to late. -
Is this the tutorial you are refering to. https://www.youtube.com/watch?v=hHCmWLZIdaE
-
Rooster, Tandy has a book Black powder bags and pouches. It has patterns and is a downloadable E book. Also if you go to the muzzleloaders forum http://www.muzzleloadingforum.com/fusionbb/index.php you will find some patterns there. Do a google search under shooters bag, huinting bag or pouch, and fowlers Bag you should find a few patterns. I have some around I will have to look and see what I have.
-

Question About Making A Rifle Case
camano ridge replied to johnggrg's topic in Gun Holsters, Rifle Slings and Knife Sheathes
When you say three piece are you thinking of joining three pieces together to make the rifle case. THe picture below looks like multiple pieces of leather joined together, actualy it is one piece of leather with the tan suede overlaid. You can make a two piece that is essentially a scabbard with a top that attaches as in picture two. -
Eatnjar, it is not the same as having someone working side by side helping you with hands on, however this site is the next best thing. Go to the patterns forum and do a search for what you are looking for you will find free patterns. Do a general search on the main forum page for armor, bracers etc and you will find plenty of information and examples. Ask questions, there are plenty of people willing to give you advice and how to's. Hopefully this site will help you get started until you can find a FTF mentor.
-

Horsehide Shoulder Holsters
camano ridge replied to Josh Ashman's topic in Gun Holsters, Rifle Slings and Knife Sheathes
Very nice, Josh -
If all the pieces are from the same hide and you have never had the problem before it probably is the leather. If you have a piece not from thre same hide try it and see what happens.
-
On ebay there are several Tandy Diamond awl blades for sale and they are diamond awls. You can also look up DOuglas awl blade and see the ones made by him (they are expensive $27.00) they are hand made and good quality. The Tandy ones will work but will need sharpening. Bob Blea is correct it is called rhombus and the picture below shows the cross section this is also shown on page 8 of Al Stholmans The Art of Hand Stitching.
-

First Holster
camano ridge replied to Wade D's topic in Gun Holsters, Rifle Slings and Knife Sheathes
Looks, pretty good. The hammer thong, leg tie downs and Buscadero rigs primarily came about in early 1900's Hollywood. -
SHeath looks great. THe knife looks like it could be either a full tang or hidden tang. I am leaning toward hidden tang. The dark brown is that leather wafers like on a stacked handle?
-
Are you using a ready made pattern or is this your own design? If it is a ready made pattern then cut the pieces as specified by the pattern when you asseble everything will work out. If this is your own pattern draw the pieces so they fir together as you want them with the leather laying flat. Here is a you tube video that may help https://www.youtube.com/watch?v=VUor11Eeq5Q. I highlyrecomend going to Adams leatherworks and watching his videos on making Avenger style holster. They will cost you a few dollars to watch but are well worth it in the time and leather you will save. Here are some pictures that might help. THe first one is the main body pattern. The second is the re enforcement piece aligned flat on the main body. The third picture shows the two pieces folde and not aligning (so don't fold). The fourth picture shows the holster I completed yesterday from this pattern. SO when your two pieces are layed flat and aligned that is when you glue and stitch. worry about folding after the two pieces are attached to each other. The tention of the two against each other is what forms your pocket. Hope this helps. Excuse the photography I just clicked a few pictures as demo for you.
-
When I make an avenger holster the main body is cut out then the re enforcement piec. I locate the belt slot location on the re enforcment piece then lay the renforcment piece on the main holster body laying flat. I make wure the everything lines up now I glue and stitch the reenforcement piece in place. I then stitch along the bottom of the holster and the top of the holster (stopping before the are that will be stitched together to form the main seam. Once you are readey place glue in the apropriate area then fold glue and stitch the main seam. As long as the re enforcment piece lined up when the holster was laying flat it will be ok. WHen you glue and stitch the re enforcement piece the the holster body it becomes one piece of leather and will act accordingly.
-
What is your asking price and where are you located?
-
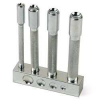
Ok, the two blade punch is for punching slots for the blades of the spot to go through then you still need to bend or set the tines of the spot. If that two blade punch is like most of the Tandy stuff it probably needs to be sharpened. There is a setter I use see picture. you place the block under the leather with the appropriate dish under where you will put the spot then place the spot in the appropriate sized spot setter place where you want the spot and hit the setter. It will push the spot down through the leather as the tines of the spot hit the dish under the leather they will bend and you spot will be set. There are presses that you can buy , however you will spend close to a hundred dollars or more by the time you buy the press and apropriate dies.
-
Contact, blackriverlaser.com, or studio -N on these forums they can answer your your questions. Yes they have lasers and mace stamps and templates. However I trust both of them to answer your questions without sales mans pitch just the facts.
-
So they are hand engraved?
-
What size is it, who is the manufacture? Nickle silver and german silver have no silver in them they are aloys made of nickle and copper, even zinc and tin can be added.


