LederRudi
-
Posts
390 -
Joined
-
Last visited
Content Type
Profiles
Forums
Events
Blogs
Gallery
Store
Everything posted by LederRudi
-

Sword Scabbard, Back Carry
LederRudi replied to Bayou Bengal's topic in Gun Holsters, Rifle Slings and Knife Sheathes
Mick, give him your wallet! What for? He's got a knife! That's not a knife. THAT's a knife! I like the clean lines of both, scabbard and sword! -
Second Holster
LederRudi replied to Rolandranch's topic in Gun Holsters, Rifle Slings and Knife Sheathes
Thank you for the info, Rolandranch! -
Thank you for the nice comments Bullmoosepaddles, Bikermutt, Battlemunky and Noobleather! Forgive me for responding only now! My children kept me rather busy presenting me with a wood carving course ... a nice new experience!
-
Second Holster
LederRudi replied to Rolandranch's topic in Gun Holsters, Rifle Slings and Knife Sheathes
Very nice design, very nicely executed! And you definitely don't shy away from backgrounding! Background looks very even! What kind of backgrounder did you use? -
...And that much stamping and stitching paid as well (even if in rather volatile currency): I got plenty of OOOHs and AAAhs from fellow archers (who don't know much about leatherwork, I have to admit). Thanks for commenting, Stetson!
-
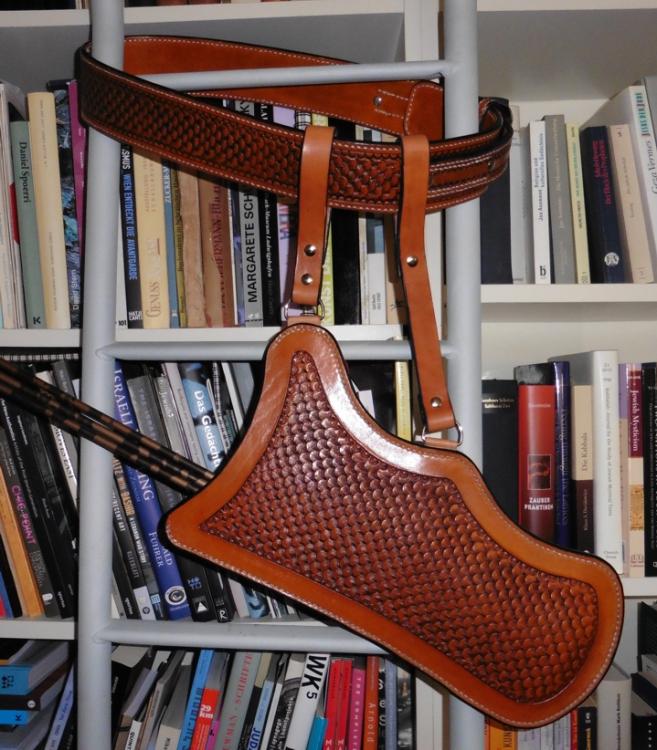
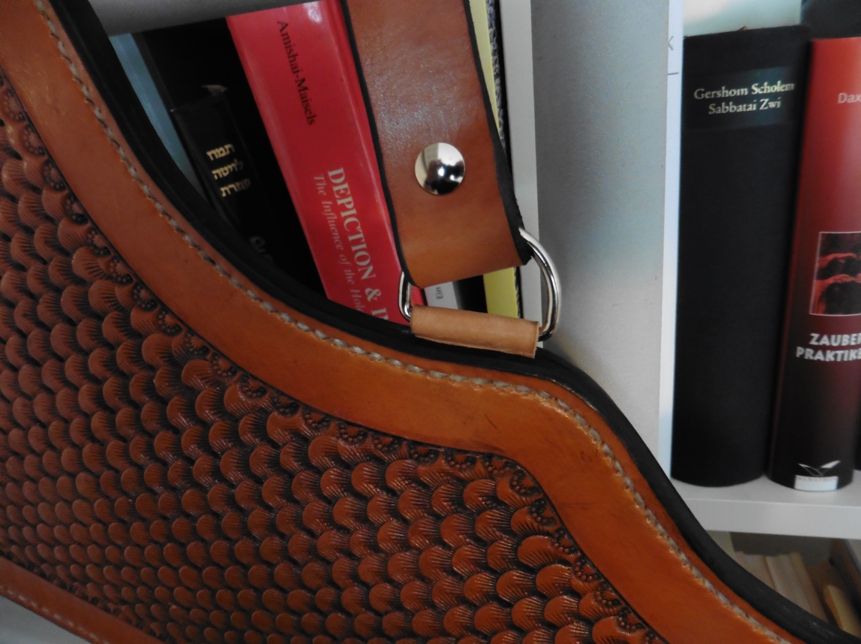
Just finished the quiver I started to make a while ago. First I finished the edge then cut it open where the straps that hold the D-rings had to be fed in. I combined the piece with a matching belt which I’ve made some years ago and that I’d forgotten about. Everything is sewn by Hand. Comments welcome.
-
I wouldn't wear such shoes ... they are masterpieces in more than one respect though! My favorite is the next to last.
-
Unique! Great design! Makes me think about imitating such a decoration on a shave kit.
-
1911 Holster
LederRudi replied to IngleGunLeather's topic in Gun Holsters, Rifle Slings and Knife Sheathes
Another unearthly clean one ! -
Working on the basketweave
LederRudi replied to doublehbar's topic in Gun Holsters, Rifle Slings and Knife Sheathes
The old hands here on Leatherworker.net I often said that the use of quality stamps does make a difference, so I bought some. They do make crisper impressions with more detail and facilitate keeping up consistency because they are machined precisely, as opposed to Tandy’s tri-weave e. g. that is practically useless. With BK’s tools I made progress from “beyond critique” to “fair” and hope to arrive soon at the level “neat”. -
Working on the basketweave
LederRudi replied to doublehbar's topic in Gun Holsters, Rifle Slings and Knife Sheathes
You did very well! Small elongate stamps like the one you apparently used are IMHO especially difficult to work with. I achieve passable results only since I’ve bought two of Barry King’s basket stamps. -
Thank you, RegisD! Basically I just hammered a single tool impression into a small piece of moist leather and put it on the scanner. Then I filled a page with copies of the scan. Making the little pictures transparent helps the precise arrangement of the pattern. Creating a pattern page isn’t as tedious as it might seem because you can double the outcome of each step.
-
Custom armguard for injury.
LederRudi replied to immiketoo's topic in Collars, Cuffs, Leashes and Leads
As always: stunning work! -
Thank you for the info, Pirate305!
-
Old West Double loop holster
LederRudi replied to RegisD's topic in Gun Holsters, Rifle Slings and Knife Sheathes
Thank you for answering, RegisD and Plinkercases. As for toe plugs … I just picked up Stohlman’s book for a closer look at his suggestions and I believe to have found the key: the distance of the stitching channels from the edge – 1/4 resp. 3/16 of an inch. This also tells me why I’ve botched an otherwise nice camera bag box stitching… -
A few projects the last couple of months
LederRudi replied to A Finch's topic in Archery Quivers and Bow Cases
Very nice items! Clever fastening method! -
Old West Double loop holster
LederRudi replied to RegisD's topic in Gun Holsters, Rifle Slings and Knife Sheathes
Very nice looking rig! Which of Ghormley's pattern packs is it? Good idea to seek the assistance of a holy man when it comes to sewing in a toe plug! I looked up "Brother Lawrence" (who was unknown to me till now) and learned that this pious man worked with leather in his later years. -
Very nice cover! I like the idea of lining leather with canvas. Only I would have worried that the contact cement leaks through the fabric. But obviously this isn't the case!
-
Thank you for your kind comments, Gentlemen! So stitching and Chicago screws it is! While sleep was deserting me I had ample opportunity to ponder all possibilities and was awarded an epiphany: “Put the ends of the two straps that you plan to attach on the right, between front and back and fasten them with Chicago screws” – said a reverberating voice – “and start the stitching only some centimeters below the lower screw, in order to give the straps room for movement (and spare thyself some stitching)!” I’ve seen a similarly constructed Turkish quiver in the Imperial Armory here in Vienna. I’m using an old version of the Corel suite. With Corel PHOTO-PAINT I reduce the opacity of the scan of a single tool impression. I import the (now transparent) picture into a blank page of CorelDraw and double it. I now align both pictures. The high resolution allows precise maneuvering in the range of single pixels. Then I double the pair and keep doubling the outcome of each step until the first line is filled. Next I put a copy of the first line below and move it to the side by half the length of an imprint. Then I double the first pair of lines and keep doubling until the page is filled. I’ve made similar templates for my basket weave stamps and found them very useful for planning.
-
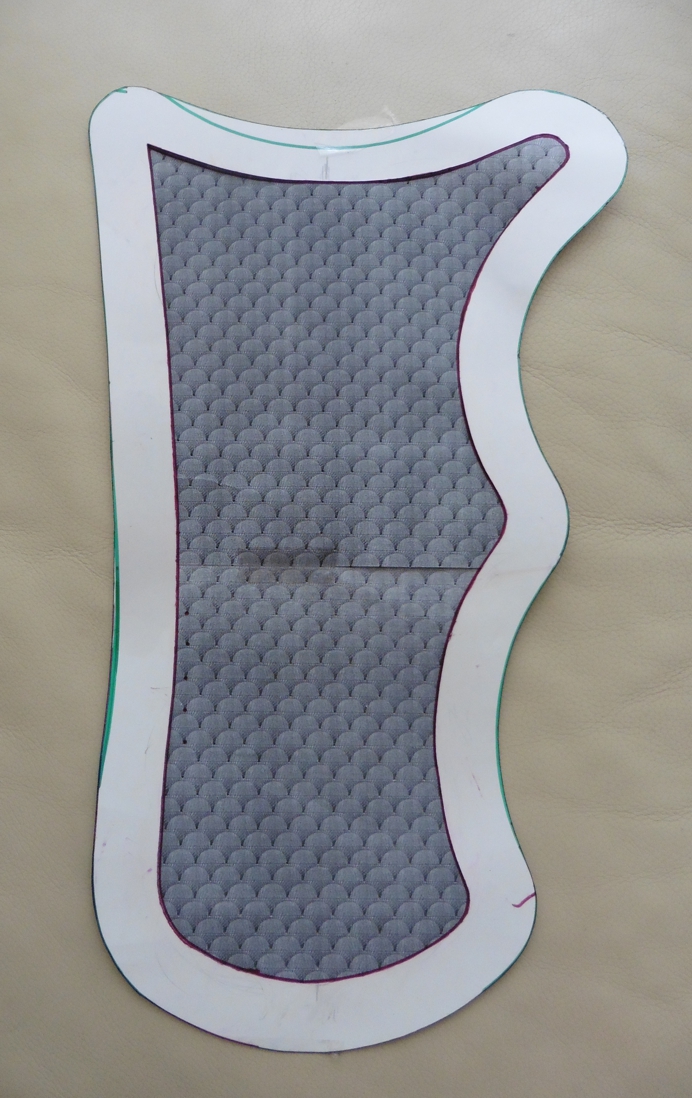
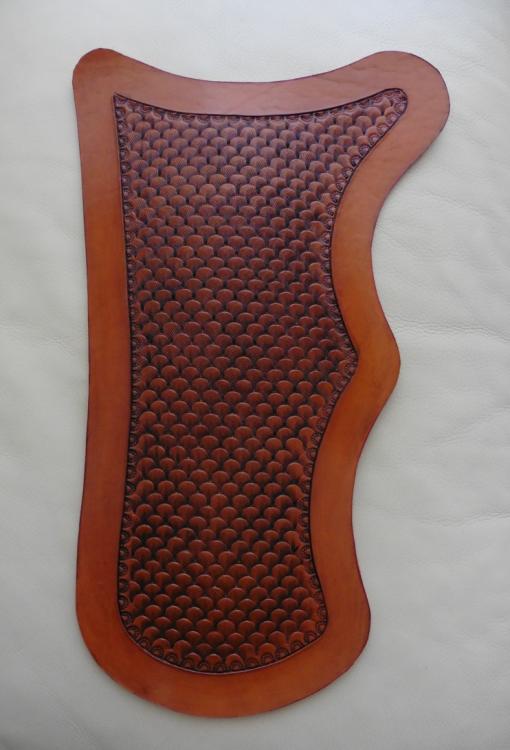
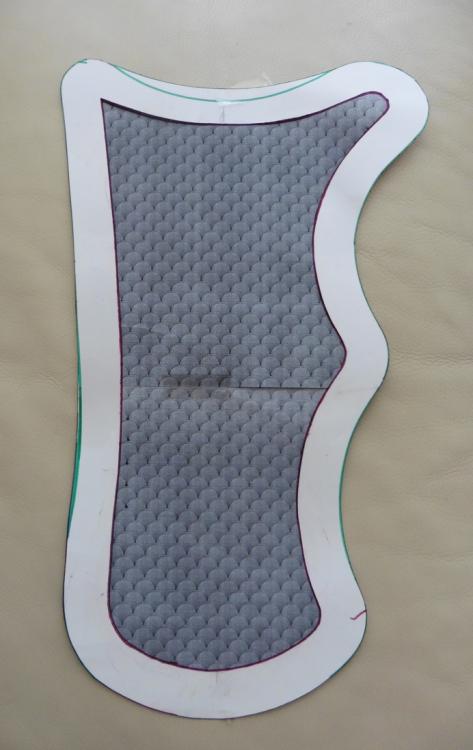
Indulging my recently acquired obsession with computer generated templates I scanned the single impression of a camouflage tool in high resolution and filled a page with copies of the scan which I arranged in a scale pattern. I transferred this pattern to leather marking the points where the impressions have to connect with an awl. There is room for improvement, I know, but the scale template has stood the test. I’ve not yet decided how to proceed: Lacing or sewing? Attaching the straps on the backside with Chicago screws going through both thicknesses? Or feeding short straps that hold D-rings in between the thicknesses? Ain’t it nice and therapeutic to busy oneself with problems of this kind while plain folly rules the world? Comments welcome.
-
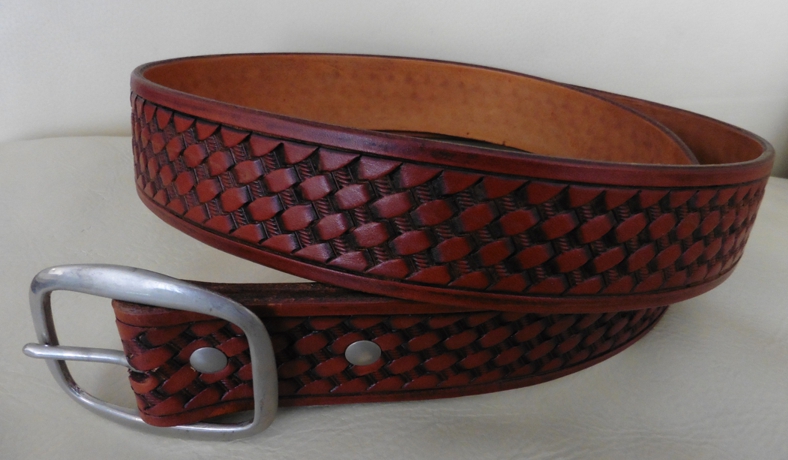
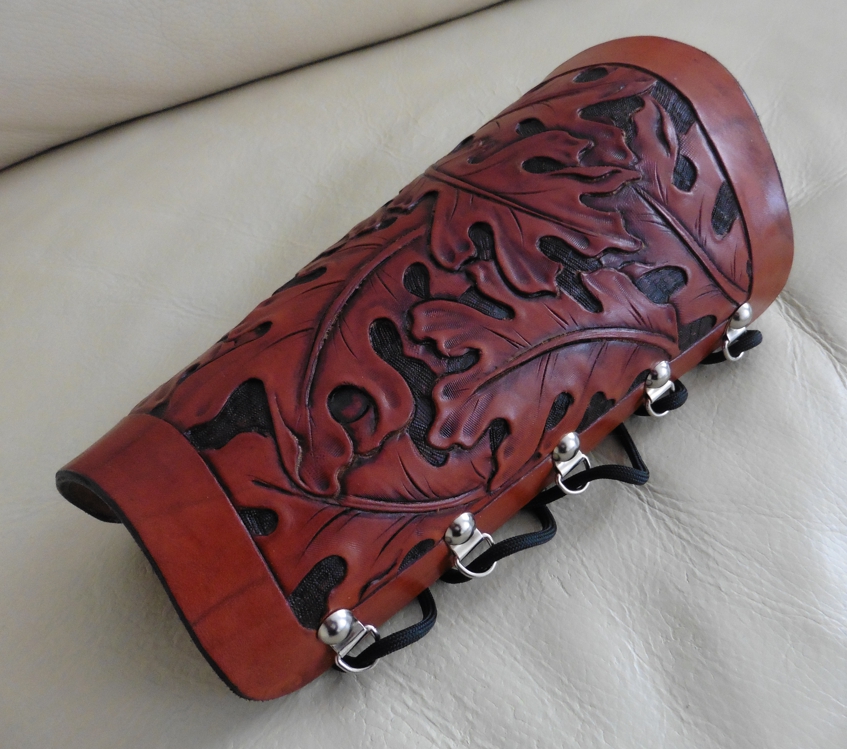
Basketweave Belt, Oak Leaf Arm Guard
LederRudi replied to LederRudi's topic in Collars, Cuffs, Leashes and Leads
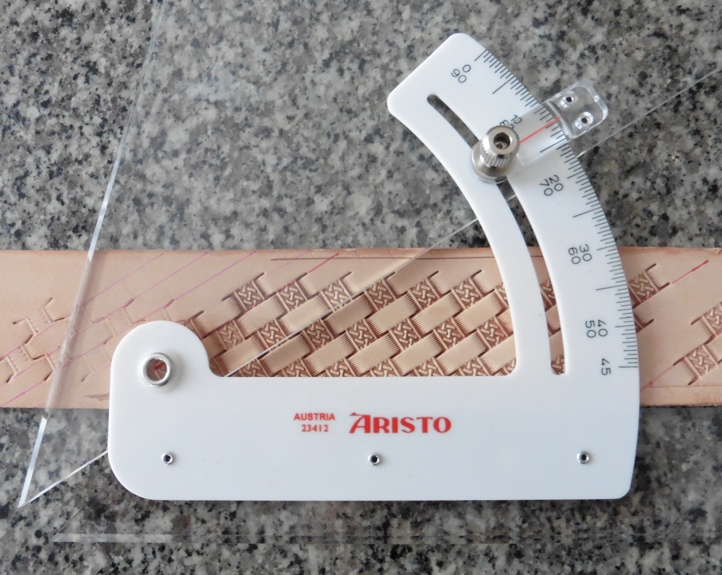
Thanks for the compliment, Noobleather. I just measured my other Berry King basket stamp (both stamps that I own are size 3, I guess) and calculated its "ideal angle" which is 32,276°, that's ridiculous of course, so let's say: "a tiny bit more than 32°". Simple trial and error on scrap leather may yield the same result. I prefer to use a large angle meter that allows fine tuning. I hammered some impressions into a piece of scrap leather and (again) found the calculated angle to be just right.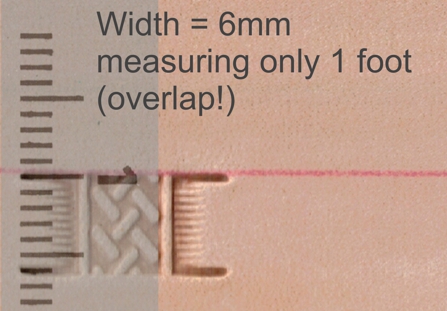


-
A lot of work (for me)
LederRudi replied to MorningStarL's topic in Gun Holsters, Rifle Slings and Knife Sheathes
Very nice work, very nice edges. Your description of the whole process made me chuckle. I guess you should add writing short stories to leatherwork. -
Now THAT'S perfect basketweave! Three rows of ribbons fading smoothly into two! Great idea to highlight the ribbons! Will try it out on my next belt. I also like the understated flawlessness of the first sling.
-
Basketweave Belt, Oak Leaf Arm Guard
LederRudi replied to LederRudi's topic in Collars, Cuffs, Leashes and Leads
Thank you all for your kind responses! I'm actually looking for a basketweave template that holds the stamp in place for each Impression .... in other words: a machine that does the precision work for me ... No such thing of course, so I had to content myself with an angled ruler. It helped. ... but I shouldn't have freehanded the border cuts ... Thanks for callilng my basketweave perfect, YinTx, but I've just looked at your latest rifle sling ... thanks anyway! Concluding I'd like to present you a page of flawless basketweave! On paper of course. I'll use it for planning the flow of basketweave around a medallion.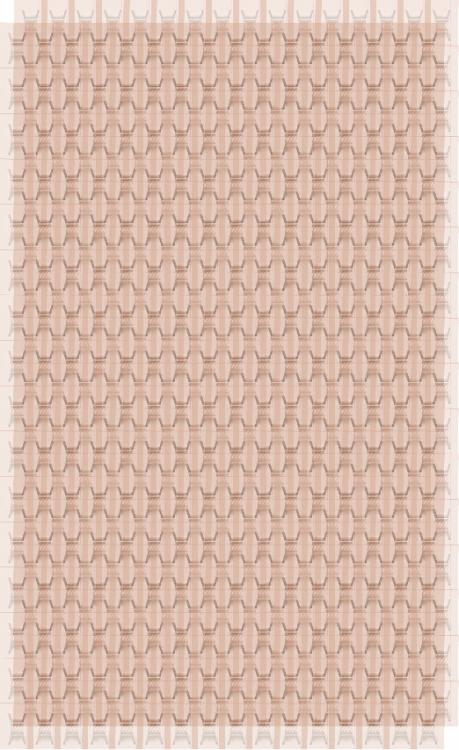
-
I measured the enlarged scan of a single impression of my favorite Berry King basketweave stamp and found that it requires an angle of 31,2 °. Each kind of basket stamp has its own ideal angle, I guess. I also strung together copies of the scan and filled a page with "digital basketweave" (without the usual aberrations to be found in my real projects) which I use now for planning layouts. The calculated angle proved to be just right. Then I knocked up a template for belt stamping. IMHO the columns of canted impressions should be parallel to the symmetry axis of a project such as the folding line of a holster. Probably all old news, but for me a step further on the asymptote that nears perfection . Tired of the basketweave science I made an oak leaf arm guard. Comments, advice, critique and praise welcome.