Josh Ashman
-
Posts
1,183 -
Joined
-
Last visited
Content Type
Profiles
Forums
Events
Blogs
Gallery
Store
Everything posted by Josh Ashman
-
Just Finished This One Up
Josh Ashman replied to JWheeler331's topic in Gun Holsters, Rifle Slings and Knife Sheathes
Nice looking holster, good job! Josh -
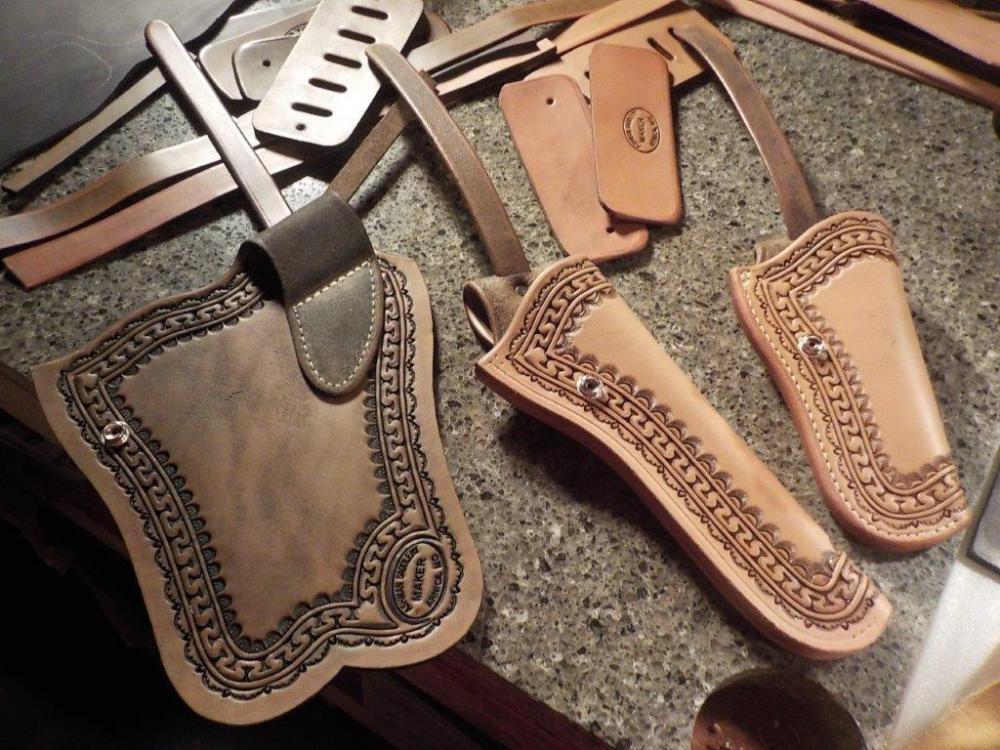
You're welcome. These progress pictures of some "Threepersons" holsters I built show how I this style of retention strap. In the first pic you can see the slot and rivet hole. I try to put the slot just "forward" of the top of the belt loop fold, the rivet hole is roughly 1/2" below that. In the second pic you can barely see the rivet in the center holster which has been sewn. As noted, the "Threepersons" and "Rhodesian" holsters themselves are different in several ways, but I build the retention straps for both holster types the exact same. All the best, Josh

-
Thanks JWheeler! It's my own pattern. the belt loop gets sewn before the holster is folded over and assembled. After the loop is sewn I wet the stitching on the inside of the holster and on the outside of the loop and pound the stitches with a smooth face hammer. I use a little CS Osborne hammer called a "shoeing" hammer, I think they are for cobblers, not sure. Anyway, pounding the stitches sets them in the leather enough that I'm not concerned about wear to them. The strap goes through a slot in the top of the belt loop and is riveted just below that. All the best, Josh
-
Thanks Radardog! I appreciate your kind words! the mix I use will stiffen things up a bit initially, but the item will flex and move and "loosen" up. At least that's my experience with belts and similar items. Holsters that were molded and "stiff" when they were finished remain stiff after being finished. One really nice thing about M&G mixed with water is that it's cheap and readily available (in the US). I encourage anyone interested in it to get some and try it. If it works for you, great! If not, you're not out much and you can use the Mop and Glo on the floor. Have a great Friday! Josh
-
Hey Chris, sometimes when I dip an item a little of the dye will come off and "muddy" up the mix. Key word being "little". I haven't had enough come off to concern me. that said, sadly my bar for light colors is not high as I always seem to mess them up . so much so, that if I want "tan" I'll leave it in the sun and skip dye as I always get blotchy results. I also always use the same product and process, so not a big surprise. Hope you're doing well! All the best, Josh
-
Thanks Forester! It's a "homemade" finish. I'm not sure if they sell it in the UK or if it's the same formula that they sell here, but it's just Mop & Glo floor finish mixed approximately half and half with water. I mix it together in a large container (empty ice cream bucket) and mostly I'll dunk a piece in and then shake off the excess. I also try to spread out, or wipe off any drips when I initially remove the piece from the bucket of finish. Once it's dry I'll usually wipe a little glycerin saddle soap or for something I want to be "stiff" Kiwi neutral boot polish on it to make he item smell like "leather" and not a clean kitchen floor. On some large items I'll use a scrap of shearling and wipe it on. Being cut with water it isn't too hard to get a streak free finish but dunking is easier and gets the finish everywhere. I've tried Tan Kote, Resolene, Leather Balm and assorted other finishes with mixed results but always go back to the Mop and Glo mix. It's cheap, readily available and it works for me. All the best, Josh
-
Schofield Rig
Josh Ashman replied to JWheeler331's topic in Gun Holsters, Rifle Slings and Knife Sheathes
That's really nice! Great job! All the best, Josh -
Holster for Colt Commander
Josh Ashman replied to thawk8541's topic in Gun Holsters, Rifle Slings and Knife Sheathes
Very nice! Thanks for sharing! -
Thanks Chief! I oil the straps pretty heavy and haven't had any issues once reported back. The only similar rig I've built for myself is out of horse and it hasn't done any squeaking either. Not sure how different the cow would be. Thank you too ScoutMom! Have a great day everybody!
-
Thanks guys! Have a great day folks!
-
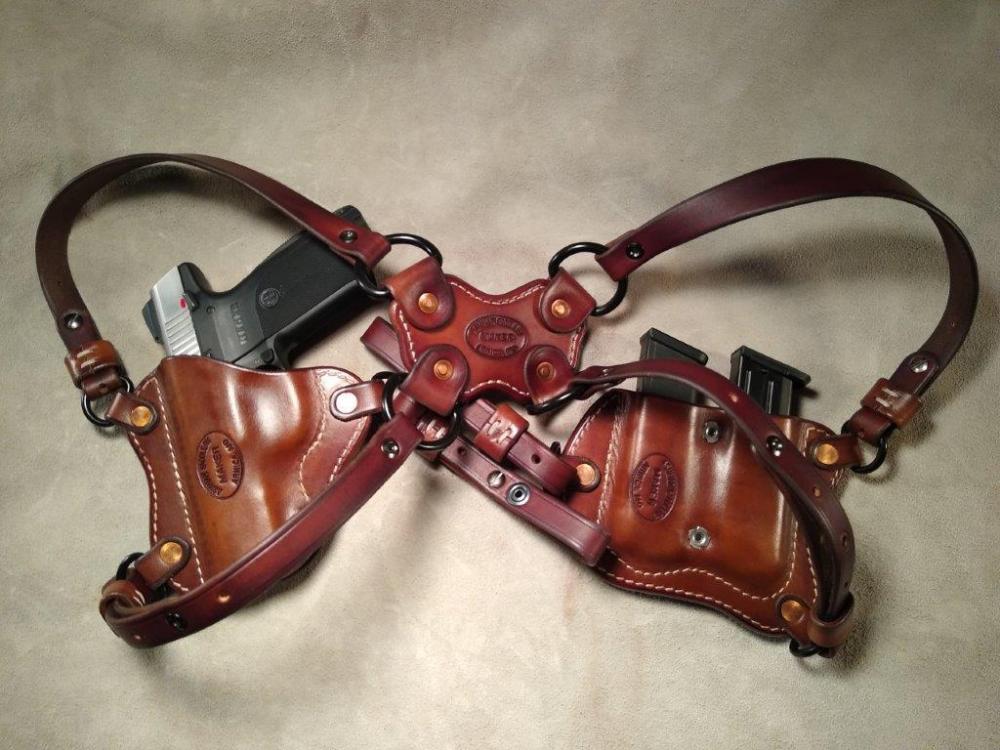
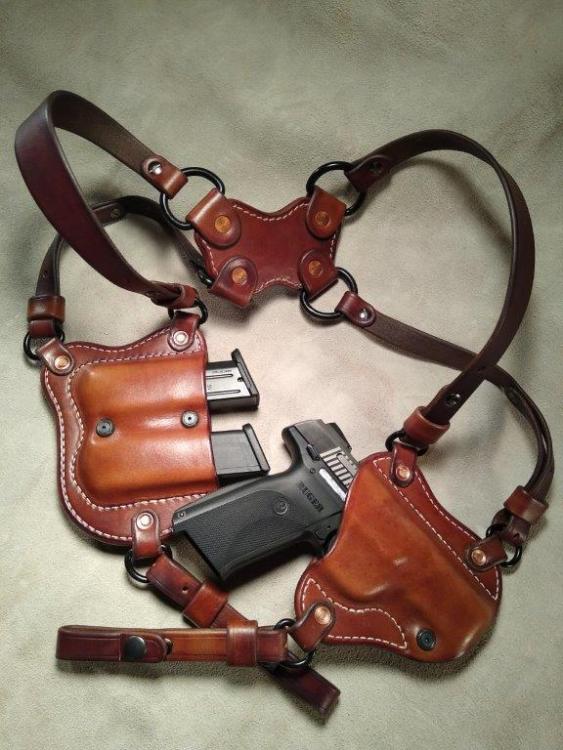
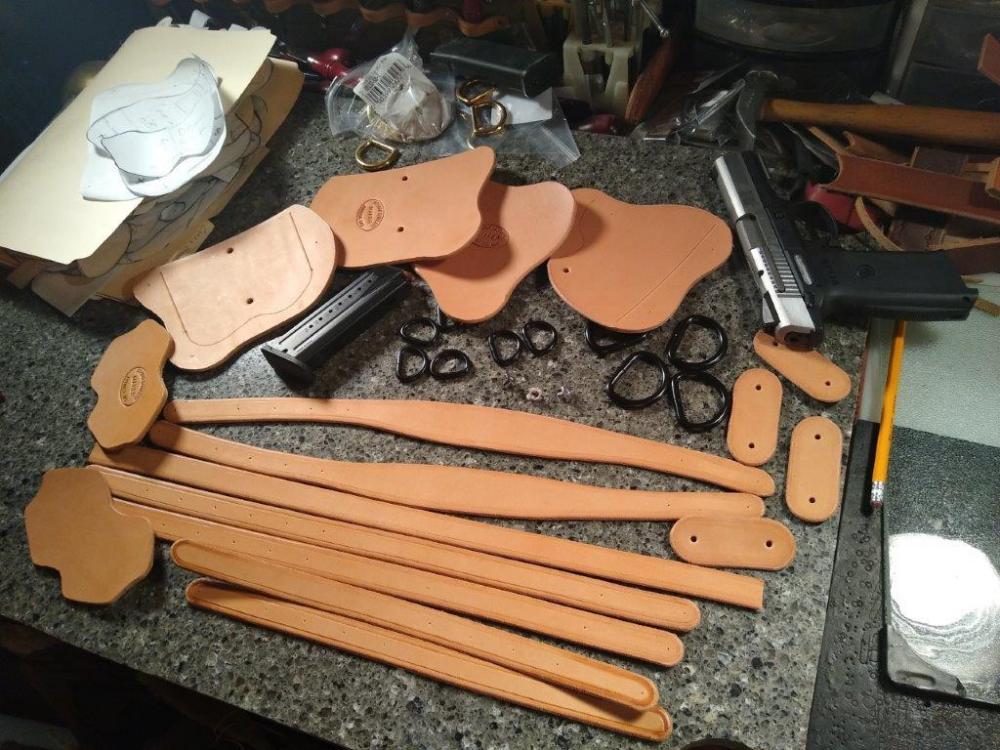
I just finished up this horizontal shoulder rig for a Ruger SR9. It's built out of 8 oz HO and dyed with a mix of Fiebings brown tones that were all dumped into ths same container some time ago (very scientific, I know ). finish process is my typical, NF oil then M&G cut 50/50 with water. I do oil the straps quite heavily while going very lightly on the holster and mag pouch. All the best, Josh


-
Replace wool on 1985 saddle ...
Josh Ashman replied to Deuce's topic in Saddle Identification, Restoration & Repair
Assuming it's a western saddle, which seems like a safe guess, it's a pretty straightforward process but a fair PITA as well. If the old sheepskin was sewn with a machine you can pick the stitches apart with a scratch awl. If you cut them along the seam you'll be picking tiny pieces of thread, if you leave them together and figure out which side to pull up you can work with longer lengths. I've done both and think each is tedious, but do-able. It's more fun if the plugs stay put, but they may come loose requiring them to be glued back into place. Rough cut the sheepskin larger than the skirts and trim them to match once they are sewn in. The best practice is to sew the new sheepskin through the same holes in the skirt and plugs, this can be done on a machine or by hand sewing, but doing it right and going through the old holes is tedious either way. Replace the tugs and or strings while it's apart. If you don't have a good saddle making reference book(s) like Stohlman's or Harry Adams it's probably a great time to buy one. Those are a few random thoughts . Good luck with your project! Josh -
Lined Loop Holster for 5" 1911
Josh Ashman replied to Josh Ashman's topic in Gun Holsters, Rifle Slings and Knife Sheathes
Thanks guys, I appreciate it! All the best, Josh -
Hey Randy, with only 4 saddles under my belt I'm not in any position to give advice. I just chimed in to say that once it's covered in innertube or mule hide t won't matter a bit . If I did have to guess I'd wonder about hitting it with your latigo and cut off pool cue about half dry to see if you could convince the feather edges of the wrap to stay down. Might even be able to re-wet them now and give it a try. Your fit up on the backside and stitching are sure nice! All the best, Josh
-
Lined Loop Holster for 5" 1911
Josh Ashman replied to Josh Ashman's topic in Gun Holsters, Rifle Slings and Knife Sheathes
Thanks Todd & Dikman! All the best, Josh -
Lined Loop Holster for 5" 1911
Josh Ashman replied to Josh Ashman's topic in Gun Holsters, Rifle Slings and Knife Sheathes
Thanks everybody! I appreciate the kind comments! Chuck, that's a fine suggestion on skiving the liner where it wrinkled. Doing so may have helped but I think my main issue was where I cut the liner. Dang near every time I get into the belly on a side and think it'll be OK it dissappoints me. You'd think I'd learn but I'm far to stubborn, cheep or slow for that . All that said it's a minor issue that really is much less noticeable in real life than in the picture I posted. Have a great Friday and weekend everybody! Josh -
Another Holster For My Ruger
Josh Ashman replied to AzShooter's topic in Gun Holsters, Rifle Slings and Knife Sheathes
Nice job AZshooter! Making specialty holsters like that can be a real challenge for me. Looks like you did a great job. that is also one supped up Ruger! All the best, Josh -
Agreed! Always fun to see what other folks are coming up with! All the best!
-
Pretty happy with how this turned out. It's 8 ox lined with 4 oz, both HO. Although I did cut the liner closer tot he belly than I should have. I believe this is why the backside of the skirt at the loop edges shows the wrinkles as bad as it does, Looks worse int he pictures than in real life, but still less then ideal. Finish is Fiebings liquid antique black over a coat of NF and topped off with M&G cut with water. All the best, Josh

-
Classy! Great job Bruce!
-
Belt, Holster, Mag pouch set
Josh Ashman replied to Hildebrand's topic in Gun Holsters, Rifle Slings and Knife Sheathes
Super clean work Todd! Nicely done! -
Superior Stirrup Leather Buckles
Josh Ashman replied to bruce johnson's topic in Saddle Supplies, Tools & Trees
+1 to everything Ken said. Also, the longer posts will work with 13-15 skirting. -
Holster Liner Material
Josh Ashman replied to DuqQuaid's topic in Gun Holsters, Rifle Slings and Knife Sheathes
Not necessarily, how leather is tanned makes a difference. Also, where the leather is cut from the hide makes a difference. Generally speaking quality veg tanned leather that has been gauged or split to a uniform thickness is fairly smooth and dense on the flesh side. This is especially true the closer you are to the back but somewhat less true the closer you are to the belly. Suede has texture to catch dirt and grit but it is also soft and not at all dense which allows the dirt and grit to accumulate easier than on the flesh side of veg tanned leather. The main arrangements made against suede lining I hear are; 1) chrome tanned leather has chemicals that damage the guns finish and 2) easier for dirt and grit to accumulate actually damaging the finish more then having no liner. I think that both are true at least to some degree. That said, my main argument against a suede liner on a concealed carry holster is that suede is soft and spongy and I want a firm, dense holster for concealed carry. For all of the above reasons I wouldn't use it for a liner on a carry holster. Maybe for a hunting or range only holster but even then it's not a great option in my opinion. In my opinion liners aren't that beneficial if you're starting with a quality piece of leather cut from the right area of the hide and of the right thickness. That said, they can be nice and there is no downside to having a liner if you'd like one. The method mentioned by Dwight is a time tested and proven one. Make your pattern, trace it on your hide, cut it out, flip it over and use it as the guide to make a mirror of it, glue them "back to back" and then proceed as it it were 1 piece of leather. Easy lined holster and you don't have to buy multiple thicknesses of leather unless you had a reason to do so. Good luck with your project, Josh -
Marlin 1894 Butt Stock Wrap
Josh Ashman replied to mishka's topic in Gun Holsters, Rifle Slings and Knife Sheathes
It depends a little on the hide you're using and where you're cutting your sling. If it's "strap" or "tooling" leather that has been made a uniform weight at the tannery and you're cutting closer to the top or back of the hide it'll likely be fairly smooth already. I'd just dye it, oil it to the degree you like then top coat it with whatever you like. If it's "fuzzy" for whatever reason and it's plenty thick to allow it you can use fine sandpaper wrapped around a wood block and sand it smooth. I like to sand in one direction and have the leather slightly cased. You can also "slick" it down using a glass slicker or smooth hardwood block with the edges rounded and fine sanded glass like smooth. You'd have the leather cased and smooth the grain down going in one direction. Both of these are good options If you're using skirting leather that hasn't been split to an even weight at the tannery. If the leather is fuzzy because it's from the belly you may re-think using it for a sling as belly tends to be stretchy. I haven't used Gum Trag for many years, it always seemed to me like plain water got about the same results. At the same time I have nothing against it either, for me it was just one less thing to buy. Good luck with your sling! Josh -
Marlin 1894 Butt Stock Wrap
Josh Ashman replied to mishka's topic in Gun Holsters, Rifle Slings and Knife Sheathes
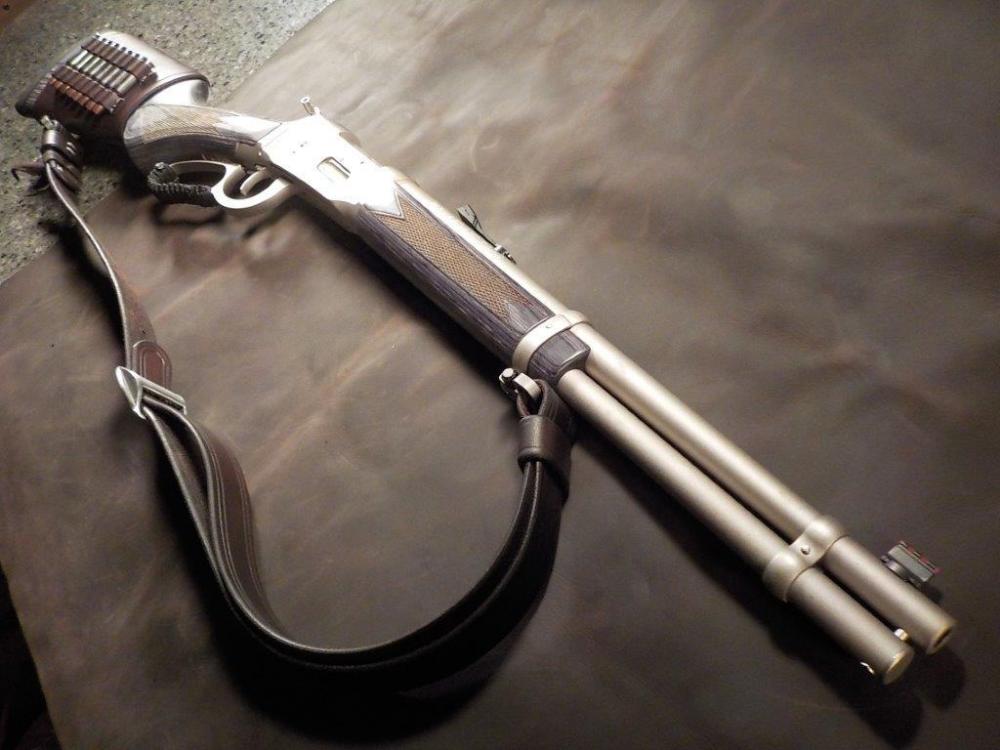
Very nice Miska! My personal preference for a sling on this type of rifle is a simple straight strap either 1" or 1-1/4" wide built out of 10 to 12 oz leather with some adjustment possible with either laces holes or a conway buckle. I've attached a pic of one of my similar rifles with a sling made just this way. All the best, Josh