Tree Reaper
-
Posts
1,870 -
Joined
-
Last visited
Content Type
Profiles
Forums
Events
Blogs
Gallery
Store
Everything posted by Tree Reaper
-
Great idea Cheryl; You could use cardboard as well for a template. How are you indexing your letters, are you guessing at the spacing or do you have a method for spacing? Kevin.
-

Should The Leather Be Damp Before Handsewing?
Tree Reaper replied to jk215's topic in Sewing Leather
No; I wouldn't sew damp leather as the thread will cut into it. -
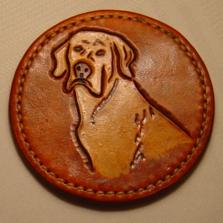
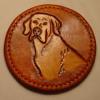
The nostrils have that slit from the hole down on an angle and I think that's what is missing. If I put those in it will reduce the nose area making it less flat, I can also model or bevel the inside of the hole. I think I'll work on a few noses without the dog to see if I can work it out. Thanks for the idea.

-
Thanks Cheryl; There's something with the nose that seems to be missing, almost too flat like a pigs nose. I don't know how to improve that and get it raised, maybe open up the nostrils and bevel the edges inside the nostrils but there isn't much room to work. Kevin
-
Well I hammered out another one and I think I have the mouth right but I'll let you all decide if other changes should be made. Thanks for looking. Kevin.
-
https://www.tandyleatherfactory.com/en-usd/Basic-Carving-Leather-Craft-Vide.aspx George Hurst explains beveling at 6:07 into this video https://www.tandyleatherfactory.com/en-usd/Basic-Carving-Leather-Craft-Vide.aspx
-
That's for hand stitching Ron as I'm sure you are aware but that's all I have as I don't have a machine yet.
-
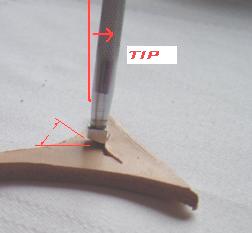
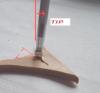
You may not be tipping the tool so that only one edge of the tool is touching the leather.
-
Two Floral Belts
Tree Reaper replied to Jarrett V's topic in Purses, Wallets, Belts and Miscellaneous Pocket Items
Very nice, looks like a bit of work! How much time to tool a belt like that? -
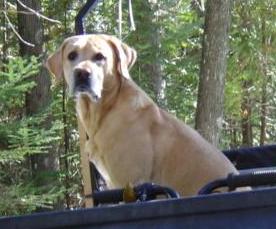
He's a con artist when it comes to treats.
-
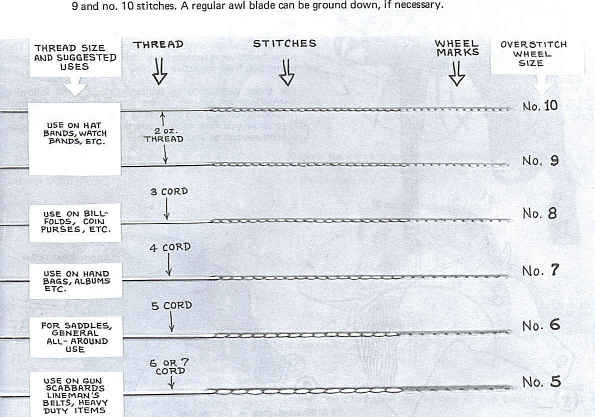
A rule of thumb for gauging distance is the same distance from the edge as the total thickness of the leathers to be sewn. This may help ...

-
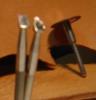
I had the same problem and by chance I made a mistake and ended up with two B60 tools. Ground the sides off one and got exactly what I was missing. The elevated heel on the tool works great for small areas, the tip is the only area that hits the leather. It was ground using a dremel.
-
Thanks Cheryl; He's a good guy and good company.

-
New Holster Made Last Night
Tree Reaper replied to George B's topic in Gun Holsters, Rifle Slings and Knife Sheathes
Nice work George, looks great. -
Got My Boss Today-Merry Christmas
Tree Reaper replied to mlapaglia's topic in Leather Sewing Machines
What was the final result, did you get the new machine and is it working for you? Did they tell you what was wrong with the machine you returned? Thanks. Kevin. -
Thanks, each time I look at it I see something that can be corrected, the chin area for example is in too much of an A shape and should be squared off a little, something else that didn't show through the tracing film.
-
Very nice, if you have never used one before you'll love it. The one thing that may be a problem for you is the long bolt sticking out, it can catch the thread. I have the same problem with the one I built and I want to put a strap over the bolt that will hopefully allow the thread to slip past the bolt.
-
Thanks for the comments. Right on Ben, I see that now that you mention it. It comes straight down where I rounded it off at the bottom a little too much too soon. Good eye! I know what happened, the picture didn't trace perfectly because I couldn't make out the lines in some places, I can darken those up with a pen the next time so I don't miss them. I'll make a note of that for the next one. Kevin.
-
Wallet With Oak Leaves.
Tree Reaper replied to Sylvia's topic in Purses, Wallets, Belts and Miscellaneous Pocket Items
Try this ... http://www.greyghostgraphics.com/images/Petal%20Lifting.pdf -
Wallet With Oak Leaves.
Tree Reaper replied to Sylvia's topic in Purses, Wallets, Belts and Miscellaneous Pocket Items
Hey Sylvia; It doesn't look bad, the back ground may have been too damp when done, a border would have really set it off but it's a good start and the leaves to follow will only get better. Are you happy with it? Good job. Kevin. -
It looks like the leather has soaked up the dye and it really hasn't turned brown but what you are still seeing through the dye is the brownish color of the leather. It may take several applications for the leather to absorb the dye, when you are satisfied clear coat it to make it shine.
-
This works well for straight line stamping with hand punching tools too! Just put the leather under the fence and the letters against the fence and you're good to go. http://leatherworker.net/forum/index.php?showtopic=36474
-
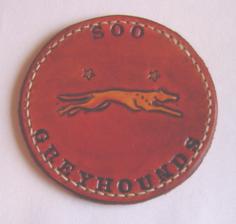
Thanks Sylvia; I should have increased the border on this but you can see how the lettering follows the stitching all the way around, very even and that's what I was trying to accomplish. The mini slab works great for stamping and tooling small areas. Kevin.
-
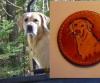
Thanks, not very difficult to do. I had a picture of him that I traced, carved, blocked out the body area except the nose because he's a yellow lab, gel saddle tan for the finish and the eyes were done with gel mahogany painted on. Finished with clear coat. With the two together I can see where I can improve on the next carving. The mouth on the left extends too far and should drop straight down and I need to darken the area under the nose a little, always room for improvement.

-
Rabbit is hair (hare) you might consider something like muskrat fur.