electrathon
-
Posts
3,014 -
Joined
-
Last visited
Content Type
Profiles
Forums
Events
Blogs
Gallery
Store
Everything posted by electrathon
-

Knife Sheath
electrathon replied to electrathon's topic in Gun Holsters, Rifle Slings and Knife Sheathes
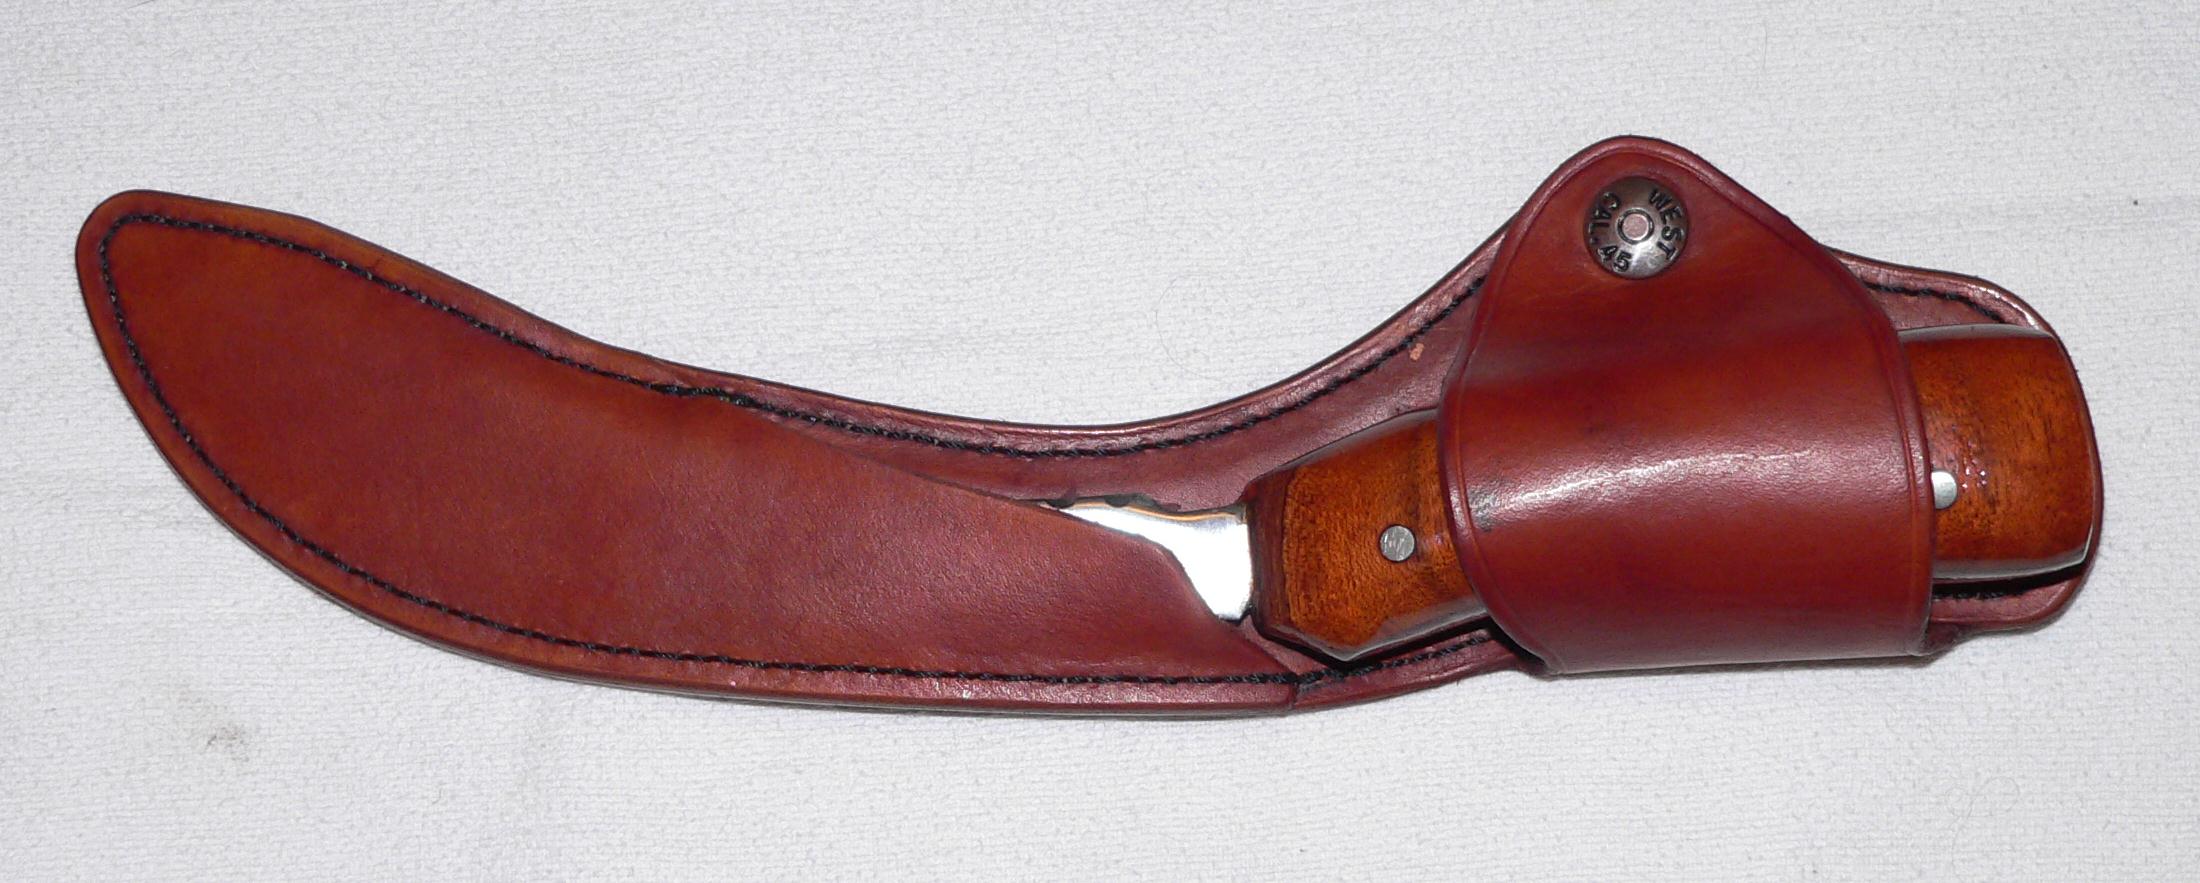
Thanks. I delivered it today so I was not able to get other pics of it. The edges were trued up on the belt sander then done with glycerine soap rubbed with a piece of denum. They come out nice that way. -
When I tore the tendon in my elbow (literally took years to stop hurting) I found that resting my elbow on the table as you happer away really helps. No direct answer to your question though. Aaron
-
Knife Sheath
electrathon replied to electrathon's topic in Gun Holsters, Rifle Slings and Knife Sheathes
Yes, there is a welt around the blade. The knife has a huge rotation to it that looks even more pronounced looking with it out of the sheath. I looked at the knife for a couple days before I came up with the shape the sheath is. Once I realized the knife had to go backwards into the sheath for it to work it fell in place. I don't have a pic of the knife itself with me, if I don't deliver it beofre I get home I will take a pic of it too. -
Foreigners
electrathon replied to JLSleather's topic in Purses, Wallets, Belts and Miscellaneous Pocket Items
Her tooling looks very nice. The only real change I would recomend is to punch the lace holes closer to the edge to eliminate the spider leg look. Aaron -
Been a while since I posted anything. Most of my work is tooled, I made this as a more basic design for a friend. He made the knife for a friend of his and I told him I would make a shieth for it. The knife has a major curve to it so I left part of the back open to allow it to slip in and out without binding. To keep the back stiff I inserted a layer of rawhide bet\ween the double layers of leather. Dyed it with Fiebings British Tan , oiled then sealed the leather with Dr Jacksons.

-
Can Anyone Help Identify This Machine
electrathon replied to ELeBlanc's topic in Leather Sewing Machines
Just as a side step, Junker and Ruh needles have been showing up on ebay for the last couple weeks. If this maching uses the same needle there is at least for now a source. Aaron -
For thick multi-layer pieces like this I use my drill press (to keep it straight) and for a bit I use a large sewing machine needle. Tandy sells 3 sizes of large needles, I use the middle size most of the time, depending on the thread I am using. Aaron
-
Handstitched Small Dog Harness
electrathon replied to Mijo's topic in Collars, Cuffs, Leashes and Leads
I am usually pretty hard on people about getting the quality up. From what I can see in your pictures, especially for just learning, you are doing well. Time and practice will clean it up more. The fact that you are critial of yourself tells me you will continue to improve. The people that post ugly stuff and say they think it looks good are the ones you have to wonder about. You are on your way to doing great. Aaron -
The way I do it is to apply it fairly heavy, then I try to wipe it back off. It will crack if you apply it to thick. I do think you are putting it on to thin. The reason you are getting the discoloration is those places are not sealed, so the antique gets into the leather there. Aaron
-
It may not be an option, but whenever I am out of town I look for any local leather shops I can find. Unfortunately, I am often unsuccessful, as there are not that many around. Aaron
-
The trouble you are having with the antique making spots in the middle areas is the evidence that you did not properly seal it up. When I neet-laq I put it on with a piece of sheep wool. I put on a medium heavy coat and smear it all over. Then take a dry piece and try to wipe any excess off. Rub gently in all directions around the tooling to lift off any ponding. You only have a minute or two to do this. When dry (overnight) you can then antique. I only use Fiebings paste. I usually will not do the entire thing just in case. Wipe it on (wool again) and then dry wipe it off (clean wool). After you have it wiped to the level you want (you can control how much you want to leave) then do the process again with Tan Kote. The Tan Kote will lift off any stains left on the flat areas. Let it dry. On a different issue: Keep the antique away from those holes! It will make a mess of the lace if you don't. Aaron
-
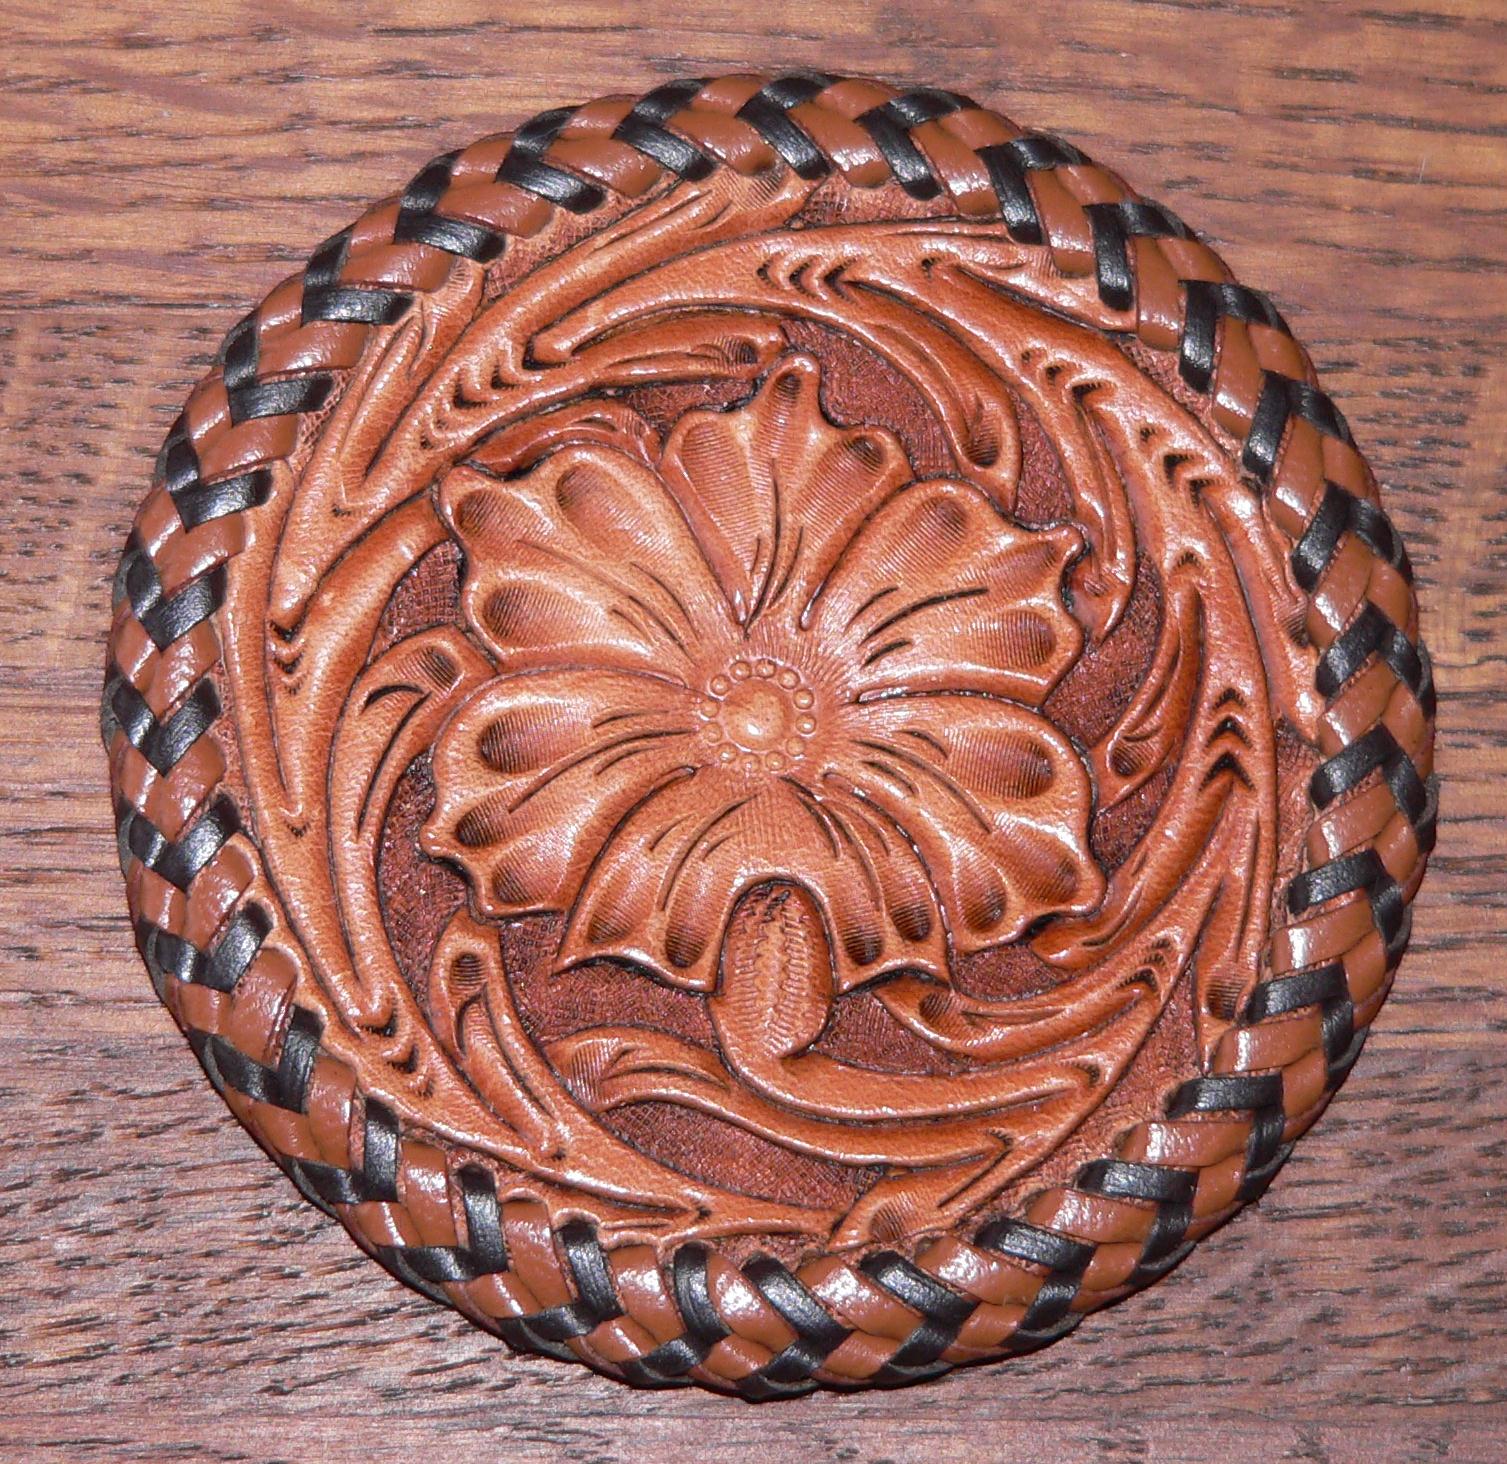
The dark backgrounding is done with dye, likely painted in with a brush. If I were doing the project I would first finish with a coat of neet-laq. Then apply antique paste. Finally a coat of tan-kote. The attached coaster was done with this process. As a warning, if you do not put a finish on before you antique, it will look like you drug it in the mud. Aaron
-
Give Me Your Thoughts On This Design
electrathon replied to Abram's topic in Gun Holsters, Rifle Slings and Knife Sheathes
Back on topic: This is more how I would recomend. Sorry about the artwork, not my strong point.
-
Give Me Your Thoughts On This Design
electrathon replied to Abram's topic in Gun Holsters, Rifle Slings and Knife Sheathes
Dick, I just saw the link to your site and looked at the pics you have posted there. I see that you have your slots 90 degrees to the belt in the pics you have posted. I think they look good/safe in their layout. I wanted to comment on this to make sure you did not percieve there to be a statement about safety addressed at the holsters you have made (believe me, if I felt them to be unsafe I would camment). Aaron -
Give Me Your Thoughts On This Design
electrathon replied to Abram's topic in Gun Holsters, Rifle Slings and Knife Sheathes
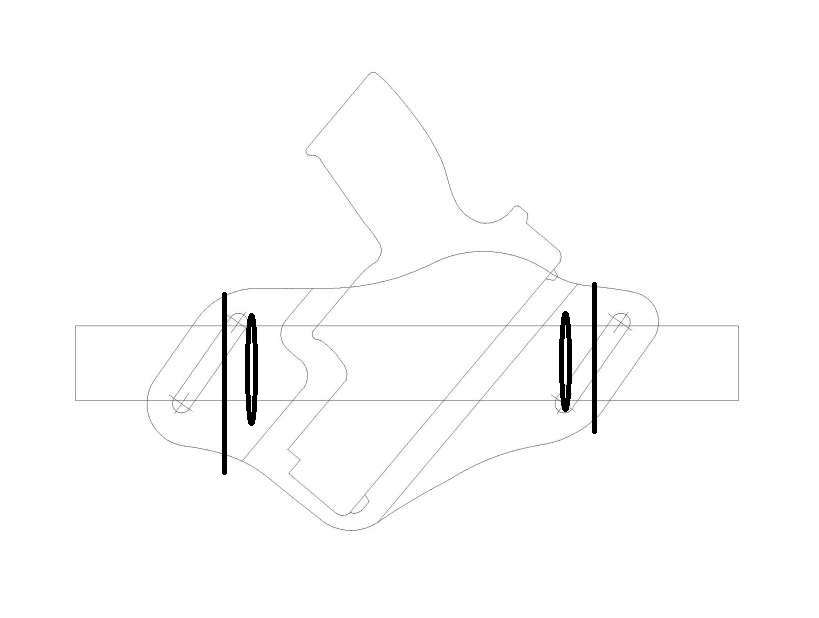
The logic in not slanting the slots? It is a simple physics issue. If the slots are slanted they are longer and are more prone to open up and let the gun/holster rotate outward. If they are 90 degrees to the belt the rig will be held more secure. It is easier to put on a holster with slanted slots, they are longer than the belt is wide so the looseness makes it easier to thread the belt into the slots. I do realize there is the argument of form over function, they look cooler in pictures when the slots are tipped. You even posted a link to one representing this. I tend to lean to function over form, especially in a possible life and death situation. I do agree, you likely will not die if you lean towards the cool look. The statement I made though was addressed at the stability of the holster. Yes, I have made holsters. Yes, I do sometimes wear/carry a gun. I don't sell holsters for a living. I do not know Gary and do not ever remember seeing his site before you posted it. I do find it troubleing he would be selling profesionally with a safety issue so visable in his holsters. Nothing against him personally, but this sort of construction is settting himself to be sitting in court as a defendant trying to argue that the loose (unsafe?) slot design was not a factor in something bad happening. That it looks so cool , it must be safe. Aaron -
Give Me Your Thoughts On This Design
electrathon replied to Abram's topic in Gun Holsters, Rifle Slings and Knife Sheathes
I would add a sweat shield and straighten out the belt slots. They may look cooler slanted, but will hold the gun firmer if they are 90 degrees to the belt. Aaron -
Mink And Otter Furs Gifted To Me...
electrathon replied to Rayban's topic in Exotics, Reptiles, Furs and others
Make the coolest trapper hat ever. -
The best solution is to spend a lot of money. Most people just starting out do not want to do that, understandably. Unfortionatly there really are not any good cheap solutions that I know of. If you can locate an old set of Tandy tools (25 years or more old) many of them were good tools Make sure they are not rusted or pitted. The Tandy situation really saddens me. I have an emotional attachment to the store that ties to my father/childhood. It is rerally sad to see a company that really cares less about what they are selling, but solely the prophit margin they are producing. Aaron
-
Disassembling An American Leather Splitter
electrathon replied to Andrew Chee's topic in Leather Tools
Take it to the do it yourself car wash and use the engine cleaner setting. It will cost you about $2 to have it totally clean. Aaron -
New Law Dog In Progress
electrathon replied to volpert's topic in Gun Holsters, Rifle Slings and Knife Sheathes
yes, too small -
I would seal it with neat laq. Antique with fiebings paste. Seal antique with tan kote. Some of the top toolers on here say to do the final seal with neat laq. I have done it that way too, but still feel more comfortable using tan kote instead of two layers of neat laq. Aaron
-
Using Petal Lifters / Undershot Bevelers
electrathon replied to Bob Blea's topic in Floral and Sheridan Carving
Barry is dead on here. -
Tandy is sort of like Harbor Freight on their sales. Their regular prices are jacked up but have lots of sales at significant discounts. Sign up online for emails. Aaron
-
Should I Avoid Carving Over A Foldings?
electrathon replied to Suicide's topic in Floral and Sheridan Carving
If possible, I always do. Aaron -
If what you have is very thin, you can glue it up back to back and double the thickness (not first choice, but you can use what you have this way). Also it needs to be vegtable tanned, not chrome tanned, meaning the leather needs to be hard, not soft and flexable. Aaron