.jpg.d60258221c476480a6e073a8805645bb.jpg)


bruce johnson
-
Posts
4,408 -
Joined
-
Last visited
Content Type
Profiles
Forums
Events
Blogs
Gallery
Store
Everything posted by bruce johnson
-
Noah, It all kind of depends on where you buy these. If you buy from Ron, Keith Pommer, Pilgrim, or guys like that, you are probably getting something that has been gone through and is ready to go to work. I have an old friend who trades in these kind of bench machines too. It takes a box of parts on some to go through to get another working. A guy who is pretty handy can strip them, fix them, machine any parts needed, and sharpen the blade. They do show up on ebay fairly often. I sold a pretty good American last winter there for just under $600, if that will give you kind of a benchmark for price. A good Landis ought to bring more. There are several styles of splitters out there, and the reason I sold mine was that I found I liked the Chase patterns better. On the hand cranks, softer leather can wad up against the blade and not feed very well. On any of the pull-throughs it is not a problem. Where the handcranks shine is splitting heavy hard leather. They are sure not any faster for me, in fact slower than a pullthrough for most splitting. Someday I'll probably replace one of my Chases when I find the right Krebs at the right price.
-
Tae, Not to dissuade you from ebay stores and sellers, but I have bought pretty much the same wing dividers at Orchard Supply and Harbor Freight for less money and no shipping charges. There are several tools that cross over into other crafts. Another source for tools is antique stores. I have found very few antique stores that don't have an old keg o' tools or wooden tool tote that don't have decent wing dividers for a couple bucks. I recently bought a set of 24" leg dividers at one for $7. That was a find, I didn't even ask for the customary 10% discount.
-

Casing leather
bruce johnson replied to UKRay's topic in Purses, Wallets, Belts and Miscellaneous Pocket Items
Ray, There are folks here who know a whole lot more about leather chemicals than me. I think Lexol is a sulphonated neatsfoot oil. I am not sure if it comes under other trade names that might be available there or not. I would anticipate the Listerine called for in the original mix is the plain old brownish looking stuff from the old days. I am also thinking eucalyptus oil, tea tree, or some of the other reported natural antifungals might be fine. I have heard that one of these is the antifungal in ProCarve. Who knows. Regarding the saddle soap. Apparently in the good old days of the old soak until drowned leathers, saddle soap was purchased in buckets by some shops. They soaped leather to block out pieces. They soaked it and soaped it again to swivelkinfe and tool it. The problem I have with it is that it resists dye somewhat. I have had dye roll off the lettering then soak right in an inch from where you laid it, black can become violet, etc. I don't use it anymore for something I am dyeing, and really haven't used it since I started the other mix. As far as burnishing effects you can get a somewhat similar effect from antiques and HiLiters too. I have been using a diluted HiLiter to bring out dec cuts and deeper lines. -
Casing leather
bruce johnson replied to UKRay's topic in Purses, Wallets, Belts and Miscellaneous Pocket Items
-
Casing leather
bruce johnson replied to UKRay's topic in Purses, Wallets, Belts and Miscellaneous Pocket Items
Regarding ProCarve. I used to use it for the mold inhibition properties. In my old shop I had a heck of a mold problem. It was a very small shop, and I can trace it back to taking apart an oldy moldy saddle. Green dust poofed out of it. After that I had a problem and ProCarve stopped it. I had a guy from Louisiana tell me at a show that he had a customer tell him his finished headstalls didn't get moldy in the trailer and tack room like they used to. He traced it back to starting to case with ProCarve. Since I moved to my new place, I kind of got away from the ProCarve and haven't had a problem. Probably a resident spore deal. I have a before and after work schedule. I generally case overnight. I cut, tape backs, wet, and bag overnight - which is about 5-7 hours in my case. I do my sewing and finishing work after that. I do my carving and stamping early mornings usually to fit my schedule - nobody else home and few people stop by between 3:30 and 6:45. I was using plain water and getting by OK. When I was using the lighter weights of HO (under about 7 oz) I found that a longer case made my basketstamping round up a little nicer. Not so much of a difference on the heavier weights. Those I could slather on water or PC water, let the color come back, and go to pounding. I tend to do a lot of stamping and like the leather to be more to the dry side for better burnishing and rounding of the unstamped areas. This baby shampoo/lexol mix seems to hold the moisture longer for me to stamp bigger areas without rewetting. If I need to, I mist more on with a spray bottle. To my eye, I get a little more tool burnishing with the mix too. I recently did a photo album, cased about 8 hours and was really looking good right up to the part where I mispelled the guy's name. I did a quick case on the second one, and it came out OK. Took a little more maul to get the same effect with the Assoc basket, but the floral corners are identical. -
Shelly, Third time to reply will hopefully be the charm. The cyberspace dog has eaten my reply twice. First off thanks for rejoining us and posting the pictures. I favor that border stamp also. Looks like the edging lesons worked, and the the entire saddle looks good. I like the color, and the antiquing sets it off nicely. Cool story to go with it too.
-
Tippmann Boss - the bottom line...
bruce johnson replied to UKRay's topic in Leather Sewing Machines
Rolf, I can appreciate your enthusiasm for the Boss. I had one of the early ones, and they will do the job. However they do have the drawback of not being powered, a narrow throat, and require one hand to run them. Tedious on production or even a single set of doubled and stitched reins. They are easy to operate and learn. Once I go the tensions right on mine, it seldom needed tweaking. However I am going to respectfully disagree with your statement that they are the only real sewing machine for western saddlery work. They will sew whatever you can cram under the foot. That said, I have had good results sewing any type of saddlery work I needed to do with an Adler 205. Likewise with my Pro 2000. I am pretty sure most people are very happy with what their Artisan 3000s and 4000s will do. The servo motors and speed reducers provide all the power and control I need. To back up, there are quite a few who like their Pearsons and needle/awl machines too. The Boss fit a niche when it was introduced, nothing else had its capacity within $2000 of it. Not the same story now, but it still is solid little machine. -
Savage, Scrap management has never been easy for me. I use the plastic totes and underbed storage containers mostly. I sort by type of leather and not size. The exception is scrap skirting, I sort into long pieces for strap, pieces larger than 6" square, and smaller that 6". Storing cutting patterns was never much fun either. I stored them in underbed totes, and it was a pain to organize and make sure they got back where they belonged. A couple months ago I visited Ken Nelson's shop. He was using a map/drafting file. I came home and checked out a local new and used office furniture warehouse. They had two scratch and dent drafting files that I bought. They are really pricey retail, but since they are not a big mover - dirt cheap when cosmetically damaged. They fit under my benches and so no big change in shop layout. My cutting table is actually an old military surplus desk. I slipped lengths of pipe over the legs to raise it up to the right height. The drawers are handy for storage, and a scrap tub fits underneath the center.
-
Johanna and Kate, Thanks for all you both have done behind the scenes today. It was trying and ladies, . This has not been a good night in the shop, and I just deleted about 10 encouraging emails from members earlier wondering what was going on -sorry. For those who sent me emails, feel free to send them to the real heroes - Johanna and Kate.
-
Storm, Really glad to be able to reply to you. Really glad. Now if you do start to get gaps, I will use a flat bladed screwdriver tip to bridge the gap between the legs. I have also done some with with a set of different size baskets with the same center pattern. I started off in the center with the smallest, and as I worked to the outside, I went to the next size up as I got close to gapping. I got a whole rope can done (15" diameter") and made it work. I had to add some "centers" as I got bigger, but it was fun challenge.
-
Of the hydraulic stands, Ron Edmonds makes the best in my opinion - www.ronstools.com. It is heavy enough not to slide when I hit against it. The top is shaped for a tree to sit in and stay on it, not a neoprene covered plank like another maker has. The drawdown strap is attached to the post, not the base. You can raise/lower/turn it withough loosening the strap and readjusting it. The tension is separate from raising and lowering it. Got the cantle sewing attachment to raise it for sewing, and you can see under there. Very worthwhile for me - I do a lot of repair work. I also bought the overhead laser for shooting crosshairs for evening up rigging installation. I don't like that it is attached in the front, I tend to catch on it without the arm in place, and the laser can shift (magnetic base on metal arm) and throw you off. I probably wouldn't get the laser deal again. My wife talked me into getting this stand at a leather show, and it has replaced two wooden drawdowns (high and low) that were good, but I have never looked back. My shop is small, and this stand takes up less space that either one of the two it replaced.
-
brutally honest criticism sub forum?
bruce johnson replied to cwa11is's topic in Feedback and Suggestions
Charley, I can agree with you also. On the other list I gave a mild another-way-to-do-it on an item I had done well over 200, and wasn't selling kits or class space. It wasn't even a critique of their show-off piece. Not sure how many the person had done, but their method was limited and cumbersome. I got a scathing offlist email reply from someone that all I do with my all posts was to stifle alternate thinking, come down hard on new crafters, and discourage others from posting. This particular individual still sends me BS offlist crap when I post to that group, and I now consider them a source of entertainment. They have recruited a couple others who do it on occasion also, often using the same phrasology so there is little doubt of the origin. I since have sent my critiques and suggestions off-list for the most part. I did make a mistake and sent Art S one on-list one time. The scathing off-list reply came in just before Art thanked me on list for being honest. On this particular forum I generally go PM or email, and receive several emails and PMs on my work from guys I respect the input too. I think that some people don't want to come across as high and mighty, and unless brutal feedback for a critique is requested, it is hard to know how someone will take it. There are some great people on this forum, and there is a lot to be learned here. -
Ahhh, these are for rodeo guys to carry their ropes from one event to the next and keep them clean, organized, and protected. Think of them as a case for a shotgun for the trapshooter, or Tiger Woods' golf bag. Calf roping (now the PC term is "tie down roping") is a timed rodeo event. A rider starts from behind a barrier, the calf is let out a prescribed distance, the barrier drops at that "head start" distance, and the rider chases the calf. The calf is roped, the rider steps off his horse, runs to the calf, lifts it and lays it on its side, ties three legs together to keep it tied down. A good time for doing this is 8-10 seconds. The rider remounts their horse, slack is given in the rope, and if the calf remains tied for 6 seconds, the time if official. The ropes used in this event have a softer feel, and the good ones generally will last for 40 runs or so before they start to wear and lose the consistant feel. They generally sell for about $35 each. They are powdered to be slicker and pull up faster once it goes over the calf. LIke I said yesterday weather affects them especially the grass or grass blended ropes. they can get really soft and have no "life" and close up as they are swung and thrown or want to remain stiffer and hold a coil pattern like new fishingline or a garden hose. Hence the drying crystals or washrag for humidity. These are the guys that use the cans. A custom or trophy rope can just makes the statement that "This is mine, and I am here to win". This event developed out of roping calves on the ranch for doctoring, tagging, branding, and processing. Team roping is another event. These guys are roping steers with horns. There are two partnered ropers in this event. Again they start behind a barrier, and the steer is given the headstart. One roper (called the header) will rope the steer around the horns. They will turn the steer's direction and lead him off, generally in a large counter-clockwise arc. The second roper (the heeler) will ride behind the steer and rope him around both back feet. As the heel rope comes tight, the header will turn his horse so both ropers are facing each other, and the steer is stretched between them. That is when the time is called. A good team roping time is 5-7 seconds long. These guys use nylon ropes, less susceptible to weather. The headers use a rope that is spun a little looser when it is made. It will have a softer feel and pull up around the horns quicker and not be as prone to bounce off. Heelers use a stiffer rope, so the loop will stay open more when they throw it in front of the back legs of the moving steer and he will step into it. These guys usually carry their ropes in soft side bags, and may carry several ropes, depending on wind (heavier rope vs. lighter and faster), the shape of their steer's horns (softer and quicker for small horn spreads), and what they like. This event was developed to simulate catching and doctoring large cattle in a ranch situation. Calf roping is a younger man's sport. Getting off a running horse, lifting a 250# calf, laying it down, and tying it's legs are physical. Old guys still do it because they are either really competitive, rope in senior divisions, or do it at home to train horses for the guys going down the road. Actually when I was in Indiana, I went to a lot of calf ropings in Ohio. THere are/were some really good calf ropers there in the early 80s. I roped at Columbus at the Quarter Horse Congress, and at Washington Court House, Fort Recovery, Coshocton(sp?), Hilliard, Eaton. I was in the Indiana Ropers and Bulldogger's Assoc. and we had weekend calf ropings all over Indiana and year end high point awards. Team roping is something for all ages. You don't get off, basically ride your horse, rope, and catch a steer. Not as strenuous. It started off as a west coast event, and has spread nationwide in a big way. There are several associations besides rodeo that exist for team roping. Young kids, ladies, families do it up to ancient guys. There divisions for the beginning roper to compete with each other up to seasoned top guys. Families that 30 years ago would have gone to the lake, go to team ropings on the weekends now. There are weeknight jackpot ropings, kind of like beer league softball games. They put their money into trucks, horses, trailer with fancy quarters to stay in, and hopefully custom rope bags. There are national team roping associations (besides rodeos) that have regional or state divisions, and the top placing riders qualify for an association national finals. There are a lot recreational ropers who have a roping arena at home to practice, have friends over, and play around with it. Much like a guy might take up golf, people start team roping. They probably have no ranch background, but they are chasing cattle, having fun, buying the stuff, and living the life of their dream. Some get pretty darn good and competitve at it. One guy summed it up. Cowboying is the only lifestyle he could think of where a guy who earns $150 thousand a year dresses up and wishes he was like a guy who makes a thousand a month and is perpetually broke.
-
Happy birthday Johanna,
-
Tim, Thankfully they are a fad that seems to be going away out here. There are some that ride them, and they will buy every gimmick that comes along, feed every supplement and neutraceutical available, and have a trailer load of bits to run 4D times. I won't address the soring issue because there is at least one person on the forum who knows a whole lot more about this than I do. Regarding the second question - no doubt a fad, and I have yet to see one with any semblance of decent workmanship or structure. There are people who buy saddles based on who endorses them. Most of the endorsers are not riding their endorsed model when the bucks are up. As far as not making the rider feel like a moron. I just refuse to work on them when they start to fall apart. Someone probably has found a way to fix them better than when they are made, but I don't want that liability. Good saddles can almost always be repaired, anything less is disposable.
-
Thoughts on Ferdco Pro 440R?
bruce johnson replied to RunningRoan's topic in Leather Sewing Machines
The problem I had with the 440 was not that it wadded up the lining. The throat plate has teeth that slant back, they allow the piece to slide back as the needle feeds it, but the teeth prevent it from sliding back forward. On straight runs it works fine. On curves when you turn the piece back towards you, those teeth grab. The effect is much like the tire shredding don't enter here deals at the parking garages. You can loosen presser foot tension, lightly file off the teeth some, but then there are feeding issues. A walking foot machine will work for wallets. The big thing to watch for - needle size, thread size, and foot lift capacity. Some machines can do smaller sizes, but not larger. Some large machines can only do larger sizes. I think my 1245 will do up to 207, and I rountinely run that through it. I usually run 138 for most of what it does. The 2000 will go down to 207 I think for the small end of things. I usually run 346 or 277 in it. Something to watch for - Ferdco puts on a leather trade show in Pendleton in November. It would be a good chance to see several of their machines set up and try a few. It probably is the closest show to you. Artisan has a good line of machines and also set up at a lot of shows. -
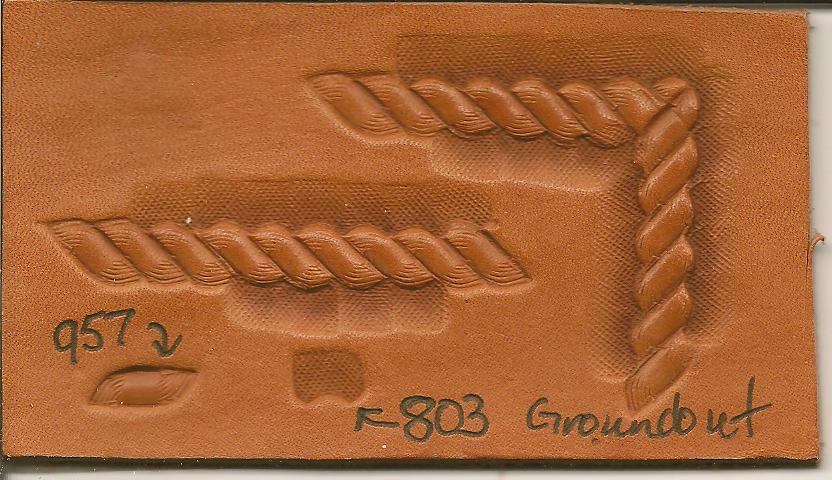
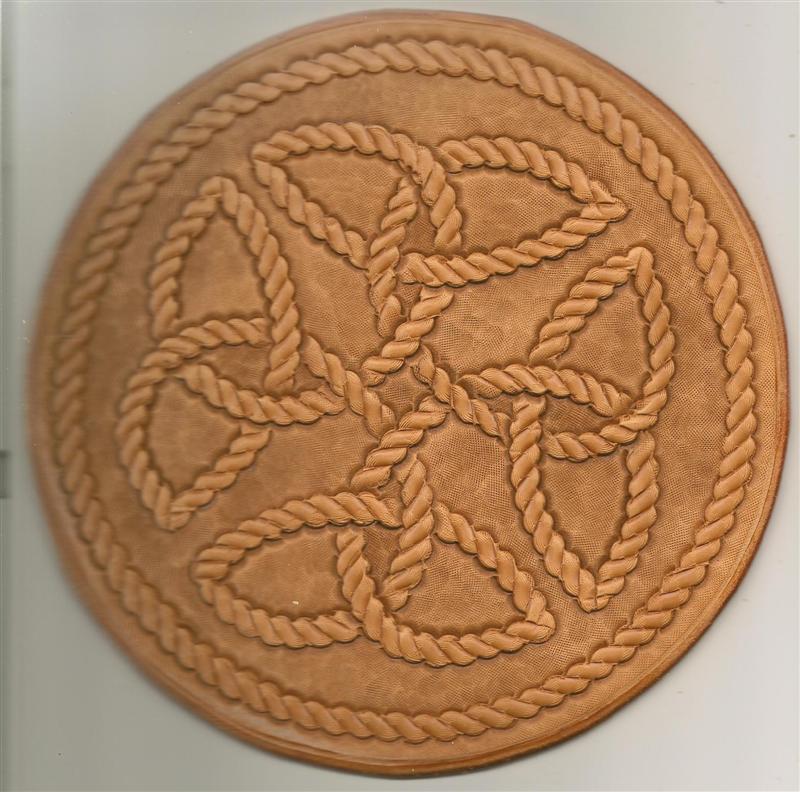
SS, I use those stamps a bunch. I have broken and bent more than my fair share, and finally caved and orderd a custom one. The issue is that the tips tend to bend up doing partially or tipped impressions, and you end up with a canoe shape after a while. I bend 'em back down until they break. That said, always have a backup. I am attaching little deal I stamped off a few years ago, and still chase it around my desk. I used the #957 for this one, and I made a special beveler for it. The beveler is a #803 that I took a cylindrical grinding wheel on the Dremel and ground away. The curved face matches the outer curve of the rope, overlaps just right, and bevels it with one hit. I think beveling really makes this stamp pop, and the curved beveler with one one hit beats walking one around every curve. I only use one scribe line to line up the stamp, and eyeball the angle. I started off with two lines, and eventually just dropped using the second line. I run right on around, and use tipped impressions for the square corners. I am also attaching another little deal I did with it a couple weeks ago for the Celtic challenge. It was kind of fun to do that with the rope. I also have used the rope to do initials on photoalbums and planners. It really lends itself to circles and ovals too, once a guy gets handy running it in a straight line.
-
Thoughts on Ferdco Pro 440R?
bruce johnson replied to RunningRoan's topic in Leather Sewing Machines
I had one, didn't like it. The throat plate eats the backside of lined stuff going around corners. At that time the 440 was the only powered machine under about $4000. Ron ended up and traded the head out for an Adler 205, and that was a good solid machine. If you are looking to do flat goods, I like the 1245 a ton. We have had it about a year and a half, and run a lot under it. I really don't think there is one machine to do everything, so a flat bed and cylinder arm machine both have their place in my shop. The 1245 is not intimidating for my wife, and I am using it a bunch more too. Good machine. -
As some of you know, I am the board president of the Oakdale Cowboy Museum. Oakdale has been a historically western town, home to still active rodeo and ranch cowboys. We have been called "The Cowboy Capital of the World" for decades. There are other towns that claim the same title. American Cowboy Magazine has set up a friendly challenge between us and Stephenville TX, who also claim the title. Basically both towns are selling raffle tickets at $10 each. The raffle winner in each town will each recieve a side of premium source-verified beef from South Dakota Beef Man. It will be wrapped and shipped to the winner. Tickets are available on-line on the Oakdale Cowboy Museum's website - cowboy museum. The winners will be drawn on the National Day of the American Cowboy - July 26th. Obviously I am a little biased, but a little about Oakdale. This is a town that has had historical ranching roots going back to preGold Rush days. It is now a strong cattle area, with foothill pasture grazing in the fall through spring and irrigated pasture in the summer. It is home of the Oakdale Rodeo, 50 plus years of continuous competition. My mother-in-law was one of the founding directors of the Oakdale Ten Steer team roping competiton, historically one of the best. We have one of the few high schools in the nation that rodeo is a "letter" sport. Several go on to college rodeo scholarships, and some go to work everyday with a horse, saddle, and gooseneck trailer. The proceeds of the raffle in Oakdale go to the Oakdale Cowboy Museum. We have a scholarship programs and school outreach educational programs. The museum itself features ranch and rodeo memorabilia from the early days to modern times. For a little more about the museum, there are some "youtube" videos online. One particular favorite features our keynote speaker from last year's dinner auction - Wilford Brimlay. Wilford has been a great supporter or our efforts. It is available here - . Wilford's part starts at about 5:00 into the video. Thanks for any support you all can give us, and eat beef, even if you can't.
-
Johanna, Rope cans are generally made from hard plastic, and used for carrying calf ropes inside. They have a pretty tight seal on them. Calf ropes traditionally are made from manila, grass, poly, or combinations thereof. They are a little susceptible to changing the feel with heat and humidity. Some guys use a bag of humidity absorption crystals in really swampy climates, and a wet Holiday Inn washcloth in dry climates in the center compartment to maintain the right humidity. There is usually a "well" in the center to put spurs, personal stuff, and it always ends up covered with loose powder. Calf ropes are routinely dressed with baby powder to keep them slick feeling, and the loop to pull up faster. You have your ropes inside, shake some powder in there, and do the "Shake-N-Bake" to coat them. The leather cover is glued on, and I use a few conchos drilled through the lid to further secure the leather. Rope bags are usually made from soft side materials like quilted nylon, cordura, or leather. Team ropes are usually made from nylon or blends, and less susceptible to humidity and temperature than calf ropes. They are also generally stored coiled up in larger coils, so the rope bags are larger in diameter. Both can have pockets on the outside to carry spurs, team roping gloves, pocket Bibles, and wallets/watches during competition. One of my customers asked me about doing a pocket on a rope can so his wallet and watch wouldn't always have powder all over them. We hadn't seen it done on a rope can before. One of the big catalog sellers of roping supplies and manufacturer of rope cans gives us credit for the first pocket he had seen on a rope can. I am sure someone had done it before, but we are world famous in parts of Oakdale because of it.
-
Sounds like the sides are a bit more "granular fibered" on the flesh side. One way to correct that is to dampen it and lightly sand it on a benchtop belt sander. That is a leather issue and not a oil/dye/finish problem. On straps that aren't lined I do a couple things. Some I have treated with gum trag (available from most leather suppliers - Weavers, TLF, etc) occasionally. it works OK, but a bit messy. Apply it, let it sit about 5 minutes and rub firmy with a glass or block slicker. On straps like breast collar tugs, I usually have oiled and dyed them, then apply a paste dressing like Williams. I then slick right over the Williams sometimes or apply a light coat of saddle soap and pull them through a rubrag. Other things I use depending on my mood, what I have the most/least of, and how much neglect the user is going to have, are Hole's Saddle Butter, Holes Chap Wax, Black Rock, Hide Rejunvenator, or "neutral case" I bought undiluted from a member here. About all these things soften the fibers and let the slicker lay them down and smooth them.
-
We buy it here. We are in the middle of a strong dairy area, and that keeps the good hay prices up. It also insures there is some good hay grown or hauled into the area, so there is always some good hay around. There is a lot of good irrigated alfalfa raised in our area, and the production costs have gone up. Most all our hay is put up in 3 wire/string bales, and average about 16 bales to the ton. You don't ride the wagon behind the baler, and hand stack them and toss them around very easily like where I grew up. Most all the hay is mechanized - picked up, haro bed, stack runners, and "hay squeezes" (like a big forklift for hay). Last year we paid $170/ton of #1 dairy grade alfalfa. A ,lot harder to find anything under $200/ton right now. The rollup doors are about 2' short of the height needed to get the stack backed in, so we have hand labor is stacking it there. We had enough trading cattle, and a dry enough spring that we ran out and had to buy a little earlier this year. My son has some 400# traders and they're gaining well on what's growing. A few weeks ago we found some clean rye grass/alfalfa for $208/ton delivered and it is feeding well to the horses. Felt pretty lucky to get the hay bought right. We've had a dry year, and the guys running winter/spring cattle on the foothill and dry pasture sure had to stock light,feed some, or sell early.
-
Anyone know where I can get a blade for my new toy?
bruce johnson replied to UKRay's topic in Leather Tools
Ray, That's a little different cutting set up than I've had on sole cutters. That said, I'd contact Pilgrim Shoe (www.pilgrimshoemachine.com). I have had them come up with some parts that you'd think were way out of stock. I think they are called "pilgrim" because they still have parts that were shipped on the Mayflower. I can't think of the parts guy's name right now, but he's a kick to talk to. He probably will know your machine and what year they switched from one shaft dianter to another, when the handle went from a straight handle to shaped, and the parts numbers in his head. If not he'll tell you who might have parts to scab. -
Ed, I may be really off-base here, but I thought they were designed so they could bent. At least among saddlemakers there are two fraternities. There are those who use heel shaves with resharpenable blades in the different number designations (shape of the curve) for shaping ground seats. Across the street are those of us who were taught to use the black skivers ("potato peelers") with replaceable razor blades and have a few - each bent to different curves to do the shape needed at hand. I just bent mine with a pair of pliers or shaped over the horn of my anvil. The only issue I have had with the potato peelers was one. I saw a Bruce Cheaney video, and he just knocked the skiver against the edge of the bench to pop out the old blade for replacement. It looked cool, and I did it for a couple years. Last year I did it, and the perfect set of circumstances came out. I popped it out, it ricocheted off the edge of a bench stamping stone, the underside of the bill of my cap, and ended up inside my glasses, right up next to my right eyeball. I have gone back to just pushing the blade out with a screwdriver again.
-
Half sized wade tree
bruce johnson replied to Elton Joorisity's topic in Saddle Supplies, Tools & Trees
Elton, Carson Thomas in Wickenburg AZ does some pretty nice miniature saddles. Not sure on the tree source, but worth tracking him down to find out. We saw one of his mini Wades in a gallery in Jackson WY a few years ago. The basket stamps, monels, everything was scaled down really close. It looked like Wilbur's monkey could just climb on and ride it. Had a 20 some thousand price tag and sold a month or two later by the time I told someone else they needed to see it. Happy Canada Day, by the way!