bruce johnson
-
Posts
4,401 -
Joined
-
Last visited
Content Type
Profiles
Forums
Events
Blogs
Gallery
Store
Everything posted by bruce johnson
-
Harvey, Clay is right. Probably better check with David and see if you are still on the list. You may be moved to platitudes unbound.
-
Andrew, To jump in here on the Alder, I used to have a 205. It is a good machine and I am sure would sew with bullet holes after a nuclear holocaust. That said it had no needle guide or center foot, and the feed dog hole was a fairly small target for a needle capable of sewing 346 to hit. It would sew doubled 9 oz latigo reins all day. It would sew new saddle skirts and normal back cinches all day. I made the mistake of building some wide calf roping back cinches based on an old style I used. I used doubled skirting for the bodies, and 10/11 oz for the tunnel loops. The ropers loved them because they are dang sure stout. The top side stitches looked fine. The bottom stitches due to needle deflection wiggled all over and missed the bottom groove in random patterns when it hit the 3 layers. If the needle missed the feeddog hole and snapped, it was pretty impressive. Tended to skip on some relining of skirts due to needles holes not quite matchining up in the skirts/plugs. Needle deflection was an issue with it. When I got my Pro 2000, the bottom stitches match the top, and I don't even think about it. The 205 is now side seaming boots in Oregon. I think 3/4" would be a real generous allowance for the Adler I had. I know a guy who had a Sewmo 205-370 clone, and that was his experience too. Good up to 1/2" and then it is a push.
-
My granite actually does have the guy's picture photo etched on it, and the dates. They broke a corner when they reset it. It is kind of eerie to see him smiling there, and I pound on the bottom side (smooth, but unpolished and will stay that way). Another source for granite I recently found was the local Habitat for Humanity outlet. Contractors donate leftovers and scratch and dent stuff. Basically a thrift store for building materials, and they have several pieces of granite countertop. It was around $3 a square foot as I recall.
-

N PORTER TROPHY SADDLE
bruce johnson replied to broncobuster's topic in Saddle Identification, Restoration & Repair
Bronc, Most of what I have on Newton Porter is at home. Originally the shop was in Texas. Moved to Phoenix where most of the reputation was built. A pretty famous old shop, and some refer to the style of carving they did as the "Porter" style, others call it Arizona style. A lot of the big names in leather carving from the middle part of the last century cut leather at Porters. I am not sure when the shop closed. I have an old geometric stamped Porter saddle that while cute, is not high end collectible. Porters were pretty fanatical about maker's marking their saddles. It is marked in 5 places. I also have an unmarked floral stamped saddle can be matched to one of Porter's standards too. Probably an ex-employee made it. The geometric was appraised at about $1100-1200, which I thought was pretty generous. The unmarked floral saddle the same or a bit more due to the silver on it, which is older than the saddle. Those old quilted saddles were before my time. I am not sure of the whole time frame, but have seen them listed in old Western Horseman ads from the early or mid 60s. Not sure the seat repair helped the value any. -
I use the SS nails too. A local big hardware store used to have a pretty complete line of SS nails, but was bought out and dropped them. I get them now from Sheridan Leather Outfitters. They sell SS nails by the pound. I have ring shank and twistshanks in a couple lengths, and am thinking I still have some smooth ones left over too. Any other sources I found were 5 or 10# minimums.
-
Marlon, My shop is a long single car garage - concrete floor. I like the concrete under the sewing machine for oil drips. I like concrete at my tooling area, so my chair can roll easily. Around the work bench and cutting table I put down those anti-fatigue mat squares from the building supplier/big home improvement places. They are squares that interlock. Makes a nice surface to stand on, and forgiving for blade tools that might fall.
-
ebay changes & boycott Feb 18-25
bruce johnson replied to unicornwoman's topic in Marketing and Advertising
I had two off forum questions yesterday, and another this morning on my comparison of ebay and real auctions. First off on consignments. Locally, feed and tack stores generally charge a 10% fee at minimum for items like a used saddle. Some charge a 15% fee on saddles, and "showcased" new items like a tooled purse or whatever - 25%. Realize that they are selling a line of American West or Montana, and these handmade items are competing items with higher margin items for them. Auction sales commisions may vary a little but not much. Most used tack sells with a commission of 15-20% on saddles, and may be 25-30% on miscellaneous items. It depends on the sale. Some of the miscellaneous household auction/antique auctions are about 25%. Some of the slightly higher end sales might charge a catalog fee also, to have a better item listed, that varies from $10-25. I am not sure what the high end western collectible auction houses like High Noon and the Cody auction have for seller fees. Pretty safe assumption it isn't 10%. A "buyers Premium" is basically an auction commission charged to the buyer based on final bid. It is a percentage. For instance if I paid $650 for a saddle, and the buyers premium is 10%, I pay $650 plus $65 bp, or $715. Some premiums are a higher percentage. It is basically another way for the auction company to recoup expenses and make a profit. Some of the sales with high production expenses like Cody and High Noon, most all art auctions, some antique and car auctions do this. Pretty standard deal with a lot of auction companies. It allows the auction whose expenses may be more than the listing fee or sales commission charged to be profitable. Some of the fixed costs could potentially be in the range of 35% of sales prices. Not many sellers want to give 1/3 away, but will allow a 20% commission, and with a 15% buyers premium, the auction company comes out. The American way - profit, it is what keeps us all in business. -
Get out the SUNGLASSES
bruce johnson replied to Elton Joorisity's topic in Clothing, Jackets, Vests and Chaps
Elton, Very cool. I like the pattern too. Nice workmanship, and those will light up an arena for sure. -
Troy, Welcome to our little corner of the world. Your reputation precedes you here. Glad to have you aboard, and I am looking forward to seeing more of your work. Don't worry about the computer skills, you've got the rest of it goin'.....
-
Dink, I thought I replied to this earlier, but appears that my dog ate the homework. My clutch motors have had a switch to reverse the direction of rotation. If you just swap ends and don't change the rotation, I would suspect the feedwheel would be going in reverse.
-
ebay changes & boycott Feb 18-25
bruce johnson replied to unicornwoman's topic in Marketing and Advertising
I have been satisfied with ebay as a buyer and seller. As a buyer, the automatic bidding takes the time and emotion factor out of it for me. I set my max and let it roll. I have sold a few used saddles, and some other things on ebay. The sellers fees charged even on the higher dollar stuff was way less than comparable commission rates at any auctions I have been around, or consignment fees at local feedstores. Ebay really doesn't do or allow things that aren't done at any other auction, except they haven't started charging buyers premiums yet. -
Marlon, I don't use mine as cutting tools. I use them to define a crease or to burnish cut lines. I don't want them to cut any deeper. That said, every maker seems to make them a little different in cross ection profile. Most of my oldies are a rounded profile, much like a cross section of a really dull round knife. The newer Osbornes are more like a thicker chisel profile that comes to a dull point.They make v groove in wet leather. I got one from Jeremiah Watt that was thinner stock, but had a definite kind of sharp edge that would cut if you applied much pressure. I rounded that over, and like it pretty well now. The oldies will lay open a cut line a little more than the thinner stock one from Jeremiah. I do have a tiny old Gomph that makes a narrow little channel.
-
Award and Appreciation Items
bruce johnson replied to bruce johnson's topic in Marketing and Advertising
Dink, Bob Brenner's book is called something like "How to Determine Prices for the Saddlemaker and Leather Worker". He advertises it in the classifieds of LCSJ and Shoptalk still I think. Most profitable $40 I ever spent. Pretty sure that Shoptalk has it in their book section too. Basically it tells you how to figure overhead, and what goes into that. Then figuring an hourly wage, and combining them to determine a shop rate. Then he discusses markup and profits on materials. The principles are pretty solid and applicable. Some people get hung up on his actual prices and miss the point of how he gets to them. When I got my business license, I got a years worth of advice from a retired business owner/advisor through a local businessman's organization. He read my copy of Bob's book, bought one for himself, and recommended it to some other "handwork" customers to use a model. I don't figure everything exactly like he does, but it was a good guideline to get started. -
It is custom. Tandy used to have an order from for those custom stamps, made by someone else. My makers stamp is exactly like that. A long, long time ago in a galaxy far, far away. Tandy had what they called the Tandy College of Leather Arts. A nifty little program. You completed modules on different things - case making, figure carving, saddlery, clothing, carving, lacing, braiding, hand sewing, etc. For evey group of modules you completed, you got moved up into another level. Once you reached ""masters", you were given wholesale prices for life, and other rights and benefits. The local Tandy I dealt with gave you your makers stamp once you completed the second level. I don't think that was universal, but the local store did it. They figured you had purchased enough materials to complete to that level, you had earned it. I really enjoyed that program. It made you do things you probably wouldn't have (like figure carving that deer 6 times to get one good enough to pass). You found out what you were good at, what you weren't, and what you liked to do. I got a lot of good instruction, Peter Main came and did the embossing class. A good program.
-
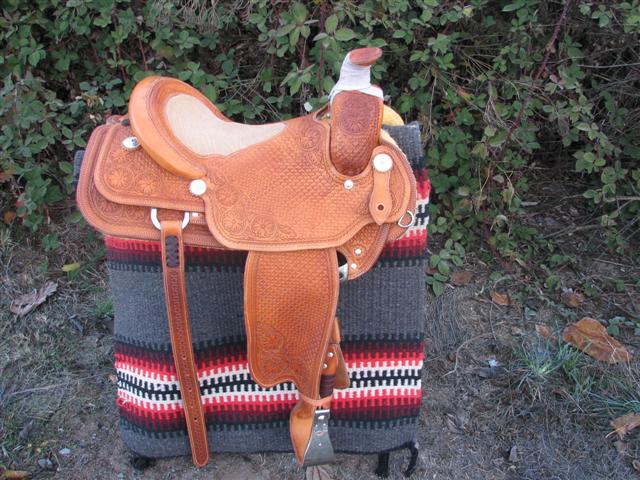
JW, After doing my first plate probably 5 years ago, I don't go back except on repairs or for a specific purpose. I like them, and find at least how I was taught to put them in, no significant issues with bulk. I see some guys who have used a deep skirt pattern. They make a relatively shallow plate pattern and the ring is on top of the skirt. That looks bulky, and I am sure is not traditional (i.e. "dropped plate rigging"). A shallower skirt pattern or butterfly pattern skirt, and the rigging dropping below that is less bulky. Using good leather, and longer tapered skives on the liner can help with the bulk issue. I am attaching a pic of my wife's saddle. It has little shallower skirts, and the plate drops off the skirts. I have got on and schooled quite a bit in this saddle, and I really couldn't have told you there was a plate rigging in it. Where I hit with my legs and feet is below the rigging. After you put a few plates in, and then go back and do a dee ring rigging, the dee set up looks pretty anemic.

-
Tracy, We are going to strike out all the way around on my first saddle. The tree was by Jim Parry. No longer with us. The leather was the Caldwell-Moser when they were in Indiana, gone too. The color came from Tandy ProDye, no longer with us, and mixed with neatsfoot oil. The drawdown was actually made from used concrete forms, and it was replaced last spring by one of Ron Edmond's hydraulic stands. The only thing I still have is that saddle blanket under it.
-
Note to self, call JW about the foam inserts tomorrow. Make a last to stretch bucking rolls over this weekend. This has been one stellar day. Thanks, Amigos.
-
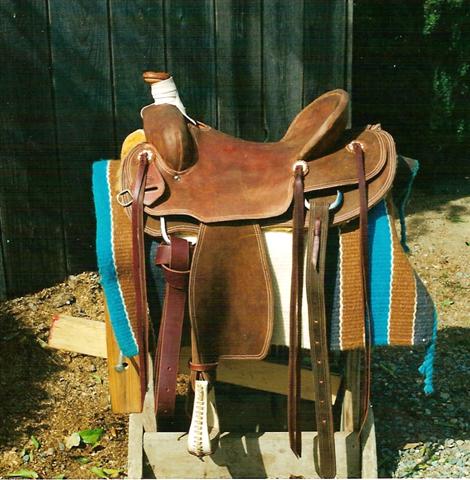
Tracy, Neat idea. This is my first solo. Association roughout. I still see it now and again. Like when it fell off the flat bed and the gooseneck tires got the off fender. Still out there working for a living, owned by a guy who takes care of nothing.
-
Don, That is really cool. You picked a saddle with every difficult variation and did a great job. It looks great. Take it in, you deserve it.
-
With the popularity of the slick forks, seems like bucking rolls are getting more popular too. I am curious on a few counts. I used to buy, was easier than making for me. Now I want to start making some. I have some patterns, and have seen some other variations in height and shape of the roll. I have seen some newer variations about center connections - thongs, wider lace, and the latest, a silver 3 piece buckle set. Some fasten up under the gullet. Some are stuffed with wool clippings, curled hair, synthetic stuffing, etc. Also on using exotics, on some of the thinner ones, do you line them with something stronger for body?
-
It seems like we are talking a lot about trees lately, but rarely have there been much discussions on trees between groups of saddlemakers and tree makers. I think the recent discussion really emphasizes that there is a lot of good opinion and experience on this issue. I think we all agree that we need to get saddles that are a workable match for our customer, whether they are riding one horse or a barnful. To further define some of the tree discussions, I want to limit this thread to two different scenarios on bars only for the treemakers and play the devil's advocate. 1) I am a saddlemaker, and want to start using your trees, and you want me as a customer. I have used trees from ------ and ------- before. The ones from the first company didn't fit right (customers said), and the second guy's trees did. I have not seen your trees before. How do I tell you what I want as far as bar shapes - angle, spread, twist and rock? I don't want to order your "standard" , wait 4 months, it is not what I was getting from maker #2, and I will now be out 8 months and the cost of this tree to reorder. 2) I am a regular customer of yours. Together we have been doing a good job meeting our customer's needs. Now his wife decides she wants a western saddle to ride her new Peruvian Paso, Spanish mustang, morgan, whatever. We have fit hubby's ranch and rope horses in the past, how do I decide what to change and how to fit the wife's new ride?
-
Krains, I used the Lexol conditioner - brown jug. As an aside, I had a few emails about what leather I use the casing mix on. It was Siegel's golden oak skirting. Some guys who have used it know, it tends to be softer than Herman Oak to start with.
-
Hilly, Don't panic. If the spots were on your leather initially, I would think you might see some differences in initial absorption when you cased it, maybe not. First off, if your neatsfoot oil ever got cold and solidified, it will get little waxy flecks in it. Heat it up enough and these will melt back into solution. If you apply it and they haven't, they just sit on the surface in little waxy globs. No big deal, either warm it up in the house or hit them with a little heat. I use a quick wave of my paint stripping gun. It will even out. No biggie. To answer another question, neatsfoot oil now is reported to be pressed hogfat oil. I have used it for years. I have used olive oil too. I still use it on all my reins. I have several headstalls treated with olive oil 20 years old, I still use them. Subject of another debate that we probably won't change many minds on. Hasn't happened in most previous discussions here and in other groups. On the subject of Supersheen over oil, go for it once the oil is even. I have also done this almost from day one. I use either Leathersheen from Feibings or Supersheen. If you want to use a finish coat, do it. I have had no problems using it on oiled leather. I have applied it over vegtan, Diamond tan, chap, workchap, Siegel's greasy USA latigo (once I melted the waxy dressing into it), most everything. Every personal item I make gets it - wallets, belts, planners, purses, briefcases, ropebags, placemats. Stuff that will never see sun, and stuff that will live in it. Rained on, spilled on, hit with the sprinkler, sweat, and the water truck. I use other finishes or no finishes too, but the Sheens are my go-to's. A light wipe with a sponge, let it almost dry, hit it again. The placemats might get 6 coats on the using side. They might feel a little like plastic, but they wipe right off. Most stuff gets 2-3 light coats. My experience.
-
Denise, To weigh in here. Dee ring riggings are pretty difficult (but can be done) to provide much forward swing further back than 7/8. Also as was seen on the pics of the cutting trees you have seen, there is not much width or wood in those front pads. That is a construction factor. Obviously with the skirt rigging, position is a lesser factor. The bar pads not being as wide, a little flare, and there is less shoulder interference that might occur with a wider pad and more to the front. Of course the smaller pad and other factors (less wood on the horse) play into this to not necessarily make these bars the choice for some other applications. So the traditional way has been to make the cutters full or 7/8. I think I brought this up, but many unkowning horse owners (who are good in their respectuive field) have been able to set the saddle by placing the latigo and cinch behind the elbow. It's the only postion they have seen in the last 25 years. Now with Ray and the others on the road, the interest in the Wades and flat plates has picked up. They get a 5/8 or 3/4 rigged Wade, and set it so the latigo is behind the elbow. They cinch it there with the breast collar and have problems. It kind of goes back to my previous thread about making saddles for arena horses vs. all day sloggers. Regarding setting the back riggings. Sitting here looking at other works, the point of the cantle or just a bit back looks to be pretty common. I use this in regards to 3" dees, my standard for most rear dee riggings. Even if I use 2-1/2" dees, that just moves me 1/4". Probably not a huge factor in back riggings for saddles that aren't going to take a jerk. If I am doing slots or plates in a flat plate, I move them back a little off that. It was the reference I was taught. Not sure now how universal that is. Ok, Great! You just caused me to question something else I THOUGHT was law and blindly accepted. Sooo, how about it folks, what does everyone else use now?? Looking at my trees here, that puts the center of the pull on the back billets right at the wider part of the rear bar pad, so I guess I am just using the cantle point to get me to that point of the rear pad. I can see where a Taylor cantle vs. oval might change that reference. Interesting.
-
Judy, I get some guys that bring me a can too. I usually piggyback an order for cans onto someone else's order who is an authorized resale customer for Smith Bros. Otherwise I have to order 10 cans at time (which I do on occasion). If it is just one or two cans and not a color I have on hand, I'll order them retail. Most of my award orders for cans have had the cans sponsored or donated to the organization already. I just have them send me the lids. I do the same for guys out of the area, just have them send me the lid if we use their can. Last year at the Wickenburg and Elko leather shows, Latta Mfg (Kaufman, TX) had the thinner rope cans and the goat cans. Their price was pretty good. I am getting ready to order some goat cans soon. Personally I prefer the Sierra (Smith Bros) rope cans better, They are more durable for me. I have had them for about 25 years, and know they hold up.