


toxo
-
Posts
2,261 -
Joined
-
Last visited
Content Type
Profiles
Forums
Events
Blogs
Gallery
Store
Everything posted by toxo
-
Those are 11.7 Folker. I thought I could get away with 11.4. But only one hole. 20PCS #282768 ALUMINUM BOBBINS fit for SINGER 211A 411U Walking Foot Machine | eBay
-
Have just bought some that measure 28x11.4. I think they'll fit else I'll sand em down. Might drill some more holes cos they only have one,
-
Thanks for the effort guys. @1hp Link doesn't have any machines that I'm looking at. @DieselTech As said, my bobbins are 28x11. Confusing! Have asked my China lady, they make the machines but can do the stuff that goes with em. The time difference is a problem.
-
I've been searching for bobbins for my 341 clone. I thought my bobbins were "M" size. All the bobbins I can find for the 341, Techsew 2750 etc have "M" size bobbins that measure approx 25mm x 11mm. My bobbins measure 28mm x 11mm. Clearly my machine has a larger hook than "Normal" but is it the only one? Not complaining mind, loving the capacity and I ordered 10 spares when I bought the machine but I'm running out now and would like to know where to get some more.
-
I've had a big unopened bottle of the stuff for a long time. And don't know what to do with it. It's not waterproof so I've always used Resolene as a finish. Apparently it can be used as a dilute for Fiebings Antique which I don't use so can it be used to dilute other dyes? What's you guys experience with the stuff?
-
Seems we are both boy scouts. I also like to be ready for all eventualities. I will go out for some silver later but I found some "JB Weld" and without much hope I stuffed the hole with that and blow me it seems to have worked. I got impatient and drilled the hole before it was fully hardened and so is a little bigger than I wanted but much better than before. Got some sewing to do today but if alls well now it's fully hardened i'll bung some more in there and do it again. I've asked China to send another feed dog to modify.
-
Magnet sticks so must be a mild steel. Been meaning to try silver for a while now. I have two large compasses?/dividers and the bit that holds the pencil has fallen off both. Tried soft solder but didn't work so I can see some more learning on the horizon. (If I can find the bits that fell off).
-
I soft soldered it and it filled it nicely but it's a straight bore hole so didn't stick. Never used silver. I know it's harder/higher melting but will it stick?
-
I'm certain I'm not the first to bring this up. Seems enormous on my 341 and because I use a variety of weight leather including upholstery weights and sometimes sew close to the edge the hole is a problem. How can I make it smaller? Solder? Maybe ram a thick copper rivet down there and re-drill the hole? Any other suggestions? I'm about to Whatsapp my Chinese lady to ask if the company does one with a smaller hole but I'm not holding my breath.
-
12 BOTTLES OF WHISKEY. I had 12 bottles of whiskey in the cellar and my wife decided she was fed up with me getting drunk and so ordered me to empty each and every one of them down the sink - or else!!! So knowing what “or else” might mean I proceeded with the unpleasant task. I withdrew the cork from the 1st bottle & poured the contents down the sink with the exception of one small glass, which I drank. I extracted the cork from the 2nd bottle and did likewise with the exception of one small glass which I drank. I withdrew the cork from the 3rd bottle and poured the booze down the sink with the exception (not wanting to create a precedent) of one glass which I drank. I pulled the cork from the 4th sink and poured the bottle down the sink which I drank. I pulled the bottle from the cork of the next one and drank one sink and poured the rest down the glass. I pulled the sink out of the next glass & poured the cork down the bottle. I pulled the next cork out of my throat, poured the sink down the bottle and drank the glass. Then I corked the sink with the glass, bottled the drink and drank the pour. When I had emptied everything, I steadied the house with one hand and counted all the bottles & corks & glasses with the other hand & there were 29. To be sure, the next time they came around I counted them again and counted 74. I was sure I had em all this time but there was one glass left which I drank.
-
Handbag finish
toxo replied to NewbieHobbyist's topic in Dyes, Antiques, Stains, Glues, Waxes, Finishes and Conditioners.
I haven't used any of these products except Resolene which I find works very well. Diluted 50/50 with water looks terrible when applying but magically evens out and leaves a glossy shine (I use white Resolene). Two coats is even better. No idea how it would react with the products you mention. But as you already have some I would be inclined to give it another go. Maybe there's a difference between the white and the brown? Didn't know they did it in brown, every day is a school day, the white dries clear anyway, IIRC Ian Atkinson (Leodis) has a video on waterproof coatings and Resolene came out on top. -
Lets have a look at a "Genuine Leather" belt???
toxo replied to kgg's topic in Leatherwork Conversation
We all know that a £15 belt or a £20 bag is as far removed from "real" leather as it's possible to get but most of Joe public don't know that. The only way to change things is legislation which is highly unlikely and even if there was such legislation how would you police it? -
Nice job Keith. You're pretty handy with that printer ain't ya. Well done.
-
Table Top Questions for Cylinder Arm Machines
toxo replied to kgg's topic in Leather Sewing Machines
This is the table top I ordered with my LS 341. It's 48cm long and 39cm wide and 25.3cm from the front to the start of the cutout. The perspex is 8mm and the metal bit is 3mm. The two thumbscrews do a good job of holding it in place and there's a hole at the right hand side of the machine which is handy to drop in any old screw to help keep it in place although I have to say, before I put the screw in the T/T only moved a maximum of around 2mm. I like it very much. It's quite robust enough and although I've leant on a couple of times I wouldn't like to stand on it..thumb.jpg.a4d1f7561998f5f0629f5dcbf48c482c.jpg)
.jpg.5879002996c7777f11147cb614c7d5e9.jpg)
.thumb.jpg.5f23e3a5c02c4fd15046dbb45d1cde2f.jpg)
.jpg.71139662e06bef523090e094524b2b2d.jpg)
.jpg.f28032ed0c713021a7ff03237333fa79.jpg)
-
It really depends on your market. If the area is money the rules are different than a depressed area. If the latter and the price is bound to be limited I would aim at getting your "shop" kitted out to turn out the quickest designs in better quality. Don't try to please all the people all the time with lots of types because you won't do it plus switching from one type to another is likely to lower the quality. Rather stick to one or two designs and make the difference in colours/fasteners/pocket or no/lining or no/ zips or no. You get the idea. Don't cut silly corners. That bag with one rivet in the strap is an accident waiting to happen with a full bag. Good luck.
-
If I didn't have my 801 skiver I'd only use a French skiver. They come in various widths and if you keep the same angle it's almost impossible to go through the leather because of the wings.
-
Here in the UK we have no clue what 130 mph wind feels like. I have a good idea though and my thoughts are with you. Must be truly frightening to know what's coming and be unable to do a damn thing about it.
-
Fourth Time is the Dubitable Charm
toxo replied to Mablung's topic in Shoes, Boots, Sandals and Moccassins
Was a normal pic until I scrolled down and saw the feet, then for some reason I started laughing. No clue as to why, just found it funny. As for the shoes, I think a thicker leather on top would put some shape back into em. -
Peeps know that I adore Cechaflo. He uses a stapler quite often which can save some time. I found this one on Amazon which looks about half the price of most of em. I was surprised when it arrived, it's quite small and fits the hand really nicely and is easy to use so I thought I'd share with you peeps cos that the kinda guy I am. Make sure you order some staples with it cos it doesn't come with any. I had lotsa staples already and 26/6 fitted nicely. D.RECT 0317 Stapler Plier | Paper Stapler | Perfect for Office or Home | Ideal for Organizing Documents| 20 Sheets | Metal Construction | 24/6 and 26/6 Type Staples,Black : Amazon.co.uk: Stationery & Office Supplies
-
Loving the forked stick to hold the harness.
-
Someone should make an air gun or pop gun or even an indoor catapult and use use them as ammo.
-
I've seen various YouTube vids where they iron upholstery leather with a kind of reusable mesh. I've also seen it for sale somewhere, maybe ebay or amazon. Ironing Mesh Mat High Heat Resistance Clothes Protector Board Cover Net | eBay Perhaps it wasn't leather? Cechaflo does it again. But not mesh. (2) How to erase wrinkles and folds - Leather Upholstery - YouTube
-
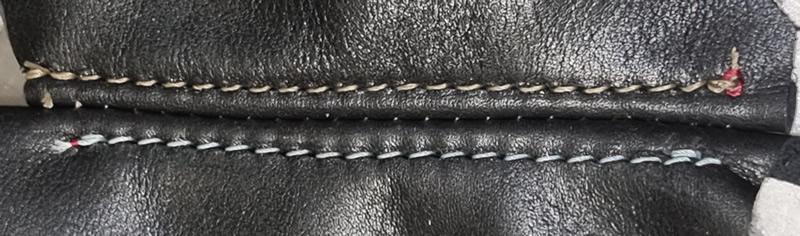
I'm on black flesh side and it's slightly furry and get's manipulated quite a bit so I need something that stands out and lasts. If you look at my patchwork thread you'll see what I mean. If one square is out of sync it throws out those around it.
-
Not that easy to get bonded polyester in all the colours over here and then it's an arm & a leg. Have lots of colours but not for this project. Have a great grey but it's V69. Have lots of V69, have a few V138 but not for this except black & white and don't have the needles til Tuesday. Found a couple a couple of V92s, here's a toast and a powder blue but I'm almost sure it's gonna be black in V138.
-
They look like the ones I bought the other day. Great on the top side. Not so much on the flesh side.
.jpg.260f5d631715f2217fec2b08a21408b0.jpg)
.jpg.a34792c1caf43b2483dc936b1b8e5343.jpg)