


Randyc
-
Posts
496 -
Joined
-
Last visited
Content Type
Profiles
Forums
Events
Blogs
Gallery
Store
Everything posted by Randyc
-
Greg I'm dangerous with a Dremel. Think I will use a hand file!!!!
-
Elton and Greg Thanks for your inpute. After studying my machine and manual, I found my machine has 2 presser feet. The part I refered to as the needle bar is a center groover presser foot that is attached to the needle bar with the needle passing through this foot. The other presser foot is a left side walking foot. The groover at the bottom of that foot directly below the needle bar is the one that is a problem. I think I may just file if off. Randy
-
Elton I'm refering to the needle bar sir. There is a protrusion on the bottom of the needle bar that pushes the stitch down. My issue is not connected to the presser foot. Randy
-
Thanks, Jeff your correct. After I mentioned adjusting the needle bar, I thought it through and decided that wasn't a good idea. I was busy cuffin and stuffin the bad guys today and didn't get a chance to edit my post. I molded a holster over the weekend and was able to smooth out the indentation made from the needle bar skeg. I may just leave well enough alone. If I do decide to remove the skeg, did you use a dremel tool when you removed yours? Randy
-
Thanks for the responces guys. In lieu of removing the needle bar skeg, I wonder if I can possibly adjust the needle bar so the skeg doesn't make such a deep depression? I may have to call Artisan on that one. Randy
-
I'm not sure of the thickness of the area of the bucking roll that you want to fancy stitch, but I do have some experience with stitching cowboy boot tops (I studied under custom bootmaker Carl Chappell in Saint Jo, TX.) I use a vintage Singer 31-15 commonly known as a tailors machine with a roller foot. Much beyond the thickness of boot tops and liners and say size 69 thread would be a bit much for this type of machine. I realize this is an older post, but you may want to ask this question on the Sewing Machine thread. Art over there knows his sewing machines. Hope this helps you out some. Randy
-
 Okie Nice looking holster. I think thats how most holster makers start off. You build a few for yourself, a few for friends, then before you know it, your shipping them around the country with a year or more waiting list. Yah, I wish! Randy
 -
I stitch my holsters with an Artisan Toro 3000. The machine does a great job. The only problem I'm having is the skeg on the bottom of the needle bar. I assume it helps lay the stitch down. The problem I'm having is the skeg leaving an ugly little groove when I start stitching. It's also a problem when I stitch a tight curve or make a 90 degree turn. I've thought of pulling the needle bar off, grinding off the skeg and using a groover to lay out my stitch lines. Are there any other options? Also, which presser foot and needle plate is prefered by you guys for holster making? Thanks! Randy
-
Holster makers opinions requested
Randyc replied to okiwen's topic in Gun Holsters, Rifle Slings and Knife Sheathes
Tony Very well stated. You and several other contributors to this forum are truly a credit to the custom gun leather business. Randy -
New folder sheath
Randyc replied to DCKNIVES's topic in Gun Holsters, Rifle Slings and Knife Sheathes
Great inlay work and overall design. I'm sure your customer is proud. Randy -
Question on mounting Pull The Dot Snaps?
Randyc replied to Randyc's topic in Gun Holsters, Rifle Slings and Knife Sheathes
Jeff I've been using regular Line 24 snaps purchased from Tandy. Are the Tandy snaps different from the line 24 snaps you mentioned? And if so, where do I purchase them? Thanks again Randy -
Pancake Holsters
Randyc replied to BOOMSTICKHolsters's topic in Gun Holsters, Rifle Slings and Knife Sheathes
Jeff Great job as always. I've made a few wallets and money clips trimmed with shark. It's really tough stuff and holds up well. I'm currently designing a tunnel/loop design holster for my Glock 34. I'm going to trim out the mouth band in either shark or caymen. Randy -
My next foray into custom holster design will be a IWB design. I want to use "pull the dot snaps" on the belt loop. I've been mounting my line 24 snaps with an arbor press and line 24 die set. Will I be able to use the line 24 die set to mount the pull the dot snaps? If not, whats the best way to mount the snaps? Thanks Randy
-
New Kahr PM45 Holster
Randyc replied to Randyc's topic in Gun Holsters, Rifle Slings and Knife Sheathes
Srigs, Thanks! That tunnel and loop holster was my first design departure away from my pocket holster and pancake designs. I wear that one myself. The pancake/beltslide holster went out to a customer. Before I start selling the tunnel and loop design, I'm going to raise the tunnel and loop a bit for a little more stability, particularly with the grip heavy double stack magazine pistols. I just finished up on a tunnel/loop design holster with mouthband for my Glock 23. So many holsters to design and build, and so little time. Randy -
Don Nice looking rig. I'm sure your customer will be proud.
-
New Holster for Glock 19, 23 or 32
Randyc replied to BruceGibson's topic in Gun Holsters, Rifle Slings and Knife Sheathes
Bruce A very clean holster with excellant boning detail. -
My first holster ever
Randyc replied to Shorts's topic in Gun Holsters, Rifle Slings and Knife Sheathes
Shorts That was one heck of a first attempt at holster building. My first holster and several there after were only fit for chew toys for the hound or to help line the bird cage. I've admired your holsters on other forum(s) You've come a long way! Randy -
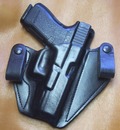
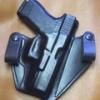
I built this tunnel and loop holster for my Kahr PM45. I used 8/9 oz. leather and dyed it USMC Black with a natural tan coat finish I built this belt slide holster for a customer's PM45. I used the same 8/9 oz. leather and finish
-
Grunt, I have to agree with the other guys. That press would not be a wise choice. I've posted a photo of my Weaver Press. I haven't found the need to increase it's 6 ton press weight. Randy
-
Tom, Do a wildcard internet search for Rings Blue Guns. Many police equipment suppliers carry them. I've seen them priced from $35.00-$50.00 so it pays to shop around. I've never used a Red Gun, but have heard from other holster makers that Red Gun's are not as close in size as the Blue Guns. Randy
-
Shorts Your holsters are looking real good. I too like the brown marbeled effect. I havent been real happy with the results using Fieblings brown. I get a splotchy rather then that nice marbeled look. I've been either leaving my holsters natural with Fieblings Tan-Kote or dyeing them black. What type of sprayer are you using to apply your dyes? I may have to try spraying on my dyes. Randy
-
I found that out the hard way. I finished one of my holsters with Fieblings Tan Kote, changed my mind and decided to dye it black. It took several coats of black dye before the smearing stopped and the surface was covered. After alot of buffing, the dye finally seems to have set. It looks pretty good now, but I doubt the dye has penetrated and will last.
-
Hi and welcome to adventures in holster making. Mike about covered it all. I too first stitch then mold. My approach to molding is a bit different. I like to use a "naked gun" as opposed to wrapping the pistol in Saran Wrap prior to molding. Take some time in drawing out your pattern and pay particular attention to laying out your stitch lines around the pistol. This will vary depending on leather thickness. I've built a few holsters where I layed my stitch lines too close to the pistol. The pistol then would not fit in the holster. The holster looked nice, but was worthless. Good Luck Randy
-
Thanks guys. After starting this thread, I discovered that the culpret was the needle bar foot and not the presser foot. The needle bar foot has a small "skag" on the bottom which I assume helps the needle track in a straight line and helps lay the stitching down. It does make a rather nasty gouge when starting to stitch and several gouges when stitching a tight curve. What would be the result of grinding the skag off of the needle foot? Maybe starting my stitch line further in then finishing the stitch line where the needle bar foot first left it's gouge, would hide the gouge ? Randy
-
I stitch my holsters with an Artisan 3000 Left side presser foot and standard need plate. When I lower my presser foot to the project, the foot is pressing a dent into my project at the rear of the foot. Do I need to lighten up on my presser foot pressure, change to another foot, switch needle plates, go have a drink? All help with my latest dilema is appreciated! Randy