MADMAX22
-
Posts
3,201 -
Joined
-
Last visited
Content Type
Profiles
Forums
Events
Blogs
Gallery
Store
Everything posted by MADMAX22
-
Kind of hard to see from the pic but looks great from what I can see. Really like that lettering style with that tooling.
-
Those turned out very good. I like the natural one the best.
-
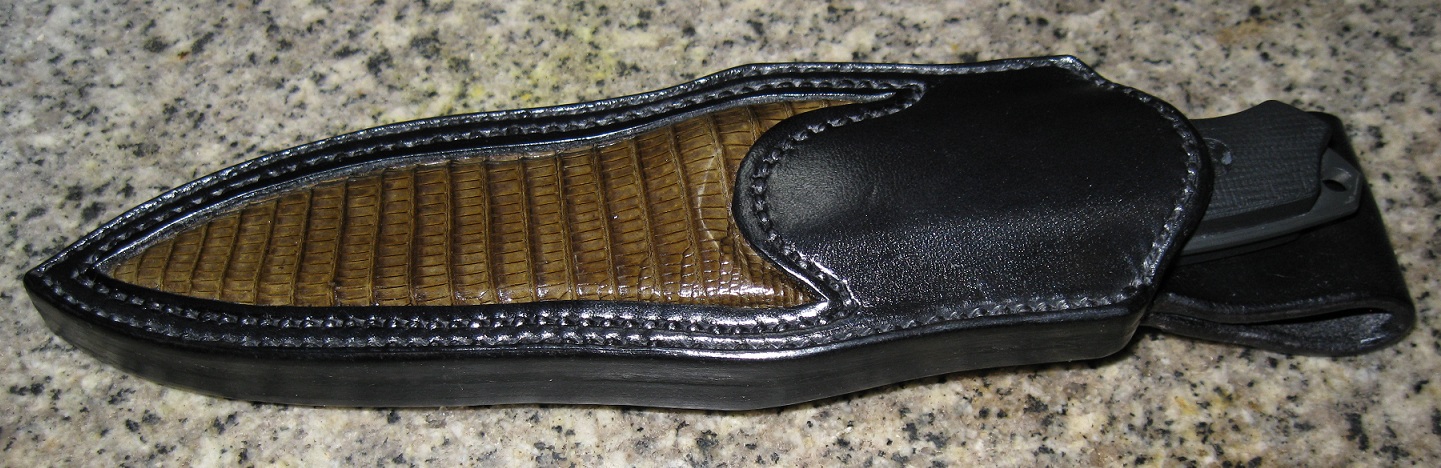
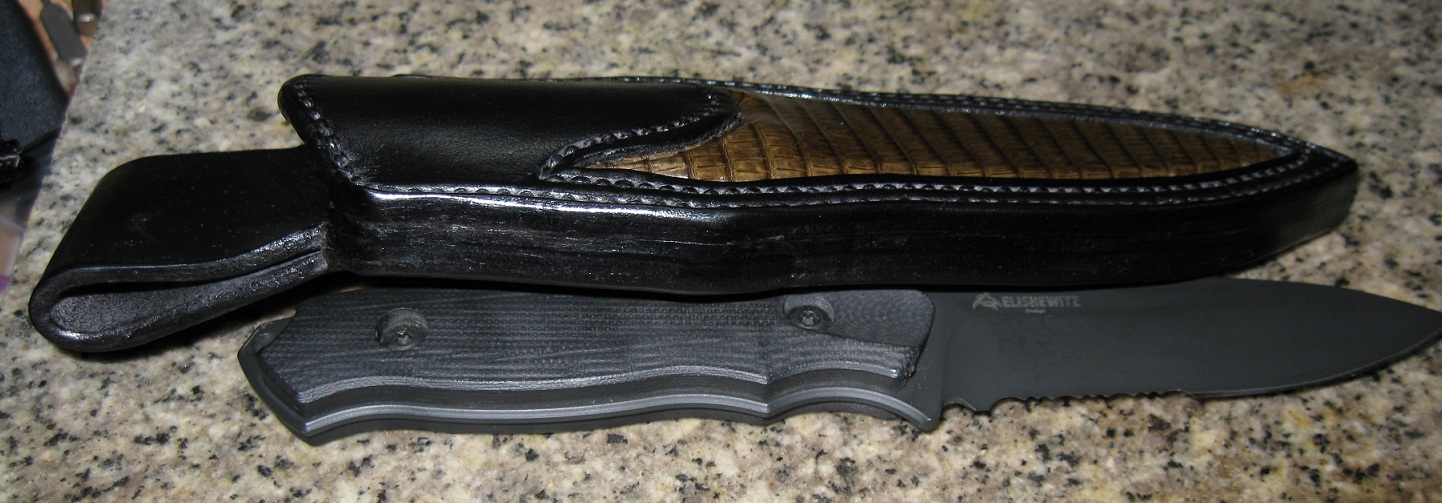
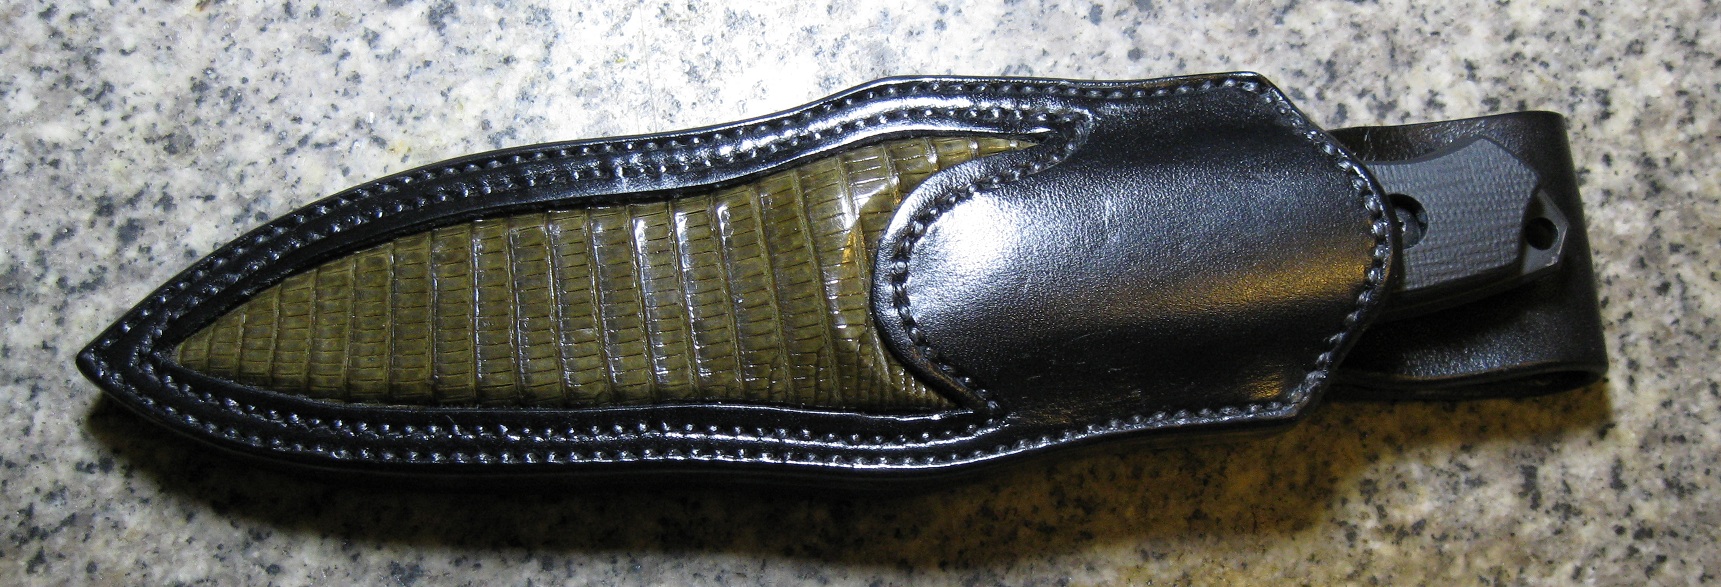
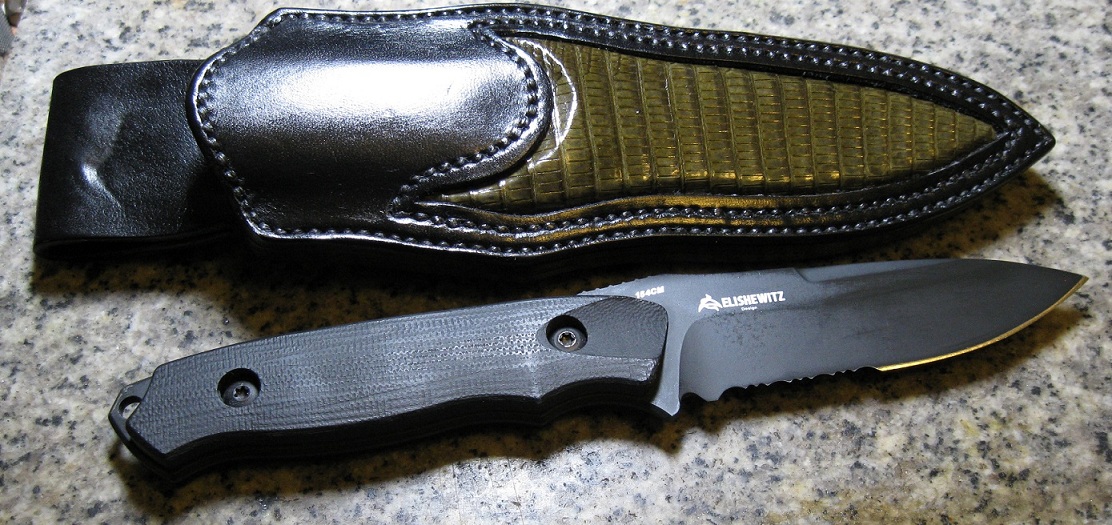
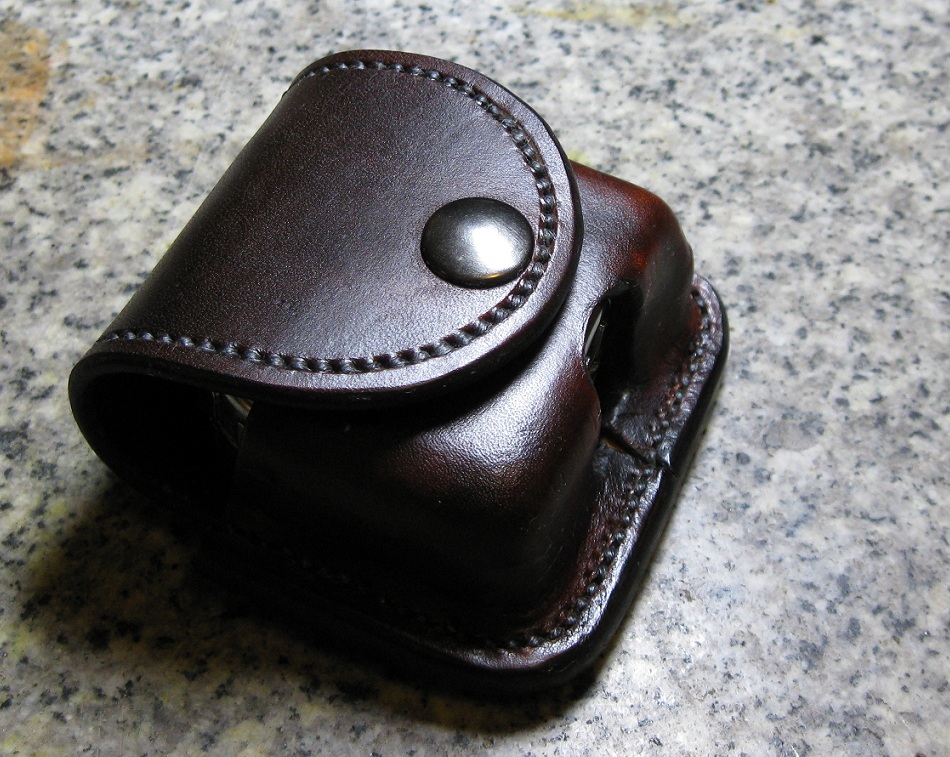
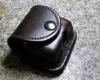
Well just finished one of a couple of sheaths I am working on for a buddy. This is HO leather, the black is vinegaroon, inlay is olive green lizard. Oiled, sno-seal, then a couple light coats of neat-lac. The top portion with the inlay is two layers of 5oz, the welt (think its called that lol) is 5oz as well, the back with the belt loop is 8oz doubled over. Alot of leather for this one. To make it a little easier to punch thru the leather with my awl and because the one awl that I have that is the correct sized width wise is not long enough to effectively punch thru all that leather I assembled the inlay portion and the welt and punched my holes, then assembled the complete sheath and repunched the holes. I had to go back thru the back side just to ensure the holes were wide enough on the reverse side. Kind of a pain in the butt however it helped alot with the final stitching. Thread is 6 cord linen dyed black. Enjoy, any constructive criticism welcome.

-

More Knife Sheaths
MADMAX22 replied to Luke Hatley's topic in Gun Holsters, Rifle Slings and Knife Sheathes
Nicely done, looks like your busy enough as it is. -
Whiskey Bottle Holster
MADMAX22 replied to KY23's topic in Purses, Wallets, Belts and Miscellaneous Pocket Items
Ha pretty cool and a good idea. Dont wanna be in the beer line lol. -
Yeah Ive used it and I think there are better products out there. I use sno-seal and alot of followers here of pecards. Someone (sorry forgot who) did a really good test over a period of time and they found that sno-seal, bea naturals, pecards, and I think montana pitch blend or whatever it is were all pretty good. The obenaufs didnt offer any longer term protection. Come to think of it it may have been esantoro who did the test.
-
Thats pretty cool, thanks for the info. Ive only scene the one version with the little teeth brackets or whatever they are called and a few variations of the stitching ponies.
-
Thats really cool. Great find and must say it doesnt look overly worn at all. That is a interesting tensioner that it has on it. Far different then the others I have scene.
-
Good looking stuff, great stitching by the way.
-
Thanks David. Yeah I hear ya about that wet forming on those seats.
-
Overstitch Wheel?pricking Wheel?marking Spacer?
MADMAX22 replied to chouinardragon's topic in Leather Tools
Being proficient with the awl just takes time and proper practice. At first you will get the front to look really good but the back side is what usually takes the most time to learn how to get properly lined up. Once you get the feel for it though you will speed right along and have very nice looking stitching. -
Fiebings Colors
MADMAX22 replied to Daggrim's topic in Dyes, Antiques, Stains, Glues, Waxes, Finishes and Conditioners.
Good then Daggrim, they are nice to work with. If you get a chance I would still say try the angelus dyes maybe just get a couple of the small bottles to play with. I prefer the oil dyes but have used the angelus dyes and they work really well also. Luke I gotta get some more of that chocolate dye, that stuff is great for when I do my edges, its close allmost to black after its burnished but not quiet and looks really good with any type of brown overall project. -
Hey Jim I use 6 cord pretty much 90% of the time and I use a 8 SPI for it. Looks really good IMHO. I dont think I would go any closer then that but thats just me. This isnt the best sewing job around but it will give ya an idea of the combination of the 6 cord at 8 spi. Hope this helps.
-
Folder Sheath Made To Customer
MADMAX22 replied to Rocky's topic in Gun Holsters, Rifle Slings and Knife Sheathes
Great looking stuff. Ive been meaning to ask how do you like those integrated belt loops like that? Do you prefer those over adding a seperate piece of leather as a belt loop? -
Overstitch Wheel?pricking Wheel?marking Spacer?
MADMAX22 replied to chouinardragon's topic in Leather Tools
They come in different threads per inch spacing and each brand seems to have there own little design on how to do it. The overstitch guys from what I understand were more of a combo space marking then ran back over the threads once sewn to kind of lay them down and keep them in line sort to speak. The others which are just for space marking have more of a point and actually pierce the leather a little bit, this gives you a staring point for the awl blade so as to make sure you hit the exact same interval every time. Atleast thats my limited understanding which is pretty much what was covered. -
Nicely done. Those are very clean and neat with the tooling.
-
Welcome to the forum. I also am up here in the great Norwet. Every starts out at some stage of "needing improvement" ecspecially when you start comparing your work to people that have been doing it for 20 or 40 yrs or more. This site if you read alot will help progress your work very quickly though and before you know it you will be turning out very much improved projects in no time. Enjoy.
-
Simple Wallet
MADMAX22 replied to MADMAX22's topic in Purses, Wallets, Belts and Miscellaneous Pocket Items
Its a good dye. The feibings pro oil dye is also very good also and you can get it at Springfeild as well. I would try both of them out and see which you like the best. Also thanks for the compliments guys. -
You can do alot of different things. You can make the neck portion of the strap wider then use a 1/8" thickness neoprene on it then cover that with suede (I do this with my rifle slings and it works very well). You can also take some type of chrome tan leather and fold it in to the middle. This makes a flat strap with rounded edges, then sew the the strap on top of this. Makes a nice thick smooth strap that I have scene used on purses and such. You can also make a larger padded area that has slits that the strap rides thru on top of it. the strap rides on top of this padded portion and you can move the padded portion around to get it in the right spot. Have a look around at hand bags, purses, slings, guitar straps ..... any of these things should give ya some ideas to start playing with. Also I would look into getting some nylon straps for the attachment points for the camera as these are usually pretty small little guys. Unless you can get some clips that hook to them with larger attachment points for the leather. Al Stohlmens books on case making have alot of good examples on making variouse straps as well.
-
Practice and read the forums as much as you can. Martin gave good advice on hole punching. Use a ruler or a wing divider to find the center of your strap and mark off your holes to be punched. Now when you mark them with a little prick of the divider make sure your hole punch lines up just to the edge of the mark. Dont try to cover the mark because you wont be able to always center the hole punch. This will help alot in getting your holes lined up. Get a few done then post up some pics if you can in the critique section and everyone here will be able to point you in the right direction on what needs improvement and what you may be doing right or wrong.
-
Simple Wallet
MADMAX22 replied to MADMAX22's topic in Purses, Wallets, Belts and Miscellaneous Pocket Items
Thanks for the compliments everyone, much appreciated. I have not used the cova dyes yet. I like the pro oil dyes alot and will probably get some more for certain colors. The angelus dyes are pretty darn good though, once they go on you wont get much if any dye coming off when you buff the leather out. The dye seems to soak right in and stay there. Even the black is pretty good at this. They also seem very durable for the most part and I think alot of this is because it penetrates so well. The angelus dyes are definatly worth a try if you have not yet. -
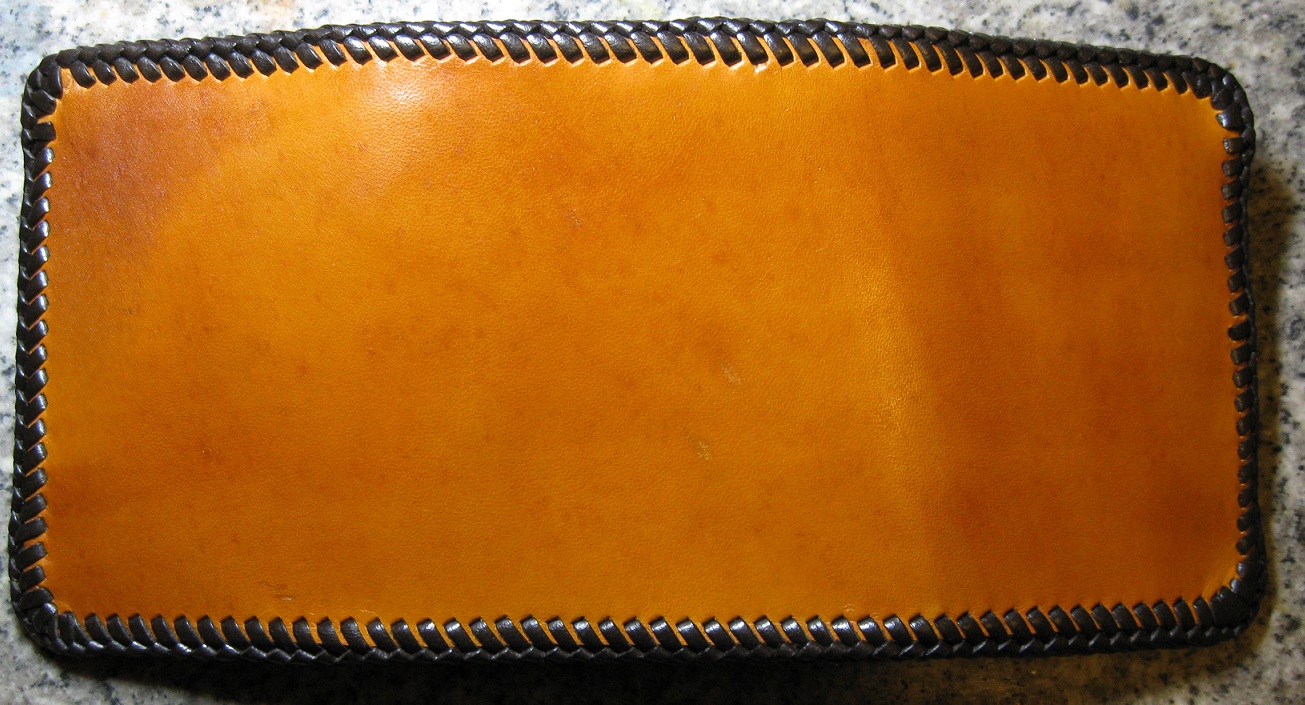
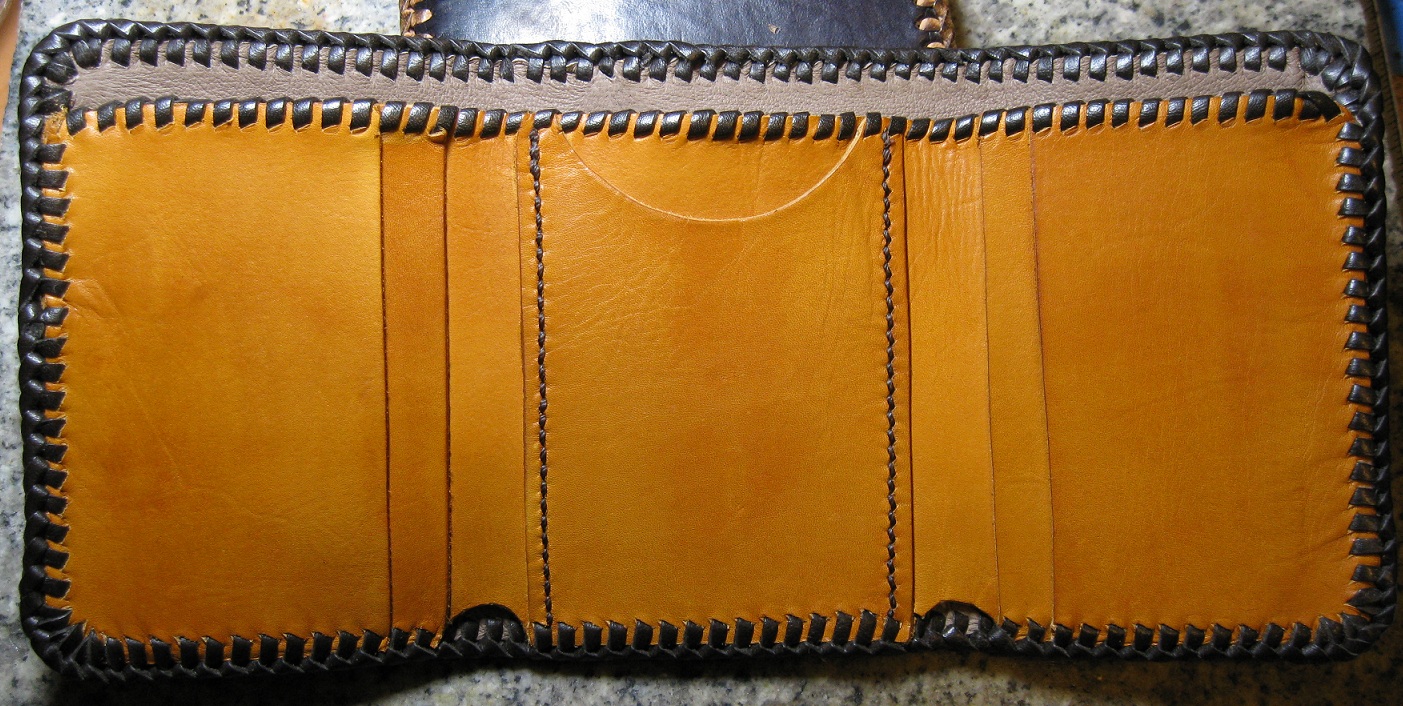
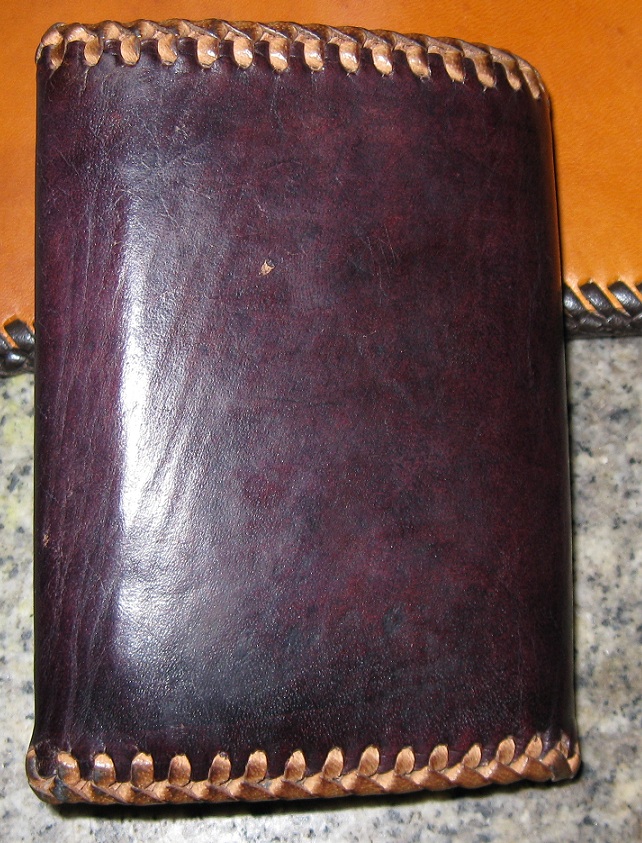
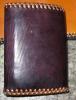
Well here is a simple wallet I made. Similer pattern that I used before and changed just a couple of things. No tooling just laced. Back is about 5oz, inside is kip or calf, lined with pigskin. Dyed saddle tan, oiled and sealed. Missed one of my holes somehow in the upper left corner, not sure how I did that lol. This is for a guy at work, just wanted a plain wallet with nothing on it so see if this will work. Oh and wanted to show a pic of my wallet that I made probably about 8 months or a year ago (cant remember) but I dyed it with angelus dye and wanted to show how well it wears. It is still almost the same color as when I made it. Seems to be holding pretty well IMO.

-
That turned out sweet, great job David.
-
Russ those are the clips that hook it to the guitar (or instrument). I forgot exactly what they are called but they are suppose to be pretty nice, they clip in I believe and you have to push the little button to release them vice having a hole in the leather that slips over the stud on the guitar.
-
Pushdagger Sheaths
MADMAX22 replied to DCKNIVES's topic in Gun Holsters, Rifle Slings and Knife Sheathes
Excellent work as usual Dave. Those are some good looking setups