dikman
-
Posts
4,847 -
Joined
-
Last visited
Content Type
Profiles
Forums
Events
Blogs
Gallery
Store
Everything posted by dikman
-
Good point, Bob. Someone on here some time ago had a similar problem, turned out to be a dried out capacitor in the start cct. (not uncommon in old motors).
-
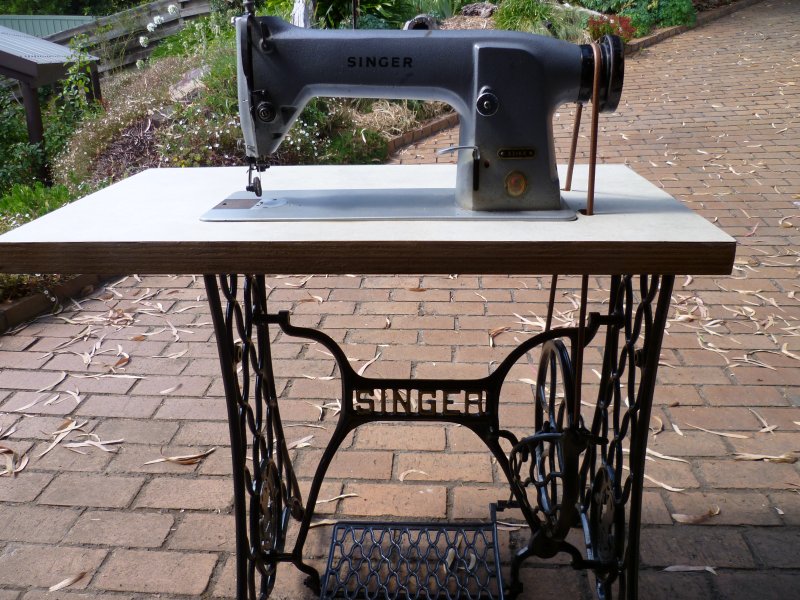
Interesting link, Lee, that guy's pretty serious! Anyhow, nearly finished - I think. Works much easier with the 331K4. One minor drawback with this setup is that the needle is almost in line with the left hand leg, so I tend to sit a bit funny at the table. I'm also thinking that a larger handwheel (and pulley) might make it easier to use. Have to fit the drip tray, paint the edges of the table and fit the drop-down part on the left side of the table (not really necessary but it was already fitted to the original table). And a spool holder. And a light of some sort. I've decided I don't like the little steel wheels on it, everything shakes and vibrates when I move it!! I'm thinking of a couple of wooden bearers under the feet with some casters/wheels, but I'm going to have to off-set the casters otherwise it will raise it too much (I think Uwe did something similar).
-
Not finished yet but I put the 166 on it to try it out. Two things quickly became apparent - I need a lot of practice to get the hang of treadling, and the heavy mechanicals in the 166 might be too much for the treadle (at least until I become much more proficient!). I think I'll put the 331K4 straight stitcher on it for now.
-
Nice! Mine has a single pedal but yep, I don't know where I can use it but I'll definitely clean it up and might even just put a nice table top on it. Whatever happens I'm not getting rid of it!!
-
I doubt it is a Singer mod, it looks a little homemade (even though it's a pretty good job). It's just a really bizarre setup. Anyhow, my replacement tension assembly arrived today from Kunpeng. Very quick service and just bolts straight on.
-
Excellent, Constabulary, I've added it to the growing list of documents that I have. The pictures explain a couple of things about mine, in particular that the thread tension parts are definitely non-standard. I also note that mine should have 1/2" clearance under the feet, so it would appear to have been re-adjusted 'cos it definitely hasn't got that much clearance.
-
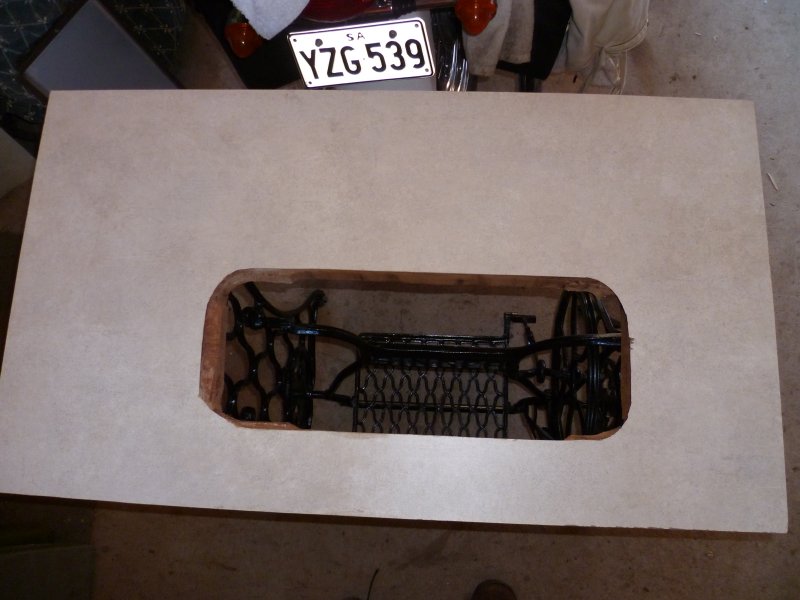
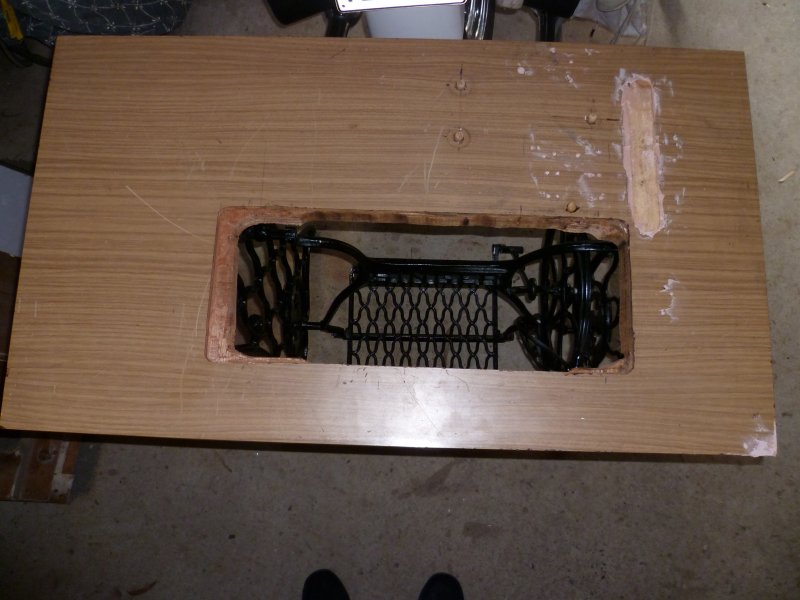
After measuring things, I realised that only the left hand leg would have to be moved and would require nearly 3" spacers! I didn't feel comfortable with that, so decided to leave it as is which would give me a choice of five machines which would fit the table. A relative gave me some assorted laminate pieces some time ago, so I dug them out and found a nice imitation granite - unfortunately it must have been very old as everything I tried to cut it with caused cracks/splits/edge chips.There was another piece which seemed to cut ok so I used that. In the photo it looks pinkish, but that's the camera, it's actually an off-white with faint darker random patterning and doesn't look too bad. I have to get a guided router/laminate bit tomorrow, however, as I don't have anything that will let me cut out the curved bits for the machine cutout (it keeps chipping!!). I'll also get the gold paint and some synthetic "belt" to replace the leather stuff. Trickiest part will be locating where to cut the holes in the table for the belt.
-
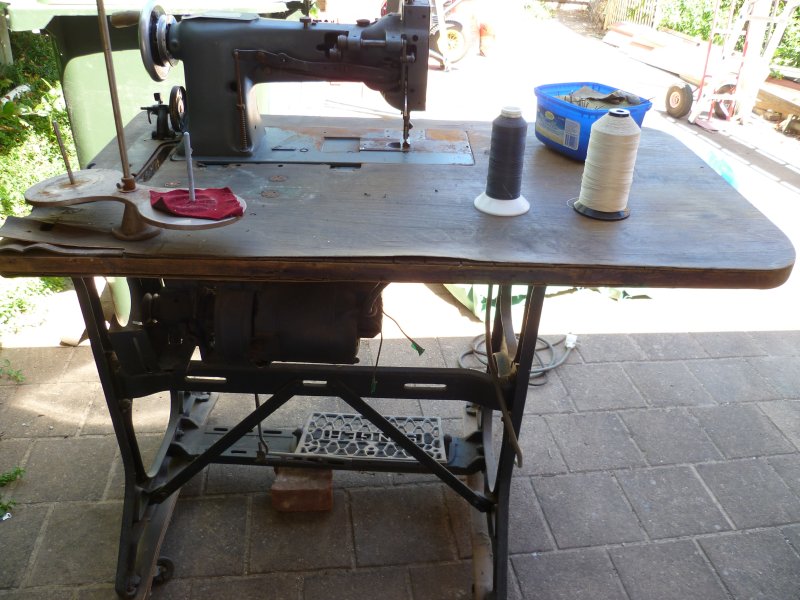
cd, I'm not too worried about the weld, BUT I have been wondering if the 166 might be a bit much for the treadle, given the driving wheel is only 12". You have more experience with this sort of thing than me, and my gut feeling now is that yeah, it may not be the best choice. That was why I wanted to fit the 117 as it's a lighter duty walking foot. Thinking about it, if I make new spacers to shift the two upright legs away from the centre section (that holds all the working bits of the treadle) I can widen it enough to fit the longer base of the 117. I'll have to use nuts and bolts through the spacers, as the original bolts will be too short, but that could work, as I only need a bit under 1'' more each side. More measuring required - and lathework. Anyhow, this is the table top I've got to work with, there's a hinge piece that fits on the left to give more workspace.
-
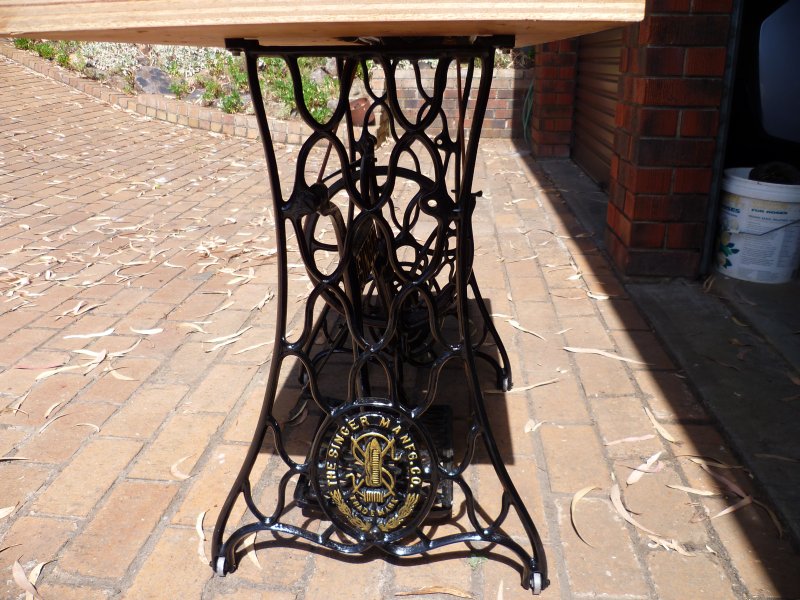
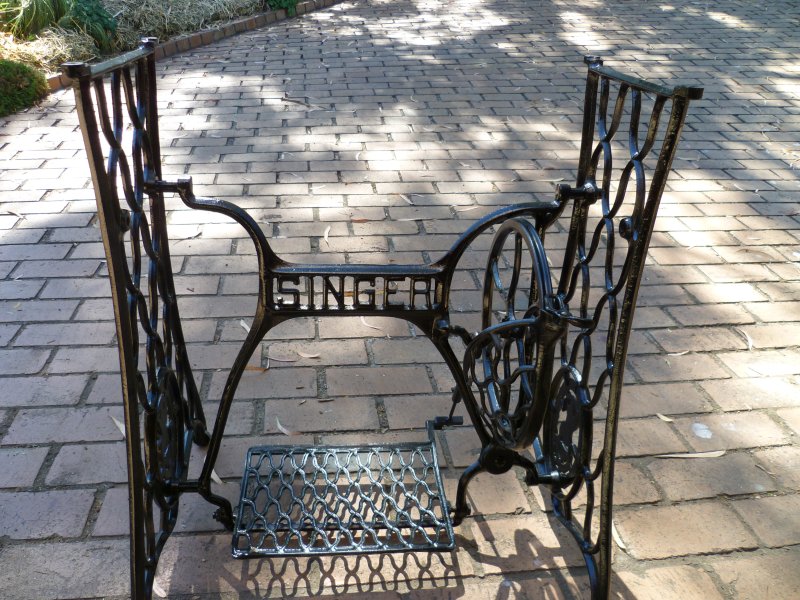
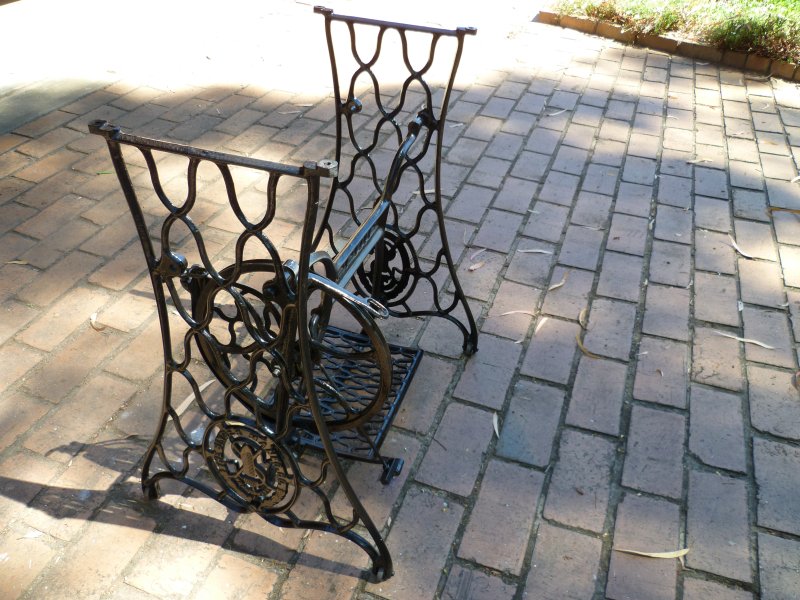
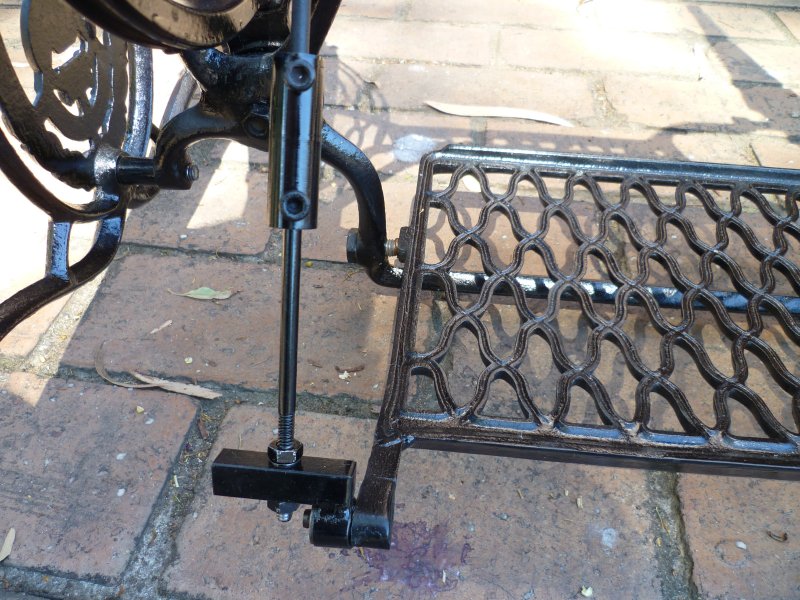
It's looking a lot better than the yucky grey that it was painted when I bought it! Still have to get some gold paint for the lettering (local hardware store didn't have any so I'll have to go farther afield). I know it's not necessary picking out the name in gold, but it just seems the right thing to do. I made a replacement pivot screw for the main wheel axle and re-welded the broken stub onto the footplate. After much tossing around of ideas, I machined a sleeve to fit the stub and welded a square bar to it. The pitman rod has a ball joint at the end and there was no obvious (read:easy) way to adapt it to the square bar so I cut the rod halfway, made a connecting sleeve and made a new lower section with a thread on it, this gives me plenty of adjustment if needed. Bolted it all together and it works great!!! I just have to machine a replacement screw for the front belt guide sometime, as this had been snapped off. Next thing is a table. I have an old one off another machine, but it has lots of holes and a large belt slot. I'll thinking I'll fill in the belt slot and holes, and then glue a new piece of laminate on top to cover it all. My original intention was to fit the 111W117 that I just bought, but that has a longer base than my other machines so won't fit this treadle assemble without a lot of messing around. The other Singers all have the more normal base size so will be a drop-in fit on the table. As to which machine, I first thought the straight stitch 331K4, but then thought of the 211G166 - I think a walking foot would be nice on it. I had intended to re-fit the clutch/pulley arrangement that came with it, but after thinking about it I can't see any point, I reckon I'll just keep it simple.
-
Whatever it is it looks to be in very good condition. On the upper right of the body are two holes, maybe where the label was (or is supposed to go?).
-
At $50 that's a steal, and if he's prepared to drop it further.......I wouldn't hesitate for 1 second if someone offered me that!
-
PFAFF1445 Need some help judgeing stitching
dikman replied to chasman52's topic in Leather Sewing Machines
chasman, I was like you when I started, I didn't want to spend the money on a servo and spent a lot of time messing around with making speed reducers and modifying the handwheel on the head unit. I eventually realised that 1) everyone is right about fitting a servo and 2) a servo works much better when used with some sort of speed reducer. Mastering a clutch motor is a challenge that appealed to me on one level, but I realised that if I wanted to get into sewing leather straight away then I had no choice - I now have 3 servos (and 3 surplus clutch motors!!). -
PFAFF1445 Need some help judgeing stitching
dikman replied to chasman52's topic in Leather Sewing Machines
As Floyd says you can fit one of those speed reducers, which will certainly help, but for a newbie I strongly suggest fitting a servo. If you use it with a speed reducer pulley setup you will be able to crawl the needle along and still retain the torque. I persevered with a clutch motor and assorted speed reducers but it was inevitable that I would fit a servo. No regrets whatsoever at spending the money as it's made the machine(s) a delight to use. As to which one is best, lots written in the forum about them but if you're unsure you can't go past one of the advertisers/sponsors of the forum. -
Amazing what you can find on trees......

-
How to attach a binder to a Singer 111W155?
dikman replied to Willie0's topic in Leather Sewing Machines
The Singer treadle that I'm restoring needed a tapered bolt (acts as a pivot) and I have absolutely no idea what the thread size is!!! I finally found a 10 mm metric bolt just fitted, without being too loose, and the threads will lock up. Good enough. Bloody sewing machine threads drive me nuts!!!!!! -
" Sometimes buying something specific is cheaper than adapting something that's free." True, but sometimes it's the principle......
-
I know what you mean . My wife told me I'd better stop looking! The folks at my shooting club didn't believe me when I said I'd just bought two more machines. They can't say too much as I make their gunbelts and holsters .
-
I haven't come across anyone using one of those, but yeah, no reason it couldn't be done. The two shafts at 90 degrees means that the motor will have to be moved and re-mounted. It would be an interesting challenge (and the price is good!).
-
How much retention?
dikman replied to hwhleather's topic in Gun Holsters, Rifle Slings and Knife Sheathes
It depends what you want the holster for. If it's for "normal carry" then obviously you want some retention so it won't fall out (assuming no retention strap or hammer thong), but for Single Action (Cowboy) shooting many like zero retention so it clears the holster easily - which is what I do. -
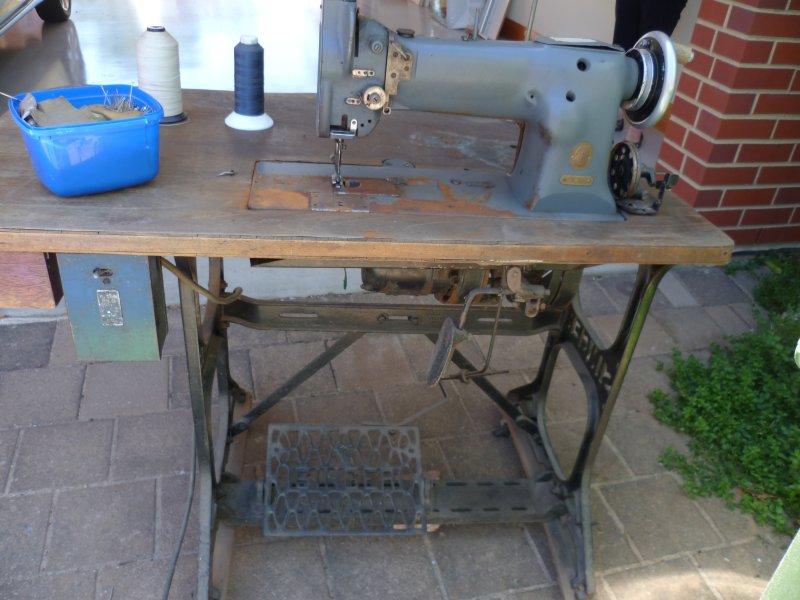
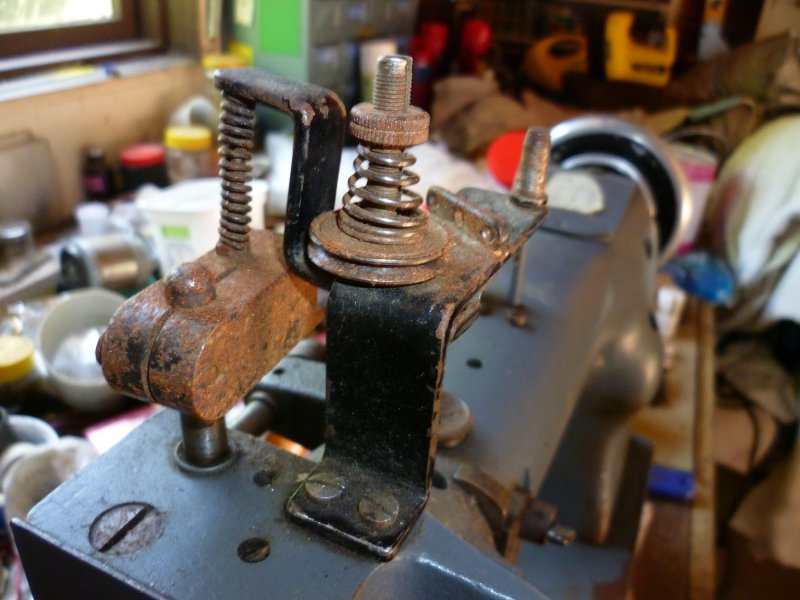
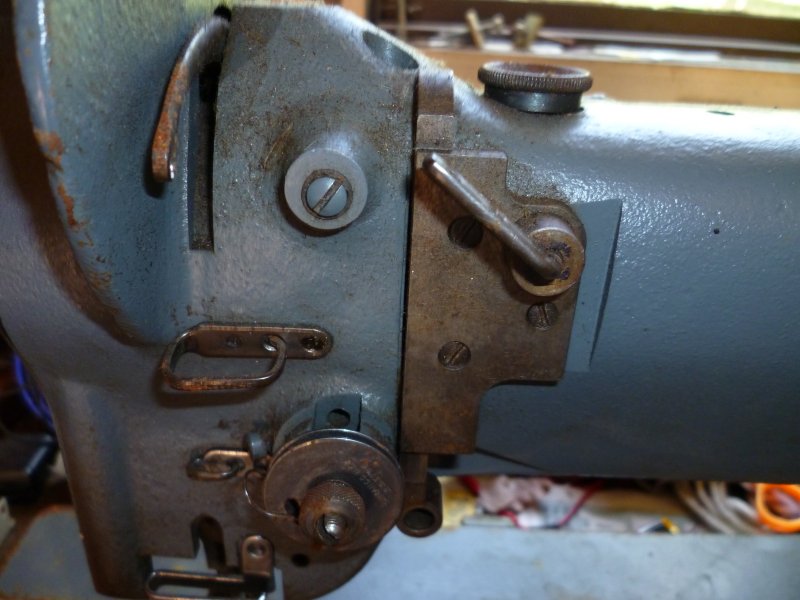
Patria, 8 industrial, one Chinese shoe patcher and 2 domestic - a drop in the ocean compered to your horde! I quite like the stand, but I have no chance of putting it in the house!!! In fact, I'm not sure where I'm going to put it. Gregg, thanks for that brochure, it explains exactly what the mysterious vertically moving piece is for, it moves the cutting/trimming arm (which I don't have) up and down. It also explains another strange bit that came with it that I couldn't figure out, it's the release for the cutter. It looks like the normal thread tensioner is a fairly generic type so I need to look at replacing that peculiar setup on this machine - it obviously works but I don't like it. Yeah, madmax, I my wife said I'd better stop looking! I've got a bit of work ahead of me, what with restoring that treadle, cleaning up this machine and making a table to suit it.
-
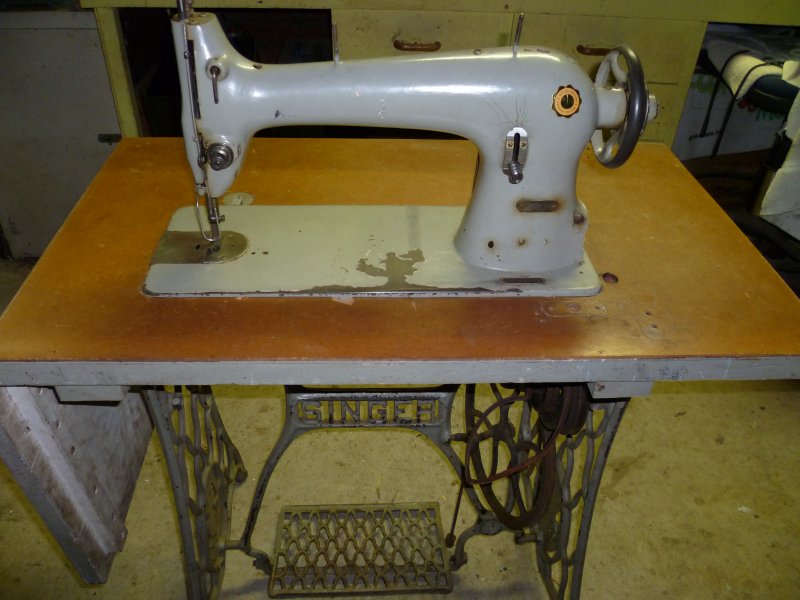
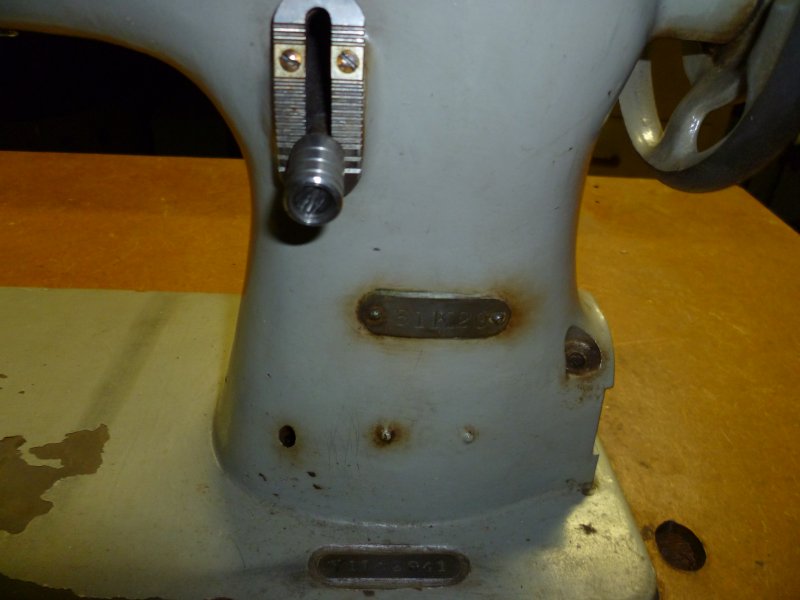
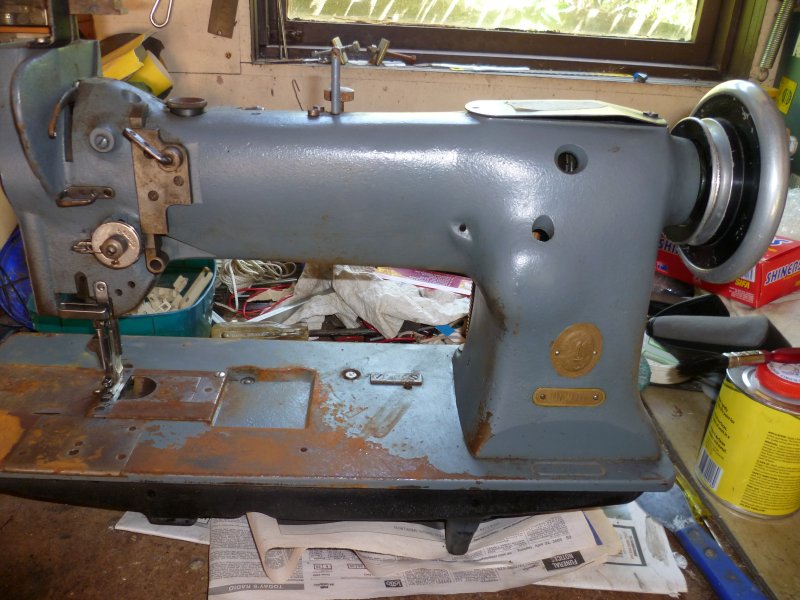
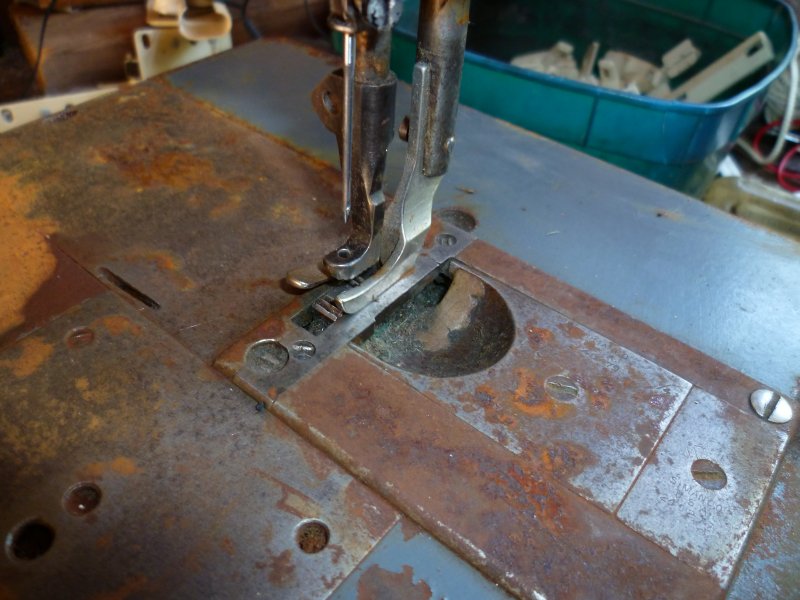
When I first saw this I thought no, table looked shot, rust on the baseplate and the motor was old. No model number listed. After looking at the photo on the sale site (rear only) I thought it looked like a 155. Hmm. So I rang the guy, he didn't know the model number offhand but it belonged to his father-in-law who use to repair sails. Asked him how much he wanted (I pointed out the obvious shortcomings) and we agreed on $100. I couldn't very well say no, could I? When I got there and saw it was a W117, and not a 115, I figured I might as well take it anyway, even though I don't know anything about the model. As it turned out the rust looks worse than it is and the baseplate should clean up ok, fortunately the rust didn't penetrate underneath. The table is scrap, but the stand looks rather nice and appears to be cast (although non-height adjustable). The motor will be going straight in the garbage. The guy has put a crude wooden handle on the handwheel. So, out of this I've got a nice old stand, kneelifter, yet another bobbin winder and a few bits and pieces. And the head unit, of course. My intention was to drop it onto one of my existing tables, but the baseplate is longer than all the other Singers I have!! Information on the 117 appears to be scarce but mine has this peculiar looking (to me) thread tension arrangement - I haven't seen it on any other 117 pics in Google. Also, in the second photo there is a vertical bar behind the plate with the thread guide, this bar moves up and down with the needle. No idea what it's for. Finally, what's the depression next to the feed dog for? It's not the heavy duty machine I was hoping for, but maybe it's a candidate for my treadle table (when I get it finished). Oh, my wife said I'd better stop looking, she's trying to downsize our household but she said I keep bringing more things in .
-
Excellent info, guys, now I have a clearer picture of how it should fit together. It won't be hard to make up a replacement connecting piece from steel. You may be right, cdthayer, about the collection of parts as the wheel still has remnants of what was probably the original black paint, as does the protective guard, whereas the rest has been painted gray. The belt holes line up with the flywheel and judging by the mountings underneath it was motor powered. I figure I'm lucky that I seem to have enough parts to be able to get it working, as people want ridiculous amounts of money here for the old treadle assemblies. And as for spare parts...... I think I'm going to need a lot of paint stripper to get rid of that yukky gray!
-
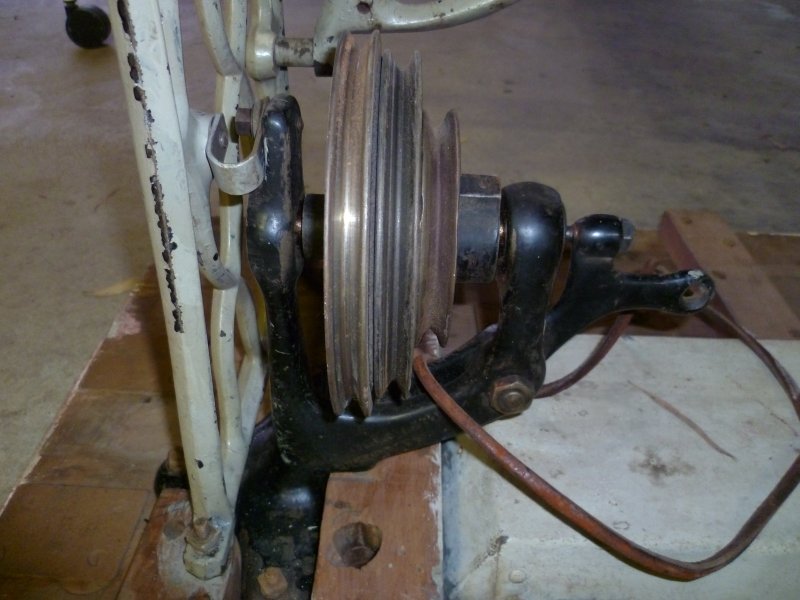
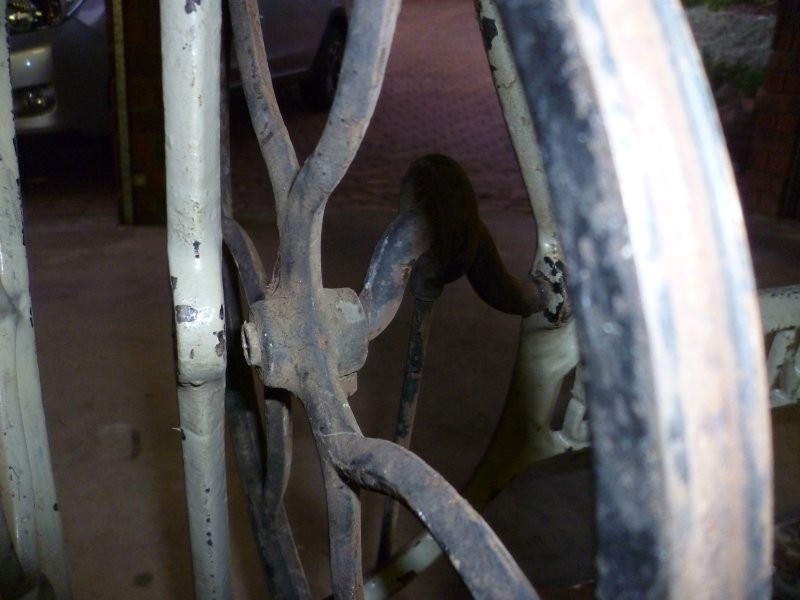
This treadle is proving interesting. I've spent a lot of time with my friend Mr. Google and so far haven't found out anything about the clutch/pulley stack, not even a photo (yes, it has Singer painted on it). The treadle pedal is also a bit of a mystery. I found out where the broken bit fits, and should be able to weld it back on (the break looks like it's cast steel, not cast iron). There appear to be two types of treadle pedal, one that has the bit sticking out like mine and the other has a piece sticking out that has a hole in it, where the end of the connecting rod (at top of photo) fits into. So the connecting rod on my large wheel could never attach to the treadle that I have! So I have two options - weld the broken bit back and make a new connecting rod to suit the existing bracket, or fabricate a complete new piece, to suit the existing connecting rod, and weld that on to the treadle. The latter will be more work, but that connecting rod end has a ball and socket in it to allow for angle changes when operating so is probably the better way. Just thought of a third option, weld the piece back and fabricate a bracket of some sort to connect the two together. Whatever I do is not going to be as original condition, so it probably doesn't matter what it looks like.
-
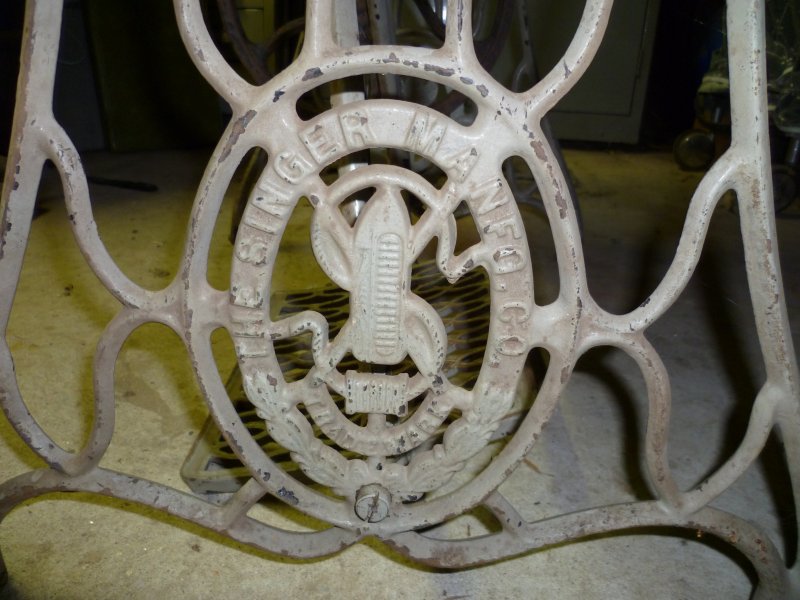
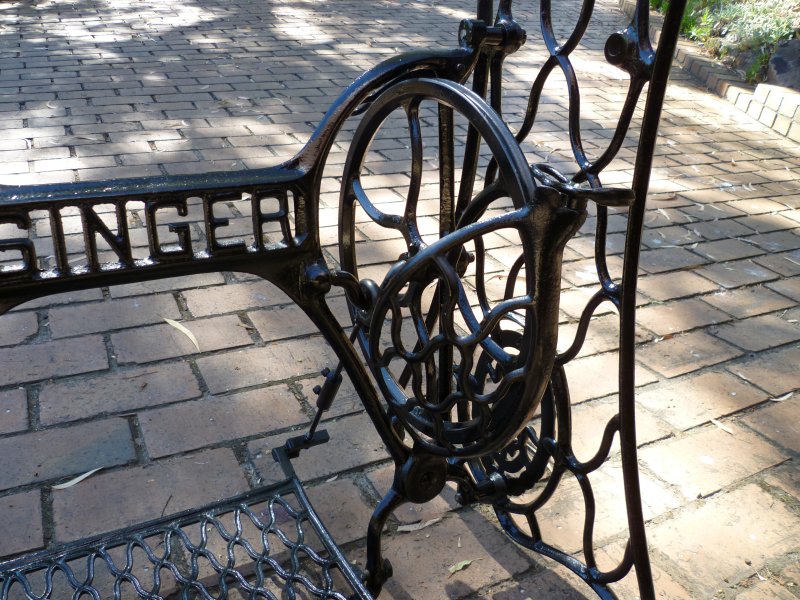
cdthayer, it's a 12" wheel. I had a feeling it was probably a domestic treadle when I saw it, so thanks for confirming that, and yeah, home-made but not a bad job. There are two plates, with bolts, mounted underneath the table and I figure that's where the motor was mounted (probably just an ordinary 1/4 HP or similar). All the parts appear to be there (including the protective cover that fits in front of the treadle wheel) and the belt guides, although there is a snapped off bolt in one of them. There is also one small part that appears to have been cut off from somewhere (haven't found where yet) that looks like a belt guide maybe. I just have to work out how the crank linkage attaches to the treadle plate, there's no obvious way I can see and no sign of where anything has broken or been cut off. I'll start looking at google photos to compare various treadle plates. The head unit doesn't have any Singer decals anywhere, so I'm guessing it's been repainted, but if so it's a pretty neat job. I'm not too concerned with the head unit yet, I'll concentrate on getting the treadle sorted. I reckon finding one with that step pulley might be a stroke of luck, as I haven't seen one in any of the ads I've looked at before.
-
When I mentioned to my wife that I just saw this machine on Gumtree (local ebay) and thought I'd buy it she didn't even bat an eyelid. My daughter and son-in-law just shook their heads and sort of laughed. Bit of a worry.....Well, it was only $120 and was advertised as an industrial treadle machine. Yes, it is an industrial machine, but I was only really interested in the treadle and stand. The guy selling it buys and sells stuff and I'm guessing this came as part of a pile of stuff he bought and he just wanted to move it quickly. He didn't know anything about it and said it came as is.The machine itself looks ok, serial no. indicates 1923, no rust and everything appears to move ok. Came with a small pile of bits and pieces - assorted feet, bobbins, two hook/race assemblies, needles wrapped in an oily rag and some bits that I haven't figured out yet. I should add that I don't really need this machine as it's essentially the same as my 331K4. Anyhow, on to the stand. The table is obviously not original and has been built from 1 1/4" tongue and groove planking. The stand wasn't set up but the pulley stack just bolted straight on to existing bolts in the table. I don't know much about these things, but it appears that this may have been a "convertible" version of the treadle that Singer made, wherein a motor could be connected via the pulley stack in lieu of the treadle. That would account for the fact that it has a clutch built into it (plus the treadle wheel looks a bit small). I've figured out that I need to make a cone-shaped bolt to replace the one missing from the side of the treadle wheel (simple enough) but I can't work out how the Pitman rod from the wheel crank attaches to the treadle itself - there's no attachment point, nor can I see where anything may have broken off. Can anyone provide any photos (or a parts list, if there is one) for a complete treadle of this type? I reckon I'll have to get rid of the yukky grey colour of the stand and give it a shot of black, and at some point make a decent table top. My intention is to fit one of my spare walking foot heads to it. This is becoming an obsession - scary stuff!