


dikman
-
Posts
4,828 -
Joined
-
Last visited
Content Type
Profiles
Forums
Events
Blogs
Gallery
Store
Everything posted by dikman
-
After looking at lots of google images of Seikos, I could only find two of an STH-8BLD, but both had the black stitch adjustment dial like mine, whereas the 8BLD-3 all have a light coloured dial. So I figure mine's an 8BLD. Next question is what's the difference between the D and the D-3? I haven't been able to find a manual for the 8BLD yet.
-
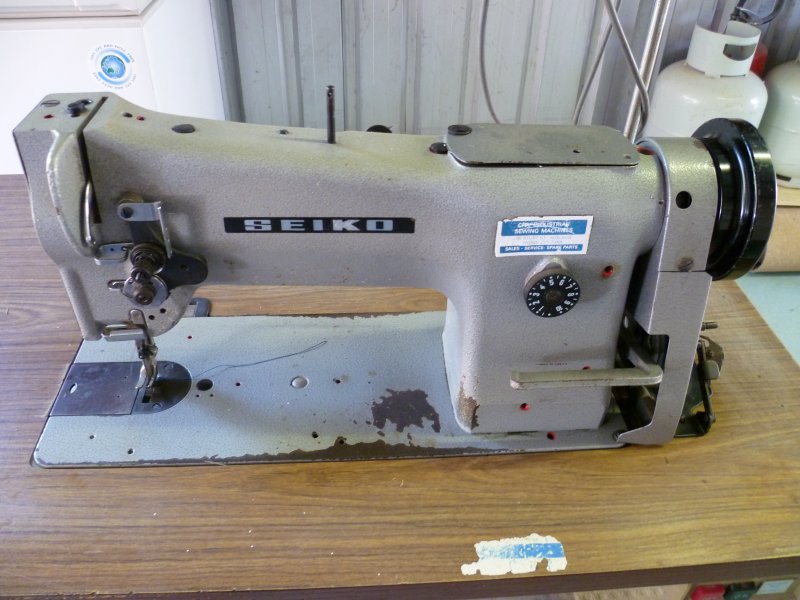
Thanks for the prices, Darren - I think . Because this is only a hobby for me (and I sell very little, only to fellow shooting club members who ask me to make something for them) I can't even consider one at those prices- unfortunately. It just means I have to handstitch the really thick stuff. Whiz, if you lived closer () we could possibly do a deal on my Singer postbed machine. Ok, a few photos of my latest acquisition. It appears to be in pretty good condition, just needs a bit of fluff cleaned out and oiling. It's a large bobbin (yay) and I got 5 spares with it, a bunch of needles (probably cloth) and some oddments of thread (#69). I also bought some nice imported Irish Tweed from her as I'm thinking it might make a couple of nice rifle bags. So, a question for all you knowledgeable types - how do I figure out what model it is? I can't find any model number, the only thing on it is a serial number - TH 9908501.


-
Bought a Singer 211U567B Need Help With Drip Pan
dikman replied to Kellen's topic in Leather Sewing Machines
Kellen, the pan doesn't have to be anything fancy. I needed one for a table that I modified (existing pan was too short for the new machine) so I used a flat piece of aluminium plate that I happened to have, screwed some timber beading around the edge and then screwed it under the table. I then measured for the lifting rod that goes to the foot pedal and drilled a hole (which I had to make bigger 'cos it was scraping). Works for me, and it was cheap ($0). -
Yep, looks pretty much like my old Pfaff 335 (except in better condition). You're also missing the slide-on cover that fits over the hook/bobbin assembly
-
Once I get it I'll definitely post some piccies. The woman said they hadn't used it much for the last 4 years so probably needs a service, said it worked fine other than a bit of an issue with the lower thread tension. Bob, what I really want/need is a Cowboy, ideally a 4500 but a 3200 would suffice. Unfortunately they're a bit dear new, and the chance of getting one used is nil and buckley's (in other words, none!) so if I see a nice "ordinary" walking foot at a good price I buy it to make myself feel better . My idea is to hopefully set this one up for 138 thread and leave it, so that I don't have to fiddle with my others whenever I change thread size.
-
Looks like I've just bought another machine (not that I need it). No model number in the advert, blurry photos but it's a Seiko, looks like an 8BLD. I rang the seller and she said there's no model number on it, so I asked if it was a walking foot. She wasn't sure so sent me a photo of the needle/foot area. Definitely a walking foot, so for $150 I said I'd take it!! It was about 6 months old when they bought it, around 1993, so virtually one owner, used for upholstery work (not leather). Now I just have to work out how to pick it up in a couple of days. Don't know where I'm going to put it yet.....
-
Advice for the type of machine I should get
dikman replied to Melonie's topic in Leather Sewing Machines
Plus if you get one that is too big (handles very thick leather and thread) it may cause issues if you try to do lighter stuff. -
You could always file another flat on the threader shaft to secure it in a different position.
-
Welcome Lineaus, you've come to the best place to find out about your machine. By the way, I doubt if it's "never been used" as it's extremely unlikely a machine of that age has been sitting somewhere since new and not touched. Anyhow, I suggest you start reading some of the excellent stickies and posts on here as industrial sewing machines have a fairly steep learning curve. The presser feet shouldn't be too hard to find for that model (contact the vendors on this site or try searching ebay). If it has a clutch motor (most likely) then you may want to consider replacing it with a servo motor, it will make it much easier to use. My 211G166 will handle #138 thread, but it requires a bit of tweaking of the hook timing, yours is most likely set for #69 thread I would think. That Lilly White oil should be fine, but don't even think about re-using the oil in the bottom.
-
-
Efka Variostop 3-Phase motor spins backwards
dikman replied to Uwe's topic in Leather Sewing Machines
Good grief!! At least we only have one "standard" for 3-phase power. -
Hotrodseth, you've certainly found the right place for any help you may need getting started. Clutch motors can be scary things for newbies and can take quite a bit to master (I couldn't!). A servo should slow it right down and may be enough by itself, but if you want to make it crawl then you'll probably need a pulley speed reducer setup too. This will also give you more torque at slow speed. If you're any good mechanically you can make your own or just buy one that you can bolt on.
-
Singer 29k171 "Another journey to the unknown"
dikman replied to jimi's topic in Leather Sewing Machines
Thanks Uwe, but it's all Greek to me . Looks like toluene and methanol. I was just curious as it took off the outer layer of paint without damaging the original. -
Efka Variostop 3-Phase motor spins backwards
dikman replied to Uwe's topic in Leather Sewing Machines
Uwe, assuming you didn't buy it new, could the previous owner have done just that - reversed the leads? -
Best thing to do is contact one of the forum sponsors, can't go wrong that way. You'll not only get a suitable motor but also help/advice if needed. (You can buy one via ebay etc from China but you're on your own if you have problems - unlikely but not impossible).
-
Singer 29k171 "Another journey to the unknown"
dikman replied to jimi's topic in Leather Sewing Machines
Nice find! Beats me how you guys find these things (easier to find rocking horse teeth here). Jimi, you were pretty lucky with that paint coming off like that. Just curious, what does the "universal solvent" consist of? -
Mine has 6" jaws. When I use it I have it positioned so that the belt is at right angles to my body so that I can see either side if I need to. I can see problems trying to use a long one like that because of the way I sew (although it might work for you?).
-
Sneak Peek: UT441 flatbed table attachment for 441 class machines
dikman replied to Uwe's topic in Leather Sewing Machines
Very nice. Tell me, Uwe, do you actually use your machines? They always look so......clean . -
My first thoughts are also needle/hook timing. I would check all the settings to do with that area. Also the condition of the hook itself for excessive wear and for any play in the bobbin carrier. Is the hook causing the fraying? I've had that problem where the hook catches a strand of the thread rather than the whole thread (hook/needle timing). And as Kohlrausch said check all the thread guides/path (I've also found deep grooves on the inside of the tension discs on one of my machines, which can cause a problem if your thread isn't the same size as the grooves). While it's probably nice to think you're buying a quality German machine over a "cheap" Chinese one, the reality is that for what you spent you could have bought a new Cowboy/Cobra machine, which wouldn't have given you the problems you're now having. Not all Chinese stuff is bad, they do make some very good gear.
-
I agree with MM. From what I've read it's basically a "heavy duty" home sewing machine. One spec sheet listing what it could do, under leather said No. If you're serious about leather then get yourself a proper walking foot - and for holsters you need a decent machine! Definitely save your money on this one.
-
Yeah, it's an unspoken agreement amongst the media that they don't publicize "drop bear" incidents, otherwise the tourists would keep away in droves. You'll hear about kidnappings, murders, shark attacks , croc attacks (and stoopid politicians) but you'll never hear about drop bear attacks. They can smell tourists from miles away!
-
pressor foot mods. Post any that you have done
dikman replied to Gregspitz's topic in Leather Sewing Machines
Good one, Greg. Cutting off the pressor foot hadn't occurred to me. -
Umm, tail wind? As a much younger person I used to work in the country and regularly sat between 90 - 100 mph (nice big Ford V8). Wouldn't dream of it now, too many other idiots (and police cameras) out there now. Came close to 180 kms/hr on a bike once, scared the daylights out of me 'cos our main roads are, basically, crap! I'm a much more sedate driver now. I guess I've been lucky enough to survive my earlier years and would like to keep it that way. Black ice? No thanks, you can keep it. Spectre, you still out there mate? Still waiting to hear from you. You asked a question that, thus far, no one can answer. I guess we still don't understand exactly what the question is?
-
Pfaff 335 w/ 135 Thread Having Tension Issues
dikman replied to drawingonblank's topic in Leather Sewing Machines
Son-of-a-gun, so there isn't anything new under the Sun . So, what does it do? -
Pfaff 335 w/ 135 Thread Having Tension Issues
dikman replied to drawingonblank's topic in Leather Sewing Machines
That little curly piggy-tail is certainly....different. I'm curious as to its function.