


fredk
-
Posts
6,000 -
Joined
Content Type
Profiles
Forums
Events
Blogs
Gallery
Store
Everything posted by fredk
-
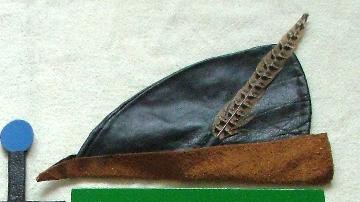
True, but its also very much fun taking odd pieces of 'scrap' and turning them into something These were made from my upholstery 'scrap' I've made maybe 30 - 40 wee hats like this, this is a 4-panel type, some have 8-panels because of the size of scrap pieces; Maybe 20 book covers like this; I used to make this 'Robin Hood' hat for children. I reckon I made about 20 or 30 Numerous draw-string money bags, odd pouches for my (old) medieval team. Once I had a very large piece and made it into a tabard for one of the 'knights' in my group. Using some of my scrap #3 son glued the scrap to some canvas in patchwork fashion and made a tote bag for his girlfriend. I find the thinking out a design to fit what stock I have is part of the fun of leatherwork

-
Interesting. Very cartoonish. What does ATC mean?
-
Its not a word we think about here, but generally 'manufacturer' means a big company. eg BMW is a manufacturer, the truck building place near me which builds about 20 trucks a month is not
-
No drinking alcohol during working hours with most businesses in N.I. Very much frowned upon here About 5 years. There were about 6 photographers. Yes, they got plenty of customers. They cleaned up in the wedding photos scene. £1000 to attend the wedding, £1000 for small album with proof photos (30 to 36 of 5 x 5 inch) and £1000 per finished album with 24 main photos (8 x8 or 8 x 10 inch). For that I charged a total of £250-ish, £200 was profit. 7 times out of 10 the photos were rubbish. When the wedding people tried to sue they lost and we, other photographers, got the job of re-doing the photos as far as could be done, which cost the couple another £2000 or so, for hiring suits, venues, new cake etc. To put this in more context; average weekly wage was about £160 then
-
I say go for it. The leather will last you a while and you can make other things from it. Almost 20 years on I'm still using some of 50kg upholstery leather I got in a deal
-
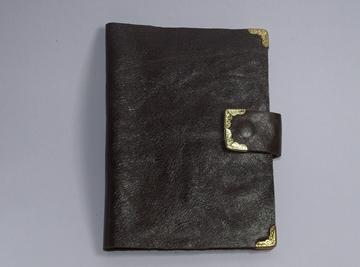
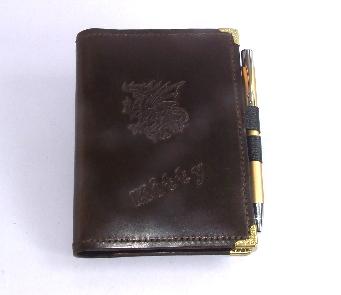
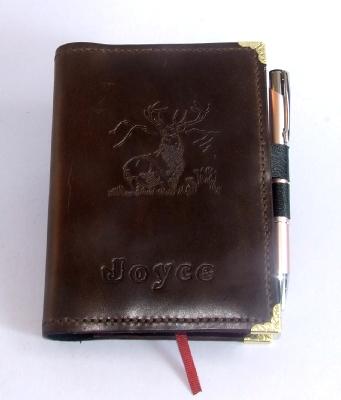
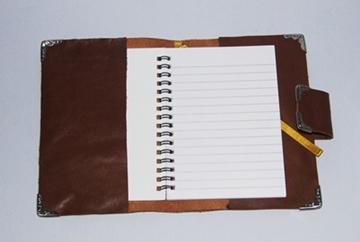
yup, agree. even October is a bit late. Year before last I made a handful, maybe 9 in total, I can't remember, leather book covers and included an A6 diary and a pen. Inside there is a panel piece front and back to hold the book covers and on each of those panels is a slot cut for a pocket I'm a slow worker. It took me several days to cut all the pieces and then about one evening to assemble each cover. I think I decided during late November to do these and some had to be ready for 5th December. Got them done ok, but it would have been maybe easier to have started them in September/October time
-
The latest buzz word is 'Artisan'. Artisan coffee, artisan cheese, artisan sandwiches, artisan cakes.. . . . . etc. Nowt has changed in how those things are made but put 'artisan' in front of the description of your 'hand made' sandwiches in your cafe and you can charge 3 or 4 times the normal price. Direct example; a cappuccino decaf coffee in Starbucks = about £2.80, go down the street, same coffee, made the same way with the same machines but 'artisan' = £6.50. Go to a local coffee & tea importer with a tea room, same coffee from them = £1.60. Guess what? people are flocking to buy the 'artisan' coffee, they are leaving the likes of Starbucks empty, and the wee local place, only the wise go there. Put fancy words and fancy prices and the common folk will flock there because they think they'll get something special. My son and I call it the 'Kings new clothes' syndrome. A deviation. When I had a photo studio I did children's portraits, sometimes family groups. I charged £25 to £30, for the sitting plus a selection of small proof prints. A group of photographers got together and formed the 'One Thousand' club. They charged £1000 for a portrait sitting. Just for the sitting. Minimum order was £1000, even if you just wanted one small photo. People flocked to them. I was told 'you must not be a very good photographer if you only charge £30'. I did put my prices up, a wee bit. The 'One Thousand' club also did weddings. Although they charged £1000 they weren't very good photographers. I and a few associates ended up re-shooting almost all the weddings done by the Club and re-doing a lot of their other work. The common person can be blind-sided by fancy terms like 'hand made', 'genuine leather', 'Artisan . . . , PS. I was once given a jacket and the label said 'Genuine faux replacement leather type material' !
-
I'm downloading ALL the Doodle Page Sets. 43 in total, 25 done so far. You never know when something on one of them might be of interest or be needed so best to have them all. Or, as children's toy adverts used to say ' Be the first on your block to have them all!' And it costs nowt to get them. After saving to my computer I'll be saving to a DVD and a pen-drive as back ups Time for another cuppa whilst I do the next 18 downloads. By the way, the set doesn't say on its PDF what it contains so I'm copying the contents off the Tandy website and putting them into a 'word' document
-
I've read most of this discussion. I think I'll add my perspective now. Just the way I find it all and how my family, my friends, associates and the general public in N.I. view it Since about the early 1970s 'Hand made' has become the short-hand way of indicating that something is made by a crafts person/people and hasn't come out of some mass-producing factory Yes, a crafts person will use machinery to make the parts he/she needs to make that final product. But he/she will, maybe with one or more helpers, will make that item My father was craftsman of sorts. He was a fully trained and qualified cabinet maker. He used to use drill presses, a planer-thicknesser, a Shop-Smith lathe, electric planers and more. He got the raw timbers in, worked them on his machines as needed and built the cabinet as was required. Even though he sometimes made a dozen of a certain style of bathroom cabinet no two were exactly the same, because they were 'hand made'. You want exactly the same? interchangeable parts? buy one made in a mass-producing factory Its a habit of English speakers to reduce some concepts and ideas down to certain terms, even if that term is wrong, or to reduce phrases down to the least number of syllables thus its quicker and handier to say 'hand made' than 'craftsperson made'
-
A few years ago Tandy did some free Christmas themed patterns. A different set each year. They could be adapted to put on just about anything
-

Card Wallet -- with extra pockets
fredk replied to DJole's topic in Purses, Wallets, Belts and Miscellaneous Pocket Items
Like -
Can I make a molded hat visor rain-resistant?
fredk replied to DanDSilva's topic in How Do I Do That?
a bluddy plastic bag! -
Thats basically how I sew. I only look at one side of my project, usually the right hand side. No ows! cos I pre-punch my sewing holes and only very occasionally need the awl to open up a hole if a needle won't go through cleanly
-
I think they could be used, but as far as I can see, only the roller on the outside can be changed so you'd be limited to what can be fitted on there
-
I can still find them on ebay-uk https://www.ebay.co.uk/sch/duckcreektraders/m.html?ssPageName=STRK%3AMEFSXS%3AMESOI&_trksid=p2053788.m1543.l2654
-
Muchly thanks for the new link. My old link wasn't connecting any more and I couldn't find if the Library was in a new place
-
yes, but limited use. I use Swann & Morton scalpels and blades. I use them for cutting threads, trimming lace to a fine point for the brass round lacing needles, for trimming badly cut edges. . . . No good for main cutting or cutting for tooling instead of a swivel knife
-
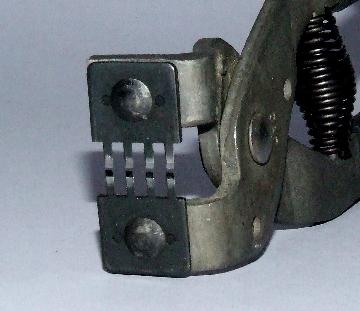
Thats an excellent summary Only other thing I can add for now is I like my stitching holes pliers These; They are available with four teeth and two teeth. Only really suitable for a maximum thickness of about 3.5mm tho They make the making of a long run of stitching holes a real doodle. Not too long ago I made a book cover, like this one, It took me about 5 minutes to make the stitching holes all round it. Down side of these pliers is the stitch spacing and the size of the holes is fixed to one size. afair The teeth are about 2mm wide and 2mm spacing, gives about 6 or 7 stiches per inch, which is ok for many things Spyros mentions an anvil. For years I've used a lump of steel that I got from somewhere. Its round, about 4 inches diameter and 2 inches thick with one square edge and one bevelled edge. Still serves me well but I also have a 3kg anvil - that is small. The anvil has a horn on it which is useful for setting ready rivets inside something
-
The frog on the web page you linked to looks like a 'general purpose' frog. It holds the sheath loosely. Its alright for when you are upright but I think it'll be too loose a fit for a sheath on someone clambering about a boat. If you are making the frog, wet mould its loop on the sheath with the blade in it When I made this frog / hanger for a stiletto knife sheath I wet moulded it to the sheath. The sheath could never be pulled out

-
Filling Pitted Round Knife with Epoxy for refurbishing
fredk replied to AlamoJoe2002's topic in Leather Tools
imo the pitting is part of the history of the blade To remove the corrosion - a conservator at the RAF Museum, Cosford showed me how just leaving the metal in a weak solution of citric acid for a long-ish period removes the corrosion. He showed me before and after examples of aluminium alloy, brass, copper, steel and iron. I've used the technique using lemon juice in water and leaving an old rusted up tool in it for a couple of months, renewing the solution periodically though. Cleaning the blade back to shiney metal - various grades of wet & dry grit paper, starting with rough, 320 grade, thru to 2000 grade then polishing with toothpaste 2nd vote for JB Weld - if you really must -
I reckon a brown oil dye and a real good coating of a beeswax/nfo/carnauba wax mix applied and rubbed will in and buffed. Maybe a few coats of the wax mix
-
sometimes ya just want to save something. try adding alcohol, eg, IPA or meths and some water. Shake and leave for a couple of days, shaking it real good every so often. If that doesn't bring it back - dump it mop & glo floor 'polish' or just a beeswax/nfo/carnauba mix
-
afair I got some from https://www.ebay.co.uk/itm/152729174649?hash=item238f5e4279:g:Y4cAAOSw52tbZCiU yes, as long as you've not used a wax to burnish, and yes
-
budget for a stitching pony or clamp
-
One less step. Get stitching chisels, sharpen and polish them and they'll make your stitching holes in thinnish leather in one job, - no marking and then carefully piercing with the stitching awl. Also, in my case, I find it hard to see where the marks are, especially on dark leather