


fredk
-
Posts
5,974 -
Joined
Content Type
Profiles
Forums
Events
Blogs
Gallery
Store
Everything posted by fredk
-
Don't feed the troll
-
Happy Independence Day to all US Americans everywhere
-

Drawing A Straight Line For My Pricking Iron
fredk replied to AzShooter's topic in How Do I Do That?
On a wallet, my first ever so far, I 1. put the parts together using double sided tape 2. trimmed all the edges neat 3. used a Tandy pen marker to mark a line where I wanted the stitching to be 4. using that line as a guide I ran the wallet thru one of my sewing machines 4a The sewing machine is manual 4b I used a magnetic sewing guide to run the edge of the wallet against for consistent line to edge distance 4c. The sewing machine was set to about 8 stitches per inch 4d. I used a leather needle but no thread in the machine. It was only to make the holes 5. I then saddle stitched the wallet together using a very fine thread -
I have this one
-
You are correct, its for lacing. I have a set of these
-
One method I learnt is to wrap the thread tightly around a ruler or stick marked with a couple of inches. Then count how many threads you get to the inch. There is a conversion table somewhere on the internet which converts the threads per inch to regular standard measure There should be no variation on thickness between manufacturers when using the standard nomenclature. A Tex90 should be the same size no matter who makes it. Thats the whole point of standard nomenclature
-
I did. The piece I had was no good. The packs in the gardening centre were £4.99 for ten but they were very poor. I bought a children's guppy fishing net with a bamboo handle for £1
-
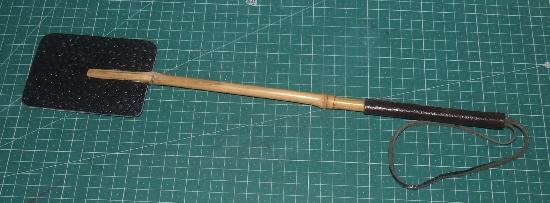
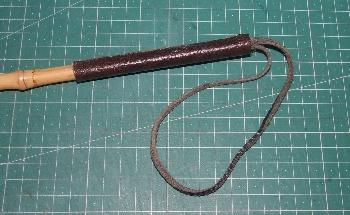
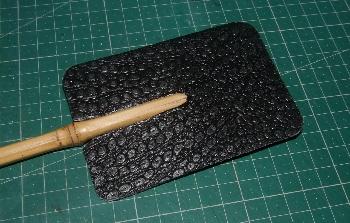
I hereby present my Buzzy Swatter Mk.1 over all length is 16 inches A thong glued into the natural hole of the bamboo and a piece of thick chrome tan upholstery leather on as a grip The Whacker is two thicknesses of a leather that has some sort of reptile skin pressed into it. The bamboo shaft is split and grips the Whacker like jaws, assisted by contact glue. Whacker is 2.75 inches wide by 4.25 inches long I nearly had a tester victim today. A buzzy came through my window, saw what I was making and exited pdq
-
Well done. You know you'll be asked back and will have to this again don't you?
-
It sounds like they sold you a piece they found in the loft. If it was me I'd send it back as unsuitable
-
Lorinery; I had to look that up. Everyday we learn somat new
-
It is possible to sew in repair patches, But you need to make it look balanced. I once repaired a well loved handbag for a woman. One bottom corner had the leather ripped away, it was not possible to sew it back together as it was, After discussion with the owner I sewed on a repair patch, but I had to do the other corners as well so the patch disappeared into the over-all look of the bag. I've done the same on new-made medieval style belt pouches and other things. PS. You say 'repainting'. By this I presume you actually mean 're-dyeing' ? You'd need to clean off any lacquer finish first. For doing that I wash things down with cellulose thinners, aka lacquer thinners. With some dyes manufacturers you can get a dye colour made up to match or you may have to go a bit darker
-
I'm presuming its the thickness you want thinning? I have one of these hand-held skivers for doing straps et cetera If its to reduce the width; I think its on this site that someone made a lacing cutter. Basically, a wood base, two wood walls and a piece over the top, embedded in the base part was a razor blade. You pull the lace thru the two wood walls and the razor blade shaves off one side to narrow it. You could use this concept to reduce the thickness
-
Can you get what you need, or some of it from Le Prevo? Sometimes, with other companies, I find that by cancelling a really overdue back order from one place and getting it in from another makes the first company shift themselves
-
My thoughts; 1. whatever weight you use, use plain clean white paper on top of the coaster, not used paper, not brown and especially not newspaper 2. absolutely no heat 3. wot he says; I got a basketweave embossing plate from Bunkhousetools, aka duckcreektraders. It wasn't too expensive. https://www.shop.bunkhousetools.com/Embossing-Plates_c4.htm I've also bought from this chap in Russia https://www.ebay.com/itm/224174509500?hash=item3431d78dbc:g:d3IAAOSwE3JcWFyb Maybe one of them would make you a plate?
-
Before any conditioner, a good wash down with saddle soap I would certainly replace those handle dees. In fact I'd replace all the external metal work with brass ones where possible
-
you're behind the news. Its a bridge betwixt Ulster and Scotland, and work is actually going on - they are looking for a site for our end, actual surveying work not just, 'umm that looks a nice place' But its all on the q. t. right now
-
yup, shore iz. Nice one. I've had a few days of un-wellness so I've not made mine yet. I need to see if I've got some bamboo
-
On etsy 1. its a privately owned on-line shopping place. They can put in place any rules they like 2. Like so many other bricks n mortar and on-line places the wimps and idiots set the rules
-
02.00 here, time for bed but I'll be on it later
-
you're on! No, I don't know. A fancy 'hand made' real genuine leather and real wood / grass diptera exterminator? N.I. is both IN and Out of both the UK and EU. Confused?, so are we. I no longer do any smuggling, latest smuggling, afaik, has just been fuel, alcohol drinks, tobacco and illegal type drugs. I'm sorry this has hi-jacked your fly swatter thread
-
book cover, pencil set
fredk replied to chuck123wapati's topic in Purses, Wallets, Belts and Miscellaneous Pocket Items
Buy a plastic basin. During a session, for a change in colour just a rinse thru with alcohol sprayed through works for me. A full strip down and cleaning after the session is over. I've never taken the airbrush to a sink - too much chance of loosing the small parts down the drain hole. I just dismantle and clean over a small ex-food tray dish. -
A small piece of scrap leather glued onto the main piece to form a pocket for the end of the dowel or bamboo, which would look nice, to slip into. Bamboo can be bought from the likes of gardening centres as plant supports. A few years ago I made bamboo cane pens from the plant support canes. 10 x 4ft canes cost me £0.99.
-
ah, there be the double catch, we are still UK as well so food etc still needs to go through the customs of EU - UK. It has to go through the customs and paperwork which ever place it come from. Thats why there is a row about it and nightly riots on our streets