


fredk
-
Posts
5,976 -
Joined
Content Type
Profiles
Forums
Events
Blogs
Gallery
Store
Everything posted by fredk
-
I might make one, if I could find somewhere to put it. At the moment I just use a portable blow heater, on low or cold, to dry anything speedily A bit off-topic - I used to use a similar arrangement in an old metal sports locker for drying my photographic films after processing. Mine was very basic; a few low power light bulbs fitted at the bottom,. . . . uh, that was it, cos the top and bottom of the door and sides already had vent slots and inside near the top was a bar for hanging kit. I could dry 10 or 12 films in about 20 - 30 minutes. Long enough to get a cuppa, before the printing session. PS. For UK readers its going to be hard to make one of these drying cabinets soon. From September 1st it'll be illegal for anyone to sell incandescent and halogen light bulbs in the UK. These are the types you need for the heat. I've stocked up
-
Photos of them, in batches of 5 to 10. When we can see what you have, their condition et cetera, then we can talk to you about them Also, put your location in your profile. This is a fully international forum. With your location included you'll get better info, especially from members near you
-
The only issue I can foresee is the leather not drying out properly causing some mold growth
-
I just use cheap £-shop masking tape. Its not too tacky, but to reduce it even more I put a piece on my trousers first. I also have Frog 'Green' masking tape which is very low tack. Frog 'Yellow' is tackier
-
As usual, from you, some very most excellent work I have a couple of 1kg bar weights which would look better wrapped in leather
-
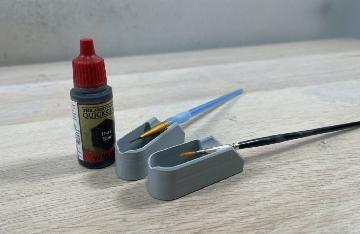
I spotted these for sale on ebay.uk Meant for plastic modellers I reckon they'd do fine for holding small amounts of dye or paint for detail work. Obviously they are 3D printed and anyone with a printer could make their own version. The bottle in the picture holds 17ml of paint so the 3D pot can hold a lot. They might be a bit handier than the 6 spot plastic paint palette I use
-
 Nicely made I must make something. So far I've been lucky, only once knocked over a part full bottle but caught it before much was spilt. I usually pour dye into a paper cup for ready-use but they are more likely to tip over as they are narrow at the base but they don't go over easy. I wonder why
 -
You mean you actually got that far !?! me too
-
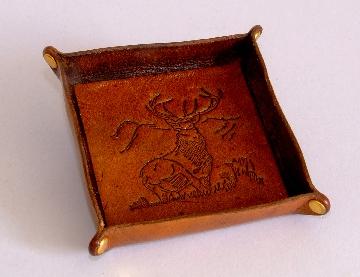
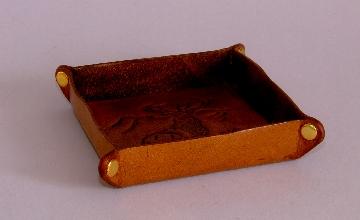
leather valet tray Valet Tray: Take 2
fredk replied to YinTx's topic in Purses, Wallets, Belts and Miscellaneous Pocket Items
Do you mean the 'ears' ? I have a half-round chisel I used. The whole tray flat was square cut. I glued up the corners, put in the rivet then used the half-round chisel on the 'ear'. On a few others I just cut the curve with my shears edited to add a PS. When I glue up the corners I clamp with a piece of wood lolly stick on each side. Juggling them around into position I get a sharp side-side join which helps keep the sides more upright. You can see this on the right 'ear' of the one in the right photo -
leather valet tray Valet Tray: Take 2
fredk replied to YinTx's topic in Purses, Wallets, Belts and Miscellaneous Pocket Items
To help make the bottom to sides corner sharper, I do two things 1. I gouge a line on the inside of the tray where the fold will be, then I dampen the leather and fold it, tapping it with a light mallet so it makes a sharp corner 2. I use a thick card base insert. The card is compressed card such as you get in good quality document postal envelopes or the card envelopes used by Amazon In both cases another leather covers the card I still get a wee bit of a curve to the corner and it varies according to how much effort I make example 1. Hex valet tray. Veg tan outside, card base, all lined with a very thin green leather Example 2. Small square tray. Veg tan outside, card base, stamped veg tan panel glued on inside over card. Sealed with acrylic varnish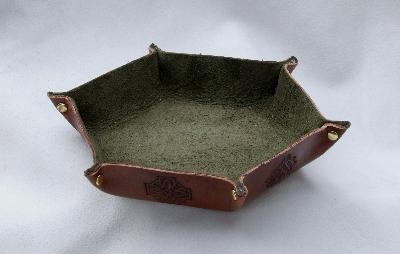
-
That is very nicey indeedy
-
The customer is always right even when they are wrong but only if they pay the bill Fabulously tidy them straps are
-
LOL, that had me in stitches! 3 pages aint long for a thread Don't let it needle you
-
How long does it take you to finish an item with painted edges
fredk replied to Spyros's topic in How Do I Do That?
I bought it through an ebay.uk seller. Its made in Italy and the brand is 'Fenice' -
Thank you fellow LW-ers
-
How long does it take you to finish an item with painted edges
fredk replied to Spyros's topic in How Do I Do That?
I use edge paint very rarely. But it seems mine dries faster than the types you lot use. Mine is touch dry in about 10 minutes. So by the time I've got round something the start is dry. I leave things for as long as until I remember I have to finish it. I don't sand before the next coat, I just rub it over with a painter's prep pad. A second coat is normally enough. -
Thank you. I'm pleased with that one, and the other one, and the next one. . . .
-
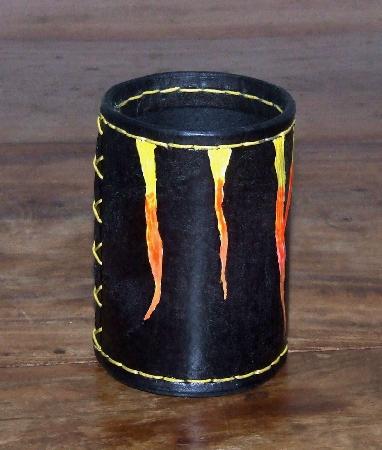
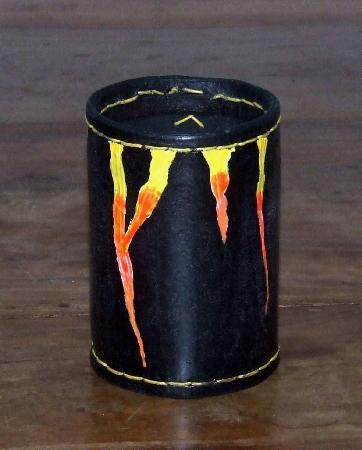
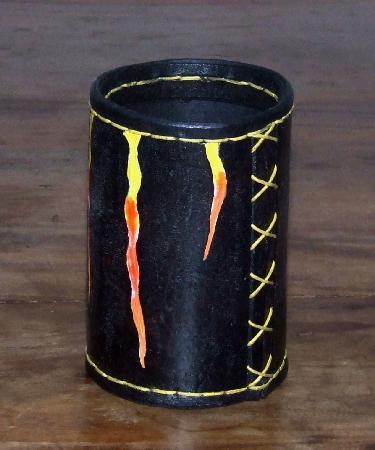
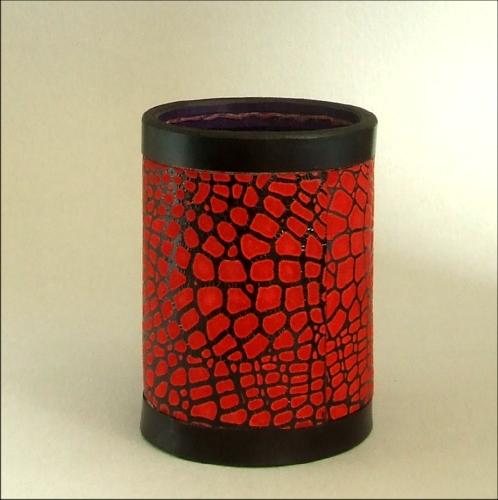
I thought I'd show you a couple of dice cups I've made #1 was made for #1 son to use playing a Dungeons & Dragons game. Its to his design idea. Its supposed to look like lava. I used a groover to scour out the shapes then used acrylic paints, yellow, orange and bright red, to paint the 'lava' #2 was made for #1 dottir to use playing a Dungeons & Dragons game as well, but not with #1 son. I have a load of this black & red 'dragon skin' leather. Its very thin, about 1.2mm and very flexible. I got it really cheap from Le Prevo many years ago. I've used very little of it since then and I've been looking at things to use it on. The construction of this one is different to the normal way or to #1 above. The main body is of 2mm, dyed purple, I made stitching grooves all round on the flesh side. I sewed the two short sides together then slid it onto my buck former with the grain side to the inside. I glued and sewed the base on. Then I glued the bottom black strip on, followed by gluing on the red & black 'Dragon skin'. Then I sewed on the inner top re-enforcing strip followed on by gluing on the top black strip. I made sure that the joins in all 4 pieces (main inner body, 2 x black strips and Dragon skin) were nicely spaced away from each other. The 2mm main body turned out to be too thin, the cup is a bit too flexible. My new selling agent wants a lot more of this one. She plans to sell them not only for D&D but as desk pen-holders et cetera. I have some other odd leathers which may get used up in this way
-
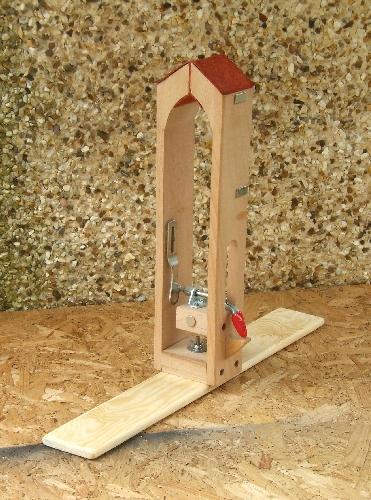
But yours is rather nice, especially compared to - You've even got a spring and a fancy lever. Kinda beats my coach bolt and wing nut

-
Theres clever, boyo (say with a Welsh accent)
-
Steel Belt Liners
fredk replied to MarlinDave's topic in Gun Holsters, Rifle Slings and Knife Sheathes
Not really, not for the purposes we were discussing Get along to an industrial business site - a real one, not a web-site. Many of the heavier industries receive goods which have steel strapping around the packaging. Mostly this steel banding is cut off and goes into the scrap metal / recycling / or trash bins. They may allow you to take some away for free or a small contribution to the tea & biscuits caddy Some heavy industries send their goods out in crates with the steel banding around them. Therefore they have rolls of the banding for doing this. They may sell you some lengths of it I've seen the steel banding in widths from 3/4 inch wide to 2 inches wide. Its also a spring steel and very hard to cut. Normal cheap metal shears won't cut it, it needs high quality shears -
Looking for a good (Cheap) scale and thickness gauge.
fredk replied to ToddW's topic in Leather Tools
I've had a look and cannot find any brand name on mine or any others on sale Link to one on ebay.uk ; https://www.ebay.co.uk/itm/124530451111?_trkparms=aid%3D1110006%26algo%3DHOMESPLICE.SIM%26ao%3D1%26asc%3D20201210111314%26meid%3D9b16d3e025514727a4fdadd6fe0e9bbf%26pid%3D101195%26rk%3D3%26rkt%3D12%26sd%3D363299089267%26itm%3D124530451111%26pmt%3D1%26noa%3D0%26pg%3D2047675%26algv%3DSimplAMLv9PairwiseWithPLXWeb&_trksid=p2047675.c101195.m1851&amdata=cksum%3A1245304511119b16d3e025514727a4fdadd6fe0e9bbf|enc%3AAQAGAAAB8KWmVn4cXp9jhMNL1vFCs%2B5UOd5WJi0%2F6XruOtk3%2FeI5DMwrq1fTMpx%2ByX3aK9KDeevfX%2FqNutq2KheKLO1Lz57iy43GbM%2BHVB7Ygxt16JgAyma28HKfnYCgKh3h6kjoikDXvvEkAr2xEWj0ToGV%2FskZRHQOPI1JPN8r74AcKTP1r41%2FFYM76W5btMoNHWrHSdwG4nFJ8850DzMZomZrU%2F8l4yxyZl%2FDyqz5SqsOt6rJ6MG5PGT54795jL8PSclsz4JFkfhDfdW6T3hWhSHLiml6p8F0QnMrx3B0pgdW2t1Gar7XCgW3md9snRcvmMo38IcnglAWu%2BN3ryBTEQimXErcWjoLGKxGZ8Lm3o8hIrqnx%2Bg601WxNGgAyN%2Bfwmnxe47ttH%2FgjIERp51Ifs%2BBeQfJ9B24yBfRyZRphbkVRKlKrUtvUoBzwcLOpcyATbrDhe9pPPjUK2YflxAuIMjPja4UZxXlPHpAu4O5wAeW6uwXA3hRKHklNIDOvhaeH%2BB69uRXh3z44qOFuI820Wp2ddgXmvC88qsrq72Ynd9zRLkxd7ntFNCC%2Bsy29ZVIDMQKsrQSdWOFy1%2FrkT95K9KiYISXz%2FLE5RorFCFZDWzQYqVcz%2BpV4PCaCV%2FRsyfmHjQv%2F2L4EoAEyHvZzI4Bz1xuZqU%3D|ampid%3APL_CLK|clp%3A2047675&epid=1987261210 One with deeper jaws; https://www.ebay.co.uk/itm/192768988421?_trkparms=aid%3D1110006%26algo%3DHOMESPLICE.SIM%26ao%3D1%26asc%3D20201210111314%26meid%3D9b16d3e025514727a4fdadd6fe0e9bbf%26pid%3D101195%26rk%3D5%26rkt%3D12%26sd%3D363299089267%26itm%3D192768988421%26pmt%3D1%26noa%3D0%26pg%3D2047675%26algv%3DSimplAMLv9PairwiseWithPLXWeb%26brand%3DUnbranded&_trksid=p2047675.c101195.m1851&amdata=cksum%3A1927689884219b16d3e025514727a4fdadd6fe0e9bbf|enc%3AAQAGAAACAKWmVn4cXp9jhMNL1vFCs%2B5UOd5WJi0%2F6XruOtk3%2FeI5DMwrq1fTMpx%2ByX3aK9KDec%2FhBQ2%2BiMO2MnZ8oGp87aPlcox%2FTFRcsqP1TGRiZ2oP%2B14y2ecczmRNtpV8IsJH60rBqkfOFl2kvMx2WtXmcKgdg2Kws3b7d0f%2FOSa9IzXSUMqpFWJWXXniyT3WCywTOdgqUFT5dOhIP4C0GP79Z82Y9VFb7HTre3hDbsbqL73dSij5ZCWtbuvAOYSIXpEBoaA6mlZBWj6yztyT7Xi3kDoO%2FZg875mRM5kmi%2BeZLgFLNTDUKgLoFQCVS%2B7Es%2Bv1KUuOVgiliLwCnfOL9bsghtxXQ986LCNr2qm%2F8%2F%2BdnDHze%2BeP%2Fgs7pN5fau9YHSgRSRt7L5A2KdLi14%2BlSiyrz8PPyZoazuOdFlWdX9XU1bRQHhP6%2BKVrdf%2BAEZ%2FUegrHO%2B%2BzCVu%2FRJcalau3RX0z58VCVqqWNfPUyXsNf2sbsqrxlSDUMqf6VmW2S0sqUkpT0qDcnLqHKom1MFUmK8QsLHNQeOMwRb9RwZF6pNzexA085yqTasA%2FNy%2Fae1a%2BxVQOHOB%2BPzNIJNO%2FpNlK2elZfkTIwLIDE3I5Ul8RUEPLGEWSOnsRuEoslJtGF%2FX03tfPdZsC6inFOYGUv3PzGBpxkI6PVO%2Fl47HqkJbfAAdHbNVX|ampid%3APL_CLK|clp%3A2047675 -
I was told to leave and never return to the woodwork class because I was so bad, which embarrassed my father no end as he was a fully qualified cabinet maker
-
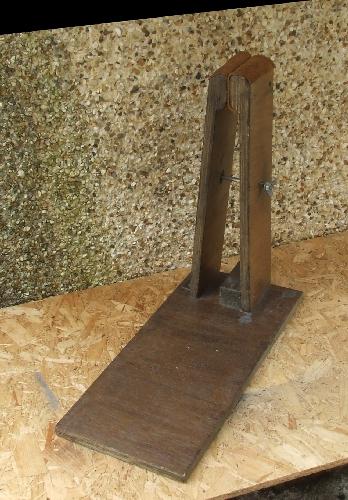
Well, seeing as we are doing a 'show and tell', here are my stitching clamps thingies #1, the first one I made over 20 years ago, still used occasionally. #2, as #1 is a bit tall I bought a cheap smaller one, cost under £10. I added magnets, changed the foot board and made it swivel-able. The spanner for the wing nut which locks the swivelling is held by a magnet on the inside. Maybe some day I'll add the springs I bought specially for these and maybe do other improvements. In the meantime some leather is calling me to cut and fashion it. . . . . .
-
Looking for a good (Cheap) scale and thickness gauge.
fredk replied to ToddW's topic in Leather Tools
I use a wee thickness gauge which cost me £3.50 but is sold by some for as much as £25. Its jaws only allow going into the hide by a couple of centimetres, but it is accurate It looks a bit like this one, just slight design differences