-
Posts
5,995 -
Joined
Content Type
Profiles
Forums
Events
Blogs
Gallery
Store
Everything posted by fredk
-
Its what you in the colonies call a 'snap'
-
If you have space and its not going to make you have to sleep out with the dogs; keep what you can then dispose of what you think is useless at your leisure. Nowt worse than seeing old stuff being dumped by the unknowledgeable before any of us can inspect and assess it
-

Multi tool pouch
fredk replied to 24569030's topic in Purses, Wallets, Belts and Miscellaneous Pocket Items
Thats a good effort for a first piece. You'll get better with each item you make. Next, you'll need to look at 'slicking' the edges You'll be seeing how easy veg tan leather can be marked by fingernails and such. When you get them, dampen the surface of the leather and 'burnish' it with the back of a spoon. -
I'd clean the old unused leather with Saddle Soap, then give it a feed of neetsfoot oil. To check if its veg tanned, snip off a piece, wet it and try stamping it with something. If it takes a good deep impression then its veg tan, chrome tan doesn't take impressions good. Old harness etc is good for patterns and show-how, as long its holding together.
-

Peeling paint
fredk replied to ffjdh's topic in Dyes, Antiques, Stains, Glues, Waxes, Finishes and Conditioners.
I don't have any of their paint but I do have some of their dye and its very much excellent -

Peeling paint
fredk replied to ffjdh's topic in Dyes, Antiques, Stains, Glues, Waxes, Finishes and Conditioners.
????? -

Desperately need advice for quality hand tools!
fredk replied to TravisRising's topic in Leatherwork Conversation
The main problem we have is that there are good leatherworking tools out there and there is crap sold as good quality. Sorting the good from the bad really only comes with experience of buying them. For honest-to-goodness quality you need to buy from the likes of Barry King. Some on here have got quality from a Japanese place. I've bought tools and have had a good experience of them whilst others on here have bought the same tools from the same seller and found the tools to be crap. Over 20 plus years I've bought and dumped a fair number of tools until I've finally found a quality tool. Price does not always equal quality; eg I bought a French skive, a top make, cost me over £25, the metal was twisted and loose in a cracked handle. Back it went. I've bought two from China, expecting poor quality at £3.50 each. Both are excellent and hold an edge well. Start with a Stanley knife for most cutting. Replace the blade for every new project. In time you could graduate to a half-moon round knife, from a top maker. I have a bird's-head knife but rarely use it. Buy individual round and oval hole punches. Not a set of them, they are often poor quality, I've found that even highly priced sets aren't any good. Buy the punches as you need them. Buying individually, if you find one is rubbish you're only out the price of one You'll need an awl, an edger, maybe a groover, a set of pricking irons or sewing hole chisels, a mallet - like the one in the photo is good, a slicker - the carrot shape is common but I mostly use a piece of beech wood with a groove in it, a skiver - the Super Skiver is good, and a beveller (Safety Beveller) is useful - both take the same blade, replace for every new project. (replace replaceable blades until you get good at stropping the blades), a set of wing-dividers, a scratch awl, a few basic design stamps - a wee bit of decoration looks good, a steel or aluminium straight edge or long ruler and a metal try-square - like a roofer's square Who to buy these from for a beginner? Buy from a place or someone who will take back their rubbish or will stand over their tools. Tandy is the first stop, but the quality of their tools can be hit-or-miss. As you are in USA I'll let your locals advise on other sellers that they know. -
Tools were made to be used. I have several 1920s / 1930s Austin 7 cars. Over the years I've accumulated a load of old tools to work on them. Some are standard tools, some were specially made for working on the cars, some tools were made by famous tool makers and those tools are very collectible. As tools I use them as they are needed for what they were intended to do Use those tools. Thats what they were meant for
-
In my experience, no matter what the item is, a tool, a bowl, a glass ornament, if it has a maker's name or mark on it it will always fetch more money than an unmarked item. Rarely, an unmarked item but recognisable as from a certain maker will fetch more money than a similar marked piece. How much they fetch or are desired is simply down to the collector or end user, not often based on how famous the maker is or was.
-

Leather hats
fredk replied to Trikegator's topic in Purses, Wallets, Belts and Miscellaneous Pocket Items
Top right of screen - you, your name & picture. Click on it and it gives you a menu. Choose 'Profile'. Click on that. New screen page. Over on left you'll see your picture. Bottom left of it is a wee box. Hover your cursor on it and it says 'Profile picture', click on it and it opens a wee window in which you can change your picture -

Leather hats
fredk replied to Trikegator's topic in Purses, Wallets, Belts and Miscellaneous Pocket Items
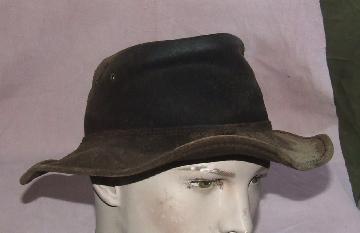
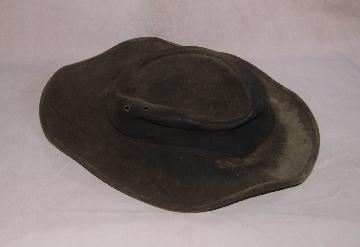
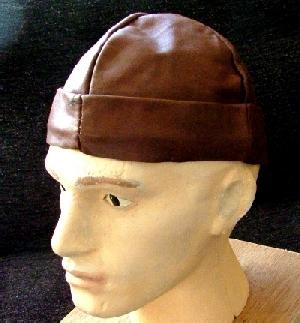
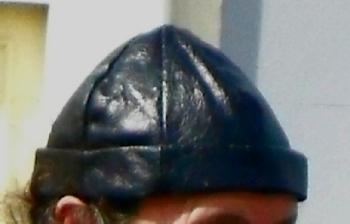
Here is my current hat. I think I've had this hat for about 14 or 15 years now. It gets abused. Folded and stuffed into a coat pocket or a haversack or laptop bag, thrown around the back of the car. Occasionally it gets sprayed with silicon water repellent. Wearing such a hat in N.I. is still quite rare and I still get odd looks and even laughed at. Its an Australian made hat. I think the leather is of a 'split' but unknown animal Whilst I sympathize with youse about wearing a leather hat in hot sun we never get 'hot' sun. Summer temperatures here are usually no more that 20* / 68* With our climate it is cooler all year round with a chance of some rain 368 days of the year My hat, as worn by Murdoch My hat in its natural state When I made medieval style kit I adapted a small skull-cap hat for wearing under chainmaille armour. It was very popular to other types of people. I sold dozens of these. On one day at a fair my wifey sold 15 or 16 (as well as the 3 me and sons were using!) This sort of hat is/would still be popular in N.I. As I said earlier; -
Thanks. I'll look it out edit; oh kaaay, I'll give that one a miss for now. Prices start at about £500 up to about £2500
-
There are commercially available extending dog leads. They are made of nylon webbing with a nylon snap hook. The lead extends from 0m to 50m (and sometimes more) and can be retracted into its case automatically
-
I noticed some time ago, just a few years ago maybe, that my Resolene was not sealing dye. I think the makers might have changed it at some point 20 years ago when I first used Resolene one coat would seal dye, two coats were good for resist on my game boards. Then, a couple of years ago, I noticed that my newer batch of Resolene wasn't doing the job of sealing red dye no matter how many coats I put on or how it was put on so in desperation to get some 'coffee cup cuffs' sealed I grabbed my local version of 'Mop & Glo' which I'd been using as a varnish on wood, antler handles et cetera and found it worked wonderfully well. Its now my main 'go to' sealer. Its also a lot cheaper at £1 for 750 ml of 'Astonish Floor Polish' as it is called compared to £6.70 (+ s&h )for 120ml
-
That is interesting. I wonder if it has anything to do with the amount of copper in the alloy. Last year a friend found two boxes of Mauser rifle cartridges. About 26 rounds total The boxes had been hidden in a dis-used chimney in a cottage. Papers with them indicated they had been put there about 1912. No verdigris on the shells, just dull tarnishing
-

Paraprosdokians are figures of speech
fredk replied to LatigoAmigo's topic in All About Us and Off Topic
A man is not complete until he's married then he's finished! -
I'm now using a UK version of 'Mop & Glo' (name?). Its a floor 'polish' by Pledge. It is actually a water thin acrylic varnish. A couple of coats is usually sufficient
-
Thanks for the responses so far
-
I have about 3000 books covering many subjects. A lot of my books are in easily accessible storage in two places. My books have have their own postcodes A sewing machine book is on my ready-to buy list Tony Laier has a reputation on carving and tooling. As I do very, very little of that good instruction type books would be a nice addition to my library. Plus, if there are new decent books out there I'd like to know
-
I have just about all the AS books I want or need
-
I have a voucher to buy some books on Amazon so I thought I might some leatherwork books. I already have several book shelves full of many of the common and not so common books What are the collective's opinions on this book from Tony & Kay Laier? https://www.amazon.co.uk/gp/product/1497203465/ref=ox_sc_saved_title_8?smid=A3P5ROKL5A1OLE&psc=1 or this one (not via Amazon tho) https://www.ebay.co.uk/itm/The-Leather-Craft-Handbook-by-Tony-and-Kay-Laier/353112101104 or suggestions for other books? I find that so many books have between 1/3rd and 2/3rd of the book devoted to tools and types of leather and so little about any work or of 'projects'. I have enough of those books. I want books which assume I know all that and just get right to the working
-

How Do I Get the Smell Out of This Wallaby?
fredk replied to MedusaOblongata's topic in How Do I Do That?
I would wash it out carefully using a dog / animal friendly shampoo. Shampoo for humans has additives which are not good for animal hair. Then hang it out to dry where there is plenty of air blowing and comb or brush it down as it dries


