fredk
-
Posts
5,999 -
Joined
Content Type
Profiles
Forums
Events
Blogs
Gallery
Store
Everything posted by fredk
-
 I thought YinTx had erred in the proportions. It seems to be too much oil to dye, I thought it would be the other way round But Feibings says; To achieve this highly desired result the trick is to mix 6% of Fiebing’s Leather Dye with 94% Fiebing’s Prime Neatsfoot Oil Compound. This works especially well with all of the brown tones and the primary colors like green and blue. As one who is never sure just how much NFO to put on, is it getting into and through the leather? etcetera. I'm going to adapt this idea and add a small proportion of NFO into my thinned dye, thus I'll oil as I dye.
 -
I've not heard of this either. I too must try it out
-
1. as soon as the dye is dried in, or just about dried. As I do my oiling later YinTx might have something else to say on this. 2. Neatsfoot Oil, aka NFO. I use a beeswax and NFO mix which I put on after sealing with resolene or Super Sheene [ both thinned, 1:1] ~ YinTx puts his oil on before final sealing, we both get results we are happy with. Either way, the NFO really helps. Note: use Pure NFO not NFO Compound 3. as soon as my resolene coat is dry, or sometimes as it is nearly dry I apply the beeswax/nfo
-
Thing is, I reckon, cos I wouldn't, you'd not notice a wee bit of uneveness in the colour as it dried out due to the stamping pattern - which looks very nicely done
-
I'm having a problem visualising this construction. Especially the bit I've hi-lited
-
Possibly, could be, uneven penetration by the thinned resolene due to the belt being a bit too dry. I'd try a few more coats of thinned resolene, maybe even thinning it a bit more - just about almost but not quite soaking the leather. Then see how it dries out over several days
-
Did Tandy drop their WC & Elite gimmicks?
fredk replied to Studio-N's topic in Leatherwork Conversation
yeah, I'll ask, asking can do no harm -
No answers for you eh? What ever you do will be a compromise, to ether weight or handiness. Here's what I might do. 2 soft wood frames, each maybe 2 ft x 1.5 ft. Hinge the frames together, book form. Panel over each with 3mm MDF, or even 6mm. Paint it all undercoat/primer white. Attach pieces of various leathers, patches no less than 4 inch square. Attach the leather using two ready-rivets or chicago screws, one in each top corner, allowing the leather to hang free. Attach in neat rows across and columns down. Print and attach description labels for each leather. The panels should each take about 20 to 24 pieces, less if you make the pieces larger. The book form panels can be folded for carrying, opened up to set on a table top. The loose ends of the leather lets people touch and feel the leather. Add more double panels to your display when needed.
-
Did Tandy drop their WC & Elite gimmicks?
fredk replied to Studio-N's topic in Leatherwork Conversation
Yes, they did. About 1 week after I paid a load of butterflies for 'Elite'. Say laa vee -
I think it would be more use as a press for 3D figure and letter stamps
-
A Few Mouse Pads
fredk replied to Fonzarellis's topic in Purses, Wallets, Belts and Miscellaneous Pocket Items
They are indeedy very nice but. . . .but. . . . but. . . . . we need details!! Leather thickness, dyes used, finish used, plain back or other material on the back side??? -
Best Method to add sharpener or marlin spike to knife sheath
fredk replied to lawman133's topic in How Do I Do That?
I would imagine; starting at the left most stitching, across, round the knife, across the back, around the spike sheath and back to the left line of stitching and then carrying on to the right line of stitching. One piece of leather. This would give 3 layers of leather at the stitching area. Skive the two ends and the place where they meet on the back piece and you can get it down to just over 2 thickness worth -
Buying my first piece of leather in UK - advice please
fredk replied to Allotment17's topic in Getting Started
First reckoning is what you want to make with it. Shoulder is fairly stiff but not as stiff as back bone part of a butt, a shoulder is not very wide, not wide enough nor thick enough for a man's belt but you can usually get a woman sized belt out of its width This chart done by Tandy is handy. It is a guide only, you don't need to stick to it absolutely For a first leather I would, and did, select a 2 to 2.5mm leather. Its a good all rounder and you can thin it if necessary. So that would be the 026 I've dealt with Le Prevo for about 20 years. I've not dealt with any others mainly as none would send to me in N.I. Email or phone Jan or Stu at Le Prevo. Tell them what you want to make ask for their advice & suggestion. They will help you choose ** be aware that Le Prevo prices need 20% VAT added plus a delivery charge & 20% VAT on that too PS. Look in Le Prevo's Clearance Offers. There might be some cheap-ish leather there. -
copied from some sellers lists; Size 1 54.5mm length x 1.0mm diameterSize 2 54mm length x 1.05mm diameterSize 3 53.5mm length x 1.02mm diameterSize 4 48mm length x 0.9mm diameter 1/0 (18) 57mm long x 1.09mm diameter 2/0 (17) 60mm long x 1.42mm diameter 3/0 (16) 62mm long x 1.63mm diameter ***Size 4***: 50mm length x 0.86mm diameter***Size 001***: 55mm length x 1.02mm diameter***Size 002***: 55mm length x 1.02mm diameter***Size 003***: 55mm length x 1.02mm diameter***Size 1/0***: 57mm length x 1.09mm diameter***Size 2/0***: 60mm length x 1.42mm diameter***Size 3/0***: 62mm length x 1.63mm diameter
-
try old fashioned shoe polish - the wax based stuff in a tin
-
Try sealing what you have done with two coats of 'Pledge with Future Shine'** polish which is actually a thin acrylic varnish. No more than three coats as it will start to be thick and become inflexible ** or what ever it is currently called - they keep changing the name!!
-
Can you tell us where you are located? then we might be able to advise you of a source near to you
-
I'd use pigskin suede, glued to the main leather
-
Leather work swap who would be interested?
fredk replied to Rossr's topic in Leatherwork Conversation
N I C E -
Not always so lucky. I'm now waiting 54 days for thirty special Chicago screws I want to use on a project. Estimated last delivery date, June 24th
-
yeah, I noticed that after but cudnae edit my post. Have had stuff from both places, its fine Its ok, these Chinese bods have warehouses in Eire and UK now. Same-ish situ, bought some oval hole punches last week. Sent from warehouse in London, 3 day delivery. We will see when I get these, thats the pudding
-
Time to add something Whilst browsing ebay I came across these: 20 stamping tools for under £9. Quality? I'll know when I get my set. As the Tandy tools are made in Taiwan same as these are I see no big problem. I reckon they are cheap enough for a beginner to use to try out the art of stamping or in my case to take a grinder in my mini-drill to reshape some of them https://www.ebay.co.uk/itm/20pcs-Carving-Working-Saddle-Making-Tools-Leather-Craft-Tools/273593838549
-
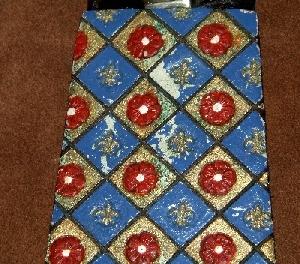
Most excellent What size is it? what is it on? eg, a book cover, a box. . .
-
Not recommended at all
-
Here's how I would tackle this; Veg tan leather, use a swivel knife or even a very sharp craft knife to cut into the grain side the pattern required - just a very shallow cut. Apply main colour dye in areas not to be painted. Thin the paint, to milk like. Apply paint in several thin coats, allow the first, second and even the third coats of thinned paint to soak into the leather, let them dry a bit, about a 1/2 hour between coats. Further coats just to get the colour density, not too many more coats. Let everything dry for at least 24 hours in a warm environment. Then apply thinned Resolene or Super Sheene. Let first couple of coats dry as per the paint. A couple more coats [4 in total] should have it all sealed. Allow to dry for at least 24 hours in a warm environment, then let it cure for at least another 24 hours - there is a difference between 'dry' and 'cured'. Resolene is an acrylic finish which needs time to cure. Thats just the painting bit. Hardware attached and edges bevelled and slicked before painting and after pattern cut. My old favourite; this painted knife sheath. Painted with modellers acrylic paints. Lasted about 8 years in and out of a box full of chainmaille armour and other stuff. Never looked after. Still a little bit presentable but needs a repaint - when I find it again in my 'to do' boxes! New; Later: