


fredk
-
Posts
5,994 -
Joined
Content Type
Profiles
Forums
Events
Blogs
Gallery
Store
Everything posted by fredk
-
 a. extraction fans need not be expensive b. the 'explosion' of vapours is a myth. I'm on plastic modelling forums and this subject comes up frequently. 'It happened to a cousin of a friend of a friend of one of our club members' is the usual. No one has yet had it happened to them. The modellers are using more explosive mixes than barge glue. I used to use an unprotected extractor fan in a shed when spray painting cars and parts with thinned cellulose paint. Over 20 years never even a pop. c. use an extractor unit designed to remove cooking fumes from over a cooker. They are sealed to protect them from grease and water vapour. They extract at a large cfm rate. For a lower rate use a bathroom fan or one designed for modelling spray painting booths d. take the exit hose at least 1ft away from the window otherwise the natural breeze will bring the fumes right back into you.
 -
Just depends on your construction. My preferred way is a thicker back part and the front being a separate piece folded down around the item and sewn to the back. Or you could have a long single piece, fold up from the bottom and sew the sides, or fold from one side and sew bottom and one side, or sew 'bottom' and 'top' allowing ipad to slip in from the 'side' - so many variables. You decide how the finished case/pouch/envelope is going to look and adapt the measurements to suit. Just personally, I'm not fond of two parts of the leather pinched together along the centre of a side or bottom on a pouch case In most cases I don't really bother measuring, I just work around the object
-
Measure the thickness of the item, double that and add it to the width of the top/front piece. Also add an allowance for the corner bend. Unless you are using belly or upholstery leather which has some stretch, add about 1.5 x the thickness on the leather for each corner, that is 3 x thickness minimum to add to the width and 1.5x for the bottom plus 1 x thickness of the item. I add about 10mm more than that in case I've mis-measured. Less costly to cut off a narrow piece as waste than scrap a whole project because it was just a few mm too small I think, that unless you are using real thin vegtan or upholstery leather you'll not get the leather tight to the ipod sides/bottom without wet moulding. With thick leather you'll need to groove the inside of the corner, wet the corner bend and fold down to meet the back piece. You'll need to shape the case around the ipod for a neat fit, or use an old broken one or shape a bit of MDF to form the case around
-
I think it is 'traditional', stemming from the days when there weren't so many handy tools for marking and punching sewing or lacing holes Yes, it is complicated and unnecessary. I use these [photo below] sewing-hole pliers for punching holes for sewing. I have them in 4-tooth and 2-tooth. I can glue two bits of project together and punch the sewing holes in a just a few minutes. I do keep an awl handy for any holes that need opening up better. If I cant punch the holes in both pieces after glueing I punch them in one piece and use the awl to make the hole into the second piece, thru the pre-punched hole. I also have similar pliers for 3mm lacing These punch diamond shaped holes neater, more evenly spaced than I can do with an awl. The holes are suitable for up to 1mm thick thread, 0.8mm is about best with them. None, but the worker thinks he/she is doing it the 'proper' way, the 'only' way

-
I thin regular Fiebings acrylic dye with meths & water for spraying
-
Have you got a sewing awl? the type with the flattish diamond shaped blade? Use that to pierce the leather, push the prongs thru and fold them over. Use something like a flat blade screwdriver to fold the prongs over and push their points into the leather a wee bit. If you don't have the awl, sharpen a small flat blade screwdriver. To find where the prongs need to go, lightly press the ornament to the leather in the place you want it, the prongs will mark the leather. Usually you fold the prongs towards each other, then glue a small circle of very thin leather over them. Work with the ornament on the neoprene rubber I suggested before. The rubber will protect it. You can buy a special chisel which has moveable prongs for doing these. I have one but rarely use it. You don't say where you are. It would be good to add your location into your profile then we can suggest things suitable for where you are. I've bought these ornaments by the 100s direct from China. They cost about £2 for 50
-
The usual method is to tip the stamp so its at an angle; the low part where you want the stamp, the high part where you do not want it and stamp carefully. If you intend to do a lot of the same sort of stamping consider buying more of the stamp and grinding away part of it. Some of the stamp makers supply patterns in full and half stamps
-
If they are rivet-on, use a thick piece of neoprene rubber under the face and hammer the rivet head on carefully
-
Try washing it down with cellulose thinners
-
The name has been cut in simply in the angular style as that is easy to cut in wood using a chisel or knife, but the overall look of the letters is later-Art Deco as the cutter has not tried any curves which he/she could have done as they did on the horse head engraving [assuming it was the same person and probably was - a maker cuts their name in, a new owner writes it in pencil or pen] I don't think you can date anything by the dowels; dowels have been in use since the 1600s. But the spreader bar on the left side [far side of the photo] is simplistic, but slightly fancy [the ends]. A fancy turned spreader would be pre-1920s, a plainer one from the 1950s onwards The hinges are typical of the type used in drop-leaf tables of the 1920s to 1950s Importantly too is the saw cut lines on the bottom of that board. Not bought pre-planed then, cut with either a very large straight hand saw or a very large circular saw, of about 3m [10ft] diameter It could be a 'Mechanics' plan but there were and maybe still are a large number of woodworking magazines. My father did his time and was a cabinet maker. He subscribed to many of those magazines and made many of the pieces in them for our family and for customers
-
I too use a beeswax neetsfootoil mix, but I add some carnauba wax. Initially the cream when applied has a mild beeswax smell but that disappears and the true smell of leather comes through. I agree too that people lift up goods and sniff it to get the leather smell. An old trick which was used in the second hand car trade years ago is to give the old leather a wipe over with Imperial Leather soap. No one does those tricks in the 2nd hand car dealerships here anymore
-
Thinning dye helps it to penetrate the thickness of the leather. Initially it will look blotchy but as more diluted dye is applied this blotchyness evens out until it totally disappears. Diluting dye also slows its drying. Neat dye put on leather dries fairly quickly and often leaves a blotchy look, dense colour where you first applied the dye with dauber/brush/sponge and less dense where it ran out. Another coat of dye can often not flow into the first to even out the colour. Diluted dye will still look the same at first but as it is slower drying the next application flows into the first application better
-
I use methylated spirits [a wood alcohol] or water or both at the same time. The meths also helps speed up the drying time but affects the oils in the leather so it needs some nfo after dyeing The main differences between the alcohols is in the purity and also what they are derived from, but in usage each is good
-
For the quantities you want I would ask Le Prevo Leather in Newcastle. They sell pre-cut leather items and do leather fabrication as well as selling raw leather. They might work with you in cutting the discs and supplying them to you. No harm in asking. . . . http://www.leprevo.co.uk/
-
Is there a cheaper alternative to a bell knife skiver?
fredk replied to williaty's topic in Leather Machinery
If you study the photos the machine comes with a set of rollers so just the edge can be skived and in the spiel it says; quote; Equipped with 4 different sizes of rollers to choose from, in order to achieve different peeling width. end quote Don't wait on me; it could be months before I get around to using it PS; some of these use a peculiar type of blade, some, like mine, use the cheaper and easier to get blades as used in box cutters [aka Stanley knives] -
Nothing that I've come across Over the last couple of years I've been lightly researching what 1800s Westerner's wore; items such as chaps, shirts, trousers, vests. I've not come across any single book on either these together or individually. I have now accumulated about 30 books on various aspects of Western life, simply to get the photos within those books. One thing I've not done this time but I did do when researching Medieval clothing and accessories was to contact museums. I contacted them for brochures and postcard pictures of items in their collections. In a few cases the museums had books produced by archaeologists, very specialised books and very expensive [3 books from Dublin museum were over £50 each] and not normally available to anyone outside of academia. Thus I'd advise you to contact the very numerous museums throughout the Mid-West and ask for copies of their hand-out brochures and postcard photos of items. If you go to 'True West' website they often have details on some of the museums and what their collections consist.
-
Is there a cheaper alternative to a bell knife skiver?
fredk replied to williaty's topic in Leather Machinery
I bought one of these recently: https://www.ebay.co.uk/itm/Sewing-Leather-Splitter-Edge-Skiving-Tool-Leather-Craft-Device-Paring-Cutter-/254213890096?hash=item3b30542030 1. Mine cost £26 2. I've not had the opportunity to use it yet 3. Allegedly they need careful setting up to work correctly but once set up they work great -
interesting piece of furniture mmmm, my thumbs are itchy, I'm getting the feeling that this was made in the 1930s/early part of 1940s. Looks like the wood was scumbled, probably a cheap pine or white wood underneath. Very nice piece for all that anyhows
-
I've wet moulded in thickness from 0.5mm to about 4mm. I reckon, maybe 3mm, or 2.5mm, 2mm at the thinnest for your requirement. The heavier the item, the thicker the leather. Recently I moulded a moblie phone holster for myself. I think the main moulded leather was about 2mm and it got a lining of 1mm leather.
-
What tools do I need to recreate this design by hand?
fredk replied to Alexis1234's topic in How Do I Do That?
I use a Chinese company, thru ebay, but I'm not sure they could do this one. I mostly get binary stamps made. I think this is one 3D printing would win on -
What tools do I need to recreate this design by hand?
fredk replied to Alexis1234's topic in How Do I Do That?
tbh, I'd go the whole hog and get a brass stamp made for this. One stamp, used with hammer or press, will cost less than the tools needed plus it'll be quicker to reproduce in the small size and multiple copies. Where I get my brass stamps cut this would cost about £10. Either a brass stamp or a 3D printed one just some thoughts on it -
Dying pre-existing colored leather that is not veg tanned?
fredk replied to JC2019's topic in How Do I Do That?
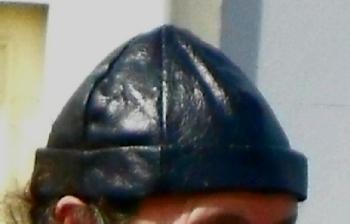
I cut thru the lacquer coat with cellulose thinners. This usually removes some of the dye as well. On occasion I have left it partially dyed, then put fresh resolene on to seal it. It was done for a customer who wanted a 'well used' look to the item. Other times I have re-dyed in dark brown or black, then sealed that with resolene These hats were made out of chrome-tanned, pre-dyed upholstery leather. The brown hat on the left is untreated, the black one was done as said above;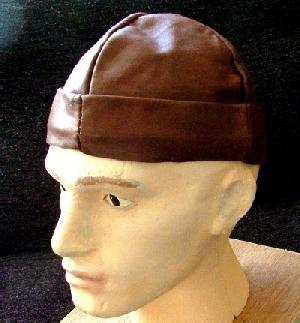
-
yes. make sure to use a top quality glue and ensure all areas are well and truly coated, especially the edges. Maybe use a brayer to press the two pieces together.
-
In N.I. a name beginning with X has that letter pronounced as EX not as Zee. Thus Xena is Exena, Xavier is Ex-aavi-eer, not Zav-vier. Is it the same in France? H and Th have their own ways of pronunciation here as well
-
If, If, it suits your needs, go for it. What is a drive to get what you require? Decent roads, plenty of rest places, a tankful of motion-lotion. . . . In my reckoning; If I can drive there and back inside 24 hours, then its 'local', thus all of the island of Hibernia and most of Scotland is 'local' to me