


fredk
-
Posts
5,976 -
Joined
Content Type
Profiles
Forums
Events
Blogs
Gallery
Store
Everything posted by fredk
-
As final dye sealant I mainly use Feibings Resolene, C54 & C55 in the Le Prevo 'Finishes' list and sometimes Tandy Super Sheene https://www.tandyleather.eu/en/product/eco-flo-super-shene which was easier to get when there was a Tandy branch in the UK Lately I've also been giving a coat or three of 'Astonish' wood floor 'polish' which is actually a water thin acrylic varnish. Available at many branches, but not all, Home Bargains for £1 for 750ml Resolene and dye can be diluted with water. I usually go about 2 water to 1 dye, 1 water to 1 resolene. Sometimes I add in some meths for a speedier drying time, but that adds some smell so you might not want to do that. My method is to dampen the leather and apply several coats of dye thinned with water until I get a colour density I like. Let that dry almost completely then apply several coats of thinned resolene. After that is dry I sponge on up to 3 coats of Astonish varnish. No more than that as if it gets too thick it gets hard.
-
 What defect? I can't see one. It is most stupendous. I'm jealous of your artistry and carving and stamping on this Your niece will love it, almost as much as she'll love you for having made it for her You are now her very favourite uncle. . . . . . . like forever
 -
I use standard Fiebing Acrylic dye, bought out of Le Prevo, Newcastle. C30 and C17 on their list: http://www.leprevo.co.uk/dyes.htm I've been using it for 20 years, the last 14/15 years in my spare-bedroom leather working room. No problem with any vapours at all, even when I spray it.
-
You could use a wing-divider to mark a grove https://www.ebay.co.uk/itm/1X-Leather-Craft-Making-Rotating-Tool-Wing-Divider-Spacing-Compasses-Edge-C-9A7/303183339744?epid=3027848963&hash=item469722a0e0:g:6Y8AAOSwu95c~ZXN https://www.ebay.co.uk/itm/1PC-Carbon-steel-Scriber-Divider-Wheel-Compass-Leather-Stitch-Hole-Distance/352721836889?hash=item521fdc1b59:g:BXoAAOSwuMxdHwL~ and then use a groover/edger like this; https://www.ebay.co.uk/itm/New-5Pcs-Working-Hand-leather-Edge-Skiving-DIY-Tools-Keen-Edge-Beveler-Silver/273261100050 These are so cheap I have about 15 of them! instead of trying to sharpen them I just use a new one. I'm totally rotten at the sharpening On the dividers, I have shortened the point end of one arm so I can run it along the edge of leather easier with the longer arm running on the outside edge and the shorter arm marking the line hth
-
When I do what I call a single needle saddle stitch I start about 3 holes in, from one end, sew to the other end then come back on those stitches, past the start to the other end, double back to the start and do two stitches past the start. The holes 3, 4 and 5 have three threads through them. I bring the first and last of the thread through the two thickness of leather. When a bit of glue is added to stick the edges together and then the edge burnished the thread is secure. When I do a full two-needle saddle stitch. I start at the first hole, sew to the end then double back both threads two stitches. Lets say there are 30 holes for stitching; hole 30 has two threads through it, 29 has 4 threads and 28 has 4 threads. I find usually two stitches back is enough, some times I'll do up to 5 stitches back if the item is going to be rough handled, and occasionally I'll put a drop of glue, rubbed in, on the very last stitches threads after they've been trimmed flush. hth
-
Might I add that I use a flat profile thread in, 0.5, 0.65, 0.8 and 1mm. When the stitch is pulled up tight the thread lies flat so I've never seen the need to further hammer it flat
-
When can you call yourself a craftsman?
fredk replied to Handstitched's topic in Leatherwork Conversation
interesting input CD But even waaaaaaaaay back 'Crafts' man meant somat different. In his memoirs a soldier of the 95th Rifles said he was called a 'Craft' as he knew how to repair boots. He was a 'Crafts Man' even though he was not trained as a cobbler, he had been a clerk before. me; barefoot, thats how I find dropped rivets, sewing needles, stitching punches.... Usually no shirt on either, keeps the sleevies out of the dye. Splashes of dye on skin can be covered up later, on a shirt it means a ruined shirt -
imnsho, personal preference. I never hammer and only very occasionally run a stitch marker down them, just to tidy any that look askew
-
Best Glue For Leather To Leather, And Leather To Fabric
fredk replied to CCPhotog's topic in How Do I Do That?
What you have to bear in mind is the affect certain glues will have on your leather. When I use PVA glue on chrome tan nothing much happens except it sticks. When I use in on veg tan on my game boards the water in the glue soaks into the leather and when it dries out it shrinks the leather a bit, not much, but enough that I need to let a covered game board dry out for far longer than I would using contact adhesive before I carve in the lines or press in the fancy design stamps. If I don't the drying and shrinking can pull the lines askew When I use contact adhesive, a bit too much can seep through to the front, or near the front of the leather acting as a dye or finish inhibitor, which PVA seems not to do Also available for sticking are two other adhesive products; 1. double sided tape, good for holding gussets in place 2. iron/heat activated sheets. you need to test on scrap leather first. its too easy to get too high a heat and totally ruin a nice bit of leather (yeah, ask how I know, ) -
$1.99 from Tandy Library https://www.leathercraftlibrary.com/product/1959/belt-pouch-with-phone-pocket https://www.leathercraftlibrary.com/product/1749/steampunk-style-round-leather-belt-bag
-
When can you call yourself a craftsman?
fredk replied to Handstitched's topic in Leatherwork Conversation
unfortunately here in N.I. it has been watered down so much more that no-one really knows the meaning and its just attached to anything and everything as a modern catch-all phrase -
waste cardboard: old brown card boxes opened out. Lay out flat to dye on. When used put into recycling old newspapers can sometimes be used too, but check that their ink doesn't come off on your wet leather
-
Most of my bags are made; two layers thin leather on front or back panel with compressed cardboard in between the layers. If its a one piece front panel/base/back panel/flap it gets 4 individual pieces of card, each cut to allow for glued and sewn edges and allowance for the corner to become the next piece. The gussets are sometimes made the same way, or done as a single layer if its your #2 3 pc, as in the belt bag above, which is now about 20 years old. I like bags to compress or expand to the limit of the gusset. As for keeping the bag on square its up to how thick the leather is and if you add re-enforcement
-
a. make it a feature; if the client is any ways a bit overweight a curved belt will be more comfortable on (him). If (he) is doubtful, let him wear it for a while. He'll not return it b. I think ~ if you wet/dampen the leather and let it dry slowly and naturally a couple of times that will ease the tension in it and the next belt straps will cut straight
-
You are releasing the tension in the stretched leather. The hide has been stretched during tanning and drying. The whole hide is in tension, a different amount in different directions. Without the pull of the rest of the hide the cut strip is returning to where it wants be naturally A belt with a curve in it is actually good. I cut belt straps straight, but after some time of wearing they take on a curve, especially on the bit on the back. You could wet the leather and hang it up to dry with a weight on the end to pull in downwards
-
When can you call yourself a craftsman?
fredk replied to Handstitched's topic in Leatherwork Conversation
I'm not the best one to give advice on what you should or could do. Perhaps signage saying how many years experience you have, something like 'Hand crafting leather since 2006' or ' . . . for over 14 years' ** ~ 'Every item carefully fully made and finished by hand by the craftsman himself' ~ 'Guaranteed made in Australia by a local expert craftsman of over 14 years experience' Maybe? Design and either get printed or print up yourself (computer printer?) some A5 sized handouts with photos of a few items and short concise explanations of how you see to quality. They will pay for themselves in the long term. I don't think you need to improve your work or change what you make (as a member on here, I reckon we can take your quality for granted, ) but you may need to increase your marketing and pushing yourself in the craft fair. When I was a working photographer I had a friend, also a photographer. He once said to me ' We are friends, but when it comes to business I intend to wipe you out and I expect you do the same to me, and we will both be wiping out every other photographer in the area' and he mean't it. Alls fair in love, war and business. **Local home bakery near to me. Not long open, just about 1 year, has recently added 'Making quality home baking since 2014' ~ thats only 4 or 5 years yet I know some local women are impressed that the bakery has been producing for 'that long!' I think the people running the bakery shop started off literally at home. -
I've done the; 5 pc, the #1 3pc and the #2 3pc. 5 pc: round the bottom corners of the front and back panels to ease the gusset pieces around. Sew the bottom gusset piece to the two side gussets first #1 3 pc: round the bottoms of the gusset side pieces #2 3 pc is just the 5 pc without the base being separate and needing sewing. Rounding the bottom corners can be just a small curve right up to a quarter or half circle. Not only eases attaching and sewing the gusset but also square corners get bashed in rather quickly giving the bag a bad look This is a type #2 3pc ( sorry, its an old photo), soft leather for a continuous gusset, rounded corners on front and back panels
-
Thank you for the compliments.
-
When can you call yourself a craftsman?
fredk replied to Handstitched's topic in Leatherwork Conversation
I differ; no he won't. In this 21st C age he will gain more and more business - that is my experience, not only in leather work but also in wooden toy making and furniture making with my father. Add the words 'Craft' or 'Artisan' to anything these days and the ordinary buying folk become blind to the quality of the product - in this I speak with knowledge. eg a coffee shop not far me; did coffees, teas and sticky buns. Was losing out to a big chain one newly opened. On advice the shop 'rebranded' as 'Artisan' Coffee, and pushed that their stickies were all home-baked, ie in shop. Turned their fortunes around inside 3 weeks! Still the same doing inside, they made very little changes to how they did anything - it was the branding 'Artisan' sorry, I'm going to hit you between the eyes, Do feel threatened. Work to get rid of that threat. Call yourself an Experienced Craftsman or something. Push and push and push your quality over his. If you don't he'll be taking business away from you. I speak from experience, below a tale of woe; I used to be the only leatherworker selling 'medieval' style leather goods at craft fairs here in N.I. Then comes along a guy, calls himself the 'Medieval Leather Crafter'. His work was . . . rubbish. And dearer than mine. I made items to the patterns supplied by museums etc, his were literally just scraps roughly sewn together. I and my Mrs thought he'll drop way, so I basically ignored his rubbish. Guess wot happened. I was dropped by the craft centres and castles and museums as my stuff was not 'historically accurate' compared to the interloper. I lost out to him because I ignored the threat of sub-standard work but someone more pushy than me -
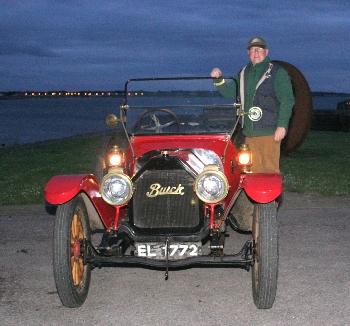
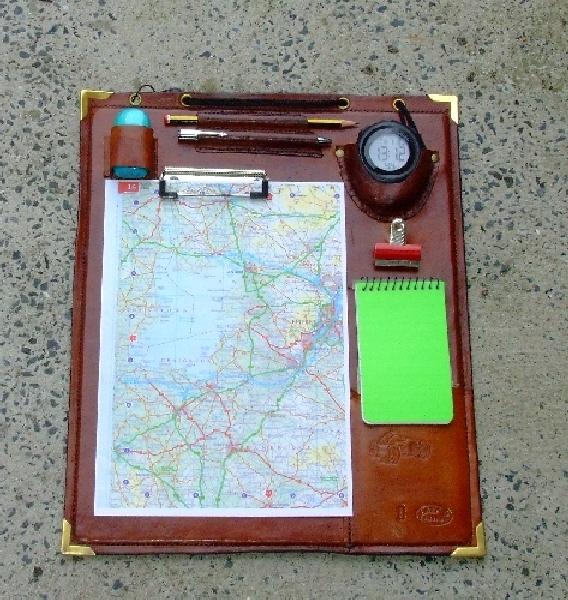
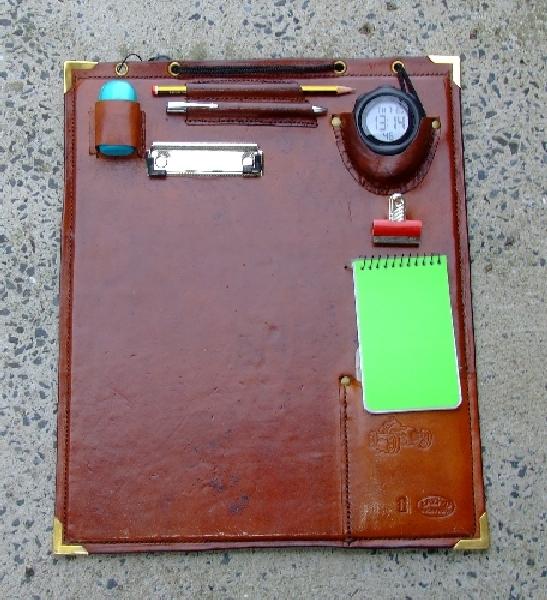
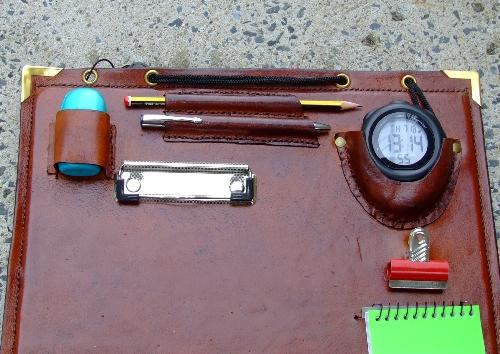
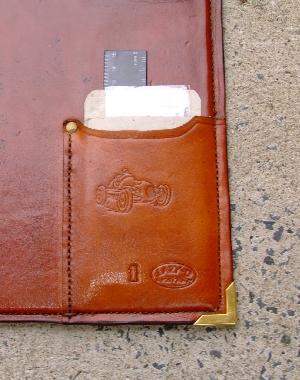
I think this the first time I've posted up something for you to look at Background to this. Two members of my vintage sports car club got married a few months ago. I only found out on July 2nd (at 04:12 BST!). I like this pair so I thought I'd make them something especially as both are, to put it politely, very, very affluent and don't need a toaster or kettle. However, both compete in vintage car rallies around the world as well at home. This started as 'I know, I'll cover a clip board for them' ~~ then it grew and grew as I added the things that rally navigators need to hand. Vintage (aka Antique) cars do not have very many places to stow the necessaries during a rally. This is one of the pair with one of their cars, an early Buick Now I present to you my Rally Navigator's Work Board. About 4 evenings designing and thinking about it and 7 days to make, maybe just about 10 hours in total. It measures 34 cm wide by 42 cm long. Leather is some 2mm (belly type I think) that I had laying around in my oddments box. Dye is Fiebings. A couple of years ago I over thinned some Tan colour so I added some Dark Brown to it and added some Red dye just for. . . . well, cos I felt like it. And speaking of felt, sandwiched between the front and back leather pieces is 3mm MDF board with a layer of felt on the back. Item holders on the front are sewn to the front leather but all rivets are ready-rivets which go through the MDF board, but not the back piece of leather. The holder for the stopwatch was wet moulded, then a soft leather glued to the inside. The pen/pencil holder is wet moulded. The eraser/sharpener loop is just a strap sewn on. After dyeing it got several coats of thinned Resolene and then about 3 coats of a floor 'polish' which is actually a water-thin acrylic varnish. I find a few coats of this helps water-proof items Without the map in place: Across the top: 4 sail eyelets, you always need somewhere to tie or hook things, in this case I've looped the stopwatch lanyard through them. Below is the pencil/pen holder. Left the eraser/sharpener held by a loop, then the maps clip and on the right the stopwatch pocket. Below it is a bulldog paper clip - tbh I'm not happy with that but I couldn't find anything better. The back of the note book below that slips down through a slot in leather. It covers the top of a pocket deliberately The pocket, unobscured, A few items stuffed in with card to stretch the pocket a wee bit The rear of the board is plain except it has a panel with the couple's names on it sewn on Plenty of mistakes, could have been better I know
-
I bought a couple sets like these. I got 4mm spacing and 6mm spacing. https://www.ebay.co.uk/itm/3x-Tool-Leather-Carving-Hole-Craft-Prong-Stitching-Punching-Punches-Tool-4mm/283327622900?ssPageName=STRK%3AMEBIDX%3AIT&_trksid=p2057872.m2749.l2649 I've only used them a few times but they work fine
-
When can you call yourself a craftsman?
fredk replied to Handstitched's topic in Leatherwork Conversation
aye chris you are basically correct. But in that my friend was a Gold Smith, he could not get his own makers stamp unless he was approved by the Guild. The issuance of Gold and Silver Smiths makers stamps is highly regulated. I mainland Europe in most professions one has to do an apprenticeship, then qualify, then spend a few years as a journeyman before one can call oneself a Craftsman. In the UK no one gives a sod anymore but many professions still insist on you have qualifications. -
When can you call yourself a craftsman?
fredk replied to Handstitched's topic in Leatherwork Conversation
right, here goes... it can depend where you live. I had a friend who is a Gold and Silver Smith. He was legally not allowed to call him a Craftsman in those metals until he had made his Master Piece and it had been positively appraised by the Gold Smiths Guild in London However, that apart, I reckon its when you enjoy what you do, turn out items to not only the best of your ability but push yourself to do even better on each successive item and sometimes have a break in your heart when you hand that item over to your client -
if it works for you it works
-
All leather closure methods for items like boxes and cases?
fredk replied to LederMaschinist's topic in How Do I Do That?
How about a toggle? sorry no pictures A. roll a strip of leather. Glue it as you roll it. Leave the last couple of cms. Punch a hole through the roll. thread a piece of thong/lace through hole. Glue one end of lace along the roll then glue that last couple of cms over the lace. One leather toggle with lace to attach. Attach to bag/box with lace though a hole. b. counter part. A loop of lace. each end through a hole in box/bag, large enough for toggle to go through length wise but not for it to go width wise