


fredk
-
Posts
5,976 -
Joined
Content Type
Profiles
Forums
Events
Blogs
Gallery
Store
Everything posted by fredk
-

What needle size for 1.2mm waxed poly thread?
fredk replied to toxo's topic in Leatherwork Conversation
I sew with 1mm thread. for that my JJ Harness needle pack says 2/0 and my Osborne Glovers needles are Gauge 17. Both are about the same diameter and a tad too big for 1mm thread but it was the closest I could get -
slim chance I reckon. OP hasn't been on for nearly 5 years. Last posted September 6 '14
-
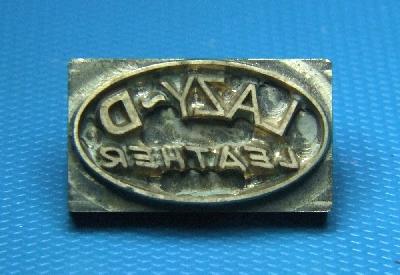
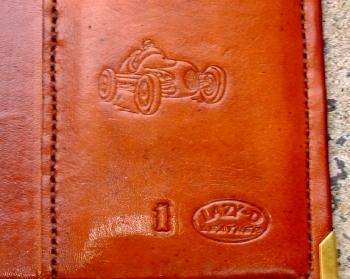
I had a 2cm wide brass stamp made. I use it with a Tandy press. This press; https://www.tandyleather.eu/en/product/craftool-pro-hand-press dampen the leather, set stamp in place, cover with a 3" square of 3mm steel plate, use press to press the stamp into leather, viola. . . .volia. . . . err, roberts your mother's brother brass stamp: Impression on leather; (bottom right)
-
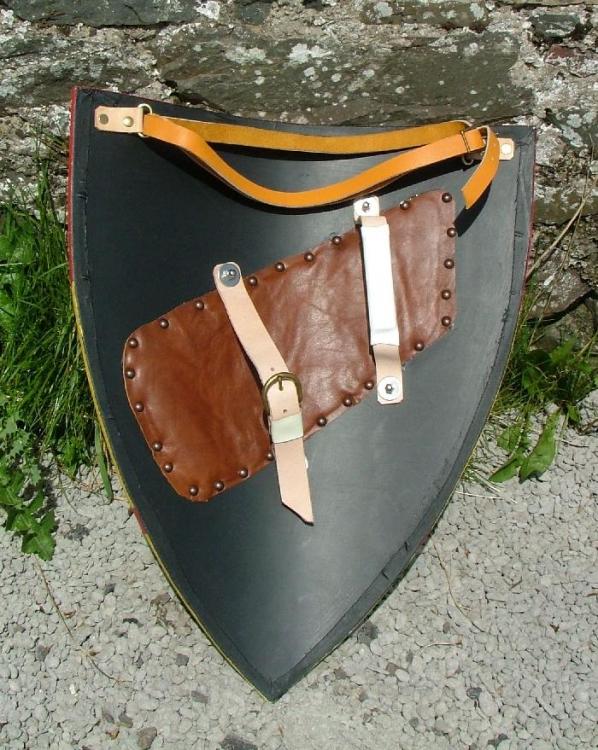
Brand: dunno, I got them from Le Prevo many years ago. I got 1000 so I'm still using them up Material: they are nickle coated steel (despite them looking like brass in the photo, they are nickle silver) On the shield they go through; 9mm of laminated board and about 4mm of the leather tab. There is just a tad over 3mm of the stem left for the head. I just give the rivet a great big whack to set it and it countersinks itself a wee bit.
-
The post of the rivet should stick out by about 3mm (minimum) to 4mm (maximum) Any less than 3mm and there is not enough of the post to crush into the head, any more than about 4mm and there is too much post crushing into the head and the rivet head will be deflected to one side. Both make poor joins, but the short one is worse. As for strength; the guige strap on this shield is held by a single 11mm head rivet on each end. The shield weighs about 8kg and the users of these shields flung them about by the guige strap. Never a fault happened,

-
First place I'd check are the feed dogs/teeth and see if they are clear of accumulated fibres and dust
-
Could it be that its a cobbler's stitching clam and the shortened tail, which looks like its been shaped, goes into a hole on the cobbler's pony? Interchangeable with lasts et cetera
-
Basic question about glueing and stitching
fredk replied to NeilMott's topic in Leatherwork Conversation
yeah, wot he says. One time some of our goats got out of their field. I found three of them on top of my Caddy. Not too much damage done tho. -
Made a clutch
fredk replied to DarrelT's topic in Purses, Wallets, Belts and Miscellaneous Pocket Items
inside-out construction? turned right side out to finish? -
Need to identify saddle scabbard tooling & history
fredk replied to butchlambert's topic in Leather History
The broken-cross symbol was a particular favourite of the Native Americans of the South-West area of the US and of the Navajo. afair the Navajo generally gave up using it during and after WW2 because of the symbol's association with the Nazi regime and the general public could not be bothered to differentiate. btw, the broken-cross features in every ancient culture around the world -
partly optical, the pencil slides in and out easy enough. The eraser/sharpener unit needs sliding down a bit to allow the pen to slide out to the left. Initially there was not going to be anything to the left of the pen holder, then it was just going to be an eraser, a lot smaller of what went in. On the Mark 2 I might slope the pen holder, left side low, right side high. Its also been suggested to put the pens vertically (and allowing them to poke up past the end of the board) where the eraser is and put that next to the stop watch. I'm toying with the idea of having two map clips; either one top & one bottom, one top & one on left side ~ in an open car one needs to hold the maps and papers well or they take off and away. PS. On Thursday 1st Aug I received a nice letter of thanks from the recipients
-
welllll, I think, its for stretching painting canvas over a frame. This is to pull the canvas over the frame and the holes in one jaw are used to tack the canvas in place. Or for pulling chair webbing over a chair frame
-
umm, mike, pardon me but I think you're not thinking straight. Lay a zipper down, the closed tag end to the right, the pull has to go left to right to open up the zip. Now turn that zipper 180*, with the closed end on the left. The pull has now to go right to left to open up the zipper same zipper orientated in different directions. pardon me if I'm getting your message wrong I should have made it clear in my previous posting that the zipper was pulled left to right to open it.
-
yeah but, no but, yeah but, no but, yeah but, the ones in my motor club are a tight-fisted lot. They'll spend ten of thousands on a vintage car but wont spend £20 on a new jumper or trews
-
Thank you once more folks. This was handed over at one of our club events on July 20th. The couple were rather pleased with it. Time will tell, and so will they, if it serves its purpose. There is a club event this coming Sunday, 4th August. I do not know if the couple will be out for it. If they are it is an event in which this board will be useful to them Secretly I'm hoping a few club members might ask about having something similar
-
A co-in-side-ance: I was thinking upon this sort of think just the last few days. Today I had to spend some time shopping in Belfast and on these occasions I take time to observe peoples' bags and how they use them. The info sometimes translates into my bags. Anyhows, I observed that the vast majority of shoppers, mainly women, hold their bag / purse in their left hand and draw the zipper from left to right. Very many of the purses were 'reversible' ; i.e. they could be turned round so the zipper went right to left but left to right was by far the more used way
-
No snakes here at all - we ain't got none at all. Well, except a few in the zoo but I reckon they'd not take it too nicely if I tried to convert them into leather
-
Made a clutch
fredk replied to DarrelT's topic in Purses, Wallets, Belts and Miscellaneous Pocket Items
Yeah, Wot he says, I too was wondering about that stitching on the bottom, but I think I can see another layer inside the bottom (?) I'd agree that a snap isn't right, a magnet lock or a tuc -
I used to attach things to my motorcycle in the way you want. I'd suggest that you do not fully tighten the bolts onto the grommets. I found the vibration could and did rip the material from around the grommet. I would now slip a bit of rubber between the bolt and the inside of the grommet and use a rubber washer on each side and tighten up almost tight but just a wee touch not
-
1. you could glue two layers of the thinner leather together for the back and flap and just use a single leather for the 'pouches' part 2. I think you need more stitching room on the right of the single prong 3. the wide spaces for the 6 and 4 are going to let those tools move about too much. I would put an extra line of stitches close to the handle bar, or wet mould the thin leather over the tools and then sew in place
-
It looks like the Kingsley are made of metal. As long as the letter blocks are thick enough or a backing pressure plate is used I see no reason they cannot be used just to impress the letter
-
interesting
-
Basic question about glueing and stitching
fredk replied to NeilMott's topic in Leatherwork Conversation
On joints of low stress the glue is sufficient. On joints of high stress the glue only acts as location grip, the sewing is the main joiner Glue, to be very basic, only soaks into the first few layers of leather fibres and under stress the leather joint can pull apart, ripping out those fibres. On the other hand, sewing goes right through the thickness of each leather and pull them tight allowing the joint to with stand more stress. I make game boards. Sometimes I cover a board in thin leather, then apply a square of thin leather on top of that to be marked out in the gaming squares. This is a low stress joint so I only glue that top piece of leather to the main one. However, the joint of a gusset in the side of a bag is a high stress joint. The joint needs to resist the pull of the front/back panels in a bag stuffed full, so glue (or double sided tape) to hold the gusset in place then it is saddle stitched. The sewn joint in this case is stronger and more reliable for the job. A good strong glued joint helps to re-enforce the sewing but cannot replace it Another low stress joint, a fold over key-ring, where a piece of shaped leather is folded over on itself, capturing a split-ring for keys. Glue only will do this Gluing a two or three layer leather joint allows the join line to be cleaned up and burnished. I go right to the edge of my leather with the glue. I trim the edge after sticking together and also maybe sewing. The trimming cuts away any glue ooze. I'm always careful that the ooze is very minimal and has no chance to get on the face of the leather. With more experience one can gauge just either how close to the edge to go or how wet to have the glue so as it squeezes down it squishes towards the edge. I put contact glue on wet on the inner of the joint spreading it towards the edge so it gets a bare minimum of almost dry-ish glue. When its clamped up very, very little is squeezed out. If a section doesn't glue down the way I like it, or I've left a section un-glued for a reason, I use a thin blade on a modelling tool to apply a thin smear of glue later. I think in your case, I would take the glue right to the edge. Having allowed a few extra millimetres on the sides, trim the edges to size. hth edited to correct spelling errors -
I can't access those photos to see the item
-
I used to use the groover which has the groover on the arm. A couple of years ago I bought one which has the groover in the removable and adjustable centre post and the arm just as a guide. I think its more versatile as the arm can be removed for grooves to be made in-land and free-hand https://www.ebay.co.uk/itm/Portable-Pro-Stitching-Groover-Leathercraft-Skiving-Edger-Beveler-Tool-Kit-Set/264247939883?_trkparms=aid%3D555018%26algo%3DPL.SIM%26ao%3D1%26asc%3D57477%26meid%3Dd7fedaa902ab478893c0e90cda396ee8%26pid%3D100005%26rk%3D4%26rkt%3D12%26sd%3D264343212144%26itm%3D264247939883%26pg%3D2047675&_trksid=p2047675.c100005.m1851
