


fredk
-
Posts
5,974 -
Joined
Content Type
Profiles
Forums
Events
Blogs
Gallery
Store
Everything posted by fredk
-
In the UK you can buy a car leather upholstery cleaner which will give off a 'new leather' smell after use. Car dealers use it on both new cars and used cars. The cleaner works on the PVC and plastic parts as well, shining them up but adding that 'leather' smell
-
I've not received an email about this and there is nowt on their website about it
-
 In RAF we had one very important one; WOP....... Warrant-Officer on Prowl Its not so much the abbreviations, which are now quite common, but the names of everyday things that can cause confusion eg; US truck = UK pick-up. in UK a truck is a heavy goods vehicle weighing 3 tons or more or a small light weight wheeled vehicle for handling very large goods US, bill-fold, UK - wallet.
 -
Almost all those abbreviations are standard fare in the UK, mainly due to t'internetty Not all British slang comes from Cockney!* TTFN was a popular phrase coined by a favourite radio presenter called Jimmy Young * in fact most British slang has nowt to do with them sort of Londoners IMHO = here, mostly is In My Humble Opinion we separate ATM from atm. But it is extremely rare for anyone here to ask for an ATM; they usually call it a 'hole in the wall' or 'cash point' Old one which still causes confusion; LOL - to some = Laughs Out Loud, to some = Lots Of Love afair, it was Lots Of Love originally to the British, but the US and international Laugh.... took over; thus older users use it for Love WTF; has a clean form, = Why The Face?
-
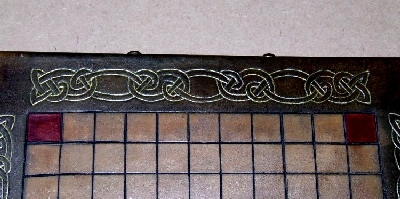
I did this game board about 15 years ago using a gold gel ink pen; I also use metallic ink pens by Molotow and also paint pens No problems so far. But seal the ink with resolene or something similar; the ink remains water soluble. If your item gets in the least bit wet the ink will thin and run.
-
I would 'wash' them down with lots of cellulose [lacquer] thinners and clean rags; until they are about dry of that oil, then apply neetsfoot oil to restore the lost oil, but not as much nfo, just enough to feed the leather
-
x
-
Taking a random sampling, we in the UK are paying approx 50% more than you in Canada for the same item, plus you have items in that flyer that are not in mine
-
What did the old shoe and boot makers use to waterproof them
fredk replied to chrisash's topic in How Do I Do That?
They also used shellac varnish. I believe shellac is still used on the boots of the Household Cavalry, the long ones worn for official duties -
A nice thing to solve the problem. Did you prep your leather before dyeing? I give mine a wipe over with a clean rag dampened with cellulose (aka lacquer) thinners to remove any surface contamination. Even some grease from your fingers can leave contamination which will prevent dye penetrating properly
-
Most excellent The kid wot rides that will need a leather jacket and cap. ala Marlon Brando in 'The Wild One'
-
I bought a brass one from a Chinese seller on ebay
-
Can I make a molded hat visor rain-resistant?
fredk replied to DanDSilva's topic in How Do I Do That?
Seal the dye with several coats of diluted Resolene. Then apply several coats of Snow Proof paste. Even apply some soft bees wax and buff it in. Then it will be rain-shower resistant, but not totally rain proof, it will never be that -
Found square head Chicago screws https://www.ebay.co.uk/itm/Solid-Brass-Square-Head-Binding-Stud-Leather-Belt-Bag-Chicago-Screw-Nail-Rivet/152694517062?hash=item238d4d6d46:m:mjGLK7T9Mvki-qyv6zAuvxw
-
Thats doubly clever, that pipe. For dipping belts I use plenty of dye in my dip tray and pull a belt through, one end in each hand, back and forth. It takes time and care to get an even coating of dye. I forsee a visit to a builders merchants soon for some PVC pipe.
-
double; I know you can't cut the edges and retain the integrity of the rivet head. Cutting off one part of the edge is one way I use to remove them. The Chicago screws is the way I think. You can buy square ones from Chinese sellers on ebay
-
A; when someone goes to lawyer and says 'I have copyright on this' the lawyer takes his/her word for it and does not investigate if they have. They act on the word of their client B. Its very, very expensive to take a court case. In N.I. a copyright case is a civil action and the complainant has to lodge a minimum of £10, 000 ~ in cash, with the court before proceeding C. I've had threats by lawyer letter over copyright ownership (I never infringe anyone's proper copyrights). I have just written a letter back to the lawyer; telling them 'no they don't have copyright' give an example or two, and tell them to prove it in court. Thats the last I've heard from them. An eg; when I had a wooden toy company it was called 'Tyrone Toys'. Shortly after I started it I got a lawyers letter saying I infringed his clients copyright, his company name was 'County Tyrone Toys'. The letter told me the date from when the client had used the name, which predated the first of my toys going on sale. I sent back to the lawyer a newspaper advert and the company registration papers for my 'Tyrone Toys' which both predated his clients claim and told him' see you in court'. btw the other toy company changed to 'Wooden Toys of Co.Tyrone'
-
Big cheat; get the Tandy Craftaids. They have them all drawn out. Also Tandy have a 'library' where you can buy older designs. Prices are from $0.00 upwards. These come to you as PDF files. With these you can resize and squeeze or expand in your computer to suit your item, then print out, trace over on your item then go to work on it. It suits me cos I'm no artist Floral design craftaid example; https://www.tandyleather.eu/en/product/floral-keycase-belt-craftaid from the 'library'; https://www.leathercraftlibrary.com/p-1743-sheridan-floral-corner-and-belt-pattern-by-jim-linnell.aspx https://www.leathercraftlibrary.com/p-1739-2681-floral-belt-craftaid-tracing.aspx
-
Try searching outside of leather work items. Model railway boiler rivets; https://www.ebay.co.uk/itm/1-16-x-5-8-brass-rivets-round-head-snap-head/232802078698?hash=item363415cfea:m:mWtAA9QFjYHGGtJWdcewASg
-
Rune bags & some questions.
fredk replied to mick86's topic in Purses, Wallets, Belts and Miscellaneous Pocket Items
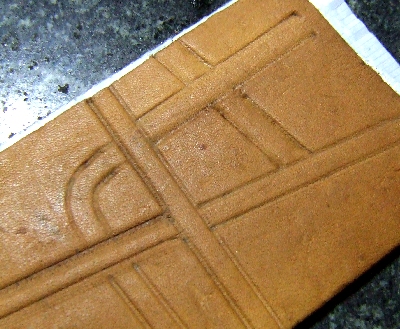
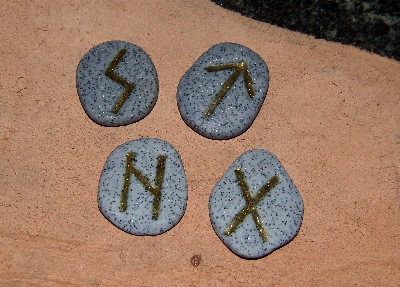
I dug through my tools and found the screwdriver interlacing markers. One makes a square edged lace the other makes a slightly wider round top lace; Just a rough drag thru some leather. I don't know if you can make it out the round top shape is to the top of the picture. Proper back-grounding would tidy the lines as well. And finally; if you're not totally set on using wood for your rune beads ~~ I use 'granite' polymer clay. Polymer clay is also known as FIMO and Sculpey. I use the Tandy Rune letters to impress the letter then I fill the grove with liquid polymer clay mixed with gold paint and gold glitter. The two top beads are FIMO straight from the packet, for the two lower I added white polymer clay to lighten them a bit. I make these for games as well as for necklace beads. They have been mistaken for real granite pebbles. A block of polymer clay is 2 ounces (58g) and I get between 14 and 18 beads from a block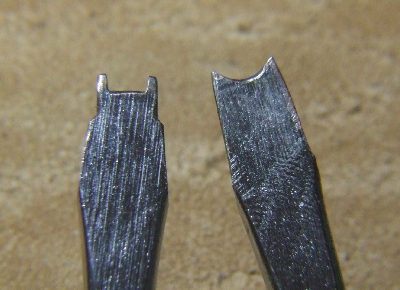
-
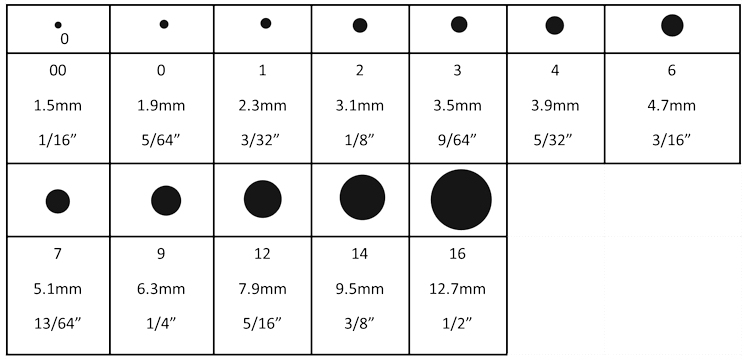
This is a chart from one punch maker. Its not perfect, it doesn't cover all the sizes ~~ and ...... I find that different makers have slightly different sizes for the numbers. Eg, Tandy's #3 is 1/8" = 3.17mm, the #2 above, the #3 above = Tandy's #4 and the above #4 = Tandy's #5 You might need to draw up your own chart
-
Rune bags & some questions.
fredk replied to mick86's topic in Purses, Wallets, Belts and Miscellaneous Pocket Items
Also; cut the piece bigger than you need. Allow for the stretch, and then you can cut your required shape out, around your worked area when its completed btw; for doing fine interlacing patterns I ground the blade of a stubby flat screwdriver. I ground out the middle of the blade to leave two points. I actually made two, slightly different. Then I use this to draw over the wet leather, leaving two tracks. It means my ribbon width is always constant. I've not used them for several (many) years -
Rune bags & some questions.
fredk replied to mick86's topic in Purses, Wallets, Belts and Miscellaneous Pocket Items
For background you do need a range of tools, from very small to the largest which your design can take. One of the common backgrounders is the simple cross-hatch as on Tandy A104 https://www.tandyleather.eu/en/product/a104-craftool-background-stamp Although this is very small, it might not be small enough. You can buy these tool very cheaply. Use a dremel type tool, or just a file to shape a backgounder to size and shape that you need For interlacing; the most important aspect imho is to have the widths of the ribbon the same size throughout. Modern drawings of interlacing are all nice and regular, but the ancients didn't have it that way; so for a 'rustic' / 'ancient' look the design can be a bit uneven As with all design stamping, but Celtic interlacing patterns especially, work slowly and carefully, taking breaks from it every-so-often -
1. your wax will be yellow-ish. That wax is the common wax; it comes from the honey stores after the honey is extracted. Some might come also from the brood frames if the bee keeper is renewing the brood frame. White bees' wax comes from the caps, the sealing tops, of the honey cells. They are sliced off carefully just before honey is extracted. For every 1lb of yellow wax there is just about 2 oz of cap wax. Its no better than the yellow wax. Yellow wax can be bleached white [almost to cap white] by leaving it in very bright sunlight for a while; the length of time depends on your sunlight 2. I use my medium hard mix for burnishing edges. I use a bit of linen cloth. I take some wax mix on it and rub it onto the edge, about 4 inches at a time, then rub the cloth very vigorously to warm the wax and burnish it into the edge. It only takes a short time to do both edges of a long belt. Sometimes I'll also use one of my wood slickers to go over the edge as well
-
Bees' wax melts at about 65*, its also very soft. I add a quantity of carnauba wax to it so it has a harder finish. Just that makes a good wood polish. But its too hard to spread into leather so I mix it with neetsfoot oil. The nfs helps feed the leather Don't ask quantities/measures; I have a very soft mix with more nfs and a little bit less carnauba, and I have a harder mix with more carnauba and less nfs, and I have a harder one with no nfs but with some (a very little) vegetable oil. I just mix it by - 'uh, thats about right'