-
Posts
5,976 -
Joined
Content Type
Profiles
Forums
Events
Blogs
Gallery
Store
Everything posted by fredk
-

Use of rabbit fur may become illegal in UK
fredk replied to fredk's topic in Exotics, Reptiles, Furs and others
Unfortunately its illegal to hunt rabbits in N.I. -
I may be adding 2 + 2 to get 5 but please bear with me 1. In the UK it is currently illegal to raise rabbits just for their fur 1a. it is currently illegal to import furs from places which raised the animal for its fur, including as per # 2 2. In the UK rabbit fur is currently obtained as a side product of rabbits raised for meat 3. the last rabbit meat farms in Britain are closing down now (due to pressure by 'Animal Rights' groups) 4. the UK Gov is about to outlaw rabbit farms, even for meat (due to pressure by 'Animal Rights' groups) 5. if you/we/me cannot get rabbit fur from a local source, nor be able to import it legally, then it has, de facto, become illegal to use it (old rabbit fur is not any good)
-
Warning; deviation; yup, but not impossible. I inspected an Italian made saddle of 1812. It had stitches of 18 per inch
-
A stitching chisel will make a diamond shaped hole, about 2mm across the points of the rhombus, it will be 1mm or less wide. A lacing chisel will make a 2.5 / 3mm rectangular hole about 2 to 2.5 mm wide. The wider hole is necessary to pull the lace, typically nominally 1mm thick but closer to 1.5 mm thick. It will take very thick thread to fill that hole neatly whereas 0.5mm thread (x2 in s/s) will fill the stitching hole
-
I would cut this just about the same as JLSleather. But after cutting off the shoulder I use my strap cutter to cut lengths of various widths of straps. I don't make too many belts these days and most use buckles of 30mm minimum to about 40mm. So I cut as many straps as I think I might want, trying not to get too far towards the belly part of the hide. This gets the better belting leather off and out of the way because I use more of the more flexible leather
-
On thin leather, up to about 2.5 mm thick use a rotary knife.
-
If you are sure its about 1/2" of material then 3/4" will do
-

Some triweave inspired stamps I made. Thoughts?
fredk replied to texasleathertools's topic in Member Gallery
Can you do the internal lines on the 'Lined' and 'Spiral' deeper? I do my stamping on un-dyed leather. After dyeing et cetera and the leather has dried I find that shallow lines have either disappeared or lost definition -

Scrap! What to do with it?
fredk replied to Hags's topic in Purses, Wallets, Belts and Miscellaneous Pocket Items
My scrap is usually very much smaller pieces, odd shapes less than 1/4 the size of a paper $. I've just been sorting out a box full to send to a lady for her to use in art with the children she teaches -
this; a lady in Scotland covers crochet needles with polymer clay and forms it into a generic hand-hold shape. She sells them to ladies of a certain age group, who really like them
-
Two things to try; 1. electric shrink wrap. a few layers of that 2. either on its own or over the shrink wrap; self-adhesive fabric band-aids/plasters I use both on some of my tools, not just leather work ones
-

What size punch or what tool would you use for this?
fredk replied to jcwoman's topic in How Do I Do That?
tbh, I think you are worrying or fussing too much about the plugs getting stuck in the punch tube. Just about every punch I have gets plugs stuck in them and I need to clear them out, maybe every 6 holes, some punches take longer to block up. For small size punches, like 0.5mm to about 2.5mm I use a leather sewing-machine needle chucked in a micro-drill vice chuck to poke out the plugs. As an extreme measure on really stuck plugs I use a cigar/pipe lighter to burn the leather plug, then hoke it out -
Weak vinegaroon on oak will give it that grey-ish look of very aged oak. We, my father & I, used to make it and use it on oak furniture, doors et cetera. We didn't know it then as vinegaroon, just as 'that jar of wood greying stuff' My father used to make it using old diluted car battery acid. Mixed with a pot of tea it worked on other woods as well. The tea added tannins to it which some woods don't have
-
A. great !, well done b. no need to remove rust from the nails, basically that's what you are doing, making an iron-rust solution c. depending on your local water, just a wash in water, or water with a very small amount of soap in it will be sufficient to neutralise d. depending on the tanning of your leather you may find the colour darkening, or deepening as time goes by as the iron reacts to the tannins in the leather
-
Years ago, after having gone through a lot of poorly made rotary hole punches, I bought a good one from Tandy. Unfortunately Tandy no longer sells it. Not only has it served me well for about 6 years but I like that the tubes can be replaced. So far I've only replaced one tube. But also, as the tubes can be screwed out they can be taken out for sharpening. Ivan now sells this punch. I've bought Ivan tools and I think they are generally high quality. I've punched 4 - 5mm leather with my Tandy version, I've had no need to go thicker https://www.ivan.tw/collections/punching/products/deluxe-rotary-punch Ivan also does a compound lever version; https://www.ivan.tw/collections/punching/products/dual-action-rotary-hole-punch
-
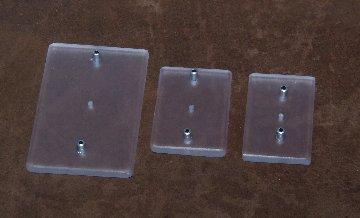
For handiness I have three sizes; (old picture, before the big one got the lines added) Made with some scrap acrylic and some 3mm aluminium tubing. They each took about 30 minutes maybe to make, using hand tools. Would take less time with power tools. Cheap as chips to make but worth a ton of gold
-
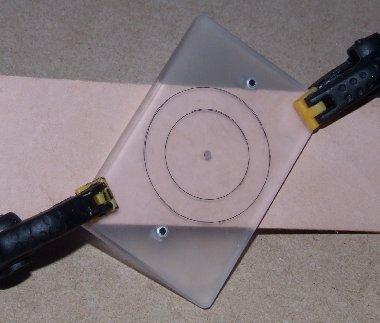
This; There is short pin in the outside holes. These go up against your belt or strap. The lines are to help with the linear spacing of the buckle-tongue holes. The spring clamps were just put on to hold the thingy in place whilst I photographed it. They are not needed in use
-
-

Leather Supply Companies - Good and Bad?
fredk replied to Gulrok's topic in Leatherwork Conversation
NO NO -
I break the blades in half
-
and the blades from pencil sharpeners will fit. Not all of them, some are too thick but blades from the real cheap plastic sharpeners will maybe fit.
-
I use the two-hole skiver blade in my wood strap cutter. Those blades are easier to get
-
Please post the photos directly on here so we can see them


