


Dwight
-
Posts
5,265 -
Joined
-
Last visited
Content Type
Profiles
Forums
Events
Blogs
Gallery
Store
Everything posted by Dwight
-
 Try Weaver Leather, . . . in I think Berlin, Ohio. http://products.weaverleathersupply.com/search?w=horse hide belt They should be able to help you. May God bless, Dwight
 -
My latest holster
Dwight replied to hwhleather's topic in Gun Holsters, Rifle Slings and Knife Sheathes
Hopefully they don't sit down in the dirt. A muzzle full of .45ACP dirt can get someone hurt bad. The reason I recognize it, . . . I'm only 72 and haven't completely grown up, . . . I still play in the dirt quite a bit. Just finished fixing a 10 inch field tile buried about 48 inches in the ground, . . . it blew out, . . . created a 6 foot diameter hole. Had to play in the dirt big time that day. Playing in the garden will get one dirty too, . . . and sometimes, . . . just sitting down next to a camp fire, . . . making memories or smores, . . . checkin' out my cast iron dutch oven, . . . and whatever is cookin in it. Seriously, . . . I would not own a slide, . . . and refuse to make em. They could be a cash item, . . . but I like my customers better than that. But, . . . anyway, . . . I still like your work, . . . keep it up. May God bless, Dwight -
My latest holster
Dwight replied to hwhleather's topic in Gun Holsters, Rifle Slings and Knife Sheathes
I would say personally, that if you sent it to me, . . . I'd be more than willing to test wear it for you for a couple of years. Seriously, . . . really good looking, . . . the only thing I don't do for sure with my pancakes, . . . I never allow the muzzle to go below the holster, . . . sitting down on the ground "could" get a muzzle full of dirt, . . . which could be very dangerous. Other than that, . . . it's a good job. May God bless, Dwight -
Recent archaeological find: 5,500 year old shoe found in Armenia
Dwight replied to DJole's topic in Leather History
Thanks DJole, . . . wouldn't you love to sit down and have a conversation with the person that made that shoe?? May God bless, Dwight -
John Wayne Suede out belt.
Dwight replied to Forester's topic in Gun Holsters, Rifle Slings and Knife Sheathes
Those pictures were the last one I did, . . . and it was indeed fun. If I had to choose making them or a regular Duke rig, . . . the money belt is probably a bit easier to do, . . . and because it is a bit "different" folks will pay a bit more for it than a normal Duke rig. May God bless, Dwight -
John Wayne Suede out belt.
Dwight replied to Forester's topic in Gun Holsters, Rifle Slings and Knife Sheathes
Honestly, I don't know plinkercases, . . . snaps are probably not "period correct", . . . but then again, not much more than the leather is, . . . and even it has undergone many changes in the way it is created / finished, etc. I tend to go by the overall look, . . . Western?, . . . OK, . . . and I kind of drop it there. But that's just me, . . . and how I approach this stuff. May God bless, Dwight -
John Wayne Suede out belt.
Dwight replied to Forester's topic in Gun Holsters, Rifle Slings and Knife Sheathes
I'm not the worlds best artist, . . . but here's a little drawing that may clear up some of the mud. May God bless, Dwight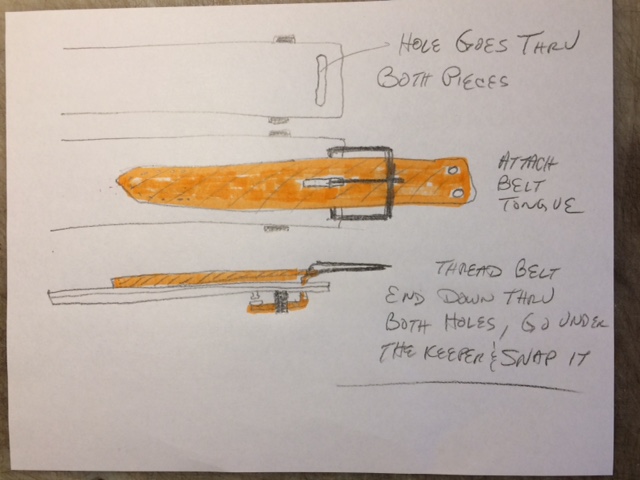
-
Well, . . . I went out to the shop, . . . and I just could not get the wire to bend like I really wanted it to do. If the scorpion were 2, 2 1/2, or 3 inches long, . . . it would work really well I think. You can unbend a small paper clip, . . . put it on a dampened piece of veggie tan, . . . put it under the arbor press, . . . you'll see it makes a really nice impression. My 72 year old eyes and fingers just are not quite up to bending that wire in that intricate a pattern for the 1 inch size. I'd probably opt for one of the Hong Kong options, . . . sure looks like the right price to me. May God bless, Dwight
-
John Wayne Suede out belt.
Dwight replied to Forester's topic in Gun Holsters, Rifle Slings and Knife Sheathes
Yes, . . . you are correct that the mouth of the belt is only deep enough for the bills to go back in and be secure. The snaps hold the buckle tab, . . . it folds back under the bottom of the buckle, . . . threads down through both layers, . . . doubles back under the belt keeper, . . . and snaps. I tried it, . . . and using that arrangement, I could even put larger coins in the money part of it, . . . and they would not come out. I don't know what happened to the pictures, . . . so I'll post it again so you can see it. I don't have the belt here, or I'd get a better pic of it, . . . long ago went to it's new owner. May God bless, Dwight
-
John Wayne Suede out belt.
Dwight replied to Forester's topic in Gun Holsters, Rifle Slings and Knife Sheathes
I make it with the suede folded, . . . best side out, It is a fun one to make in my opinion. I only leave the money belt part of it open far enough to get in a folded confederate bill, . . . the rest is not only sewn, but also contact cemented together. This is the last one I did. And, . . . no, I didn't oil the suede, . . . just a light coat of Resolene 50/50 with water, . . . my customer and I both really liked the end result. May God bless, Dwight

-
Definitely, yes, . . . just a bit more intricate, . . . probably have to do it under a magnifying glass, . . . The big key is to make the exact shape you want on the computer first, . . . print it out, . . . use it for the template / pattern. Again, . . . solder the connections, . . . file and sand the solder joints smooth, . . . should work really well for you. May God bless, Dwight
-
For that, . . . it would depend upon the size, . . . whether this is 1 inch long or 6 inches long, . . . For discussion sake, . . . say it is 3 inches long. I would go to Lowes and buy a couple feet of 12/3 or 12/4 Romex cable. You want solid copper wire, . . . not stranded. Using needle nosed pliers I would then bend the wire to match the shape of the scorpion. (You need to strip the plastic covering off the wire) It can be spot soldered together, . . . then spot soldered onto a piece of galvanized sheet metal. The sheet metal I would then contact cement to a nice looking 3/4 inch thick pine board. You could then dampen your leather, . . . place this stamping tool on the leather, . . . and roll it with a rolling pin or even probably a wall paper seam roller, . . . it will give you a nice impression. May God bless, Dwight
-
The first thing you want to do is lay the belt down flat on a table, . . . roll up your sleeves, . . . grab a white or light colored wash cloth that your wife will not miss out of the cupboard, . . . And buff the belt like you are trying to erase the blackness off the leather, . . . be serious, . . . be personal, . . . and be rough about it. A half hour later, when you have worked up a minor sweat, . . . your wrists and forearms are telling you that they've exercised enough today, . . . AND no more black is coming off the belt, . . . then you're good to go. Give it a couple of light coats of resolene, . . . mixed 50/50 with tap water, . . .let it dry, . . . you should be good to go. My belts and holsters I sell are 99% done with resolene/water, . . . and I get zero complaints. May God bless, Dwight
-
I used to use USMC black myself, . . . and it does give a rich and deep black. But you will buff it till the cows that haven't been born, . . . die of old age. I prefer Feibings pro oil dye, . . . use it for just about everything. Bikermutt gave you the good directions, . . . the only thing I would add is in the neatsfoot oil, . . . it is really easy to get too much on the project. Put some on an old tee shirt piece, . . . and just kinda rub it on until you get an overall color change in the leather. If the color change is even, . . . the oil is even. If the color change is splotchy, . . . your oil is the same, . . . you will have to practice that, . . . there is no perfect way to learn that other than practice. And when you do the Resolene, . . . apply it with a cheap, . . . 1 inch wide, bristle brush. Apply some of it and swish it around with the brush, . . . up, down. left, right, oblique angles, . . . brush it on until you get a bit of a "little bubble" lather built up, . . . then brush out the bubbles. For a bill fold, I might do two coats, . . . most likely I would only do one. After it has dried for several hours, . . . go to a real good light, . . . like a window, . . . hold it up at an angle, . . . look for dull spots in the shiny finish. Dull spots means you didn't get a good coat on. Add another coat, . . . and make sure you get the dull spots this time. May God bless, Dwight
-
Most every thing I do uses size 346 thread, . . . will this machine handle that heavy thread? May God bless, Dwight
-
Beautiful work, . . . as a pastor, . . . I really enjoyed the cowboy church scene. May God bless, Dwight
-
Thanks, Jim Timber, . . . I have not the slightest inkling of the reason for the Tippmann Boss bashing I run across every now and then. My machine is one of their aluminum machines, . . . been running it over 10 years, . . . and like any thing else, . . . I've had a couple of issues. Nothing that could not be fixed, . . . and fixed darn quick, . . . by very competent people. Tippmann is in my opinion, . . . based on 10 years of service, . . . one of the VERY BEST companies I've ever had to deal with. The equipment is excellent, . . . warranty is good, . . . service is great, . . . and they have bent over backwards to help me the few times I've needed it. My personal opinion is most likely the biggest detractors of the Boss, . . . probably would find fault with a ten pound brick of gold, . . . have very little mechanical ability, . . . and just like to gripe to hear their heads roar. Rant off. May God bless, Dwight
-
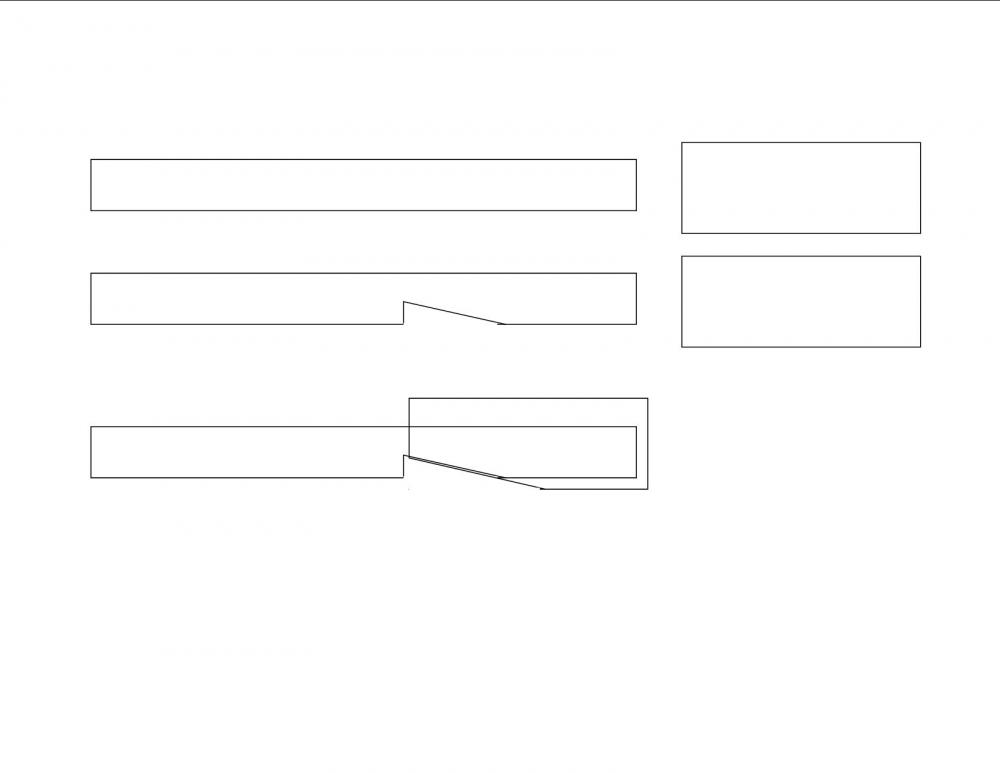
I would cut a small tapered channel across the bottom of the belt, . . . and be very careful but very firm, . . . bending the bottom of the tip up into that groove kind of like the little drawing I've enclosed here. I would first put several coats of trag on the tip of the leather though, . . . to harden it up. Then the very last thing to do is put on the metal tip, . . . gently peen down the edge, . . . it should hold till the cows come home. May God bless, Dwight
-
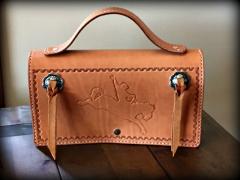 Very attractive, . . . can be used as a girly-girl purse, . . . or just a knockabout. May God bless, Dwight
 -
Rifle/Shotgun Case liner
Dwight replied to txclas's topic in Gun Holsters, Rifle Slings and Knife Sheathes
Actually the suede liner or the wool liner are not that bad to sew. I use my Tippmann Boss, . . . so I can see exactly where, . . . and put it exactly where I want it, . . . AND when sewing the outer shell to the liner, . . . in between the two, . . . is the zipper, which has to be sewn in anyway, . . . Kills two birds with one stone, . . . sews in liner, . . . adds the zipper. May God bless, Dwight -
Rifle/Shotgun Case liner
Dwight replied to txclas's topic in Gun Holsters, Rifle Slings and Knife Sheathes
That may be true, Ken, . . . but who puts a rifle in a leather scabbard and leaves it for any length of time other than on the horse?? I don't know anyone who does / did / or plans on it. May God bless, Dwight -
Rifle/Shotgun Case liner
Dwight replied to txclas's topic in Gun Holsters, Rifle Slings and Knife Sheathes
The chrome tanned story is pretty far blown out of proportion. From what I've been able to understand it's more or less an old wive's tale, . . . maybe some fact somewhere, . . . but nothing to get real uptight about. A very reputable holster maker wrapped a mild steel rod in a piece of chrome tanned suede, . . . stuck it in a personal locker for several months, . . . pulled it out, . . . nothing, nada, nein: no corrosion or rust. I wouldn't worry about it. Got the deerskin??? Do it, . . . and have fun. I only like suede better because it is a bit thicker usually, . . . and might in some rare case be a tad more of a cushion if the weapon got dropped on concrete or something. Plus, . . . all things considered, . . . suede can be an inexpensive liner. May God bless, Dwight -
Rifle/Shotgun Case liner
Dwight replied to txclas's topic in Gun Holsters, Rifle Slings and Knife Sheathes
No, YinTx, . . . when I do a rifle scabbard, . . . I simply line it with suede, . . . contact cemented to the exterior. It IS THE padding. I personally don't like those nylon padded gun bags, . . . prefer a canvas one with no liner if I'm not going with leather. Our veteran honor guard used to have canvas bags with sheep wool liners, . . . hated them, . . . couldn't keep zippers in em. May God bless, Dwight -
Rifle/Shotgun Case liner
Dwight replied to txclas's topic in Gun Holsters, Rifle Slings and Knife Sheathes
For anything but a saddle scabbard, . . . I like suede, . . . Would not line a saddle scabbard. Too much traffic in and out. May God bless, Dwight -
How can I adjust a cowboy bench spitter/skiver?
Dwight replied to ADDgirl's topic in Leather Machinery
Mine is the Tandy version, . . . widest part of the useable blade is just shy of 6 inches. I've pulled 5 1/2 inch leather thru mine to make a special type holster. Key is keeping it sharp, . . . which I do. Just wish I could get my regular knives that sharp............. May God bless, Dwight
