BearMan
-
Posts
710 -
Joined
-
Last visited
Content Type
Profiles
Forums
Events
Blogs
Gallery
Everything posted by BearMan
-
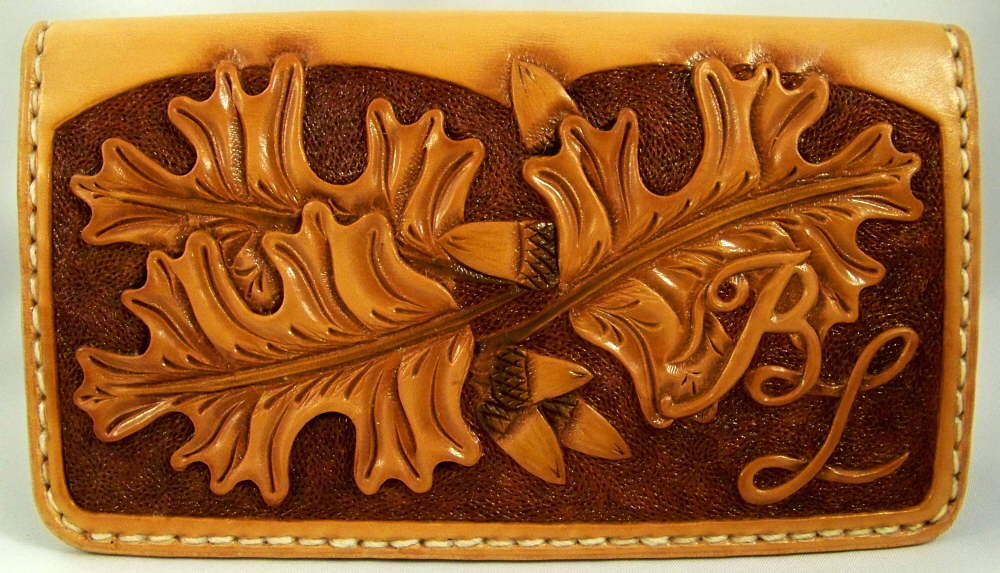
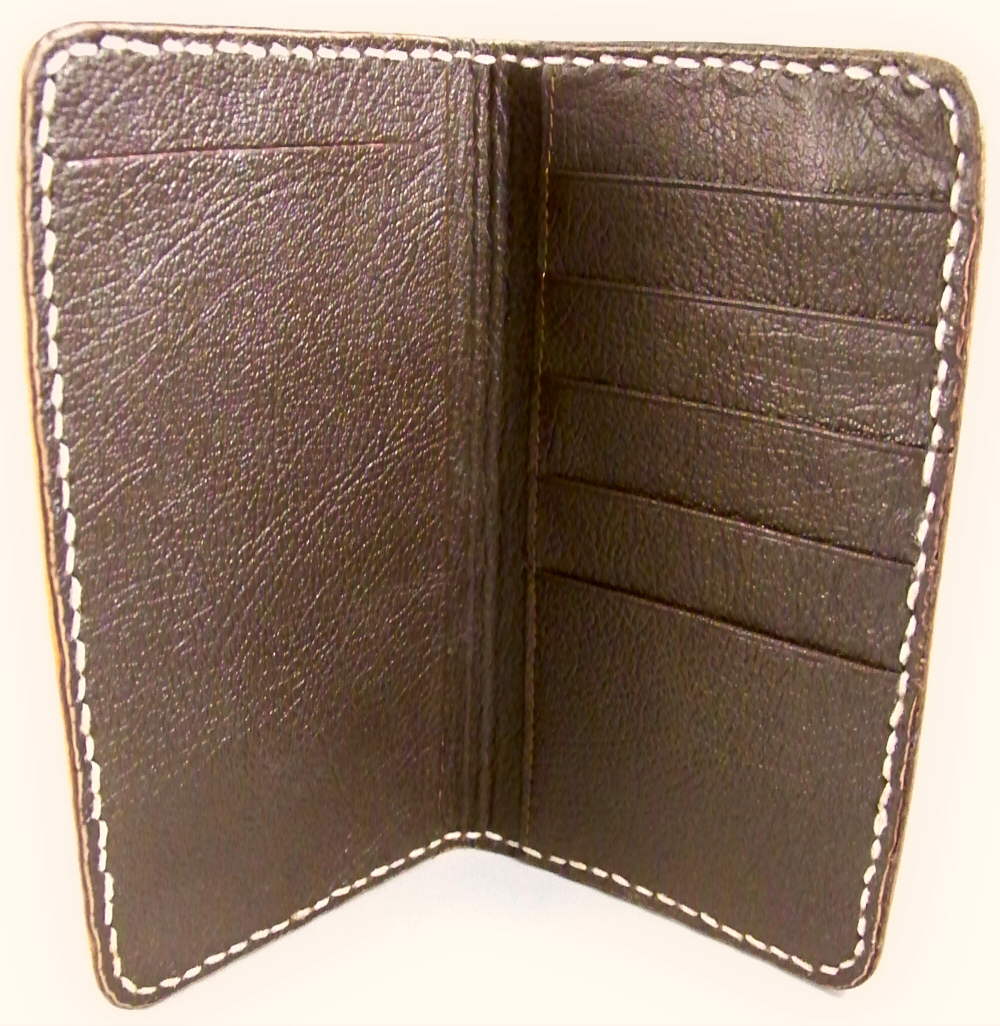
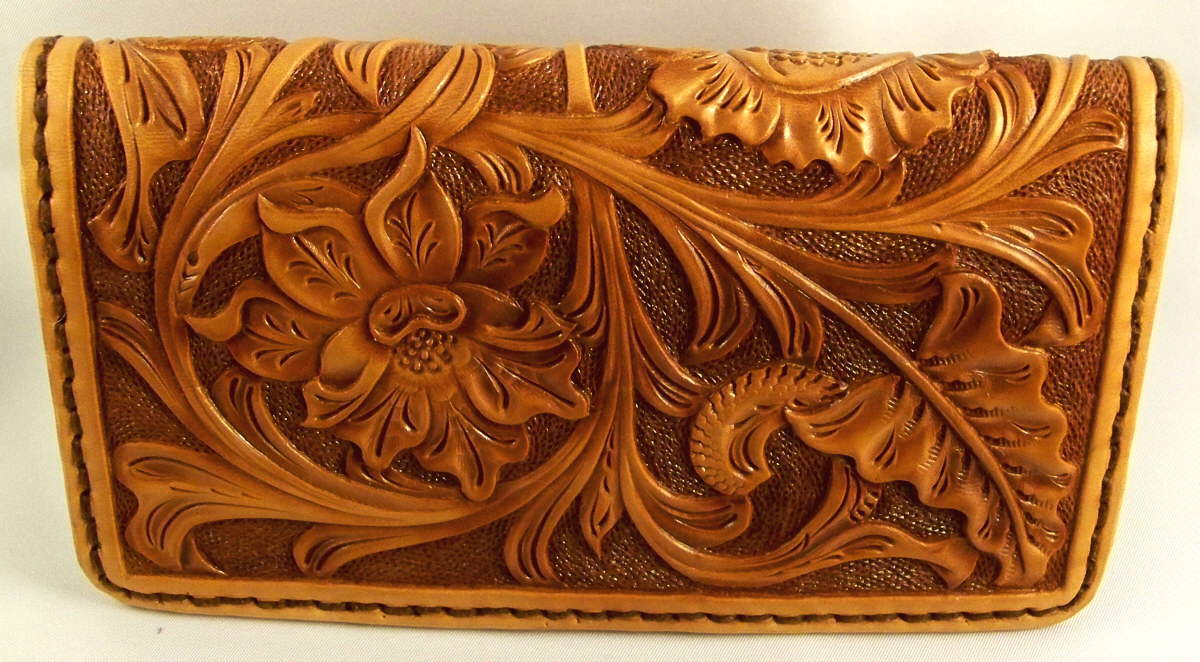
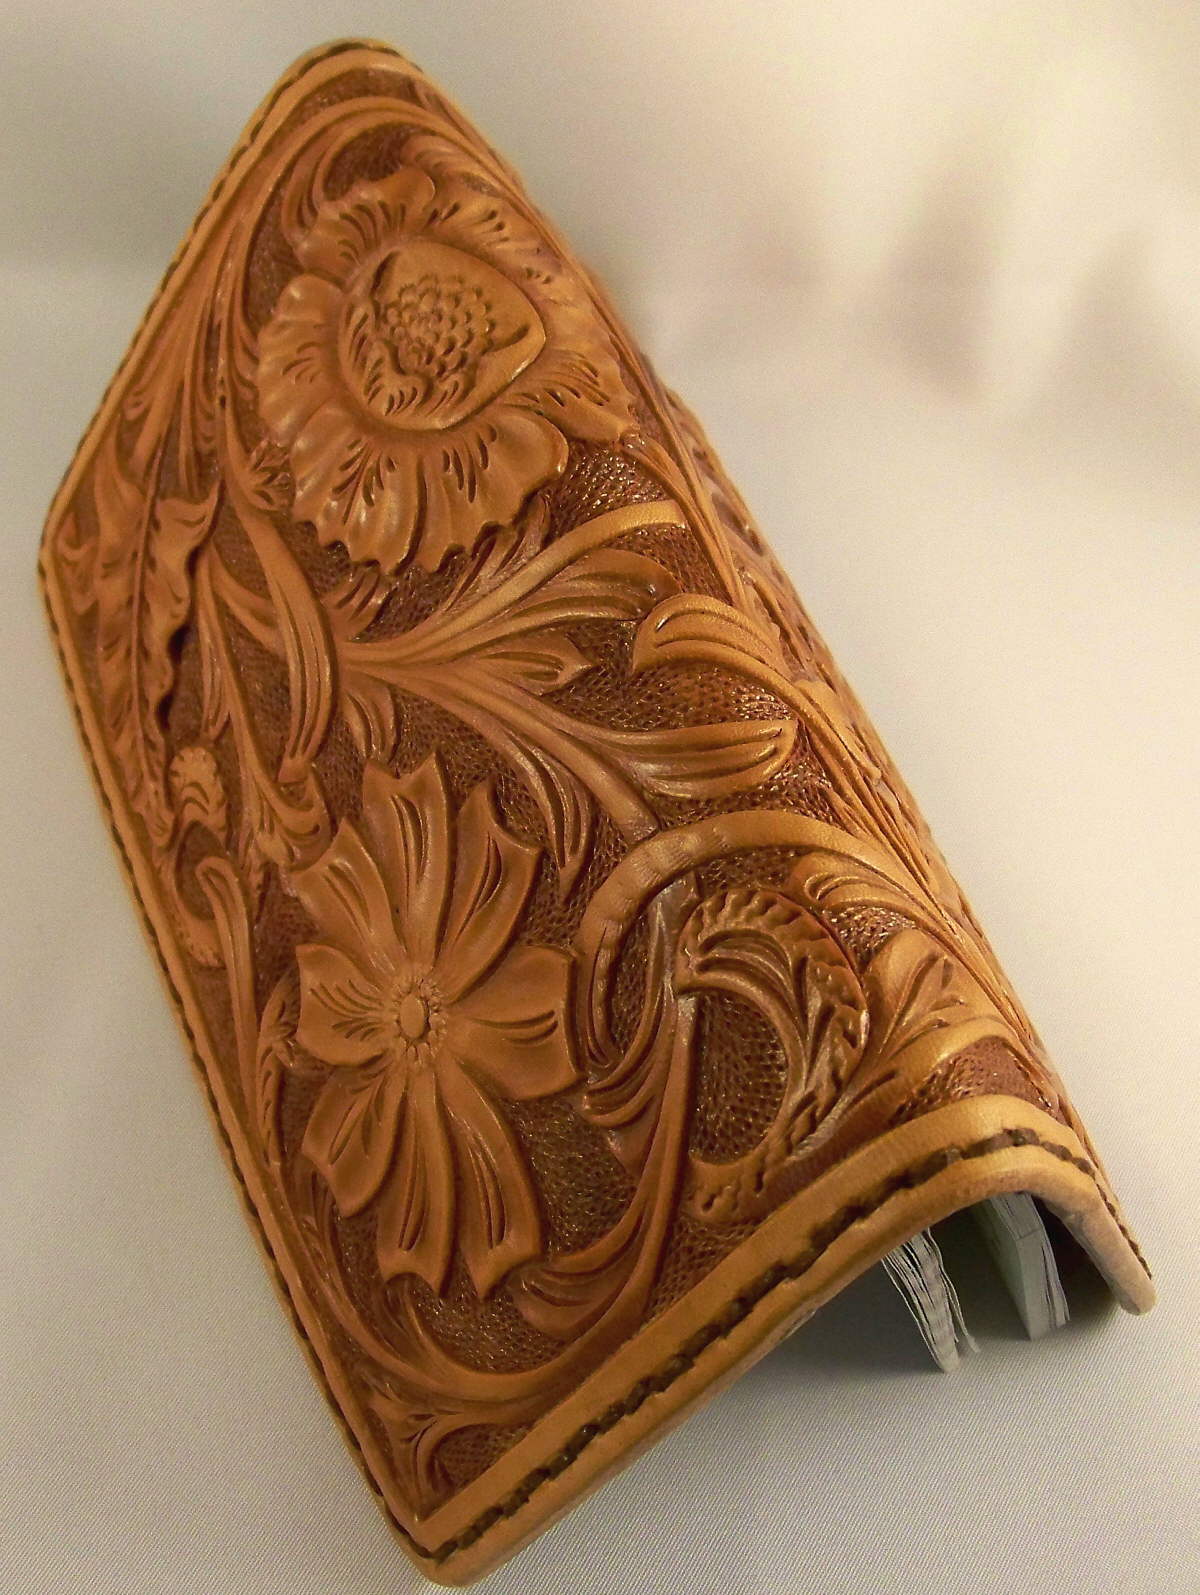
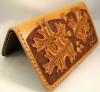
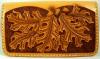
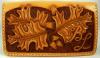
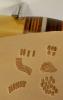
Here is a wallet I just finished. The person wanted a place for a checkbook register, to keep track of his Debit card use, & also some slots for a few credit cards. It's made out of some 5oz Zack White leather. The Oak leaves match Guitar pick guard, I made for him, on one side, & a holster I made for him on the other. It measures 6 1/2" X 7 1/4" open. It had a coat of oil, a few hours of "Sun Tanning" , background is a diluted down Med. brown, with 2 coats of a NeatLac replacement & one coat of TanKote. I may still do a "Sheridan" antique to it,,, haven't decided yet. Yes,,, No?? Thanks for looking! Ed the"BearMan"
-
Good Going Brent!! You're showing some vast improvement there!! I'm impressed! Keep up the good work! Ed OK, my swivel knife work usually bites dirt. I had a class with Jim Linnell this weekend (Indy Tandy store), and he showed me a few things. I mentioned I was doing some bookmarks, and he whipped one out & encouraged me to use it. So I did. I tried doing a tapoff, but it was light. It got me started though. The bottom one is my attempt to recreate his design from the tapoff (reversed). The top two were attempts to freehand what he had done. The other one was just me getting weird. Fun though! I think I have the concept figured out, but it seems to be an extension of Sheridan style, which is my weakest skill. Now I just have to practice for 30 years so I can be as good as Jim! {Jim, if you see this, PM me so I can find you in the dark! Otherwise, see you next week at the spring show.} Brent
-
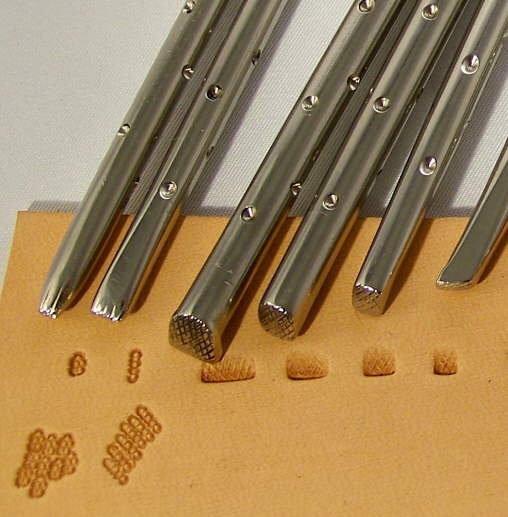
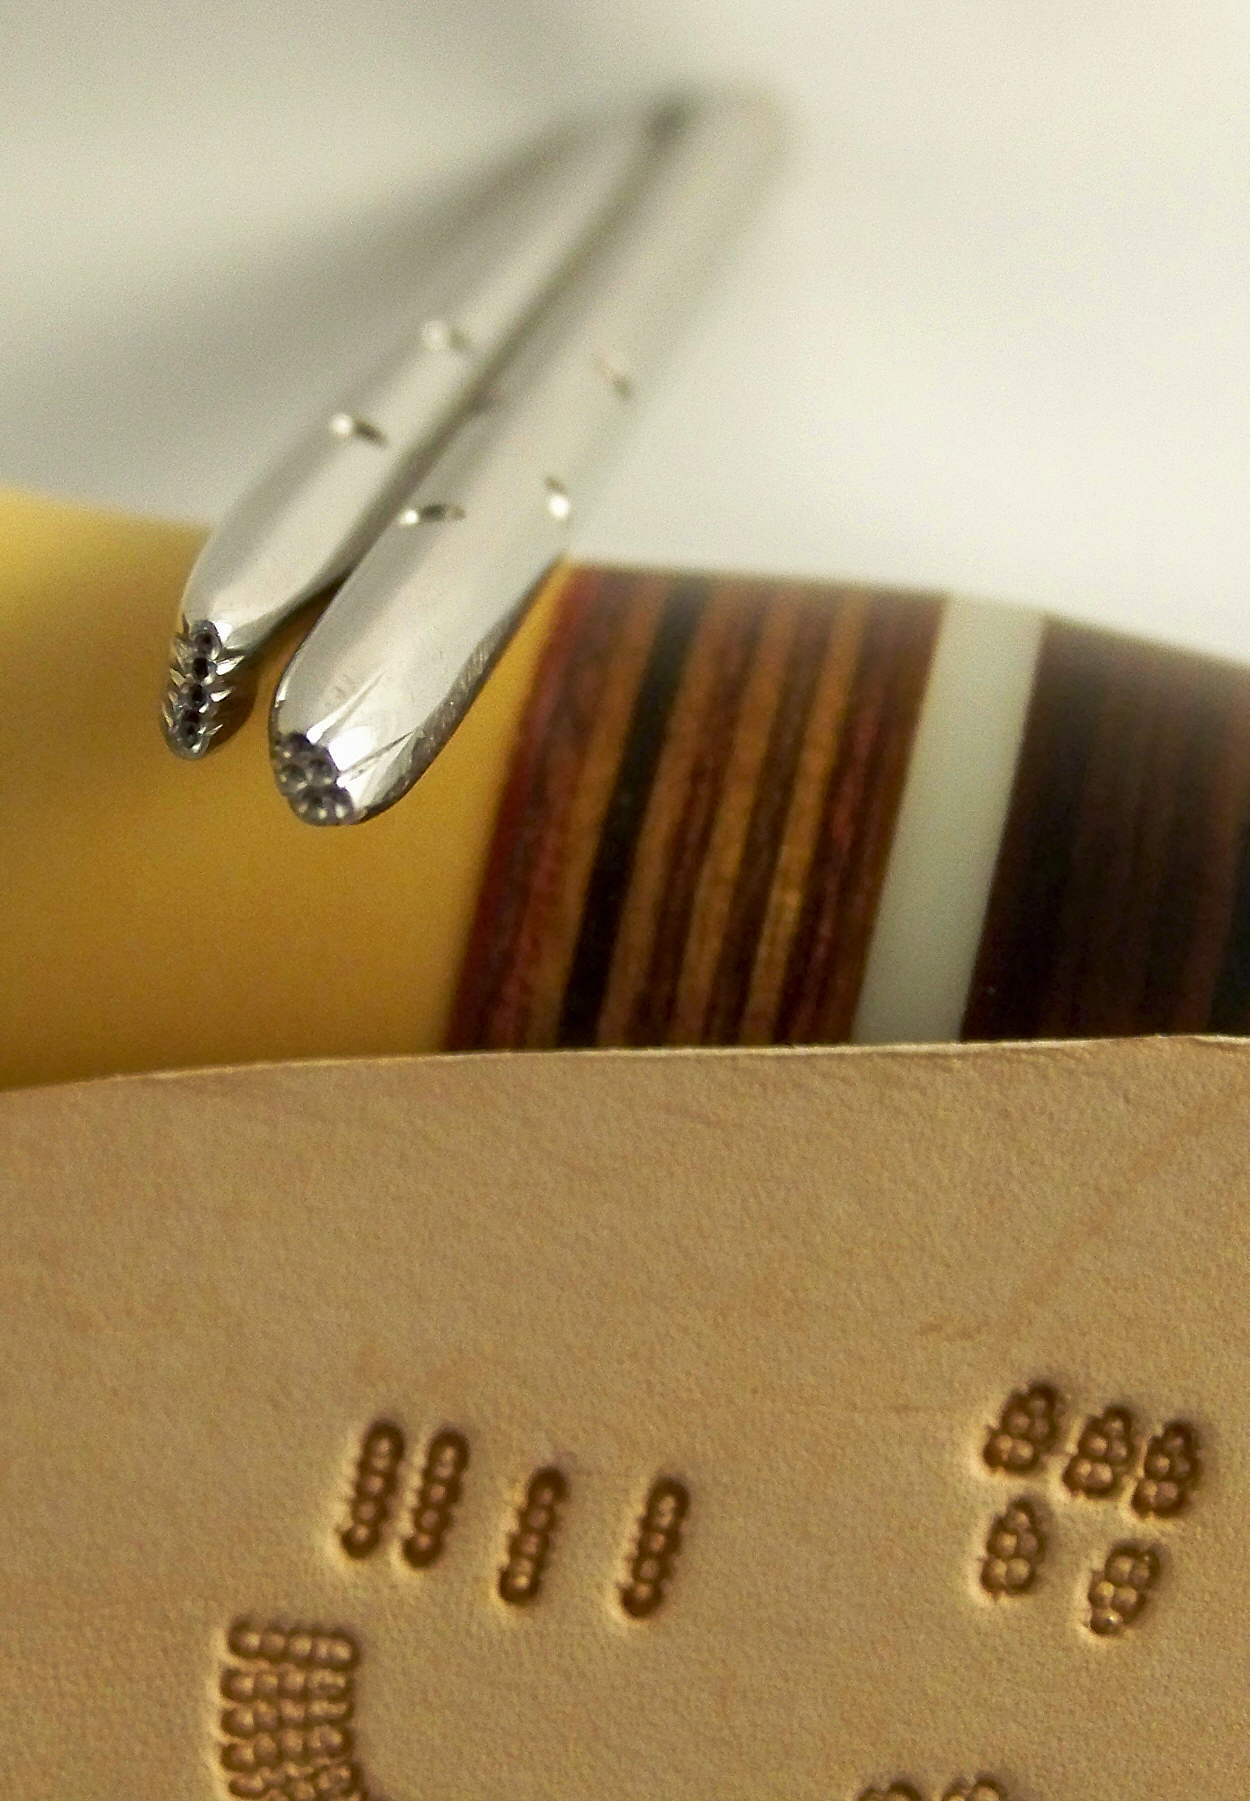
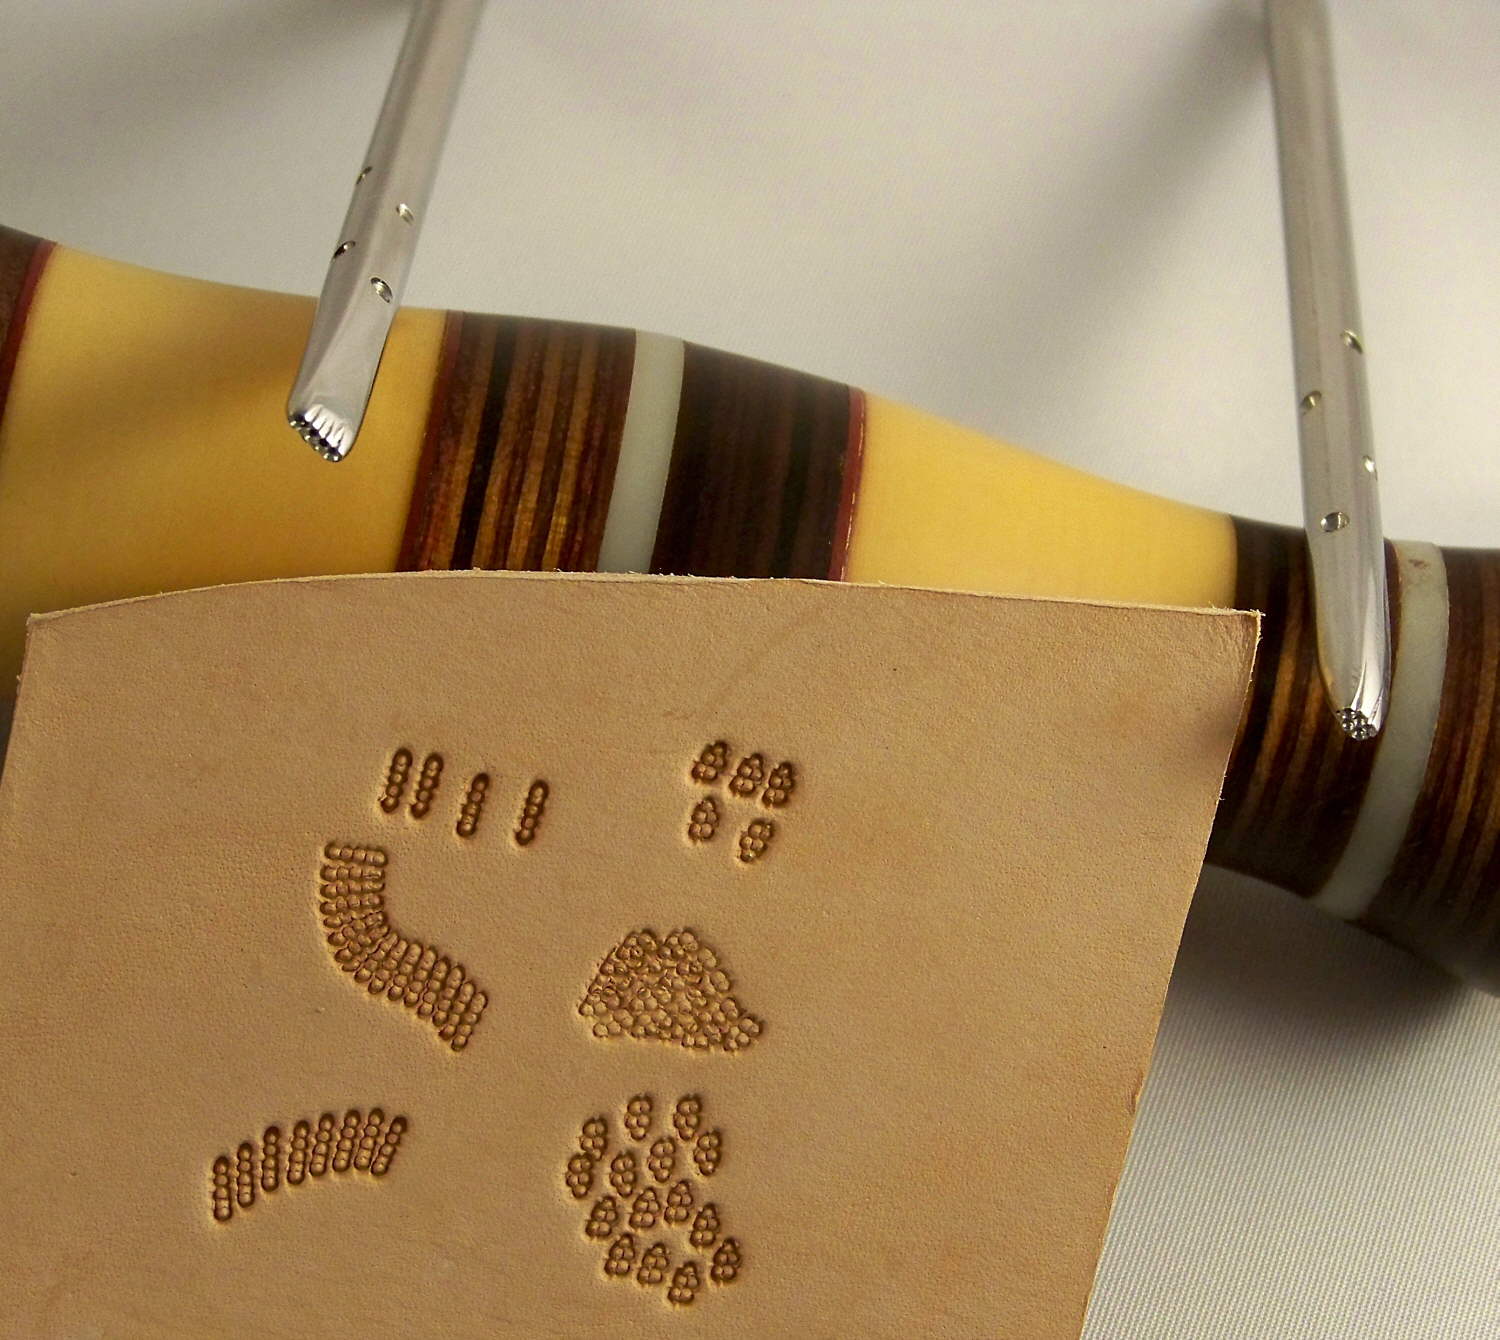
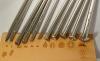
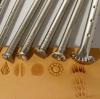
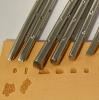
Hello everybody, After I've recieved so many requests to make some tools for sale, I thought I'd post them here. They are all made with Stainless Steel. From left to right: Sm. cluster Bar grounder, 5 line Bar grounder, $25.00 ea. (these are higher, just cuz they are such a Pain to make, & hard on my Old Eyes) 1/4" checkered Beveler, 3/16" checkered Beveler, 1/8" checkered Beveler, 3/32" checkered Beveler, (Sheridan or Porter style) $18.00-$20.00 ea. Undercut checkered Bevelers (not Shown) $20.00 Diamond shaped leaf liner/border tool, Leaf shape border tool, $20.00 ea. 3/8" checkered matting tool, $18.00 ea. 1/2" flower center, $20.00 Lg. Camo. $25.00 Most Pear Shaders Smooth, checkered, lined (not shown, Sheridan design, or regular) $20.00 Most Veiners (not Shown) $20.00 Special orders, just ask. If you want something special You've never seen, but thought there should be,,, just ask. As you can see some of the tools aren't completely finished, in the pictures. When done they will all have the drilled finger grips on the shaft. I've found that by having a more random grooves like on the Lg Camo, the result is a more realistic result. I can make them with perfectly spaced lines,,, but nature just isn't that perfect. The Checkbook I showed on here about a week ago was tooled using mostly these tools. Of course, being that these are hand made, they may not look Exactly like the ones pictured, but they will be Very close!! Please contact me through Private Email, Thank You, Ed the "BearMan"

-
Hi Aaron The lines on the Bevelers are done with a type of file called a "Checkering File" the one I use a 40lines per inch, which is somewhat courser than the "commercial" makers use. I just like the larger checkering. ED Very impressive! I agree that the random lines on the camo gives a MUCH more interesting pattern. One question: What did you use to cut the checkering on the bevelers? I made a beveler and a pear shader, and tried adding lines to the beveler with a leaf-shaped needle file with very little success. Ended up filing the whole thing back down smooth. Thanks -Aaron
-
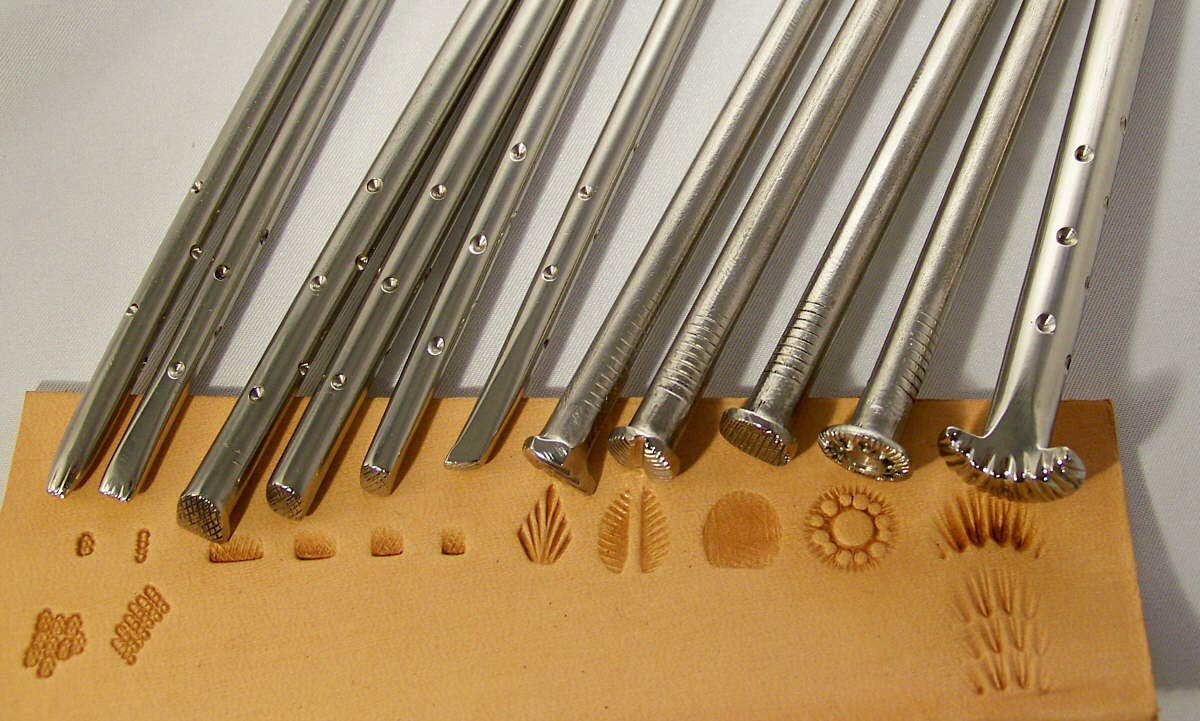
Here are a few of the tools that I'm making, to replace some of the old ones I made many years ago. I've started using 304 Stainless Steel on all of these. I like the stainless, a lot better than the steel I've used in the past. I needed a new beveler in a size that I didn't have,,,, & that's where my new obsession began. The stainless just feels soooo much nicer to hold & to use! My old tools are still very serviceable, so I think I will pass those onto my Son. From left to right: Sm. cluster Bar grounder, 5 line Bar grounder, 1/4" checkered Beveler, 3/16" checkered Beveler, 1/8" checkered Beveler, 3/32" checkered Beveler, Diamond shaped leaf liner/border tool, Leaf shape border tool, 3/8" checkered matting tool, 1/2" flower center, Lg. Camo. As you can see some of the tools aren't completely finished. When done they will all have the drilled finger grips on the shaft. I've found that by having a more random grooves like on the Lg Camo, the result is a more realistic result. I can make them with perfectly spaced lines,,, but nature just isn't that perfect. The Checkbook I showed on here about a week ago was tooled using mostly these tools. Soooo,,, What Ya think??? Ed the"BearMan"


-
Hi, Yep,,, that's the best thing to do, just like what Tina said. The only thing I'd add, is to burn off the chrome platting also. It's easy to do, & it makes the impressions quite a bit crisper. Ed
-
What makes you describe a piece of work as 'well finished'
BearMan replied to UKRay's topic in Leatherwork Conversation
Hmmmm,,, It seems that we have a LOT of like minded people here!! Is it that we are always looking to do things,,,, Just That much Better everytime we pick up a tool. Or,,, is it the "perfectionistLeatherist" disease?? I know that I always find, & know where alllllll the areas where I Really need to work on. But Alas,,, it seems like even with the best of intentions,,, I have a Brain Fart,,, & do it again!! Seems like I just went through that,,, with the background on a recent project. So,,, even though "perfection" is something, I'd like to be able to do,,,, I know that until I can walk on water,,, it just Ain't gonna happen,,, no matter how hard I try. ( Ohhh well,,, at least I'm good lookin',,, hehehe NOT!! Ed -
i need help for a knife sheath
BearMan replied to flyingcuda's topic in Gun Holsters, Rifle Slings and Knife Sheathes
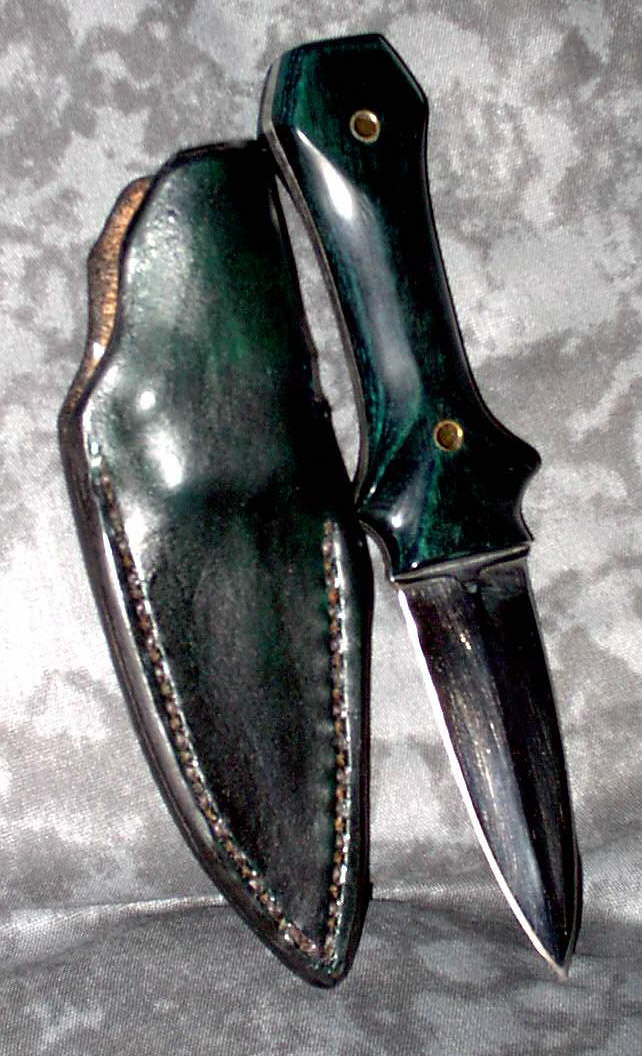
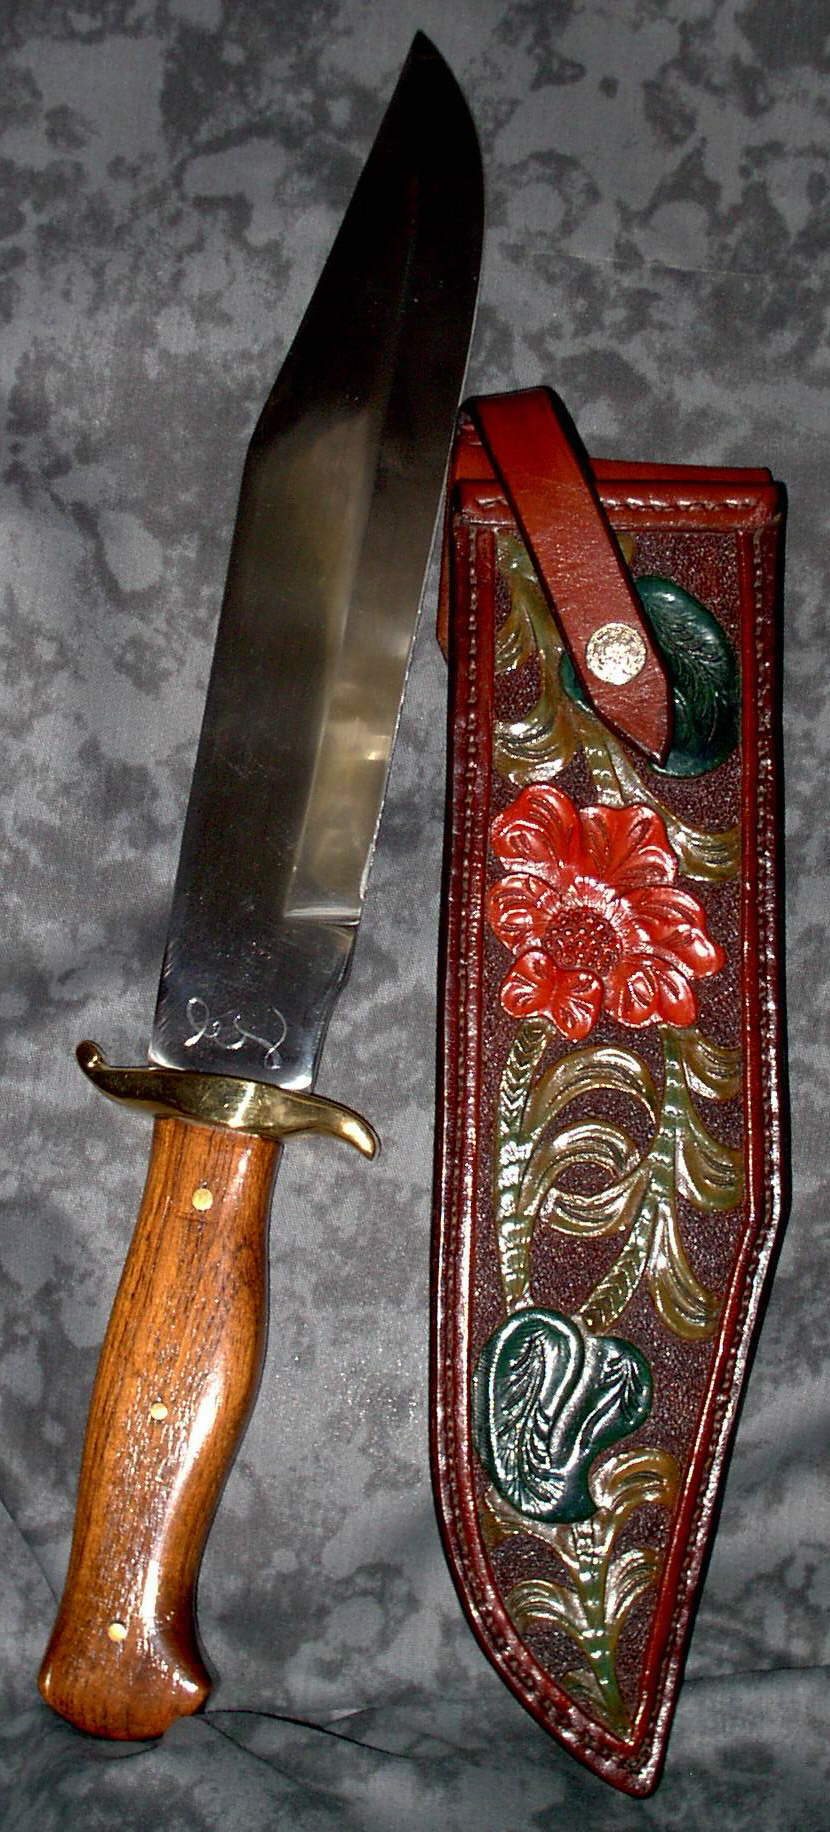
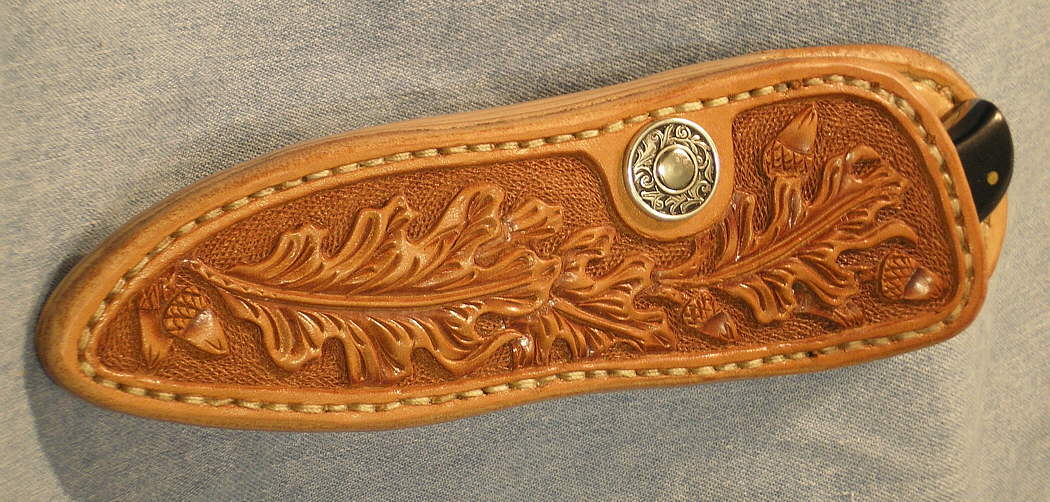
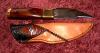
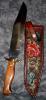
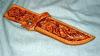
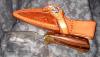
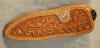
Sure, I can help,,, as I'm sure there are at least a dozen more that can. First,,, what kind of knife,,, fixed blade or folder. Do they want it moulded, tooled,,,ect. Here are a few examples of some I've made. Do any of these look like what they'd like?? Ed the"BearMan"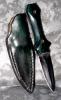
-
Stunning work!! Very nice design, & very well done!! Thanks for sharing. ED ...
-
Hi everybody, I've never tried any kinds of tape to hold a pattern. I either just hold it in place with my other hand,,, Or I used my lead shot filled leather bag. As a weight to hold down the pattern. If it's a hand drawn pattern, where the pencil lead might rub off on the weighted bag, I put the bag in a zip loc bag, so that I wont transfer anything onto the leather later, while I'm using the weighted bag to hold the leather in place while cutting & tooling. Ed
-
Welll, That's great to know. I knew I liked him, never knew why till now!! hehehe Ed
-
Ben, The person's ID is: ghstrydr164 That had a picture of a large beveler he'd made that had the same kind of drilled impression, except he used several more, in a cpl diff. sizes.
-
Hi Ben, I can't claim the design for either, of those. The "cluster" is something I remembered from one, from a Looong time ago. The drilled impressions, I actually saw from someone on here. I wish I knew thier name so I could give them credit. Once I find out who it is,,, I will post it here. Ben, I'm glad You liked it anyway! Ed Ed, Hmmm. The one that really caught my eye was the offset cluster one. That's not the normal style - it's different and neat. Another unique feature that jumped out at me but had nothing to do with your bargrounder pattern was the rather unique pattern of holes along the shaft of the tool. Regards, Ben
-
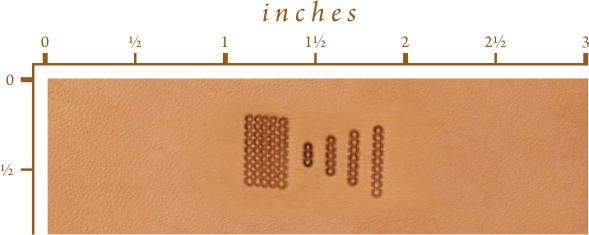
Hello Everybody, I one of my other posts, we got on the discussion about Bar Grounders. Here are a couple that I use from time to time,,, sometimes I forget though!! Anyway,,, they are made out of 304 Stainless. My local Marine supply house carries lots of Satinless, in many forms. These were origanally large nails. It really tested my eyes making these,,, even with a magnifier. I have another one in this same size not pictured, which has 7 holes. These were made using a 1/32" drill bit, & some small files. What do "Ya'll" think. Ed

-
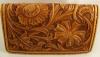
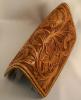
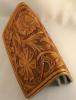
Sheridan Checkbook cover design by Jim Linnell
BearMan replied to BearMan's topic in Floral and Sheridan Carving
Here are a cpl picture of the completed checkbook. Ed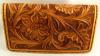
-
Sheridan Checkbook cover design by Jim Linnell
BearMan replied to BearMan's topic in Floral and Sheridan Carving
Hello Tom, A Bar Grounder is a series of small circles gouped very close together. They can be in multiples of 1,2,3,4,5, or 6 sometimes more. They are right, I should have used a bar grounder for the background. I had already started with the one I used here, without thinking. By then I was committed,,, sooo I had to finish it out. But,,, it would be better with a bar grounder type of background. Thanks Everybody for all the nice comments!! I knew somebody would see the "substitution" on the background mistake. Force of habit can be a terrible thing,,, hehehe I just started going, before I realized,,, & said a few "Choice" words!! Ohhh well Tom, Here is a picture of bargrounder impressions. Ed Tom
-
Sheridan Checkbook cover design by Jim Linnell
BearMan posted a topic in Floral and Sheridan Carving
Here is a checkbook cover I just finished tooling. The sheridan style design is by Jim Linnell. I hope that I did him justice. I just got my Photo Studio/tent,,, & just had to try it out. It Really helps ALOT!! I just need to get a few things figured out,,, like the best angle to prop the piece,,, & the best angles for the lights(which came with the tent). But for the first picture with it,,, I'm pretty impressed! Soooo what do "Ya'LL" think??? Ed the"BearMan"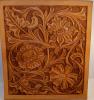
-
Verde Vaquero Roping awards
BearMan replied to hidepounder's topic in Saddle and Tack Accessory Items
AMAZING Work,,,, as Always!! Bob ,,, You really give us something to strive for! Ed I second what Tina said: (I wish I could be a fly on your workshop wall and pick up a trick or two *LOL*) -
Hmmmm, I'll tell you what Bob,,,, just as soon as I finish the two checkbook covers I'm starting on, I'll do that,,, as long as I get it back after the "test". I would be Honored to have someting I've made evaluated by You! Just send me your address, in PM,,, & i'll send it to you,,, in a few weeks. Maybe sooner. Depends how good of a Kick Start I get,,, hehehe Ed There's no question about it!!!!! You should definitely send it to me for a scientific, time tested evaluation!!!!!!!!
-
Great Job!! Nice design,,, Ed
-
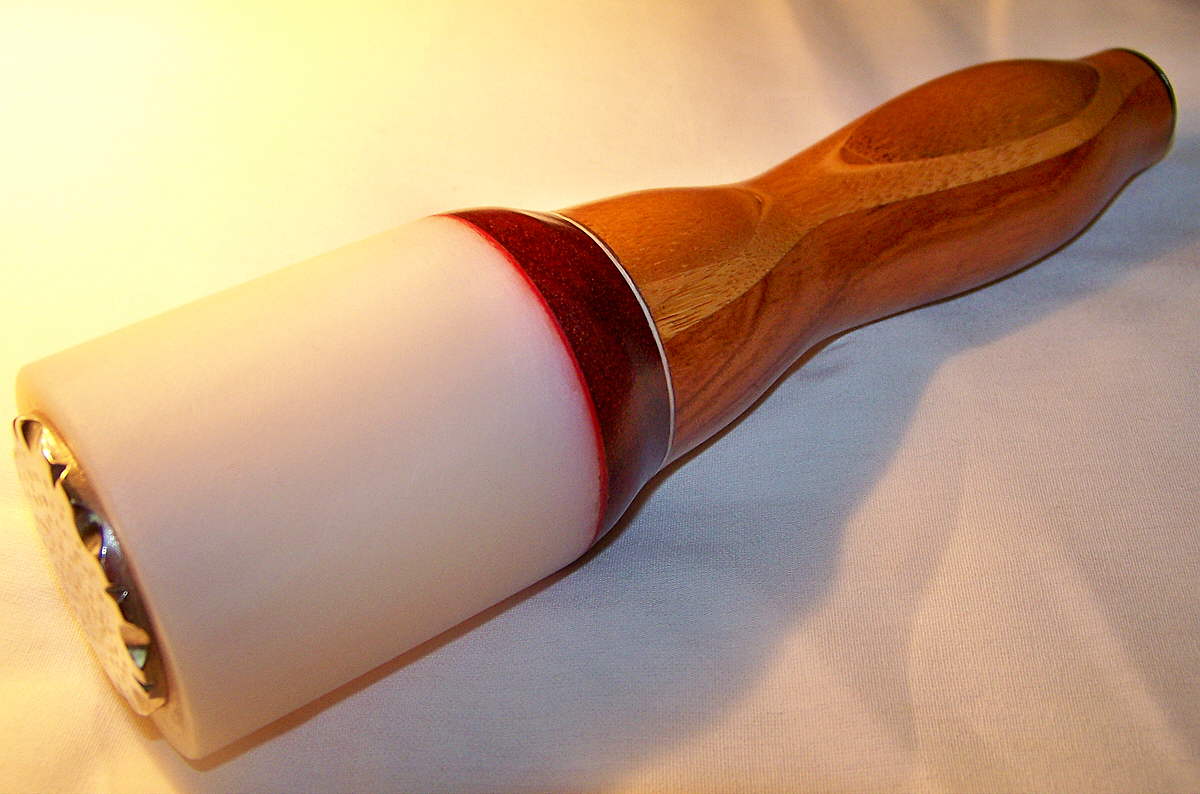
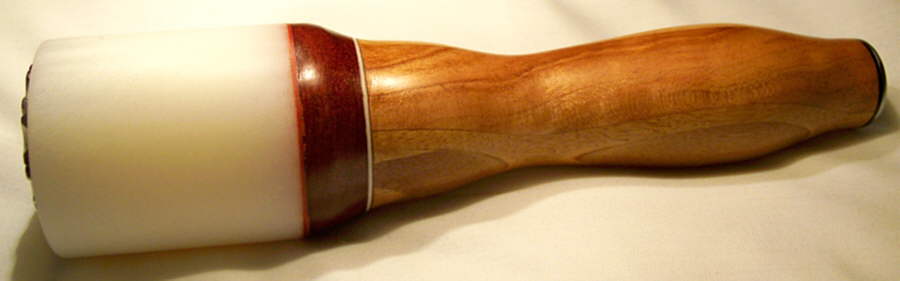
Hi Bob, It's kinda the "feels Right after a couple tries" idea. I found with this shape handle, you hold it toward the end, if you are an "elbow off the bench" tooler,,,, hold it in the middle,,, for us "wrist rollers",,, & hold it close to the head,,, to do more delicate work. I may need to do some more profilling on the handle. Even though it's about 4oz lighter than the maul I've used for the past 30 years,,, it feels a little heavier. So that tells me that I may have the balance a little too far down the handle. Or,,,, the one I've used for soooo long is balanced too close to the head. ??? After I get my hand back in shape & do some more tooling, I'm sure I'll know. Or maybe I should send it to you, so you can test this prototype!!?? I really appreciate, all the nice comments by everyone. Take Care,,,, & stay away from sharp chisels!! Ed Really good looking maul, Ed! How did you come up with that particular handle profile? Trial and error until it felt right? Bob
-
Hi Everybody, Sorry about taking so long getting back with you. Between the Dr's,,,, & the cable being down, this is my first chance. Yes,,, as I'm sure everybody noticed,,,, there isn't a retaining nut. I just thought this new design would have a more "smooth" look overall. The top plate is actually a thick stainless disc, that has a nut welded onto the bottom side. Of course, it doesn't come with the decorative file work. The rest of the bolt is a 1/2" carriage bolt. BTW,,, the Dr said I could still be able to play the Violin,,,, Thats good,,, cuz I never could before!! hehehe Ed
-
Here is the latest, design Maul. There's something missing,,, I'm sure You'll notice. It's 16oz, & made out of Curly Cherry, & Bamboo, with a Paduck seperater disc. This is a prototype, to see how well things work out. I just got my wood lathe set up this weekend, & just had to turn something, to make sure everything was working ok. So I wound up making a maul handle, so of course I had to finish the Maul. I almost wasn't able to complete it, as I almost ran a 1/4" wood chisel through my hand. It didn't make it, my third finger knuckle on the inside stopped the chisel. OUCH!! It's really gonna hurt tomarrow! Anyway,,,, Here's the Maul. I Hope everybody likes it. I may make some more, after my hand heals, & I finish some of my Backed-up Leather projects. Thanks,,, Ed


-
Good Morning Tom, I agree whole heartedly with everything that Clay said. Far be it from me to critique anything of his! There are a few things I noticed also, First, it appears that some of your lines stop abruptly, and a little too long. I think they should fade out sooner. Secondly, it looks like some of the pear shading, isn't close enough, & evenly spaced from the edges. If that makes any sence. Also, it's really had to tell, but it looks like the leather was a little too dry, or you were a little hesitant about hitting the tools. I agree, You did very good with the veiner. Lastly, if You had a swivel knife with a thicker blade, that might be better for your finger (decorative) cuts. Also, when doing the cuts, remember to follow the flow. Keep up the good work! Ed This is great. I already feel like I'm getting my head on straight about a lot of things. I'm going to try that same pattern again and I'd be willing to bet it will come out nicer looking because of you guys. Thank you for all the help. I want and need the critiques from all of you if I'm going to improve. Tom
-
angelus dyes
BearMan replied to Tkleather1's topic in Dyes, Antiques, Stains, Glues, Waxes, Finishes and Conditioners.
Good morning Tina, Please tell me more about the Angelus spirit dyes. What can they be reduced with? Are they lifted by NeatLac? Do they get "muddy" when combining a few colors together, to get another shade? And lastly,,,, how many little bottles, of reduced shades do you have??? ) Ed http://turtlefeathers.net/text/product-index.html Just scroll down a wee bit:-)