


RockyAussie
-
Posts
3,265 -
Joined
-
Last visited
Content Type
Profiles
Forums
Events
Blogs
Gallery
Store
Everything posted by RockyAussie
-
In the gallery pics up the top you see a bike tool bag. That is made for a friend Tom who is Barrister up here (hence the scales of justice theme on the bag end)and believe it or not one of his other interests is teaching Taekwondo. Couple of years ago he actually went over to China I think to improve his skills in that area. Remember if your going into that silly brick breaking stuff to pick ones that go thud not ting. Last i shook his hand he nearly collapsed due to possible fractures in his hand. If you get up this way give me yell.
-
Welcome AussieMade hope to see some good work coming. What belt color/tip are you at.Is it Packers your referring to?
-
Not sure if this will help but I often use hand punches in a hand battery drill when i have to get through rugged stuff and a lot of it.Leaves a nice clean hole when pushed into cutting board.When material is extra thick I just put the hand punch in drill and grind the outer of the punch down thinner whilst it rotates.
-
That 2nd link is an excellent recommendation to read. Without knowing the work requirements it is very hard to offer advise. The Kingsley machine as in the ebay listing I have 1 among many other types and this one would be used here very rarely and only when I need to set up lettering.The letter sets here in my opinion is the main value in that deal.In my work I have many different products and I need to have a wide base to put in and attach different templates to expedite line ups.The brass stamps are good for your own main one but I have many many others for different brand names and there would be nearly every week a new stamp to be made up. One of the states in the government area here in Australia has now 6 different stamps made in only 3 years.Magnesium is a lot cheaper and quickly made. I generally send them the pdf and cdr file and have the stamp in my hand next day.
-

First order: biker's makeup bag
RockyAussie replied to AKworkshop's topic in Motorcycles and Biker Gear
Very good and thanks for doing Video.For your 4th leather child I can find no criticism at all. Hope to see more of your work in the future. -
Hi MG513, Is it possible to see some pics of the set up on this machine as it is? I think I may have one of these down in a shipping container but buried down the back.I used it when I was making shoes for the uppers only and I would not think any good for beady ray work. I know it is a singer post and has a roller foot but I think the dog feet are only on the left side and I don't know without seeing some pics of the dog feet on yours if the roller foot would be an easy change over.
-
Can anyone tell me how once you have a few pictures inserted how to move them around so they will display in the correct sequence?
-
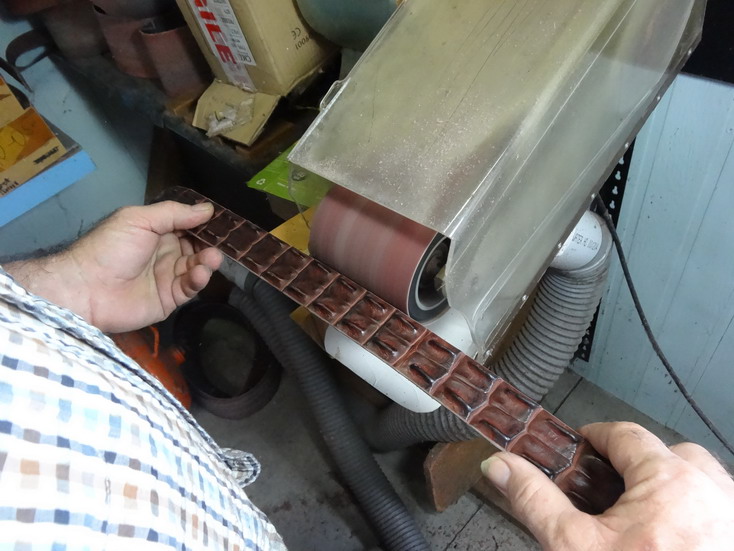
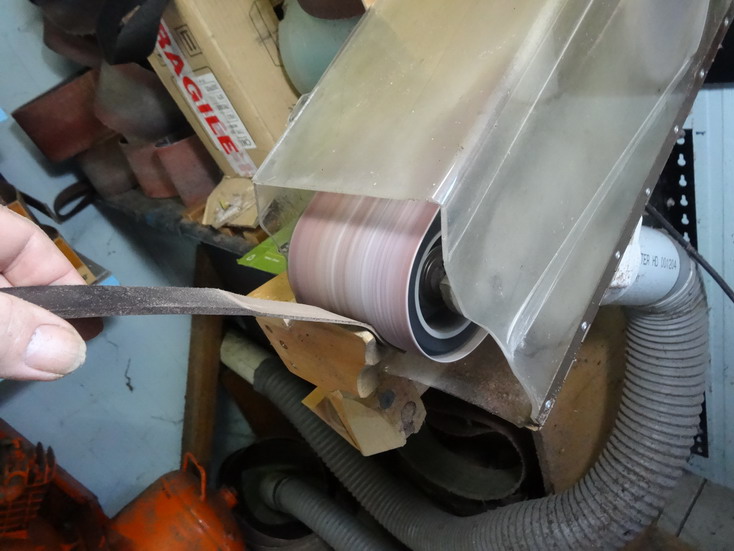
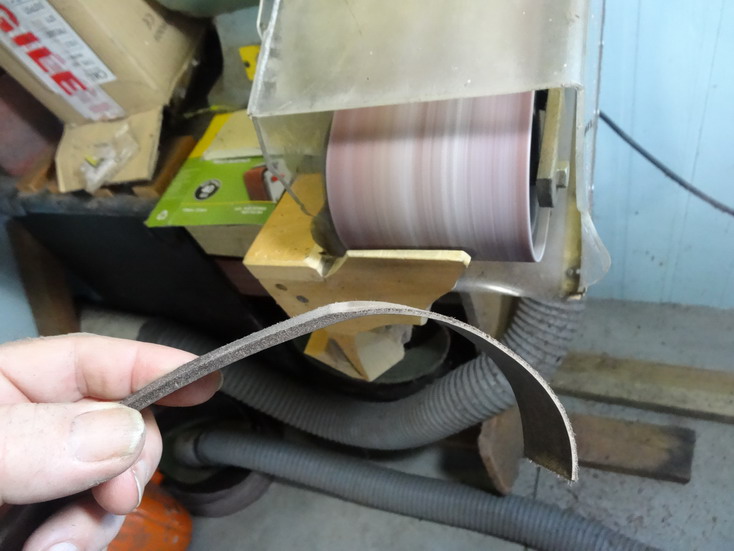
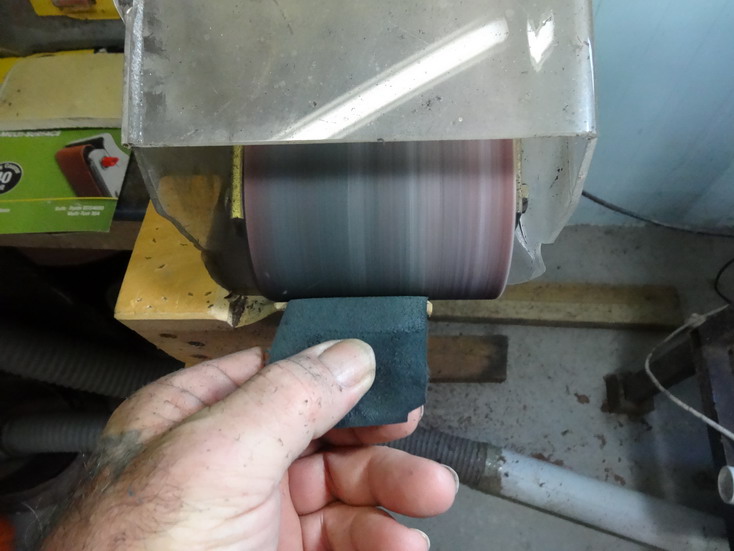
This is just a very handy tool I have come up with that I mostly use for quick removal of thickness when I do my Crocodile backstrap belts. I have found by putting in place a steady at the front it can be rotated back to act as a thicknesser. I have sandwiched a coarse sandpaper between the rotating guide/steady, and this works well to hold firmly in place wherever I set the steady to.The steady can rotate right out of the way to allow free hand sanding or right in to touching.See the pics. The newer model I am working on will have a foot pedal to allow it to be opened and come back to an adjustable stopper which will improve the input of materials.Although I have bandknife splitters and skivers this machine would get used between 1 and 2 full days per week and I have another similar 2" version which gets at least 1 day per week. Hope this can be of help to anyone starting off. Note it takes a bit of practice if sanding down soft chrome leathers to a thickness.


-
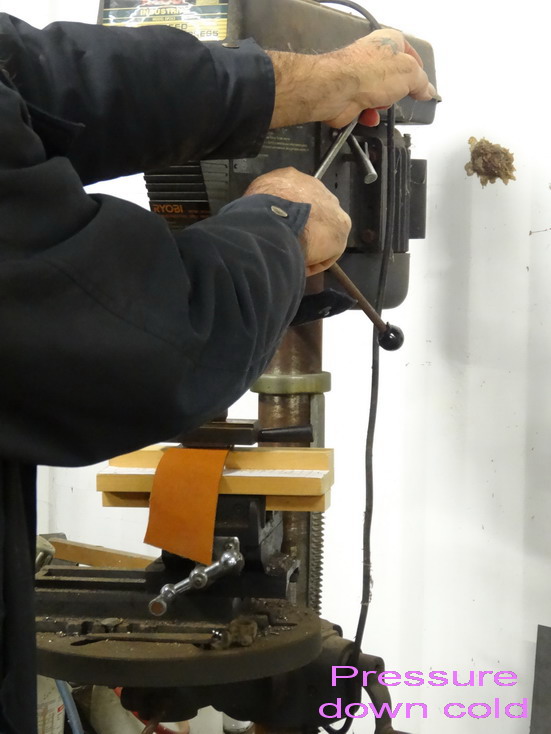
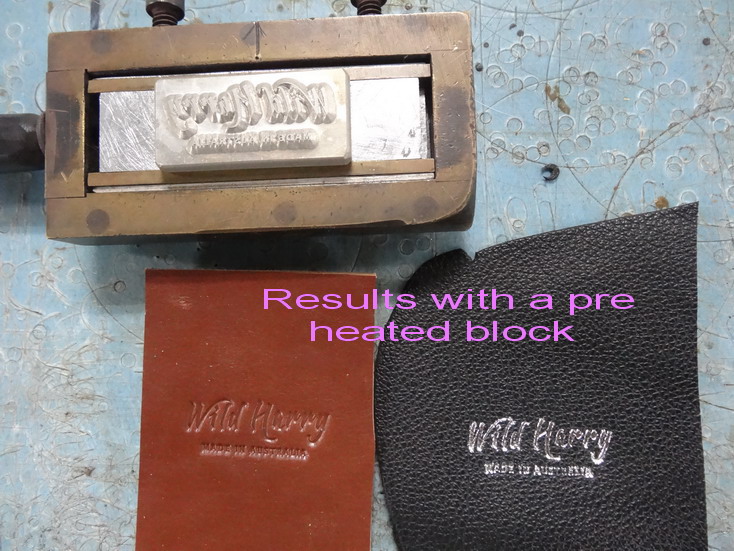
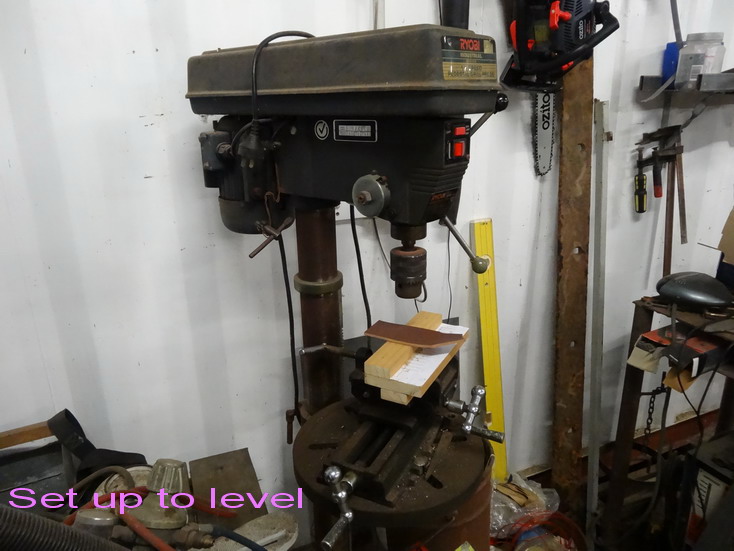
Recently I suggested a drill press as a possible way for doing some embossing. This interested me as an advantage with a drill press is that you can turn the table for getting the stamp into perfect alignment, it can be made to level if not quite aligning with stamp, the table can be moved lower for higher jobs like box lids and for some the drill press could easily revert to use for burnishing edges etc. My idea is to get the morse taper blank and fit a block onto it to receive the embossing plate slide holder.This would have to be pinned to stop the rotation.A screw or magnet should work.Second to get a thermostat connected to the side of the machine and have a bayonet style plug as on computer power supplies and jugs etc.This then can have a way of attaching the cylindrical element which inserts into the block with the morse taper. The last pic should show a similar set up on one of my current machines.


-
Long Road Bike Glove Box?.JPG
RockyAussie commented on RockyAussie's gallery image in Gallery- Our Leatherwork
 No the buckles are hand made silver by some fellow in Brisbane, and these were his second go after I rejected the first ones. The customer went and had them made without any input from me in the first instance.It was the first headstall I had to make for a prize in a yearly Campdraft competition they have over here.The pearls are real and set into silver as well.
 -
Like I said if all else fails drill through that pin bit by bit.A tap with a good drift from the back will eventually loosen it.
-
Need to get things vegtan cowhide (.8mm and thinner)...
RockyAussie replied to thekid77's topic in How Do I Do That?
Hey thekid77, Tell people where your at roughly. Most bandknife type splitters should have not much problem but are expensive. I do it all the time for people in Australia no probs. If someone wherever you are has one I'd guess they'd do it for you. -
Long Road Bike Glove Box?.JPG
RockyAussie commented on RockyAussie's gallery image in Gallery- Our Leatherwork
Yes the straps are left long until the fitting is sorted out. They can go through the back fitting as shown up and down or sideways. That is why I haven't edged them yet in these pics.The back holder piece can also be unscrewed and turned around if preferred. Not much saddlery here though I wish I had a horse head for the ODD bit. See pic but show no one OK. -
Cutting shoulders straight in quicker time
RockyAussie replied to RockyAussie's topic in How Do I Do That?
Ha Ha not saying anything in particular but you gotta watch them Kiwi,s mate. -
Cutting shoulders straight in quicker time
RockyAussie replied to RockyAussie's topic in How Do I Do That?
Thanks for that Billybop it looks interesting. Is it possible to getting a picture of how you use it?I think it looks a bit light on for a lot of this type of work. -
Cutting shoulders straight in quicker time
RockyAussie replied to RockyAussie's topic in How Do I Do That?
Thanks for your efforts MADMAX22. Something along this idea may be of some help. If perhaps I were to hinge the steel at 1 end and foot lift it at the other at midway or something.Something to mull over and thanks again for your trouble. -
Cutting shoulders straight in quicker time
RockyAussie replied to RockyAussie's topic in How Do I Do That?
They are 3mm approx to start with and are backing for the crocodile hornback belt products. See picture
-
Cutting shoulders straight in quicker time
RockyAussie replied to RockyAussie's topic in How Do I Do That?
The strap cutter is just an old Merkle and is limited to only 5x38mm cuts at a time. The buts are quite stiff and need to be cut first to get them to pack well at the finish. Once split they have to be packed of and sent up to my main competitor in the belt area that is. For my own belts I mostly use a stiff chrome due to the softer feel and resistance to shrinkage. In flight to America the Veg loses an inch+ in length, something that near drove me mad to start with. -
Cutting shoulders straight in quicker time
RockyAussie replied to RockyAussie's topic in How Do I Do That?
-
Long Road Bike Glove Box?.JPG
RockyAussie commented on RockyAussie's gallery image in Gallery- Our Leatherwork
Thanks Thor. From someone with your talent I am truly appreciative. Here's three more -
-
-

-
-
Cutting shoulders straight in quicker time
RockyAussie replied to RockyAussie's topic in How Do I Do That?
Hi Bikermut07 All I did was straighten the edges of the 70 shoulders, not cut up and into strips or split yet.The time btw is 1 and 3/4 hours so far. I am getting close to 60 now and maybe getting slower and time as I get older gets more precious and I.d rather have me feet up and a stubby that much sooner.