mendedbowl
-
Posts
323 -
Joined
-
Last visited
Content Type
Profiles
Forums
Events
Blogs
Gallery
Store
Everything posted by mendedbowl
-
My second motorcycle seat is almost done
mendedbowl replied to Kustomizer's topic in Motorcycles and Biker Gear
very nice! i like the color ken -
My Second ever leather project...
mendedbowl replied to Talfuchre's topic in Gun Holsters, Rifle Slings and Knife Sheathes
very nice, i'm sure your dad is proud of his new sheath, and even prouder that you made it for him. ken -
showing how this is done in a class would be great..but i would love to see this on DVD also. i'm sure there are many people like me who learn better by watching something over and over again. (i have a large and still growing collection of DVDs from artists such as Robert Beard, Rene Berends, Shirley Peterson, George Hurst, and Chuck Burrows, and i've watched each one several times.) i think it would be a wonderful learning tool, and a way to archive great artists for future generations if tutorials such as this one were also committed to video. (i know i would love to buy videos of figure carving such as this wren, motor cycle seat construction, armor making, floggers and paddles, corsets, and other leather garments...this is just my wish list, i'm sure there are many other topics that would be desired by others.) Clay you're a gifted artist, very clear with your step by step explanations, and this wren is beautiful. please consider a DVD video. ken
-
Beautiful work Clay, amazing details ken
-
hi Tom, great work! they all look awesome. thanks for all the pictures and explanations... i've wondered before why you notched the bottom edge of your bracers...now it makes perfect sense. the tooling and coloring on the hammer is beautiful. and the lucifer bracer reminds me of an old woodcut print. any chance you'll share your source for artwork? ken
-
Congrats on such a beautiful little girl!!! ken
-
Questions about hunting arrows and quivers
mendedbowl replied to UKRay's topic in All About Us and Off Topic
Hi Ray, since most of your questions were answered already i'll just answer the one on bow fishing... there is a special arrow tip used for fishing...the barbs spring out to keep the fish from fighting free once it's struck. also a spool of twine is used. (the spool is usually attached to the bow, and the the twine end attached to the arrow) this allows the fish to be pulled in...or to retrieve the arrow after a missed shot. as far as making quivers for fishing arrows...they should fit inside anything a broad head tip will fit. but personally i never carried more than one fishing arrow at a time. having it attached to the twine made it unhandy to change arrows quickly, and a quiver was just more bulk to worry about. ken -
Simple bowie sheath
mendedbowl replied to badger's topic in Gun Holsters, Rifle Slings and Knife Sheathes
i thought Karl's hat was strictly a fashion statement... that's a very nice sheath for a heck of a knife!! i really like how you accomplished the color. any chance you could share the ratios of dye to neatsfoot oil? thanks ken -
Never done anything like that...but i would suggest lots and lots of rep tan ken
-
Bruce I’m interested in the Douglas set you mentioned. Where might I find one to purchase? Oh, and I like your anvil…I’ve been using an NC shoeing anvil for over 26 years. Bree thank you for the instruction links. My son is starting to make his own armor and he’ll enjoy looking at the forth armory site…too bad they’re out of business now ken
-
wow! Karl you're quite an artistic photographer! thank you for sharing. it looks like all of you had a wonderful time. Steve your workshop is fantastic. hmmm...you guys have got me yearning for a road trip to visit some shops here in america... ken
-
Drac, Thank you so much for sharing this!!! I'm amazed at your work man. now if i could only find enough time... but i will use your wonderful tutorial one day soon. Thank you again, ken
-
Medusa is here :-)
mendedbowl replied to Tina's topic in Purses, Wallets, Belts and Miscellaneous Pocket Items
tina that is just ssssssssso cool!! you have a wonderful imagination...keep it up please. ken -
Lighter cover
mendedbowl replied to wildrose's topic in Purses, Wallets, Belts and Miscellaneous Pocket Items
very nice ken -
that's pretty tasty...i mean tasteful...
-
LOL!! hilarious!
-
Coffin Bag
mendedbowl replied to Spider's topic in Purses, Wallets, Belts and Miscellaneous Pocket Items
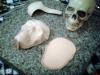
hi spider, what a cool bag!!! lots of great details. (i really like how you lined it) what an appropriate bag to carry samples of your skull art. ken -
lol thanks greybeard!! i actually started this piece as a halloween project in early October, but then my father passed away and i wasn't able to finish it until just recently...but there's always next year...muhahahaha!
-
thanks madmax!! yes i'm going to have fun with it. being dark brown and small, it doesn't catch a lot of attention...but when someone does notice it...i enjoy the double-takes.
-
hi spider, thanks man! that means a lot
-
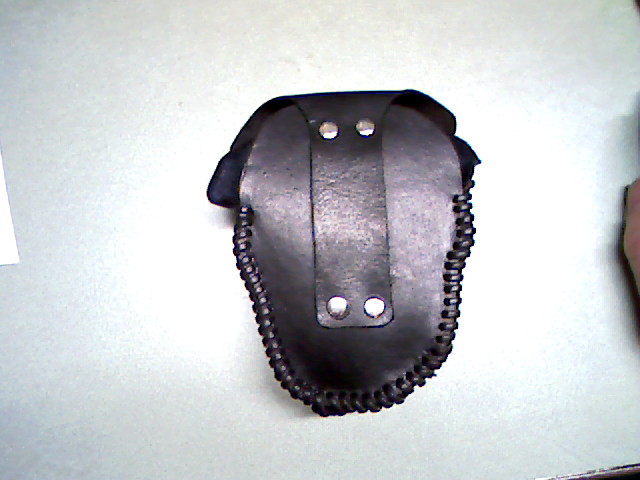
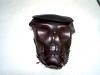
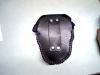
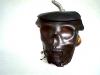
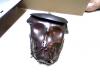
Here's a little strange cell phone case i've made...my first attempt at wet forming. i got the idea from works by spider and troy (thanks guys, i admire your work greatly). please forgive the poor photography ken
-
I miss seeing your posts Tom.... be careful and hurry back. ken
-
very nice work, and a unique idea. i like how you've added a little color. i'm sure they'll love it. thanks Tim for linking my memories of sitting on the dock of the bay with going to the crapper ...it just changed the entire meaning of the words...now when i think of the lyrics i think constipation "Sittin' in the mornin' sun I'll be sittin' when the evenin' come..." " I'm just sittin' on the dock of the bay Wastin' time..." oh well...i still like the song...and i still like the seat Greybeard. ken
-
Hi Kustomizer, what you have done so far looks great! very nice. i would suggest searching for the thread where David Theobald was doing a wonderful koi and dragon on a motorcycle seat. He would be the one i would ask for advice on how to get the effects you're wanting. i hope to see it when you get it finished. ken
-
How would I spiffy up a belt?
mendedbowl replied to Seamus's topic in Purses, Wallets, Belts and Miscellaneous Pocket Items
Hi Seamus, If your belt is veg tanned and is able to take in water (if it isn't sealed with a finish) i would think you could tool it some. I'm not sure how it would look on a pre-dyed leather, i guess it would depend on what kind of dye was used and how deep it penetrated. but you could always dye it black again if it's water based dye and runs when you wet it. if you search the forum you can find lots of examples of very elegant swivel knife finger cuts to use...also you could consider adding conchos, spots, or some other type of bling. good luck with your project, ken