Treed
-
Posts
294 -
Joined
-
Last visited
Content Type
Profiles
Forums
Events
Blogs
Gallery
Store
Everything posted by Treed
-
Welcome to leather crafting. Hope that we can meet someday in person. The great thing about Portland and SW Washington it that there are so many leather crafters around and they are so willing to share and work with each other. We are very fortunate that we have two great stores in the area with great service. I have been talking around and there seems to be a general consensus that we need a leather guild in the area. This would give us all the opportunity to meet each other and to share more in leather crafting. We need to find someone who can act as a contact person to help get this started. I can't do it with the work load and the out of town travel. The contact person would be someone who can field questions as to meeting times and place, general information as to what the guild will be, and initial sign up. I can help with marketing and getting the word out. Any one in the Eugene Oregon to Longview Washington area interested in this idea, or have suggestions? Bobby R
-
Most of the time the welt is used on light materials that will take heavy abuse or where great amount of stress are placed on the seam. With fine materials the sewing is with holes spaced very close together and this weakens the material. The welt adds strength to the area and the material Bobby R
-
 I usually use walnut with a quick dip or cut with denatured alcohol. After drying I start to had light coats of oil with 24 hours of dry time between coats to reach the brown color that I want. Bobby R
 -
Great holster, love it Bobby R
-
I agree with better leather, but that doesn't fix the problem with what you have now. The best fix is get a bottle of Gum Tragacanth from Tandy or other leather provider. Apply a liberal amount to the back of the belt and rub it in, I usually used my fingers. After rubbing it in so that it penetrates good I use a wooden slicker or glass slicker and rub it over the back smoothing out the leather and removing the excess Gum Tragacanth. I then lightly wipe down the back with a paper towel or rag and let it dry. I forgot to mention that if you are dying the belt that this is done before applying the Gum Tragacanth. Gum Tragacanth is a natural glue and I use it on most all of the unlined holsters I do on all the leather, leaves a very smooth and finished product. What ever you use to finish the front also apply to the back of the belt. Bobby R
-
Finishing Gone Wrong!
Treed replied to kates's topic in Dyes, Antiques, Stains, Glues, Waxes, Finishes and Conditioners.
Its hard to say with out seeing the item.... can you post a picture It sounds as if the Neatlac did its job.... you tool your project, oil, then if dyed do this or leave natural, Neatlac (let it completely dry), then antique stain, clean off stain. Stain should be applied in one coat very liberal making sure that it gets down into the background, and crooks and crannies then is wiped and cleaned off the top area of the tooling. The biggest problem is that people leave the stain on to long and it penetrates the neatlac. Another problem is they rub to hard applying the stain and rub the neatlac off during the process allowing the stain to penetrate where it shouldn't. With out seeing the project I can't give you a work around for it..... best guess is go darker, removing what has penetrated the fibers can't be done... Bobby R -
Western Holster Question
Treed replied to BanjoMan's topic in Gun Holsters, Rifle Slings and Knife Sheathes
As Chuck has stated check out Will Ghormley's site as he has some great aids in building some of the holsters from patterns he sells. I can contest that the holsters video and knife making video that Chuck sells are a must for making western holsters. The video covers the making of holsters, but has great information in general leather working techniques and process. Chuck is an artist, and has been an inspiration to me and many other western holster makers. Check out Chucks site Wild Rose Trading Company . I am not an authority and still trying to learn the craft but this is some of the steps that I use Pattern, layout and cut, tool (backing to prevent stretch),oil, dye (if used), lac or resist, antique. Then I do the final assembly. In the final assembly if I am using extra heavy leather and need assistance in bending the leather I normally wet with a sponge the inside of the holster body along the fold line and not the outside of a tooled holster. As Chuck stated the tooling should stop short of the vertical fold line. Bobby R -
I just had the same thing happen. I grabbed the wrong black thread and it was to large for the needle that I had in the machine. Are the black and the white thread the same size? Bobby R
-
I went on the hunt for the brass hardware for this holster sometime back. No luck!..... Will Ghormley has just done it in a new pattern pack that will be coming out next year through Tandy. He is using a brass rivet and leather to replicate the brass hardware. I have seen this done before and It was not close enough to the original to be done. El paso Saddlery sells a reproduction of the original. I figured with the time involved, all the pattern making, all the waste on prototypes that I did not want to do it for one holster. I bought the one El paso sells, and it is a good quality holster. Bobby R
-
Great job, love the tooling. I am getting more and more orders for the older styles as I get around to making some to show. Keep the great work coming. Bobby
-
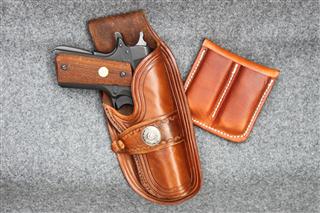
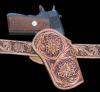
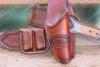
I was going though some boxes and found a box of duty holsters and in it was a Chapman Hi-ride from Bianchi holsters. It was a cross draw for the 1911. I decided to give it a try and the holsters here are the first prototypes that I came up with. The first holster is a cross draw, 8oz Herman Oak with liner, neatsfoot oil and antique paste. The second is my version of the holster made in a strong side carry. The same leather and finish
-
I spray on tan kote. I use a regular spray bottle from the hardware store, with a 1:1 mixture of tan kote and water. I spray and then wipe off the excess with a damp sponge to smooth out the finish. It usually take two coats to smooth out the finish. A lot of trail and error with the finish to get the process down. Bobby
-
A Good Weekend.
Treed replied to Eaglestroker's topic in Gun Holsters, Rifle Slings and Knife Sheathes
Great job, it is a pretty good undertaking to get done in a week end. Bobby -
Realy looks nice. Great job Bobby
-
Thanks for the support, I have a few hours into these. I am working on my version of and old classic that I found in the bottom of a box of my old duty holsters. It is a Chapman Hi Ride cross draw that I bought many moons ago. I am doing one of the cross draws and adapting it to strong side carry also. Thanks Bobby
-
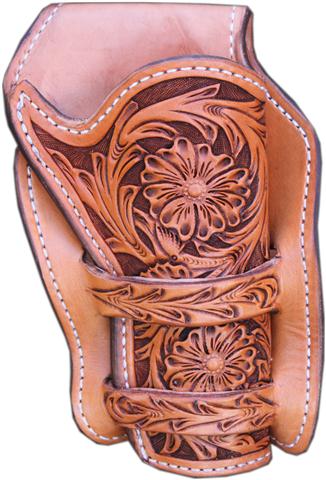
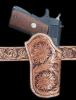
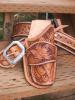
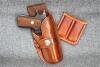
Here are a couple new ones just done. The first is belt, holster and mag for 1911 in oak leaf pattern. The leather is HO, oil and antiqued. The second is a Mexican loop for colt 4 3/4.
-
Proper Way To Dip Dye
Treed replied to Kcinnick's topic in Dyes, Antiques, Stains, Glues, Waxes, Finishes and Conditioners.
I use Feblings Oil Dye. Most of the items I make are for outdoor use, hunting, horses, racing, etc. I have been using some of the ecoflow all in one for some books and albums with pretty good luck, gives a real rich finish but very little penetration. With the oil dyes if I have to dilute the dye then I use denatured alcohol. Bobby -
Proper Way To Dip Dye
Treed replied to Kcinnick's topic in Dyes, Antiques, Stains, Glues, Waxes, Finishes and Conditioners.
Dying leather is one of the hardest things in the industry to master. There are as many ways as there are leather workers and as long as you get the results that you want then they work. I have some basics that seem to help in the dye process. 1. Dye is a powder that is suspended in a liquid base, this is what allows it to absorb into the leather. 2. Leather has different absorption rates depending on a large number of factors. The tanning process, the batch of leather, outside influences ( molding, oils, handling, etc.), where it is cut from on the hide, type of dyes used, etc. 3. Leather is a material that is made up of fibers. As the leather is worked; hammered, molded, rubbed and any other numerous process some intentional and others unintentional the fibers are compressed and tightened. When this happens it affects the absorption of the dye into the leather. When I am going to dye a piece I try to dye the item as soon as possible before assembly to exclude as many problems as possible. I inspect the leather for any problem areas that I might have and degrease of clean the leather. There are many products that accomplish this. Oxalic acid, lemon juice, or commercial products. This takes off the oils and other products that may have come into contact with the leather during handling at the tannery, cutting, or just laying around the shop. I then give the leather a dip in clear water or wipe down the leather with a wet sponge to open up the pours of the leather. There are many views as to how wet the leather needs to be, I usually give it a fair dunk and then let it dry back to almost the natural color before I proceed with dying. I usually dip dye most products. I use plastic tubs as I have found that they are easier to clean and maintain. I prepare my work area next. I like the blue shop towels that they sell at auto stores. They are strong, great absorption and don't leave any impressions or marks on the leather when it is wet. I usually tear off three or four sheets and set them next to the tub that I am using. I also have next to the tub a spray bottle of denatured alcohol for clean up. As the leather is cased and ready for the dye I dip it in, depending on the color wanted for a time. The time in the dye depends on the color, dye used, leather etc. and comes from trial and error. I usually remove it at the first signs of bubbles in the dye. I have found that the next step is one of the most important. As I have stated the leather will absorb differently on the project. I remove the item from the dye and set it onto the table. As you observe the item you will notice that different areas will absorb quicker than other areas. At this time when at least half of the leather has absorbed the dye I take one of the shop towels and remove the excess dye. When removing the excess I do it with a circular rubbing motion and actually buff the leather. The reason for this is that as the leather lays there any excess dye will also lay there until it is absorbed. If one area has more dye than another you will get a darker spot. Another reason is that leather will only absorb so much liquid, as the excess is laying there the liquid base will evaporate leaving behind the powder dye that will dry on the outside of the leather. This is what causes the color rub off that comes with dyed leather. As I leave the leather to dry I will keep checking the color process. At times I will find areas that have not absorbed enough dye, this is usually because the fibers were compressed in this area for what ever reason, or that I did not get the leather cleaned, After I have determined the reason I will then used a dauber and reapply dye to the problem area and allow it to puddle for a short time before buffing it off and feathering it into the surrounding area. A problem area may take more than once to fix. I then let the leather dry for a full 24 hours under a fan before I decide if it is what I want or if I need to add more color. When I am done with the dye I pour the dye back into the bottle, spray the tub with denatured alcohol and wipe it clean with the shop towels and I am done. I hope that this make some sense, I guess I should put it into a video it I can make the time one of these days. Bobby -
Wild Bunch/ Bbq Rigs
Treed replied to Treed's topic in Gun Holsters, Rifle Slings and Knife Sheathes
Thanks for the comments. Josh all the time looking at the one rig I never did catch the fact that I did not double line the mag pouch. Using the bar grounders has been one of the roughest tools to learn to use I will try to post pictures of a couple more hosters this week. Thanks Boby -
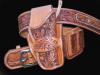
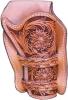
I wish I could get more time to post here, between the ranch and shop there's not enough hours in a day. Someday I hope to get more work out of my teenager, if he can find time around rodeos, girls and high school. Here are a couple that I have done The first is a 1911 rig from Herman Oak, Tandy background stamp and Barry King border stamp. It was did dyed with Feblings Lt Brown dye and neatsfoot oiled The second is a tooled 1911 rig. The leather is also Herman Oak, neatsfoot oiled and Feblings antique applied. I am still struggling in drawing my own floral patterns and this is the first one done from the new pattern. I see some changes that need to be made before the next one is done. I would welcome any comments that will help me progress and improve my leather working Thanks Bobby
-
The first thing is to determine if the gun is a black powder sheriff or has it been converted to the metallic cartridges. The true 1851 was used in Slim Jim holsters with small belt loops as they slid over standard belts in the 2 1/4 to 2 1/2 belts with no loops. Ammo (paper cartridges) were held in pouches on the belt. With the coming of the metallic cartridges and bullet loops on the belts the slim jim holsters would not slide over them. This is when the Mexican loop holster came into being. The larger belt area allowed for the holster to be mounted and moved over the bullet loops. The slots for the Mexican loop are made usually at a point under the curvature of the trigger as the outer edge of the holster flows to the barrel. The reason for the slots if to hold the holster in tight. The biggest reason for the slots is to keep the holster from moving and rising as the gun is being drawn. There were many styles of sots, single, double, jock strap etc. Check out rocknrhoslters.com on the western page and you will see the different types and copy of the slim jim.
-
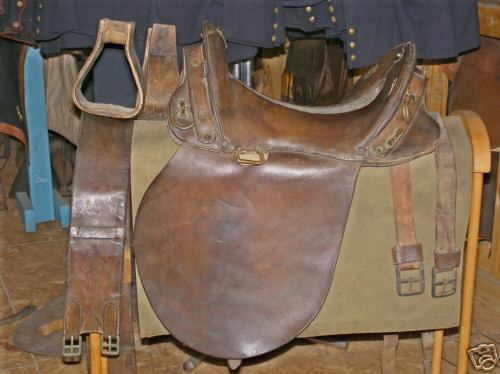
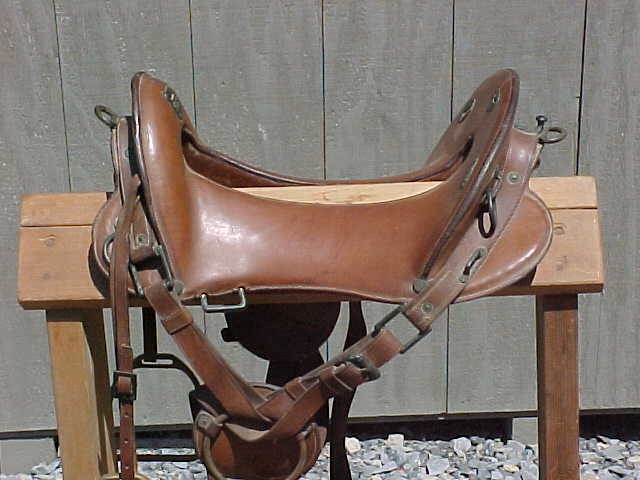
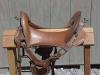
Mcclellan Calvary Saddle
Treed replied to Live2Ride's topic in Saddle Identification, Restoration & Repair
With out seeing the actual rigging on the saddle i would say that it is a 1928 model. The 1904's did not have the skirt attached to the saddle. The rigging attached over the front and rear with adjustable straps. The changes from the 04 to the 28 changed from this rigging to an English style three buckle system and added the skirts. During the change over the saddlers in the field were provided materials to make the skirt and rigging addition to may 04's. With a closer look at the pictures this is a field modified 04. You can see where they cut the old style rigging straps when they made the change. The first picture is a 28 and the second is an 04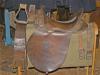
-
Usmc Wwii 1911 Holster Template
Treed replied to Semperfidelis354's topic in Gun Holsters, Rifle Slings and Knife Sheathes
Western holsters for the 1911 are very popular right now. They are called wild bunch holsters and rigs from the SASS shoots. I have been building a lot of them for the 1911 and other large autos for outdoorsman and hunters. Here are a couple the I just finished.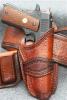
-
Getting a good dye job is so dependent on so many things. Leather is a lot like wood in that different areas of the same hide has different absorption qualities. Then you add external problems such as oils, waxes, dirt and other things picked up off the bench, hands and tools. I clean or deglace my leather before any dying. There are leather products for this, I use oxalic acid (wood workers bleach) to do the job. Keep a spray bottle of it mixed up and spray it on, rub it down with a good shop paper towel. Leather is a material that is made up of fibers. Loose fibers will absorb differently than tighter so you need to open up the fibers to get an even dye penetration. I do this by handling my leather as I would to case the project for tooling. I give it a quick dunk in water or sponge on a liberal amount. I then let the leather set so that some of the water can be absorbed and swell the fibers. As in tooling when the leather has dried somewhat back to the natural color that I will dye. Dye is a solid suspended or mixed in a liquid. With time as liquid will evaporate from the mixture you will get very small chunks of the dye. These chunks will not penetrate, and will just set on top. Make sure that your dye is well mixed be for you start. The most difficult way to apply dye is with a brush or dauber. As you touch the leather with a dye loaded dauber the dye is deposited in a large amount and absorbed, but as you move the dauber less and less is deposited. With painting on most surfaces the material is hard and you have time to move the excess paint around to even out the amount applied. With leather there is no extra to move around, basically more dye is absorbed into the leather as you touch the leather then when you finish. The only way to get an even dye job is to load the fibers up evenly with dye on the whole project. To get and even load on the fibers is with a airbrush that evens the flow of dye to the leather or dip dye. I like the dip dye to get better penetration deeper into the leather. Dip dye, I place the leather into the dye long enough to see some small bubbles start to rise. This is a very short time and made sure that the whole project gets the same time in the dye. As I remove my item from the dye I shake off the excess dye into the bucket. I place the item onto my dye bench and immediately take paper, shop grade towels and remove the excess dye. As you place the item down you will see that areas have absorbed the dye into the leather. There will be areas that the dye has puddled, these are areas the the leather as absorbed what it wants in dye. If left the liquid will find someplace to go or will evaporate into the air. If left you will get a darker spot than the other areas, it will also be the areas that will have dye rub off after the item is finished. The rub off is because there was excess dye left that could not penetrate into the leather. With the paper shop towel I will rub and polish my leather, making sure all excess dye is removed.The biggest problem I had starting out with dyes was trying to be to perfect. As i finished applying the dye I would see light and dark spots so I would immediately start to try an even the color out. I would then get to much dye in one area and not enough somewhere else. I now dip and clean off the excess then leave it alone. You will see area that are darker but as the leather drys most of the color will even out. Sometimes I will have to do a touch up after a complete dry, but most of the time I let the leather dictate the final color. Good wood workers know that each piece of wood will have variances and uses these to produce a one of a kind piece. Any way these are just my ideas and what has worked for me. I do know that I spent may hours practicing my tooling and other leather working skills. I would never actually practice my dying. After I ruined my fantastic projects, I finally practiced dying and figured out what worked for me. Bobby Rose rocknrholsters.com .
-
If you can have some high end items on the tables, gets people to looking. You will not sell many of these but customers feel that if you can produce something that wonderful then you will do a great job on your other items. Take the time to seek out the cheaper holsters and know where they are. Don't cut your price just for a sale. If they don't have the money or won't spend it then send them to these other dealers. Shows you are understanding, carring and not greedy. It won't be long before they will be back and purchasing a good holster. I have been doing gun shows for a couple of years and sales and customers don't come over night. Its all I can do to keep up with inventory and custom orders from the shows. Cultivate some of the gun dealers to help promote you and your product. I get a lot of orders from the dealers themselves, do a good job and keep them on your side. Bobby