Treed
-
Posts
294 -
Joined
-
Last visited
Content Type
Profiles
Forums
Events
Blogs
Gallery
Store
Everything posted by Treed
-
 I went to Duncan's and got there gun mold..... I have sold large numbers of holsters for this gun, the 460 Ruger Alaskan, and the Freedom arms guns. Very popular with hunters headed north.
 -
Would Like To Make A Border Similar To This Any Ideas
Treed replied to camano ridge's topic in Stamping
No I don't..... going to order one but just haven't got around to it......email and he should be able to send a picture. Web site Purdy Gear uses it a lot on holsters and belts as a boarder tool -
Zack White Horsehide
Treed replied to harley45's topic in Gun Holsters, Rifle Slings and Knife Sheathes
Use the 7-9 unless you want to line it. -
Leather & Canvas Ammo Belt
Treed replied to Eaglestroker's topic in Gun Holsters, Rifle Slings and Knife Sheathes
Great attention to detail and execution -
Custom Cartridge Belt
Treed replied to Handstitched's topic in Gun Holsters, Rifle Slings and Knife Sheathes
Great job.....love the hand stitching. I love recreating works of art from the past. The only thing that I notice is the strip that you have at the top to keep shell in is actually a strip that is under the shells to keep them up so that it is easier to get ahold of the shell for removal.... look at the last picture of the original belt with shells in it. Just turn the belt over. Great Job love it -
Would Like To Make A Border Similar To This Any Ideas
Treed replied to camano ridge's topic in Stamping
The picture is small and can't tell exactly but it looks like Bob Beards ram curl tool -
1911 Carry Holsters
Treed replied to Josh Ashman's topic in Gun Holsters, Rifle Slings and Knife Sheathes
Great work..... I am the same, just got use to head and round knifes and it is difficult to use anything else. Bobby -
Mcclellan Saddle Identification
Treed replied to eroider's topic in Saddle Identification, Restoration & Repair
I am having a tough time telling anything from the pictures, they are too small. What little I can see I think it is one that was done by a saddle maker for private sale and not done by the military. Need larger pictures to be able to tell anything. Bobby -
Hot Box Holster Drying Cabinet
Treed replied to Lobo's topic in Gun Holsters, Rifle Slings and Knife Sheathes
I took some osb and made a cabinet 4' X 14" X 18" (this was the size of some scraps laying around). Had some old wire shelving from a closet and added it to the cabinet. On the backside I cut a small hole to accept a small ceramic heater with fan and temp controls I had laying around. Put in a thermometer and I can dry between 5 or more holsters at a time depending on there size at 120 to 130 degrees. -
Need An Oversized (Width) 1 1/2" Oblong Punch ... Where Do I Look?
Treed replied to RoosterShooter's topic in Leather Tools
That's an Item that you will have to go to someone like Texas Dies to have made. -
Just my two cents..... there is no way with that light of leather and the way you have constructed it not to get a pucker. The leather looks to be 2-3 oz. so trying to groove the spine area would be difficult for me to do. The construction for this type of notebook for me would be cut outer leather glue stiffeners to front, back, spine glue to liner glue front pockets on edges glue rear pocket for clipboard on edges sew add rings This will give you a more ridged notebook that will carry the weight of the papers better and keep them in better shape. For a softer notebook if that is what you are going for then cut outer leather glue to liner glue front pockets edges glue rear pocket for clip board edges sew add rings
-
I do a lot of holsters and knife sheaths that are tooled and formed, the tooling is done before construction. The biggest thing to remember is that you will not get the same degree of forming that you can on a non tooled piece. A tooled project can not receive as much water when you do the forming process on a tooled item. I only use as little as possible, wetting only the inside as much as possible. I let the item dry considerably ( something you have to experiment with) before forming. When forming the item I only try to form a few key areas around the cylinder on revolver and the trigger, auto the trigger and the ejection port if you are forming by hand. I use no tools on a tooled project only my thumbs. This is where a vacuum bag comes in handy if you are doing any number of tooled pieces. Bobby
-
I usually apply with a piece of sheep skin. Apply light coats at a time with a night or more between coats until I get the affect I want. The biggest problem is that people see one area that may have absorbed more than another area and they try to fix it at this time. Let the leather dry as the driest areas will pull oil from wetter areas and will even out with time. I have had pieces the have had dark oil splotches after oiling that I figured were ruined and through up on the shelf....after a week or more I could not find the splotches..... Don't Get In A Hurry
-
Single Loop 'slinger Cross Draw
Treed replied to DHopper's topic in Gun Holsters, Rifle Slings and Knife Sheathes
During the years of the black powder guns the gun owners wore a belt with usually one holster, one knife and a cartridge box (this was for paper cartridges). After the advent of metallic cartridges and very few pockets on clothing they filled the belts up with cartridge loops. The cartridge loops didn't allow the slim belt loops of the slim jim holsters to fit over the filled loops. The Mexican loop holster was result as the size of the belt loop now expanded and now provided more secure way to fasten the holster to the belt. The fastening of the holster to the flap with one, two or three loop slots is mostly style but the more loops on the body the more secure the holster body to the flap. This allowed the moving and removing of the holster with out taking the holster apart -
Great looking holster.... How is the security being an outdoor holster without a strap for the gun? These chest holsters are the greatest for outdoor use, I have sold over thirty this month at sportsman show
-
Need Help With Sheath Idea
Treed replied to Shooter McGavin's topic in Gun Holsters, Rifle Slings and Knife Sheathes
you hit it out of the ball park -
Great work.... I wonder also where you would be today.....keep with it you have real talent
-
Latest Holster, Belt, And Mag Carrier
Treed replied to 4wheeler4's topic in Gun Holsters, Rifle Slings and Knife Sheathes
Great job...... a couple suggestions for the next time. The cut lines for the branches pop more than the stamped oak leaves and acorns and draws the eyes. I like to stamp the leaves and acorns, cut the branches and then with a small beveler bevel everything. This sounds like work but the benefits are worth it. It will really tie everything together and make them stand out. Try it on some scrap and also study casing leather. Keep up the great work an look forward to seeing some more of your work. -
Skulls & Roses On A Western Rig?
Treed replied to Josh Ashman's topic in Gun Holsters, Rifle Slings and Knife Sheathes
Once again great job.... -
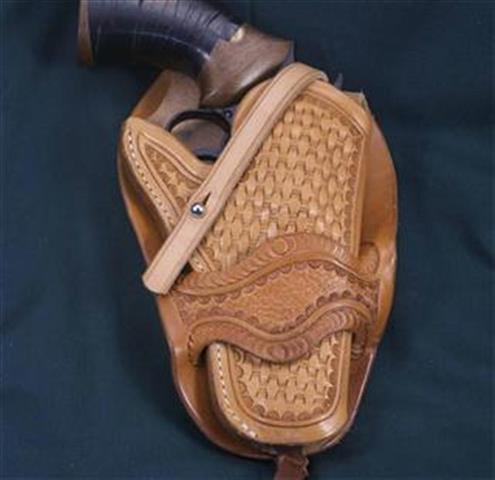
Cowboy Rig For Modern Revolvers
Treed replied to glockanator's topic in Gun Holsters, Rifle Slings and Knife Sheathes
Here is one that I made from a pattern out of the Al Stolhman's books. They are great for a lot of the early styles covering the move from single to double action and work great with the heaver guns and heavy use.
-
Take your draw gauge and cut a long strip to width. Take the long strip and cut it up into the lengths you need. Place cuts that you need and place on zipper. This method you can cut different lengths and widths to fit any zipper and not have to have multiple dies. You can cut a dozen or more in the time and effort it would take to cut five with the press.
-
What I do is find a small border tool, smaller than the one used on the outside of the basket and go around your makers mark. I don't have access to my pictures but will try to post one latter.
-
Some Great classic old styles and you nailed it. Great job
-
2 Gun Buscadero
Treed replied to Josh Ashman's topic in Gun Holsters, Rifle Slings and Knife Sheathes
That's simple enough, never used the liquid acrylic antique will have to try it. Thanks Bobby -
I know what Fullmetalsam means. I have been looking and no one makes the old traditional basket stamp. The lines coming out of the new stamps are very uniform and give a very flat appearance between the stamping. The older ones the lines ran longer and were somewhat tapered this gives more of a rounded shape to the area between the stamps and a different feel when you run your hand over the stamping. I have been going to contact Barry or someone to custom order a more traditional stamp but have not done it yet. Bobby