DonInReno
-
Posts
794 -
Joined
-
Last visited
Content Type
Profiles
Forums
Events
Blogs
Gallery
Store
Everything posted by DonInReno
-

Help on Singer 153 stripped hook saddle screw hole?
DonInReno replied to rlevine's topic in Leather Sewing Machines
If down the road those last few threads give way I’d vote for a helicoil in size 10-32. The only helicoil inserts I’ve ever seen that came out weren’t installed correctly or the bolt corroded - helicoils are by far the most common method used to restore threads. The 10-32 is only .015” or so smaller than 13/64, but because they are the same thread count it wouldn’t be impossible to reduce the factory screw thread to fit the helicoil hole so it looks right. Many Singer screws are pretty hard, so I’ll bet that just trying to run the screw through a 10-32 die would chip the die teeth and/or make a mess of the threads. However, a thread file could be used to carefully reduce the size enough that a die could then even out the threads and reduce it the last few bits. If you chuck the screw in a low speed drill that’s clamped to a table and run it in reverse, it’s not to difficult to hold the file as it travels down the threads. For one screw it is probably just as easy to use a small triangle file if the edges are sharp enough to get down into the bottom of the thread. You only have to take off .005” or so - much more important to be careful than fast. A good quality die would help a lot - avoid the hex shaped ones at Home Depot or Lowes. While at Home Depot, in the plumbing section where they will rethread a pipe while you wait, dip a few qtips in their bad smelling cutting oil - this is really good cutting high pressure oil to use with the die, just clean it off everything or the smell will linger for a year. Every time I run a die down a semi hard high strength bolt I’ll use an adjustable die and do it in three passes, but each time I’m cringing hoping the teeth don’t break. -
It’s common to tap binder holes to whatever screws come with the binder, or are readily available, and to not necessarily match screw pitches found on the sewing machine, which are often a nonstandard size. Existing tapped holes are often not in the ideal locations, so it’s also common to not pay much attention to what’s already there and simply put new holes where they need to be.
-
If you bury the needle then hold the thread tight you can be preventing the thread loop from forming as the needle starts moving upward. This makes it much harder for the hook to get behind the upper thread to complete the stitch. If it misses that first stitch and you are pulling hard then it’s just as likely to miss the next stitch. Personally, I think you’re better just barely getting the needle in the leather, and hold the thread tails stationary - don’t pull on them - as the needle goes down and starts back up it has a better chance to have the right amount of slack to make the stitch.
-
That’s funny - I totally missed the handwheel was backwards.
-
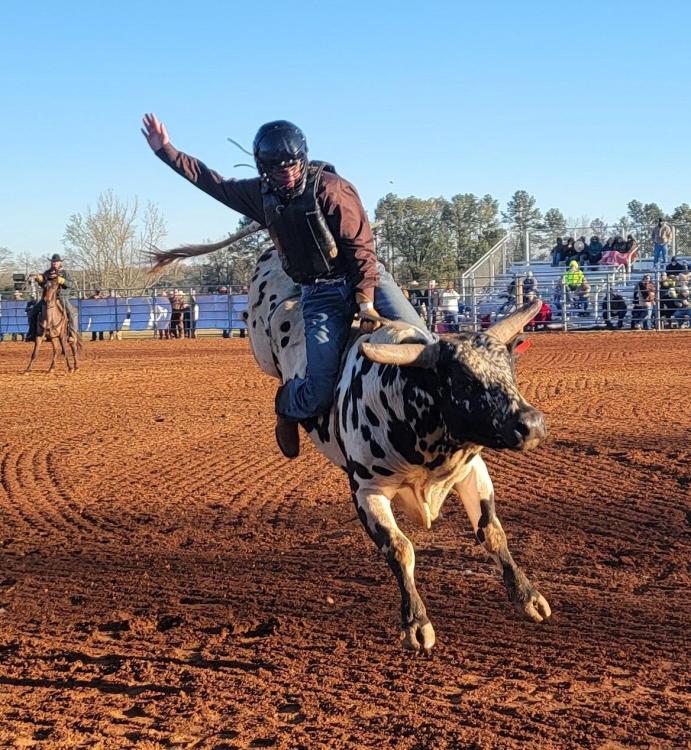
High school bull riding safety vest
DonInReno replied to DonInReno's topic in Leather Sewing Machines
Looking at the freedom of movement and attention to chest and spine protection in modern motocross gear, I can’t help thinking rodeo gear is in its infancy and will adopt a lot of the designs eventually. The flood of Chinese made body protection for sports of all kinds is great on one hand because it’s very affordable, but often lacks any ratings and is hard to determine actual level of protection. Many states require ASTM rated equestrian safety vests for any bull riding events. These can be quite affordable, but a lot of these might get laughed at for being non-western, and a number of them are clearly lacking. In many rural western communities you won’t find anyone scrutinizing vests as long as they have one. I don’t think I can offer any better advice to the parent making their own gear - it’s very much a trade off between protection and mobility - and what they make will only work if the kid will wear it. I’ve looked at over 100 different vests and the large number of different designs is interesting. Some are just for looks, some are mainly for protection and are surely very stiff and bulky, and some are even inflatable. Many are built like a soft bullet proof vest with front zipper, and some get all the protection from molded lexan plates. Some that didn’t seem all that protective were a series of small foam pads held together with thin nylon mesh on both sides - a hoof would easily split that design wide open. About six years ago I watched a coworker free fall, flat on his stomach about 10’ and bounce off a concrete floor - luckily it was the middle of winter and his work clothes and heavy jacket cushioned his body pretty well, but it took a few minutes to understand how he landed face first and didn’t have any facial injuries - turned out the bill of his baseball cap hit the concrete first and cushioned the head so well he never lost consciousness and didn’t even have a bloody nose - If something bad happens it doesn’t hurt to be lucky! Lol -
High school bull riding safety vest
DonInReno replied to DonInReno's topic in Leather Sewing Machines
Lol Thanks for the article - every article seems to add a little bit of new detail. I have to keep reminding myself the vest is primarily to distribute blunt force over a larger area. Apparently the Spectra Shield material is very good at resisting deformation when being pushed against, much like a hard plastic, but is also very tear resistant whereas a simple hard plastic would fail with a lot of force from the edge of a hoof or even a blunt horn. Like protective gear in many sports, it makes sense to have stiffer more protective vests for younger riders. It seems the outer shell material only has to hold the vest together for impacts, but should rip apart if hung up on a horn or hoof, so the Velcro between front and back, and over shoulders makes sense, and makes it adjustable for different riders. The outer material doesn’t affect the performance, Cordura or canvas duck fabrics work fine and leather is just more durable with normal wear and tear and looks better. Inner liners on the best vests are often a soft synthetic mesh and it seems denim weight fabric is a good low cost alternative that would hold up well to teenagers. -
I’m helping out a gal who is part of a well meaning group of parents sewing bull riding safety vests for what are essentially high school teams. I’m not convinced the $100 vest they are patterning off of is worth a hoot, when just the raw materials of a good $300-$400 vest look to be quite a bit more than $100. I supplied a machine to one of the gals that will sew 138, but I’d think a heavier thread is appropriate here. From what I can gather it’s a chap weight leather exterior, EVA foam layer, spectra shield penetration resistant layer and heavy synthetic liner (courdura?). Big zippers with 2” wide Velcro over the zippers. The specifics I can’t seem to pin down. If anyone can give me a little guidance and direction I’m all ears.
-
I do see how the reducer looks pulled to the side - is that what you were thinking? Belt tightness can vary quite a lot and be ok. I like them as loose as possible but tight enough to not squeak or slip. A belt loose enough to slip a bit if a needle or hook gets jammed up can prevent more serious damage. Eventually you’ll develop a feel for the situations more likely to break needles and go slowly over these areas and quickly let off the gas if things do lock up, but some of that experience involves breaking a few needles.
-
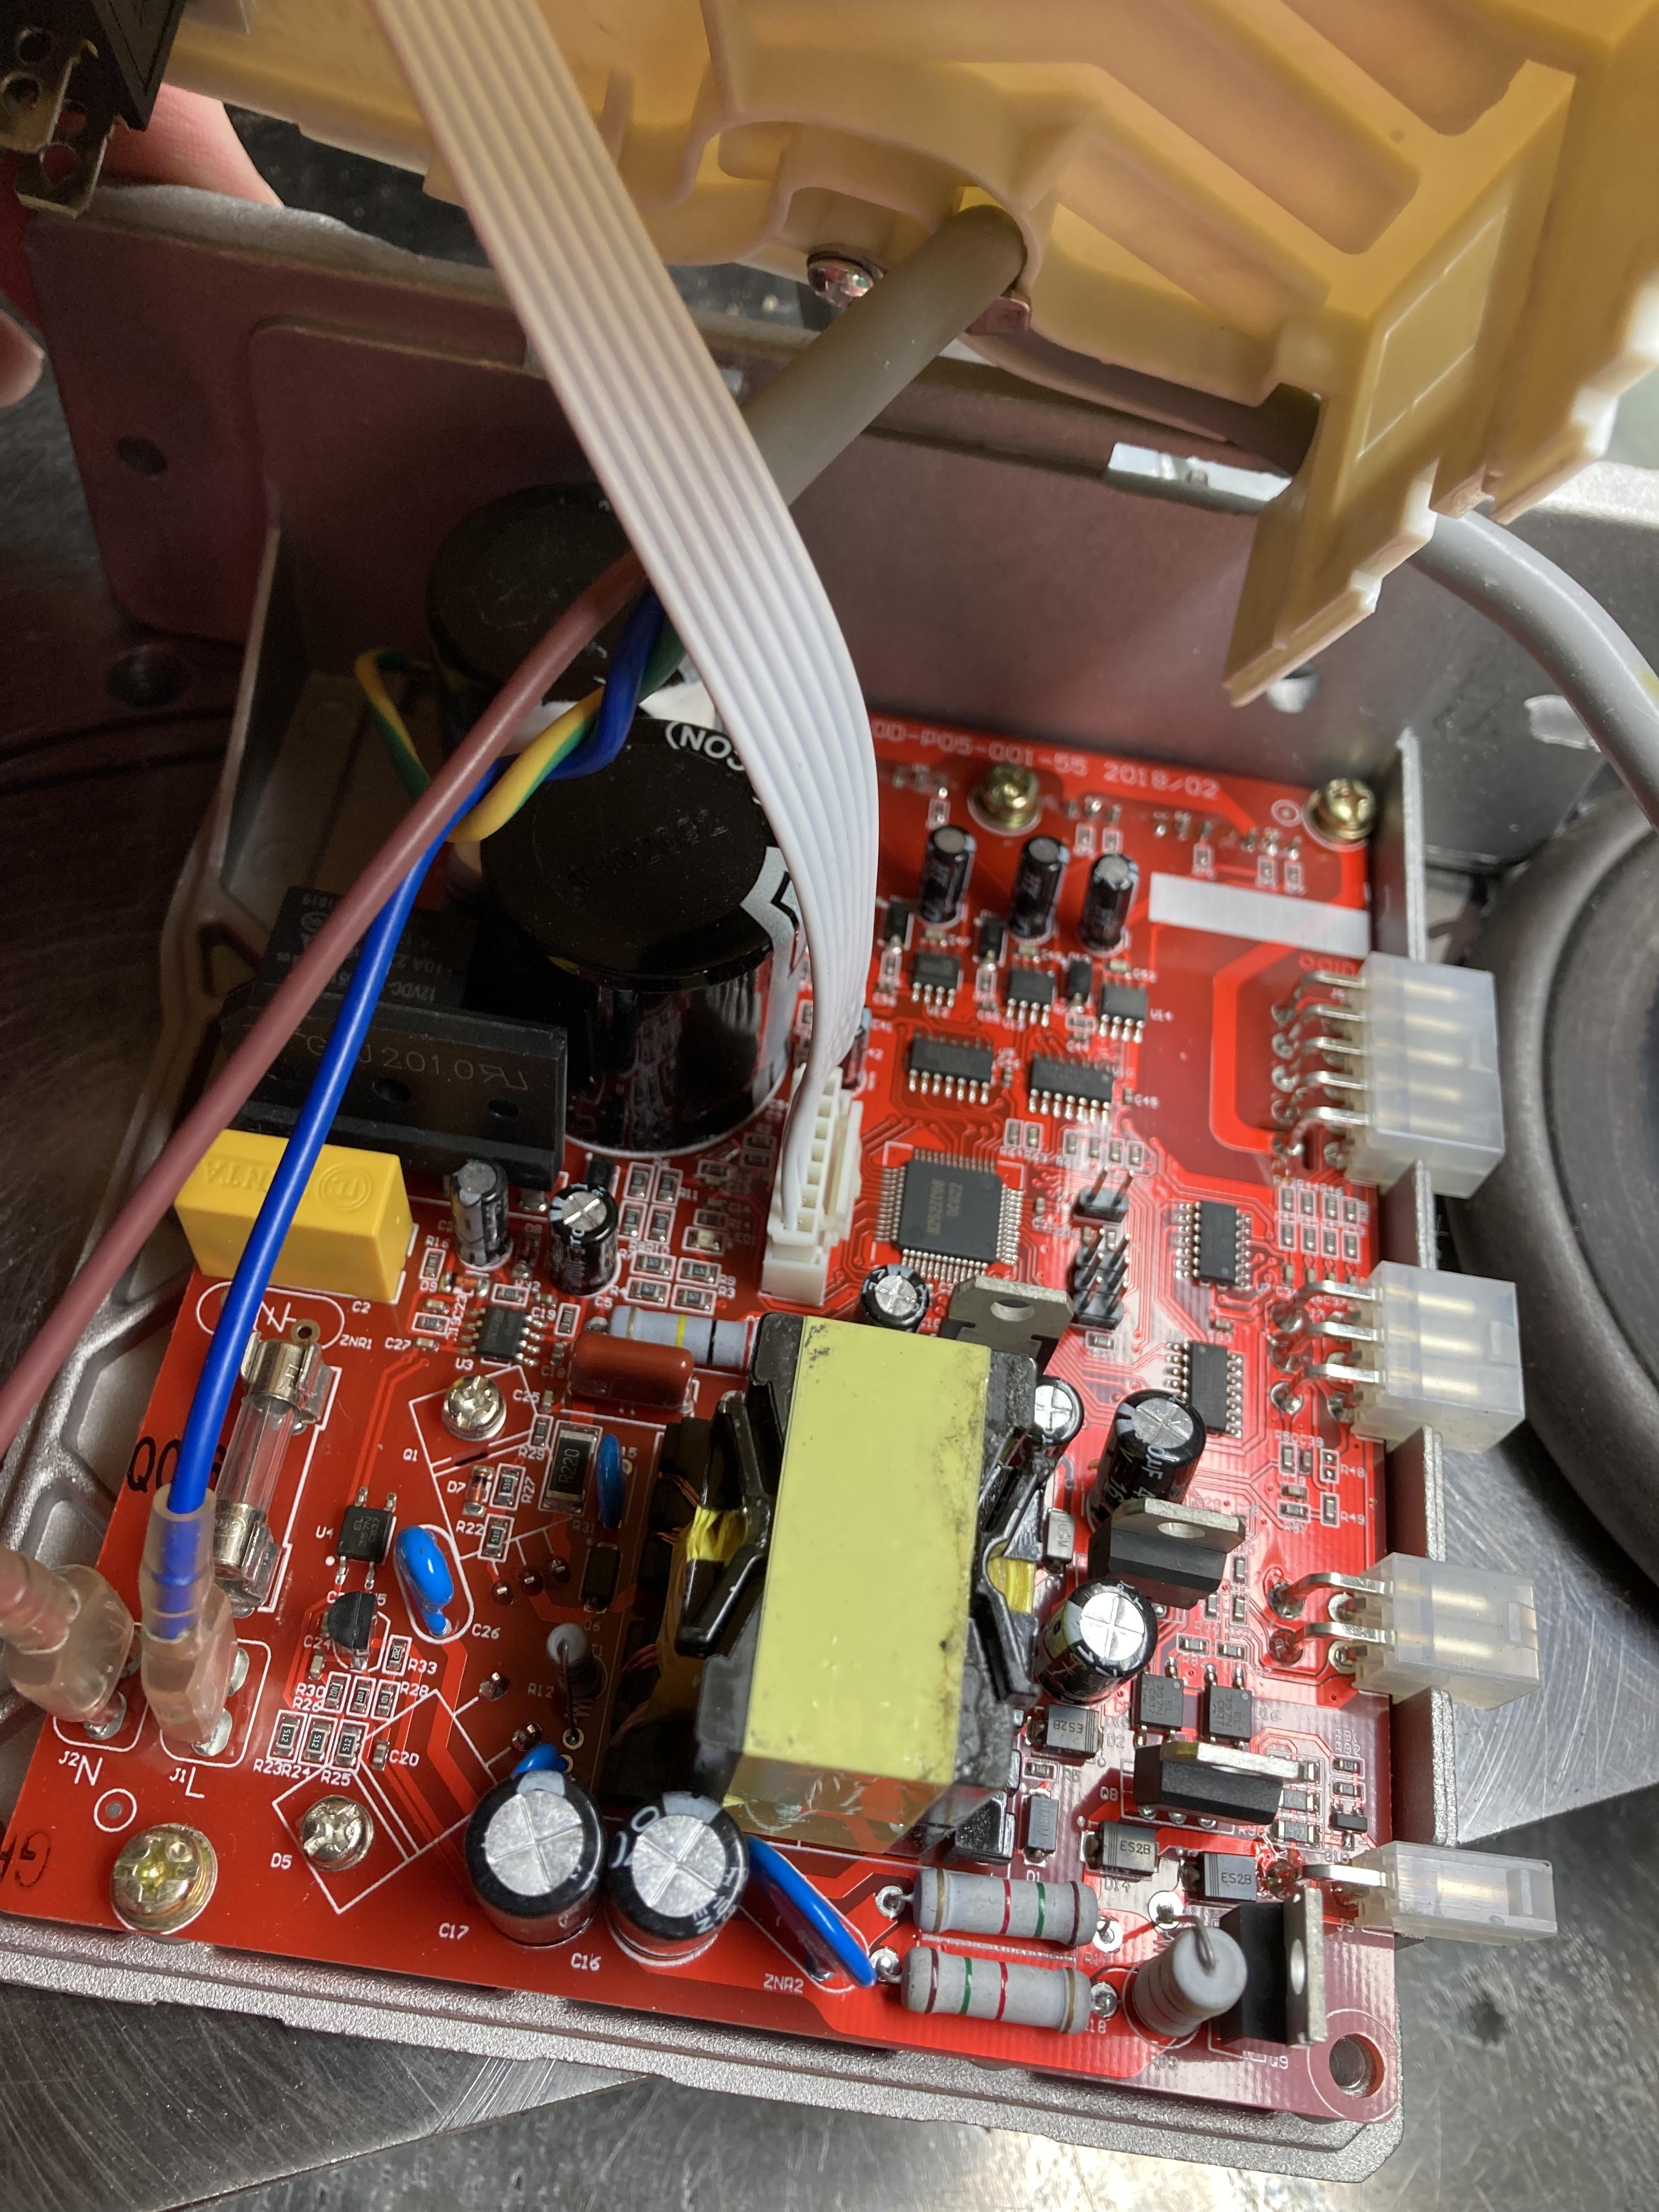
That control box was handy today so I took out the two case screws, dusted it off and snapped a picture. I know very little about electronics, but if you look very closely at your board there’s a chance it will be something obvious. Always get rid of any static electricity and touch the aluminum case before touching anything inside. Let it sit for a number of minutes after it’s been unplugged to allow the capacitors (round black thingies) to bleed off or you may get shocked. I don’t know what that trouble code is and didn’t keep the manual. Don’t blow the dust off at first - some metallic threads or high humidity dust actually conduct electricity and a dust bunny may be a clue. If you have a lot of dust I’d blow it off and try the controller. Check the fuse. Check voltage coming in - I was at a clients house and power tools were acting strange - checked voltage and the entire house was at 90v instead of 120v - turned out the transformer that fed the house was bad and the power company had to replace it. Others, much smarter than me, have said they look at the capacitors for leaks or a bulged top. Then look closely at all chips for dark spots that might indicate they are fried. All the solder joints are carefully inspected for cracks or missing solder - the surface mounted stuff is very hard to inspect so drag out that magnifier. Then look at any wiring (inside and out of the box) for anything out of the ordinary, especially at connections and unplug wires to feel for good fit. Same for the speed controller circuit board and connections. If that doesn’t work I toss it in the trash and get a new one.lol

-
Cobra Class 26 Loose Stitch and Noise
DonInReno replied to Bullduke's topic in Leather Sewing Machines
As soon as I heard that distinctive noise it hit me it’s something I’ve experienced before, but for the life of me can’t recall what caused it - maybe once some more coffee kicks in it will dawn on me. . . . It came back to me what that noise was in my case - it was a two piece adjustable brass bushing in an old piece of equipment that would make that noise when adjusted a little on the tight side. It must be the harmonics of the stick and slide, stick and slide of brass on steel. I’m sure with a little use it will go away completely. Since your noise is consistent with hand wheel rotation and doesn’t change as needle bar slows and changes direction so I’d bet it’s a contact point on the upper shaft of some kind on the other end opposite of the handwheel. In industrial settings, to track down minuscule machine vibrations too faint to be felt or heard by a human, an oscilloscope reads electrical impulses from tiny acceleration sensors (see photo). Two of these can be held onto two sides of a part, or two separate parts with magnets and it will show which has more vibrations. With inexpensive portable oscilloscopes and sensors this is also really changing how automotive noises and vibrations are traced.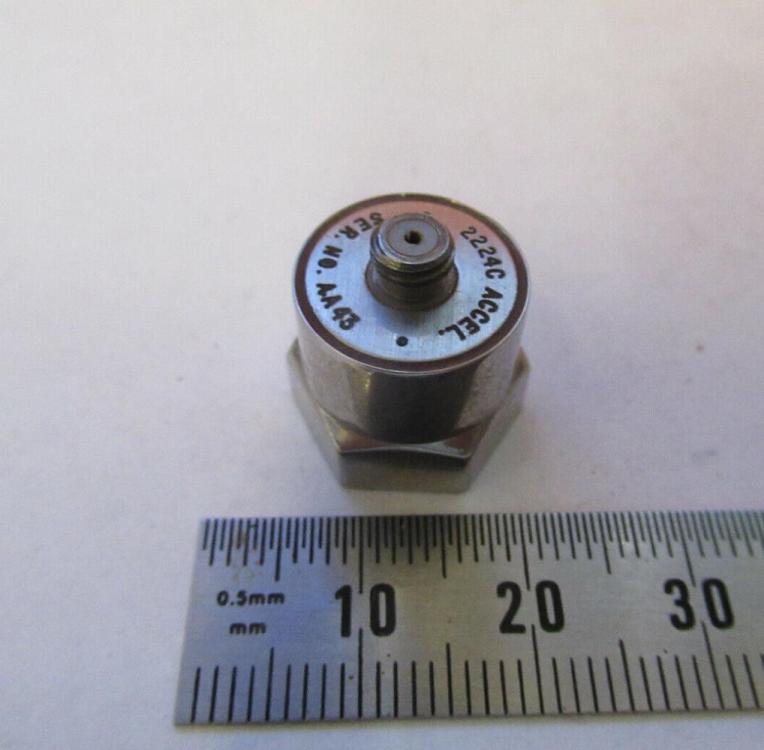
-
I like the look of heavier thread so 138 doesn’t bother me on functional items. For someone else I’d probably drop to 92. You will find a wide variation in thread thicknesses between brands - it seems most higher quality thread is a bit thicker and keeps its roundness, while some less expensive 138 won’t be much thicker than 92.
-
Hitting the corner with the needle
DonInReno replied to PlanoMike's topic in Leather Sewing Machines
It’s great practice to sew a squarish spiral on a 4” or so square piece of leather - draw out lines every 1/2” in from all four corners - try to sew as straight as possible and hit all corners exactly. Sew in a spiral until hitting the middle then sew in a spiral going out in between your first stitches. The key is to not let the needle hit the leather on the corner stitch unless it’s exactly where you want it. With the needle near the leather surface use the reverse handle and observe what that does to the needle - if that movement won’t position the needle in the right spot get used to letting up on presser feet tension and move the leather until you are right on. I don’t have great vision in dim shadows so a strong work light helps me a lot. Im not using a magnifier yet and probably should be, but one of the visor looking ones that can be flipped up and down easily even over glasses can be had in various magnifications. -
Many of us do daily or weekly searches on Facebook Marketplace, Facebook groups, eBay, Craigslist and a few others I’m not real familiar with. Other search sites will search multiple places at once, which can be faster, but doesn’t seem to be as reliable. Dont forget to check the equipment for sale section on LW - I have 3 sewing machines originally found here - and a few more I wasn’t quick enough on and someone beat me to them. If I’m really searching for something, doing regular searches on Google, Google images, Reddit, and other search engines will turn up items listed in obscure places or that are not called by common names. Search terms are important - for instance most machines can be found searching for “industrial sewing machine”, but someone who just inherited grampa’s machine may call it “commercial sewer” or “sewing machine” or “leather stitcher thingy” or “harness stitcher”, or it might not have a description other than a picture and the price, or it might just say “Singer” and a picture. About once every few years I miss out on a free triple feed machine, but I have two free ones found here. More search terms and searching more sites produces more results, but it also brings up more crap to wade through. It can be addicting, so competition is often quick to buy something if you aren’t looking often. I used to like to check first thing in the morning, 11:30, 3:30, 6:00: and right before bed, but many who work from home seem to keep search pages open and refresh often throughout the day. Local auction site inventory or estate sale lists often dont come up anywhere, so that can be another couple of sources to check. Finally there are the antique shops that can sometimes have a very desirable machine for a fraction of what it would normally go for. Pawn shops and thrift stores are low value places since they are quite time consuming to visit in person. Thrift stores get nice machines more often than most people know, but once it’s priced anyone who works there often has first dips at buying it, or it’s kept in the back until someone’s buddy shows up to buy it and that night it shows up on craigslist.
-
The old school TV, VCR, Wi-Fi repair shop might be able to help if it’s something obvious like a blown relay, transformer, or capacitor. The few electronics repair people I’ve watched seem to think of basic electronics a lot like a car mechanic thinks about mechanical things - the parts that make up the whole are like legos and a failure is a matter of troubleshooting parts until the bad component is found. That methodology works. . . until it doesn’t. Garage door openers are famous for simple components on the circuit board - the few times I’ve looked at getting one fixed, the cost was approaching that of a new board without a guarantee of an actual fix. There’s no rocket science in servo controllers, but they do use a lot of super small surface mounted components that are more challenging to work with. The programmed chips are likely to be the most challenging since not everyone with electronics repair experience is set up for that and it’s not as intuitive to understand unmarked specialty chips. All this makes repairs less likely and more expensive. I bought one of these $300 motors from Gregg and really like how much torque it has. If my controller crapped out I’m not sure I’d spend $100 to have a shop look at it since there’s a good chance it won’t be repairable. Having said that, I’ve known a number of recreational electronics guys who enjoy this kind of stuff and would look at it essentially for free just because it’s something new they haven’t taken apart before - you might ask in an electronics forum, or even look for someone who teaches electronics locally - I can picture a community college class taking it apart and testing as a small class project.
-
Cowboy CB4500 or SIECK type 441 K
DonInReno replied to JustCurious's topic in Leather Sewing Machines
I’m a semi-retired carpenter and have used decent quality bags for 25 years. You’ll really enjoy all the useful modifications you'll be able to do with a big machine. I have a 441 clone and would recommend that size over anything smaller. There are over a dozen 441 clones - I’d highly recommend a machine that you can get dealer support from easily. As for a Juki - if you can afford it great, but you’d have to sew professionally for a number of years to start wearing out parts on any of the clones. As you know we wear out stitching before the leather anywhere except the corners on bottoms of the bags, so the thicker the thread the better! We also wear out thread so quickly there’s not a lot of benefit to us resistant polyester over nylon thread unless bags will be stored inside a car out in the open. The number and variety of custom tool holders will keep you busy for months until you find the ones that fit your style - we all have a different set of favorite tools and once you can put them anywhere on or in your bags it takes a lot of trial and error, but you’ll be glad you did since it makes bags much more efficient. If you’ve never tried one, a deep hammer pocket, made from heavy leather to keep its shape, totally changes how the hammer is stored - it’s faster, easier and the head is kept away from anything it might scratch during window/door install or finish work. I like the shape to put the handle right at the hip bone pointed slightly rearward and within a few inches of the belt. There’s so many cordless tools, my right main bag has turned into an extra deep bag so drills or impacts just sit in there and I don’t have to worry about them falling out or scratching anything. A sharp chisel, screwdriver, end cutting pliers, torpedo, etc can be mounted in the corners that don’t get in the way of the main bags. A folding aluminum hook at belt level in front is a very useful third hand to hold a drill, nail gun, longer level, especially on ladders. Im getting too off topic. Lol Anyway, once you have a big sewing machine and you’ll just rebuild bags as they wear out or you get a new idea, be prepared for thick synthetics working their way into your leather bags! For two decades I swore I’d never have anything but xtra thick all leather bags and at one time had three sets - framing, finish, and electrical - but a sewing machine had me adding more and more synthetic parts and a light large framing bag works better for a lot of finish when working off ladders especially since everyone keeps a cordless impact close by. My trim and woodwork bags have changed into a tool vest and two small nylon bags that clip on my pants belt. Let us know what machine you end up with and how your projects work out! Edit: Definitely get a cylinder arm machine - many bulky, complicated and heavy leather or synthetic parts just can’t be flattened enough to be sewn on a flat bed. Fall protection is much more of an issue for all carpenters nowadays with big complicated McMansion designs, and it’s more and more common for carpenters to have custom bags added to a good rope harness. In the old days I’d just use a thin sport climbing half harness worn under work pants, but OSHA requires a full harness so why not use the structure to hold bag components to save weight and prevent clutter of using safety belt under proper tool bags. It’s my understanding OSHA allows sewing accessories onto a harness as long as what you are adding doesn’t interfere with the functionality - at least they aren’t nit picking it. -
Lol
-
Yes, sort of. Going up in needle size would be a way to test if this is what is going on if it’s a minor problem, but going over thick seams has always been the poster child for needle deflection and breakage. Cordura and other synthetics can be very slick and sometimes the operator will be inadvertently putting side to side pressure on the material causing it to slip under the pressure foot, especially with larger projects. It greatly increases the chance for needle breakage, but a needle plate with smaller hole will quickly show if the needle is being bent due to too much or not enough operator guidance of the material. A looser belt will allow slippage if the needle actually impacts the needle plate.w Perhaps the feed dog and moving foot are slipping while the needle feed is bending the needle - or the shape of the item is catching on the machine bed or needle plate rather than feed correctly. I like a much more aggressive feed dog, serrated presser feet and extra pressure with synthetics - not to mention it requires a lot more concentration to provide the correct guidance compared with heavy cottons. Your hook doesn’t look bad and I’d be very surprised if it didn’t feed heavier thread perfectly, but thinner thread does need minimal clearance between needle and hook, and the hook point needs to be sharper to cleanly scoop behind the thread, pulling it away from the needle rather than scrape it off with a blunt tipped. Comparing an otherwise decent looking hook with a first quality one that’s factory fresh will often point out slight issues that otherwise get overlooked. Replacement hooks or hooks that have eaten a number of needles are often a little blunt, but for instance, a new Juki hook is very sharp and crisp. I have to keep in mind thread is stretched tightly against the needle as it penetrates the material and only slackens enough for the hook to slip behind it as the needle is withdrawn a bit - about the thickness of a nickel.
-
I googled industrial sewing machine repair shops in Seattle and half a dozen businesses showed up.
-
I went through a phase of measuring diameter and breaking strength of any thread that I came into contact with and the numbers were all over the place, especially with cheap thread being on the smaller side generally, but not always the weakest. All the thread broke at more, sometimes much more weight, than generic charts would suggest. Thread that produced the nicest looking stitches and kept a nice round profile was often the weakest. To test breaking strength it works great to wrap about 8-10 turns of thread around a smooth S-hook on one end and the same amount of wraps around the hook of a decent quality 100lb capacity spring scale on the other. Without knots it seems to show nearly the pure thread strength with some breaks happening in the middle and others near an end, with similar readings. I was rather surprised that none of the thread slipped on the round steel hooks, but it was carefully wrapped over itself to try and lock it in place.
-
78-1 Singer Model 78-1. Bought frozen to get sewing.
DonInReno replied to AlamoJoe2002's topic in Leather Sewing Machines
These are pretty simple machines, but the needle and presser bars are somewhat exposed along with bushing nearest the hook. Luckily many sewing machines that are locked are only suffering from old oil that has hardened throughout and eventually softens up with a little solvent or even new oil. Rusted machines on the other hand suffer the most in the areas water can get to. One of my projects sat outside for a few months before it was sold and the bushings with direct paths for liquid water are the most corroded, while others exposed to high humidity and no liquid water get rusty all over and under. -
78-1 Singer Model 78-1. Bought frozen to get sewing.
DonInReno replied to AlamoJoe2002's topic in Leather Sewing Machines
I should try evaporust again - maybe the pits were already there and I misjudged what was going on. Once upon a time there was a guy who enjoyed buying rusted and locked up old Singers at auctions - he liked electrolysis and said hooking up the wire on the shaft that was frozen would get any rusted shaft to turn. -
New Member and mystery machine
DonInReno replied to piningforfjords's topic in Leather Sewing Machines
It would be fun to know the history - where it was used in its past life, how did Goldsworthy acquire it and what color is it under the new paint. An inexpensive triple feed with reverse is hard to beat, regardless of who made it originally. I also have an old mystery machine that was labeled Singer, but doesn't have a single Singer part in it. It’s Singer-ish. -
New Member and mystery machine
DonInReno replied to piningforfjords's topic in Leather Sewing Machines
Bobbins, bobbin cases, case opener, hooks, presser feet, tension disks, timing belt, and many other parts will almost certainly interchange with any other juki 563 or similar machine - industrial machines are practical if nothing else and nobody would buy a machine that needed special parts unless there was a financial benefit from doing so. We are all too young to remember the old days when small cast iron foundries were everywhere - when mom and pop shops made a lot of parts for medium size manufacturers. China has mega factories, but it also has a huge number of mom and pop shops producing parts - their system has a lot of incentives for small and medium manufacturing. There are still small foundries that you can walk up to and order rough cast sewing machine parts based on something they have cast before, or changed at a much higher price to use a hodgepodge of parts. Same for all the other parts in a sewing machine. However, for cost reasons there is a gigantic benefit to using cheap parts that don’t need to be redesigned and have a great track record already. I did see a video of an interesting visit to a mom and pop shop with a few well used cnc machines creating generic commodity parts - whatever the market was paying the most for at that time - labor cost is so low the machines run as many hours as possible - essentially 24x7. A few years later they had quadrupled with more machines. -
New Member and mystery machine
DonInReno replied to piningforfjords's topic in Leather Sewing Machines
Based on the rough fit and finish, this is definitely not a rebranded 1st quality machine, but a generic version made for whoever wants to put their name on it. You or I can order 100 machines just like this from a dozen different Chinese suppliers and they will put whatever name on you’d like - cheap low quality parts or higher cost higher quality parts - low cost painted casting, or filled and sanded higher cost finish. Generic Juki 562/3 adjustment information is all you really need - this design has been copied by a lot of companies, but there isn’t much difference in how they are adjusted. -
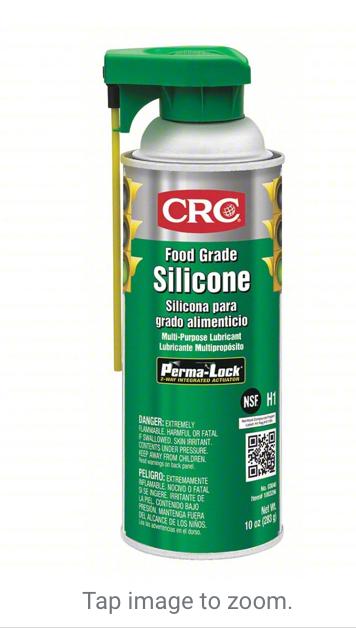
Some of that fire hose is really dense and the rubber liner doesn’t help - you may want to try a silicone lubricant on the thread to help it not get so shredded. Some machines have a sponge the thread passes over and picks up the lubricant, others have a little pot, and it’s possible to just spray it on the thread spool.