DonInReno
-
Posts
794 -
Joined
-
Last visited
Content Type
Profiles
Forums
Events
Blogs
Gallery
Store
Everything posted by DonInReno
-
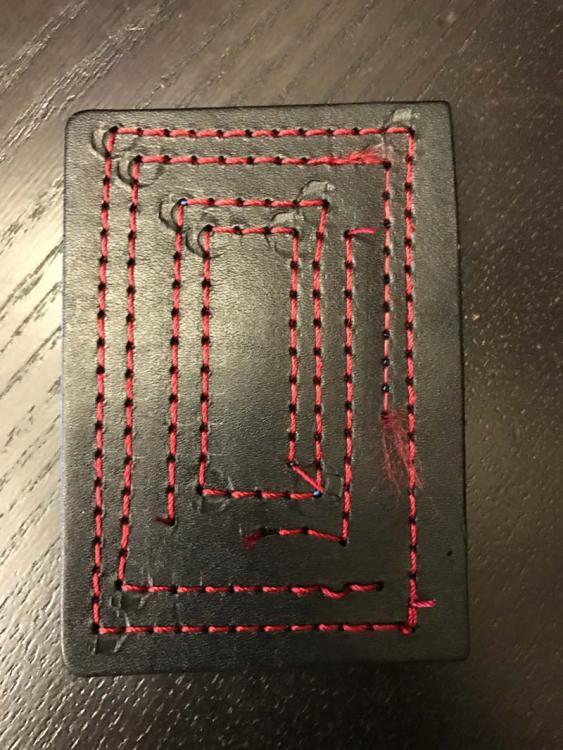
There are definitely some skipped stitches on the bottom side, so that may be another issue. it sounds like you’ve had one heck of a day chasing this thing around - you’re really close to getting it, so tomorrow should be a good day
-
Those are definitely twists in the thread or the thread is untwisting as it forms the knot - not a tension issue. Sorry to drag you through all the tension stuff - I should have asked for a picture. What brand and type of thread is it? To be honest, if I don’t know anything about the bottom problems I’d still think your thread doesn’t look right on top - like it’s not bonded and a loose twist - not the normal dense bonded nylon we usually use. The good news is, a different spool of thread will probably solve the issue. I’ve attached a random picture of 138 size thread - look at how twisted your top thread is compared to how it lays down flat in the pic.
-

Bradbury patcher vs similar German patcher
DonInReno replied to DonInReno's topic in Leather Sewing Machines
Thanks for the information Glenn! I’m going to pass on this one - the small bobbin size is the opposite of what I’d really like to end up with. In the search for information this style of patcher, the one machine that really caught my eye is your “Patcher on steroids”. Something like that would a fun machine to have. Did you ever find out who made it? Of course the odds of ever running across a similar machine are zilch, but it did get my wheels turning.
-
I’m betting #1 is still your problem. It’s very hard to just look at the tension disks and tell if the tension release is preventing the last few .001” of disk pressure. I’d also check for deep grooves in the tension disks that might be preventing them from firmly gripping the thread. Perhaps the tension adjusting nut is bottoming out on something? Aftermarket tensioners are so poorly made, if it’s ever been changed any number of things could be wrong. Have you had the tensioner apart lately? Is the machine new to you? Do you have a picture showing how it’s threaded? Is the thread down between the disks and not ridding up on the outside edges? If you can physically pull thread through that tensioner with bare hands when it’s tightened fully, it’s definitely something in there.
-
If the upper tension regulator won’t provide enough tension even when adjusted as tight as it will go, there’s a good chance the tension release is improperly adjusted not allowing the tension disks to fully engage the thread. Thats assuming the lower thread tension is correct, and the needle size is large enough to allow the know to be pulled up.
-
This chart is only accurate if the needle is large enough to allow the knot to be pulled up in the material. For 95% of all sewing the bobbin tension isn’t messed with other than the initial setting. With the bobbin in the bobbin case and holding just the thread, gravity shouldn’t let the bobbin/case fall. If the thread is then giggled up and down gently the bobbin should start to pay out thread.

-
That makes sense - there’s very little information on it.
-
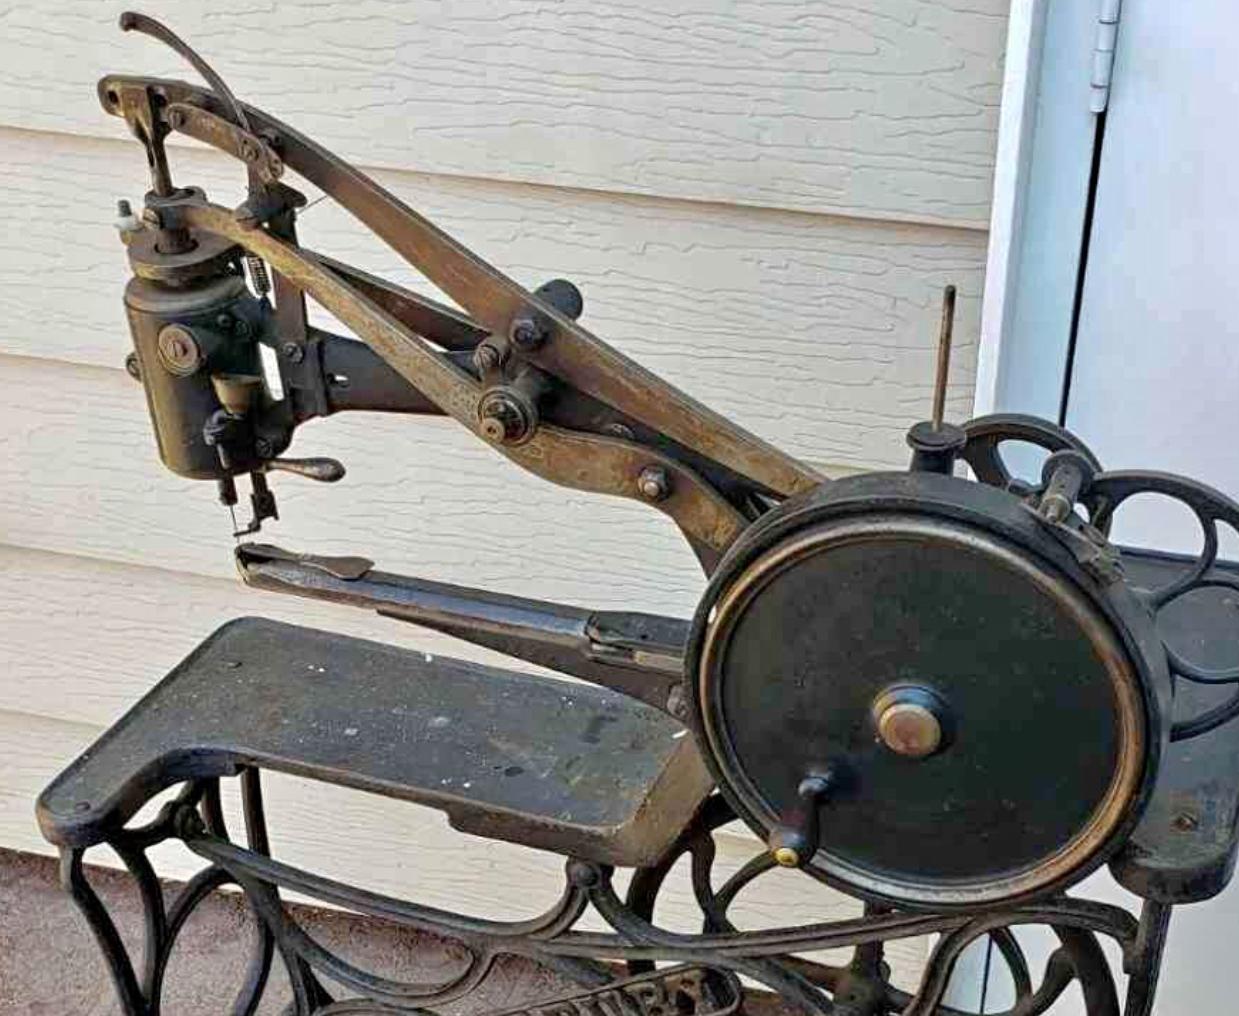
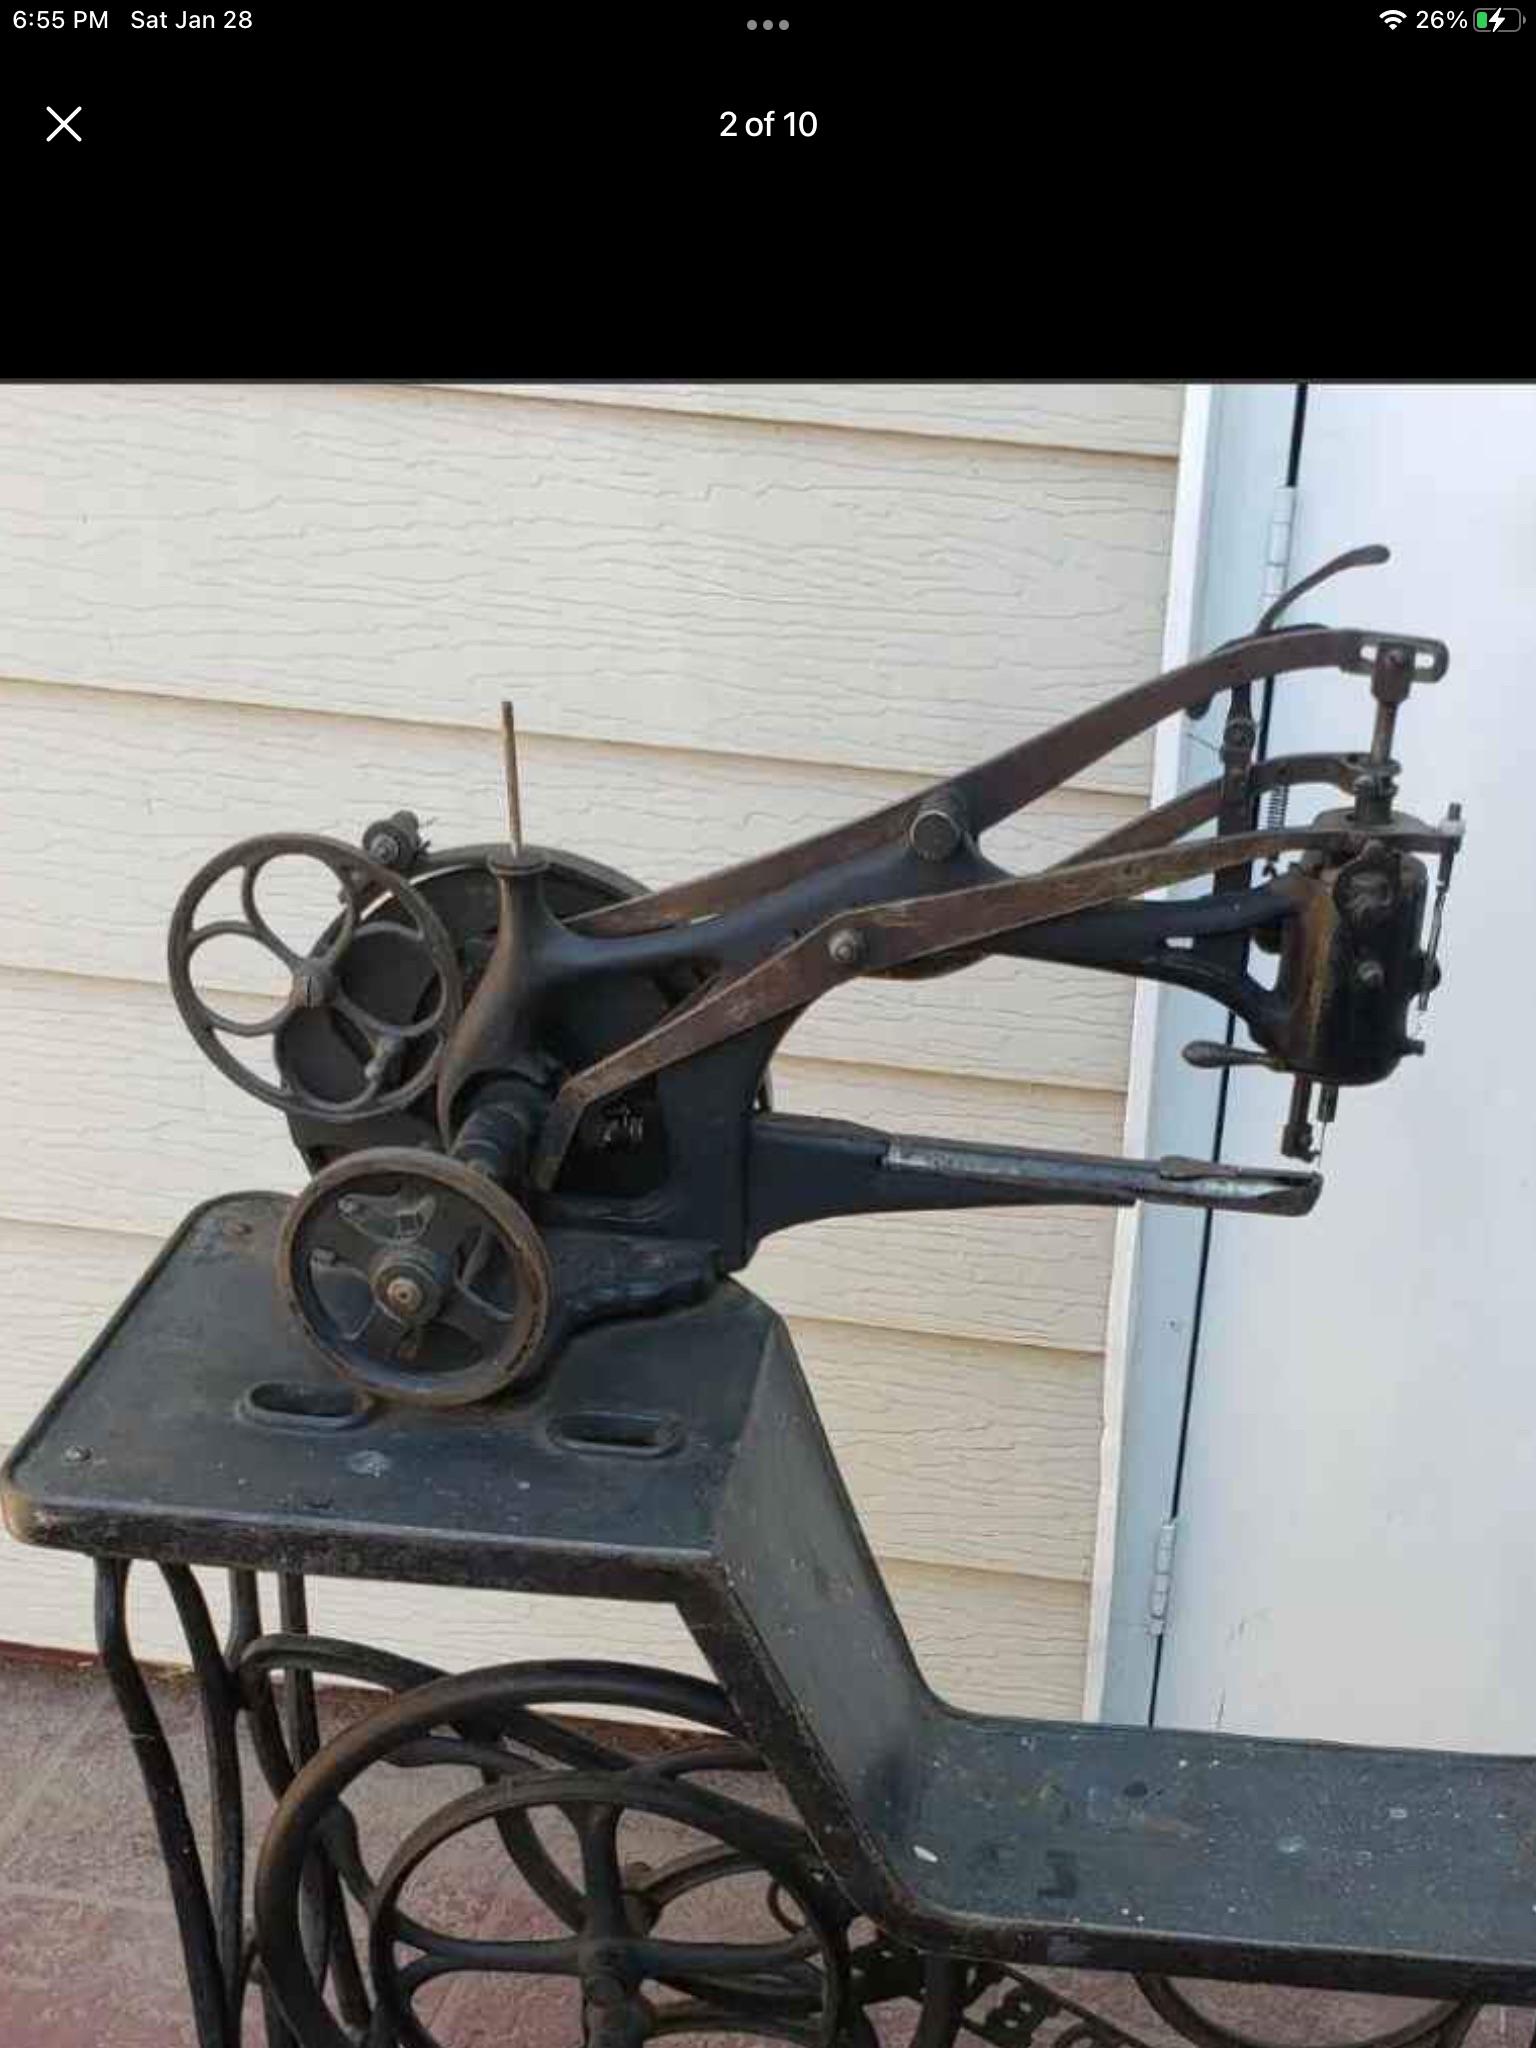
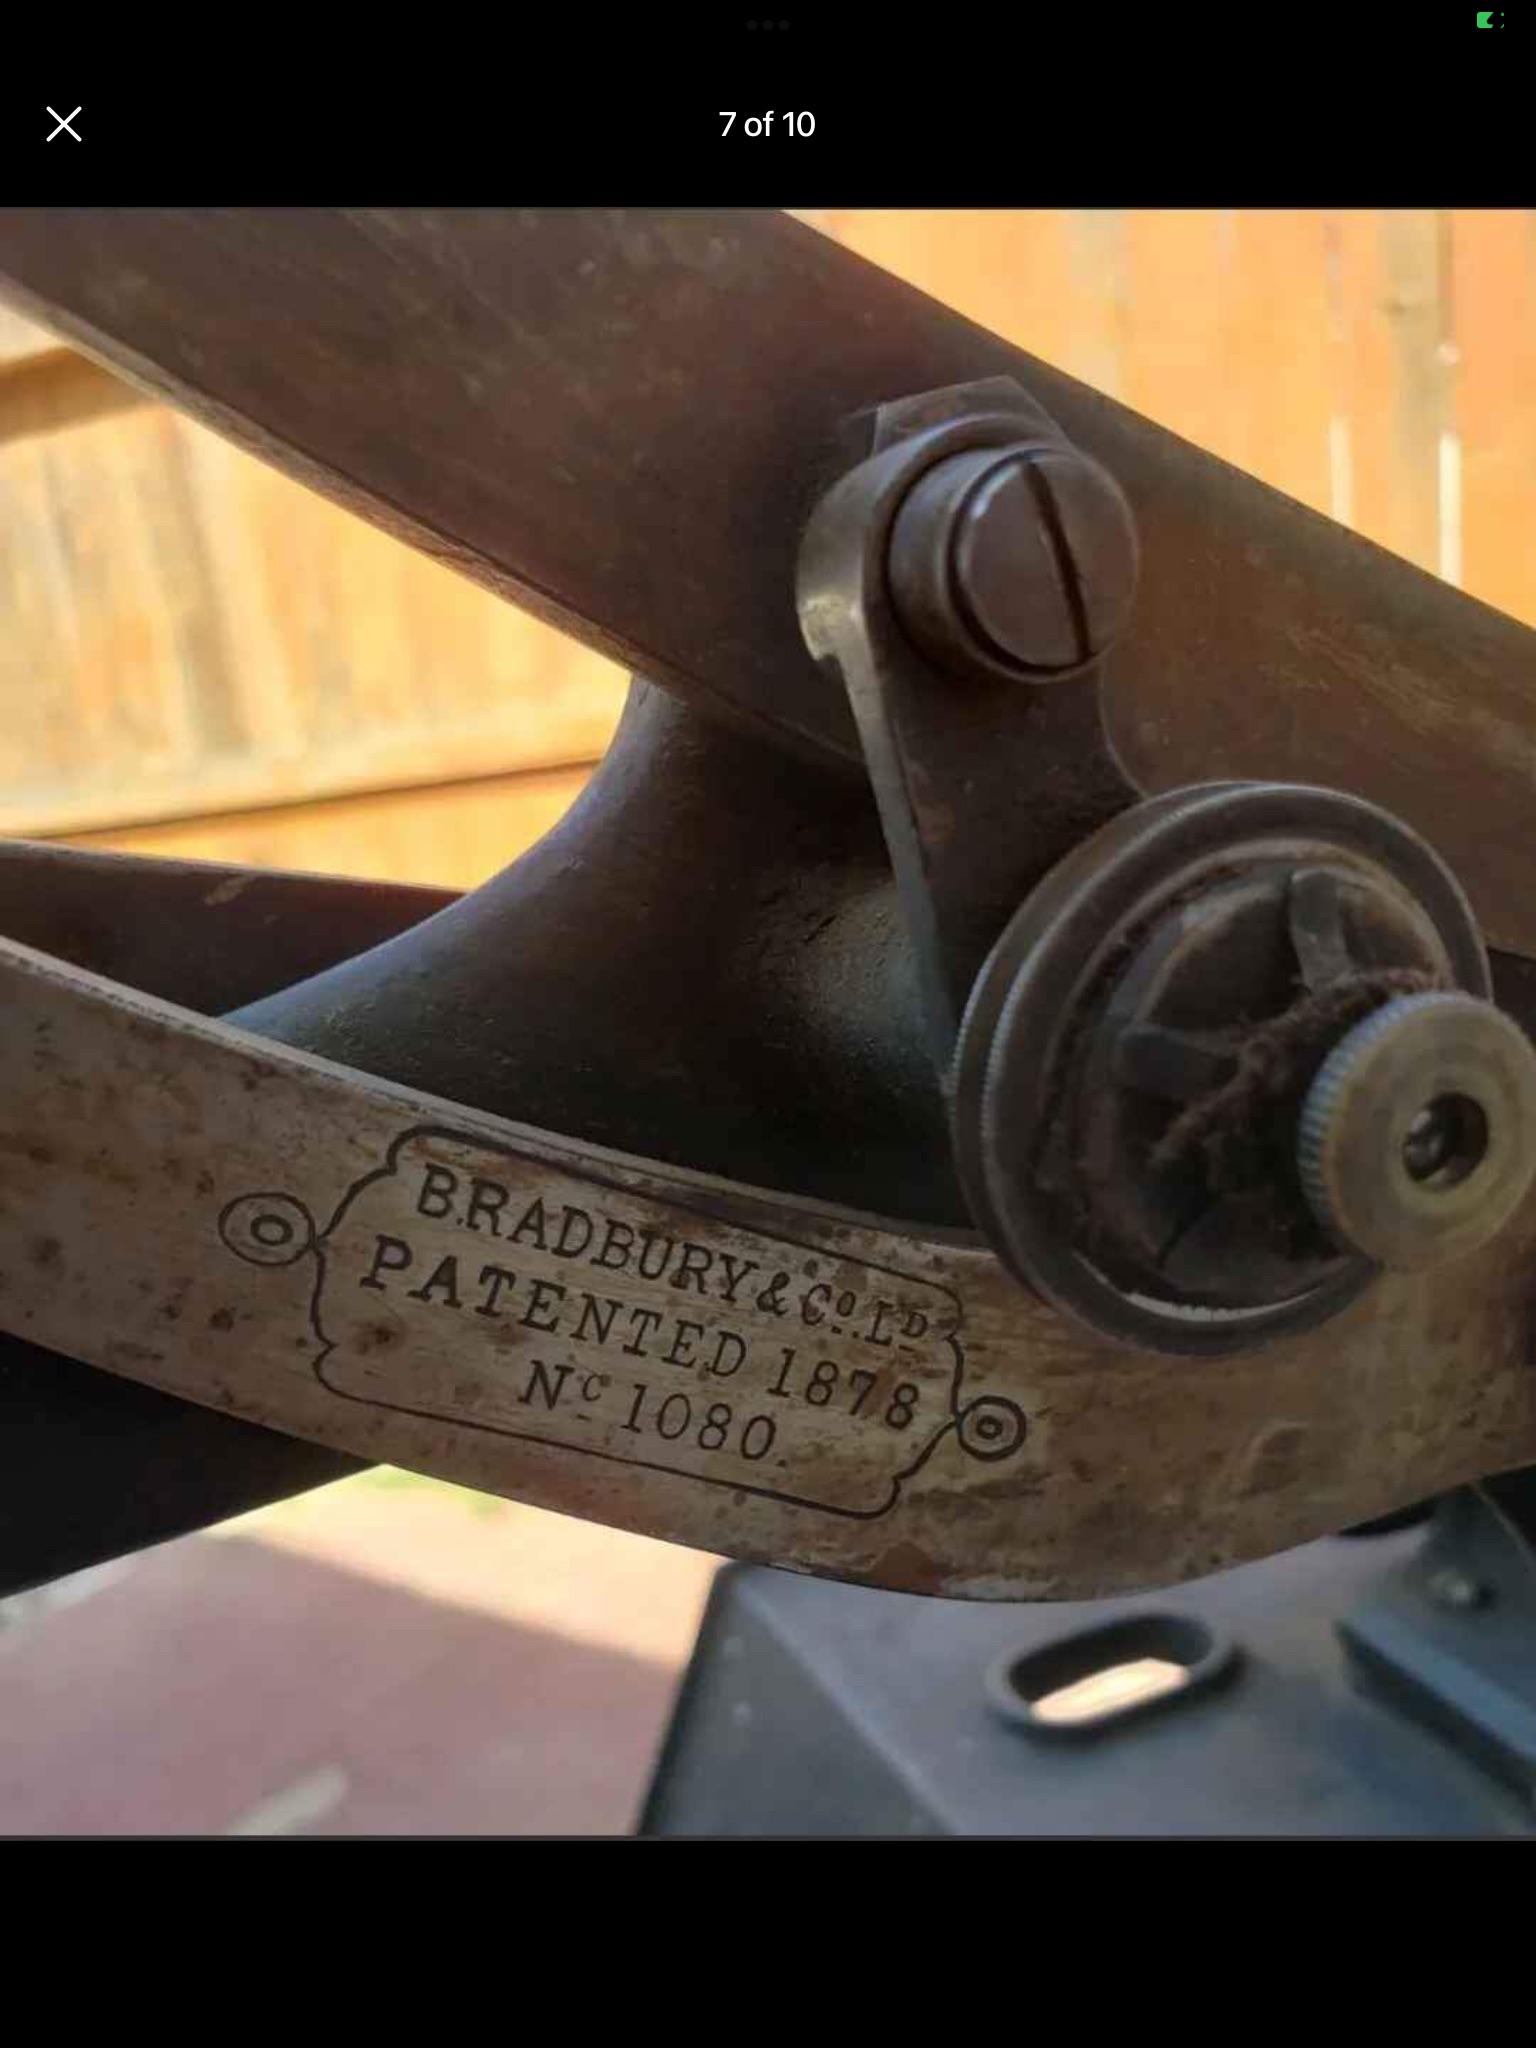
I’ve read through a number of past posts here about similar machines, but nothing specifically about a Bradbury - and it’s definitely stamped a Bradbury. From what I gathered these were made in the UK up until the early 1900s and something like 70,000 were sold here in the US. It is interesting how many different companies made their version of this design. This machine popped up a few hours away and I’m trying to gather a little information to decide if it’s worth seeing in person - wondering if anyone has used or even inspected a Bradbury A1 compared to one of the German versions? My biggest question is what kind of stitch length is common with these really old (about 1900) machines? If it only had a tiny little stitch u dear 10 spi I’ll probably pass, but I don’t have any clue. They were sold to shoe makers so it seems stitch length wouldn’t be too short. I have a Chinese patcher and would like to get a similar design, but higher quality machine that I don’t mind putting time into to tighten up, smooth out and modernize a bit. Bradbury marketed these as industrial machines and had hardened wear surfaces. Theres nothing fancy about it, but the metal parts seem decently machined and surface finishes are much like any other old sewing machine, so not too bad and worlds above a Chinese patcher. I’ve finally collected enough equipment to machine, heat treat and precision grind parts and this seems like a fun project to hopefully end up with a fun conversation piece.


-
Another person looking for machine advice
DonInReno replied to needlesnpins's topic in Leather Sewing Machines
I bought a Consew 206rb from a professional curtain and upholstery person - she was replacing it with the newest version of the same machine and had no complaints about its capabilities. You will find over a dozen different machines from different makers that look surprisingly similar - it’s not your imagination - this is the poster child for the type of machine most upholsterers prefer day in and day out. You’ll do well with any of the most popular triple feed upholstery class flat bed machines. If a friend had a $1,000 to $1,500 budget, I’d suggest a used Consew, Juki, Cowboy, or Singer that is maybe 10 to 30 years old, complete and in sewing condition with older looking table and old style of motor - you’ll want at least $100 in specialized presser feet, then spend the last $250 on a new servo motor and speed reducer. You can always upgrade the top of the table down the road for $200 or so. Most professional upholsterers would chastise me for suggesting a speed reducer because speed is money, but every single one of them does a lot of slow speed operations with a lot of manual hand wheel turning in detailed turns and whatnot. A full speed industrial will operate at twice the speed of the residential machines you’re used to. A speed reducer greatly reduces manual hand wheeling and can always be bypassed for jobs with long straight seams. The type of work and the sewing speed you like dictates this, but anyone new to industrial machines will benefit from the reducer. Getting a good deal on a used machine is often a matter of waiting and scanning both dealers and online - don’t be discouraged if none are available today - next week, or the next, or the next, something too good to pass up will come along. Just be sure to check to make sure the model is a triple feed - some look similar but are only needle feed or a simple non-walking foot single feed. Unless it’s a new machine with warrantee, you’ll need to find a knowledgeable industrial service person in case you need a hand with adjustments - not everyone understands industrial machines. Best of luck - you’ll really enjoy it! -
Lol I forgot to say to check the bobbin thread isn’t being pinched in the bobbin case opener, or in a groove in the bottom of the feed dog. I bought one old factory machine that had a ridiculously deep groove in the bottom of the feed dog for some reason - like it was sewing something that required extra bobbin tension - that drove me nuts because I couldn’t see the groove, but something was obviously snagging thread as it was pulled up.
-
Whenever tension adjustments seem harder than they should be it’s not a bad idea to double check the thread path for issues. Watch out for thread that develops occasional kinks between the spool and machine, or even thread that sticks to itself and comes off the spool jerky (old bonded thread does this). Badly worn thread guides with deep grooves can create extra tension when thread is down in the groove and alternating light tension when it’s not. Then there are often grooves in the tension disks that might contribute to problems - tension disks are cheap to replace, but you can often sand and polish out light grooves. Likewise, there may be deep grooves in the bobbin case, or a squirly spring. Tension disk springs that are too light require a lot of turns to adjust and if they bottom out just need to be replaced. The biggest gotcha that will drive a person crazy until it’s discovered is a tension release that won’t allow tension disks to fully close, making it strangely difficult to get knots to center - it should be fairly straightforward to add a few cranks on the tensioner and have the knots move where you want them to be. It’s common for replacement tension disks to have slightly different shapes/thicknesses so it’s a common issue to check. On 111w155 type of machines it’s about the size of a 15g nail and is filed down or replaced with a longer one if the release isn’t opening the tension disks when presser foot is raised - have no idea what your machine uses, but the tension release will have some means of adjustment. Ideally, lifting the presser foot part way, like when changing directions in a sharp corner or reversing, won’t release thread tension, but fully raising the foot does. Having said all that, often the first thing I’ll do because it’s the easiest is go up a needle size and see if that clears things up. The knot has to have room to be pulled up in the leather. All the other issues in the thread path may still need to be fixed, but it lets you know that the hole isn’t the problem. You're going to run out of things to adjust on this machine and have to pick up another fixer upper!
-
The 211w156 is the walking foot with reverse. I’d guess the 256 has the oiling felt thread guide and the take up lever with the strange hood - we can’t see it, but I’m guessing you have the big bobbin. The “G” is made in Germany while the “W” machines are made in the US. Here’s a manual that should work. https://www.supsew.com/download/Singer/Singer 211G155, 211G156 Service Manual.pdf
-
Yep, after the needle starts to rise (about the thickness of a nickel is most commonly recommended for most machines) , the eye should be 1/16” BELOW the tip of the hook as they pass each other. That might be what you said - I’m just double checking. The horizontal gap BETWEEN the needle and hook needs to be as close to zero as you can get without touching. Most manuals give a range for this gap, but as close as possible is ideal - that’s not just my option, but guys managing big sewing shops have said zero is just right. Heck one of those guys said if the needle is deflected a a tiny amount he won’t change it. Its a little hard to tell how sharp that hook is, but it looks a little blunt, which doesn’t help it grab the thread cleanly. It may sew great, but if you still get odd skipped stitches, or the hook seems to be impacting the thread once in a while instead of cleanly hooking around it, then you might look into sharpening it a bit. Its hard to explain, other than recommending looking at a nice sharp hook and duplicating the angle and polish on it. Probably more hooks have been damaged beyond repair than have been saved by well intentioned first timers, but you’re pretty handy and I’d bet it’s something you might try so I’ll briefly hit on it: Keep in mind you aren’t taking material away from the needle side or outer diameter of the hook. Also, don’t reduce the length. Having a good hook right there makes it easy to know where to remove material. It won’t be perfect - we’re just reducing any bluntness. I picked up an old singer with 1/4” of the hook broken off - sharpened what was left until the new hook arrived - it’s sewn threw a pound of thread without a single skipped thread so I’ve never installed the new hook yet. Sandpaper glued on a popsicle stick, or even fingernail emory boards work well - the tip of the hook is thin and it won’t take much. I’ll use 220 grit to get the shape, then 400 followed by 800 to get any scratch marks out. Finally going over the whole hook with 1200 or 1500 grit cleans up any minor surface rust and blends the new tip in so nobody should be able to tell you’ve done anything. Anyway, good job on your progress! You are learning your machines inside and out. edit: I almost forgot to mention, if at all possible keep an original Singer hook - replacement Chinese hooks are dirt cheap, but they are often soft metal and may not be shaped correctly.
-
Lol
-
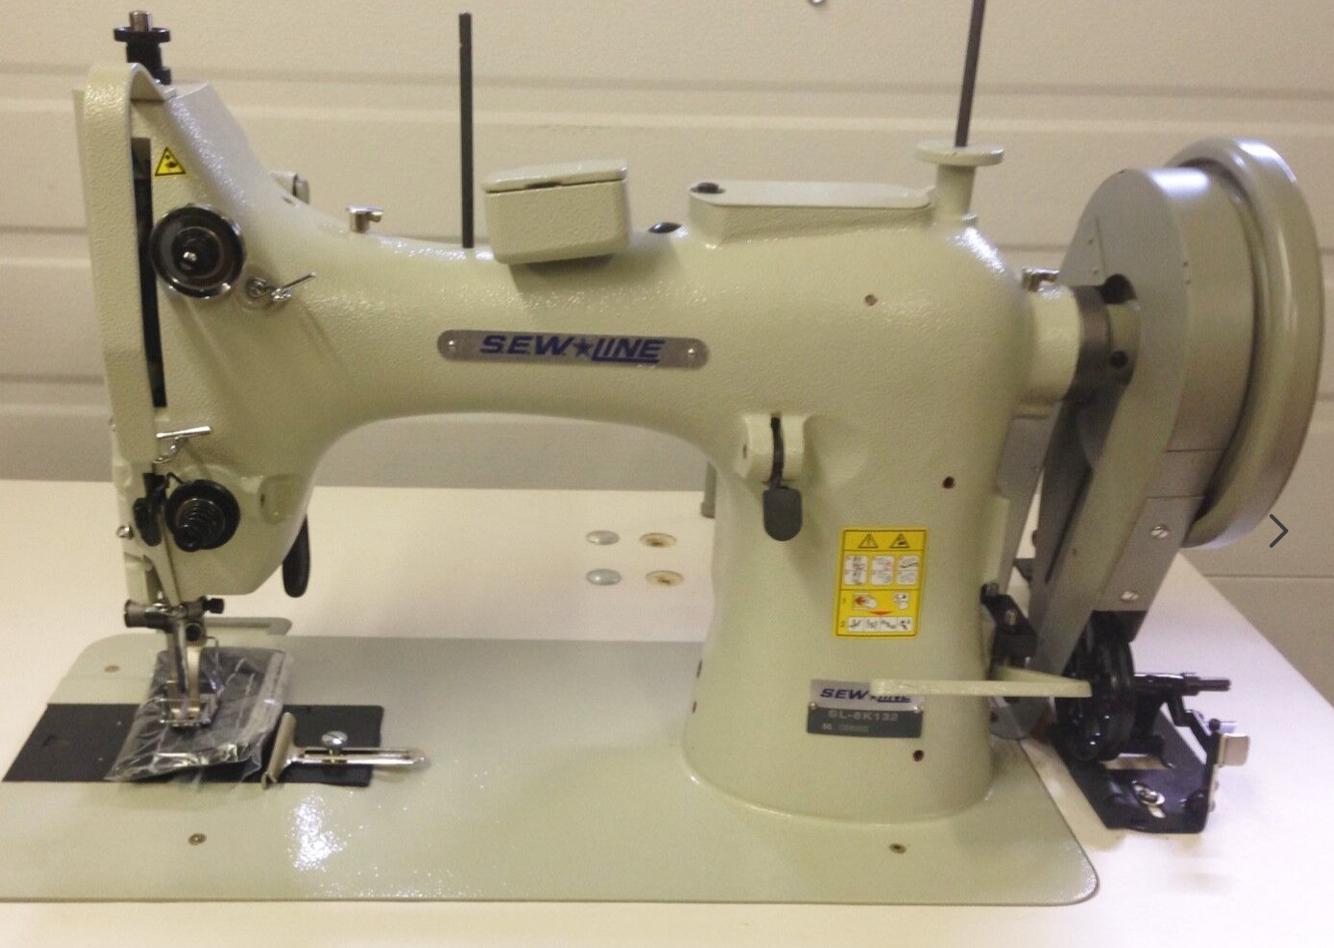
I tried to search for the Australian company and google won’t allow it - it’s like the vast majority of international companies are not searchable like they used to be. Anyway, this is the 6k132 that has both reverse and what I believe is a true walking foot.

-
It’s my understanding the 136k10 is bottom feed only and doesn’t have a walking or jump foot. I’ve never seen one in person, but what the heck I’d buy one for the novelty of it. When I was really looking hard for a 136k6, it seemed like a number of 136k10s and whatever other numbers that designate bottom feed only machines, would pop up from central and South America. Perhaps those were more popular down there than the us? I seem to recall an Australian company making or rebuilding 136k6’s into a full walking foot version, but that was never a Singer factory option. The 136 is a popular machine down under. There is also at least one Chinese manufacturer currently making a full walking foot, but it’s
-
Here’s a video I hadnt seen before with some upgrades: If someone new to these hasn’t seen it, this is probably the most extensive custom build I’ve seen:
-
There’s also a Yakumo TDU-N62 that looks just like the Nakajima. It’s interesting to see it in white - at first it looked like a new machine, but it’s probably a well done paint job. The painted over screw heads gives it away. Theres a YouTube video on this model talking about setting the presser feet so they walk correctly.
-
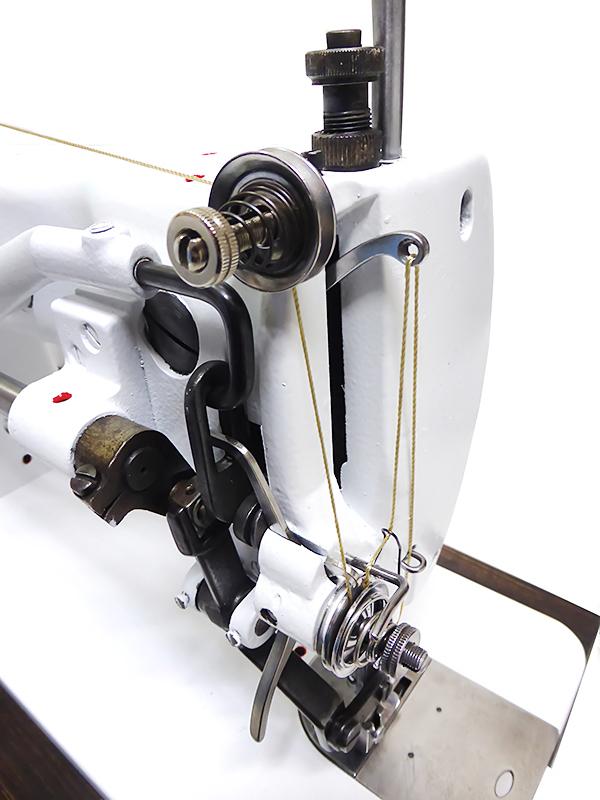
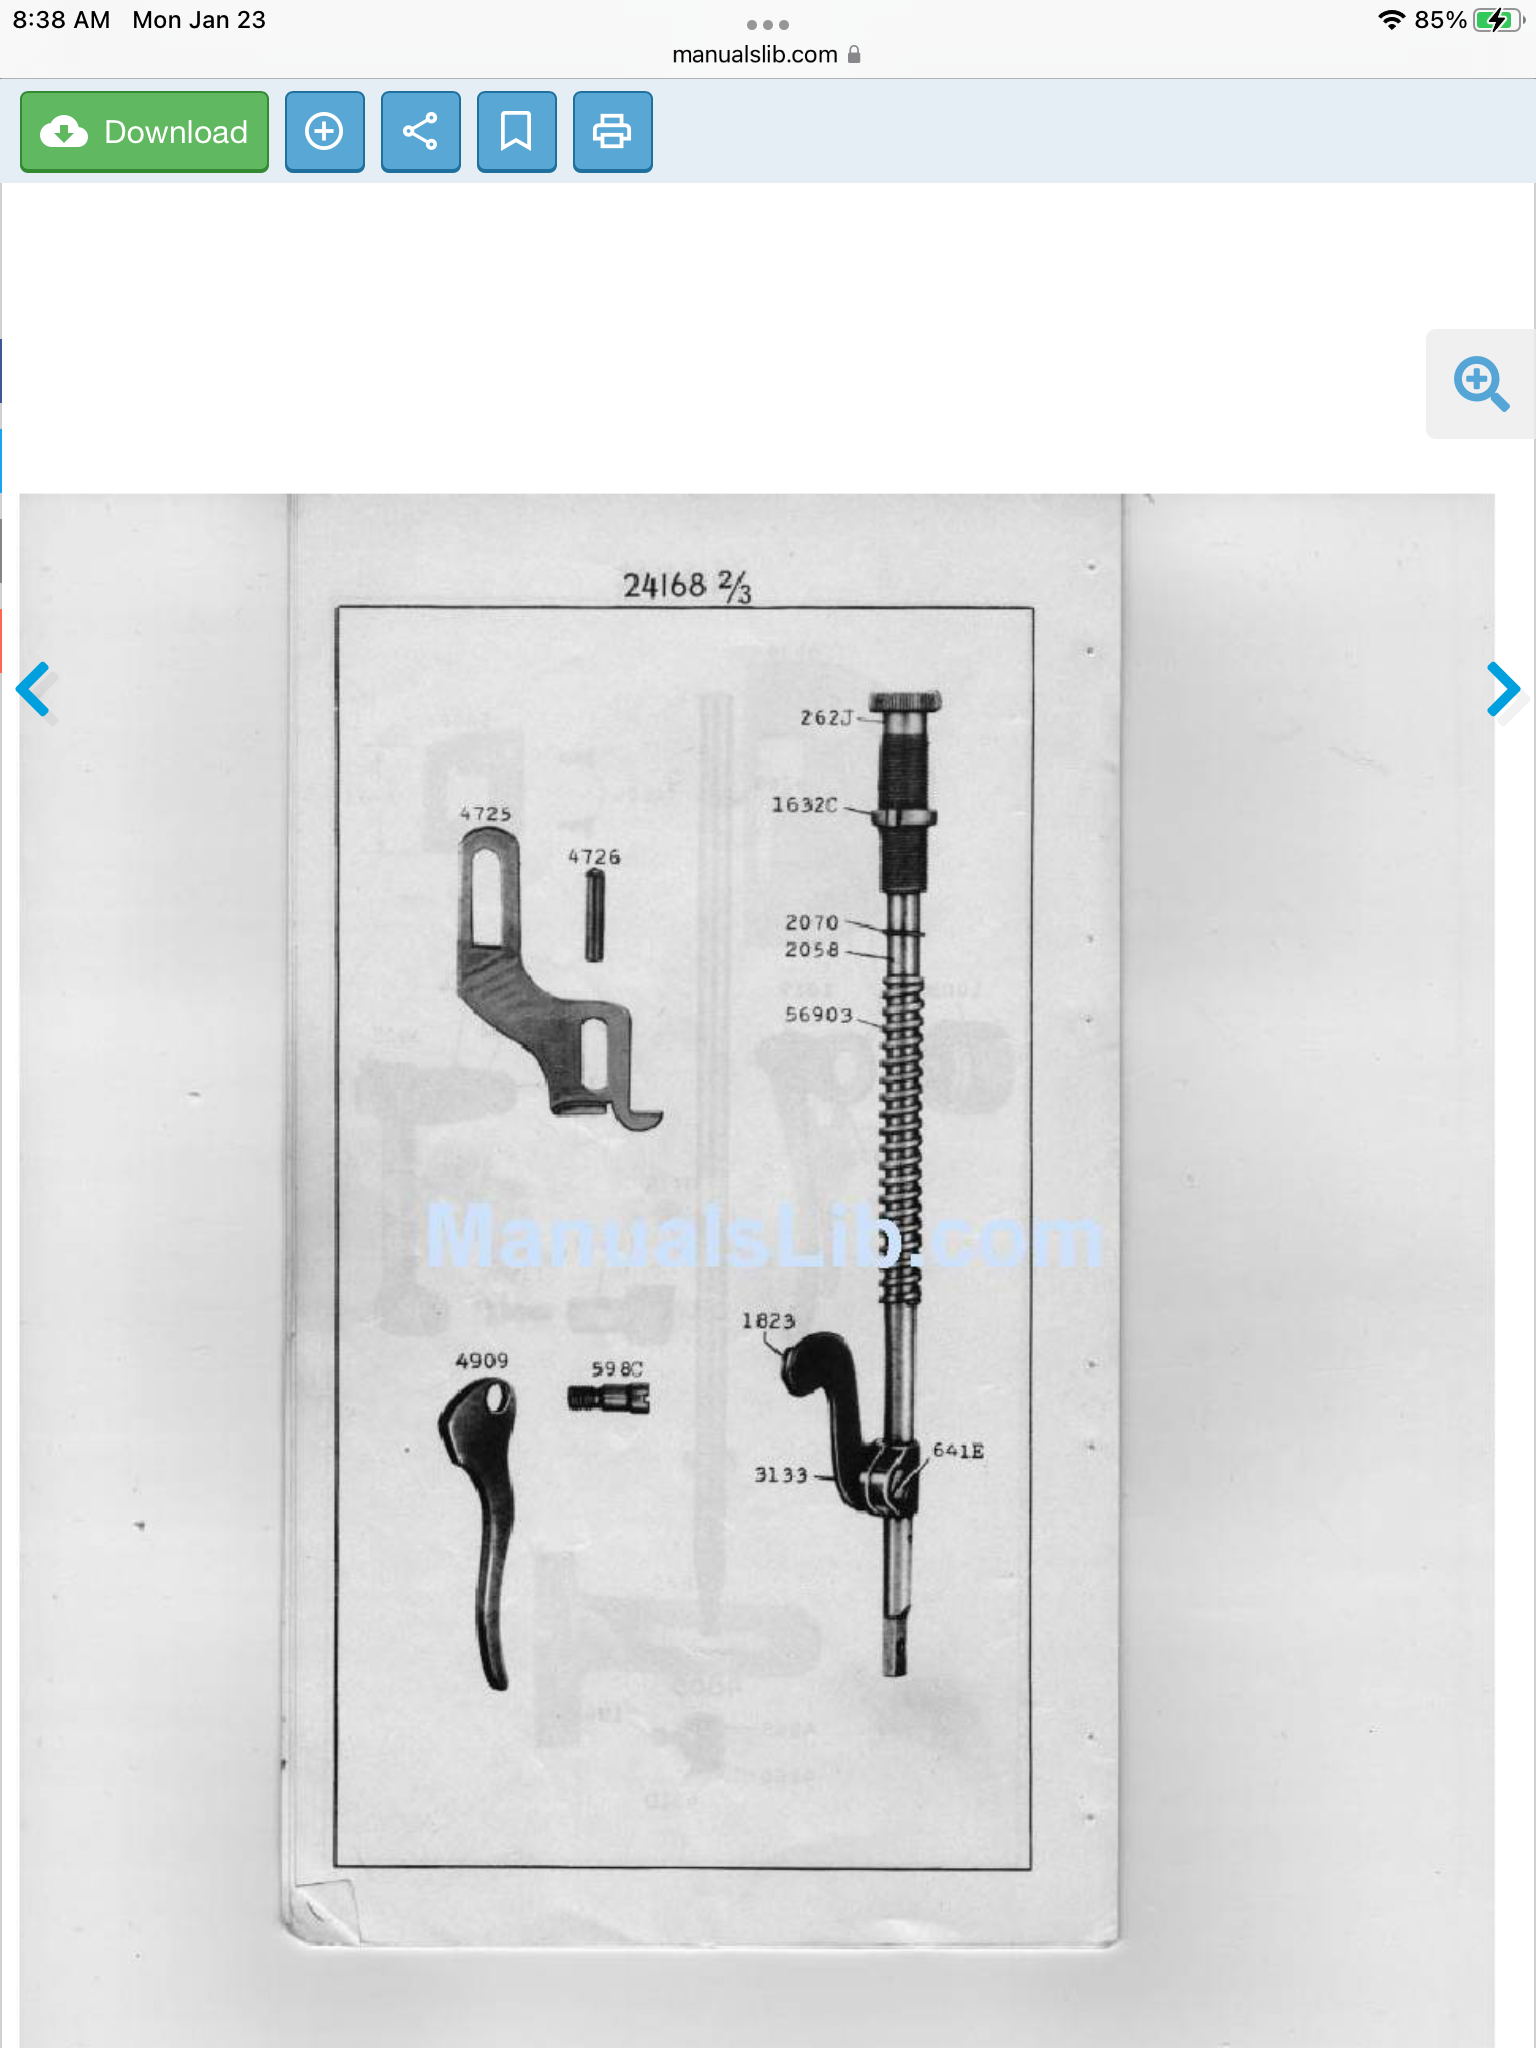
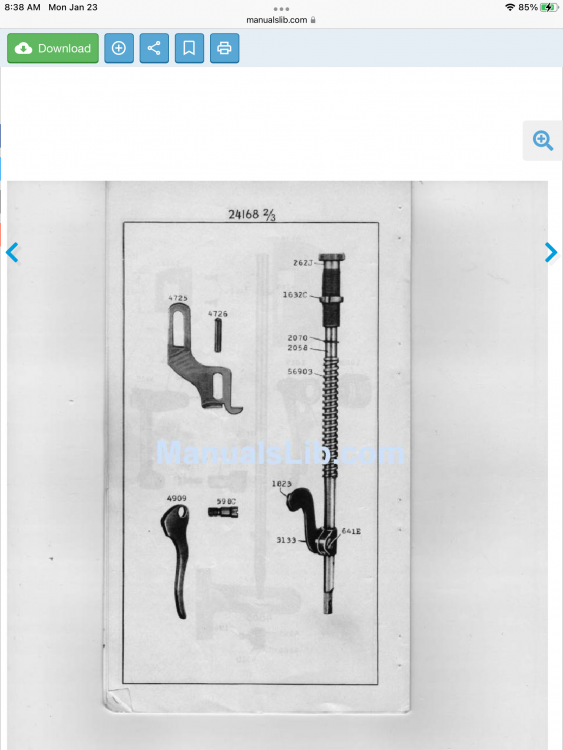
Now I’m curious - it’s a pretty simple design so it’s probably something obvious once you see it. Rex machines are often (always?) made by someone else and simply rebranded so I started there. A quick search shows the Nakajima TDU N62 as the same machine - there’s a lot more information on the Nakajima. The design also appears to be based on the Singer 16-188, which there is even more information on. I’m pretty sure Consew also copied the Singer, but I don’t know the model number off the top of my head. Anyway, the singer parts manual was the easiest to download and the attached page shows the presser foot lifting lever and related parts. It wouldn’t surprise me if the presser shaft clamp #1823, or knee lifter gizmo #4725 is either broken or not contacting the lifter knee/lever for some reason. It’s not uncommon for production users to really jamb on the knee lifter and over the years those parts simply get fatigued and break. As far as the presser shaft bar contacting the nut - I’ll bet it’s not the correct nut - Nakajima photos show a very thin looking nut. Hope that helps.
-
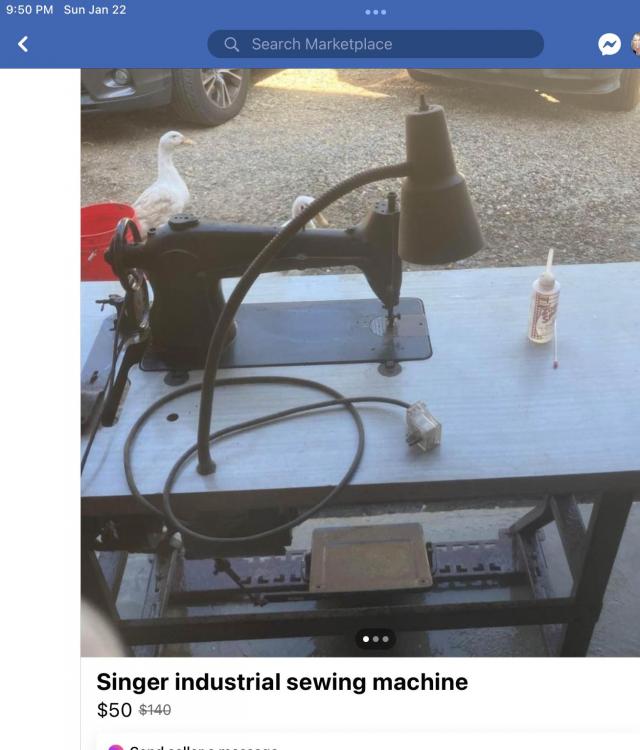
Unfortunately there’s often a reason simple sewers like this are given away - a lack of all the parts is often a larger hurdle to overcome than you’d think. It’s definitely not a juki 555. Since parts were stripped off your machine, you should inspect it closely - no telling what other parts were swapped out and your machine might have the crap parts on it. You could get all the other parts only to find out it has a bad hook that can’t be found. Simple sewers like this, from this awkward time period, are dirt cheap and sometimes free - thousands of them are sitting unused in grandmas shed or garage. Personally I’d recommend spending your time looking through the fb and cl ads in your town until a machine comes up that is fully functional for $50 - or free!
-
We have to know what you are using in order to help. Basically we don’t assume anything is set up correctly, if it came straight from the dealer or not. It may seem strange for us to ask for specifics as well as photos, but this is how experienced people troubleshoot things like this. 95% chance it’s operator error or an error on the distributors part on how he’s set things up.
-
You might check out Uwe’s tutorial on adjusting the timing. It looks to me the hook is late to the party and barely grabs the thread loop at the needle - being a little late is also not allowing the thread to slip off the hook soon enough as the top thread is pulled up causing that snapping noise.
-
Top load bobbins and needle guide
DonInReno replied to MainiacMatt's topic in Leather Sewing Machines
I wouldn’t worry about that - machines of both types have great track records when used correctly. None of the upholstery designs could be considered fragile and some form of needle protection is built into all of them. Good sewing technique and good quality needles of the correct size will prevent 99% of problems with needles flexing into places they shouldn’t be and damaging things. A speed reducer will help even more because you’ll have more control and be less likely to have the material pull the needle one way or another. Having said that, some designs are more idiot proof than others. I picked up one horizontal bobbin machine that had a history of needing a hook every few years due to needle strikes, which didn’t seem right. Digging into it, the problem was a combination of operator error (thin needles and thread on rather thick upholstery) and error on the part of the guy maintaining the machine who installed poor quality hooks that were a bad design that crowded the needle and we’re easily damaged. If you get a used machine of any brand, or a new inexpensive brand, the odds of a multitude of issues goes up - just keep in mind that if you are breaking or bending a lot of needles there is probably a reason that shouldn’t be too hard to figure out. Buy good quality needles and more than you need and change them out at the first sign of a problem - a bent needle just ups the odds of damaging something. Best of luck - you’ll have fun sewing with that type of machine - easy to learn and you’ll never outgrow it for other types of upholstery. -
I can’t say if it applies to that machine, but many fabric machines designed for thin material have a hook that doesn’t feed heavy thread well, too light of presser foot tension, and thread tensioner springs that are also too light, in addition to needle system. It seems like Sailrite used to modify and sell them under their name for boat owners - one of the sailrite or boat owner forums will have guys who have used them for semi heavy sewing. I remember one guy who said his sewed up to 138. Many machines simply don’t have the needle travel for what you need no matter what needle is used. The crank that raises and lowers the needle either has enough stroke or it doesn’t. If the stroke length is long enough, sometimes just raising the presser foot shaft allows something thick to be sewn, but it would have to be dropped to sew fabric. If the needle bar hits the presser foot you could gain a small amount by filing down the bottom of the needle bar a bit - too much and the needle won’t stay put. Since you’re sewing dog leashes and not a load rated application, you may be able to pull some of the inner core out of the rope, or simply use a more pliable rope to get it flat enough to fit under the presser foot. Sounds like a fun project - let us know how it turns out!
-
I would guess this thread is bulkier and or stiffer than the polyester you’ve been using and there’s not enough room and or tension for the knot to fully pull up into the material. It might also have something to do with the amount of twist in that brand of thread, type of needle, or inconsistent tension caused by old thread not unwinding evenly off the spool, but I’d guess needle size first. Make sure to hold thread tight when starting the first back tack - leather is less forgiving of tension variations.