kgg
-
Posts
3,393 -
Joined
-
Last visited
Content Type
Profiles
Forums
Events
Blogs
Gallery
Store
Everything posted by kgg
-
I think they are basing the sizing for most types of fabric verses sewing leather. Remember when sewing leather the hole the needle creates has to be large enough so the fibers of the leather don't catch the thread as the needle cuts through. Example the Juki LS-1341 is rated for V138 with a 180 (#24) needle for sewing thick and tough material rather then rating the machine for Tex 210 (V207) based on the capacity of the needle. Just because you can stuff the thread through the eye of the needle doesn't mean it will stitch consistently or correctly. Some factors that need to be considered, thickness of the item being sewn, material type (cotton vs ripstop vs Kevlar vs leather(chrome tan vs veg tan)) and the shape of needle tip round to separate fibers or cutting to slice through to name a few. kgg
-
If you want to use V138 buy a machine like / similar to the class 341/1341 like a Juki LS-1341 or an older Juki LS-341 or their clones. Otherwise reduce the thread size to a max of V92 with the correct needles in your projects. Personally I think this is the wrong class / type of machine for your needs in 3.5 mm leather. If most of your projects are leather be done with it and get a new / used Class 341/1341 machine. kgg
-
The needle size is incorrect for Tex 125 (V138). Reference needle size to thread size ( https://www.tolindsewmach.com/thread-chart.html ). That size of thread you should use a 140 (#22) or 160 (#23) and in thick or tough leather 180 (#24). That said the PFAFF 335 is regarded as a binding machine with the older casing machines rated for a 120 (#19) for a Tex 90 (V92) thread. Reference manual ( http://docs.uwe.net/Pfaff-335-Instruction-Book-Old-Casting.pdf ). The newer body machines are rated to a 100 needle. When you go above the rated max's of the machine you could or probably will have problems with needle to hook clearances, etc. which then can result in other stitching / tension problems. kgg
-
Thank you. kgg
-
I did check with the Canadian main distributor: The Juki LS-1341 is still available, the Juki LS-1342 has been dropped and the LS-1342-7 has been replaced with the LS-2342-7 which has a longer arm. kgg
-
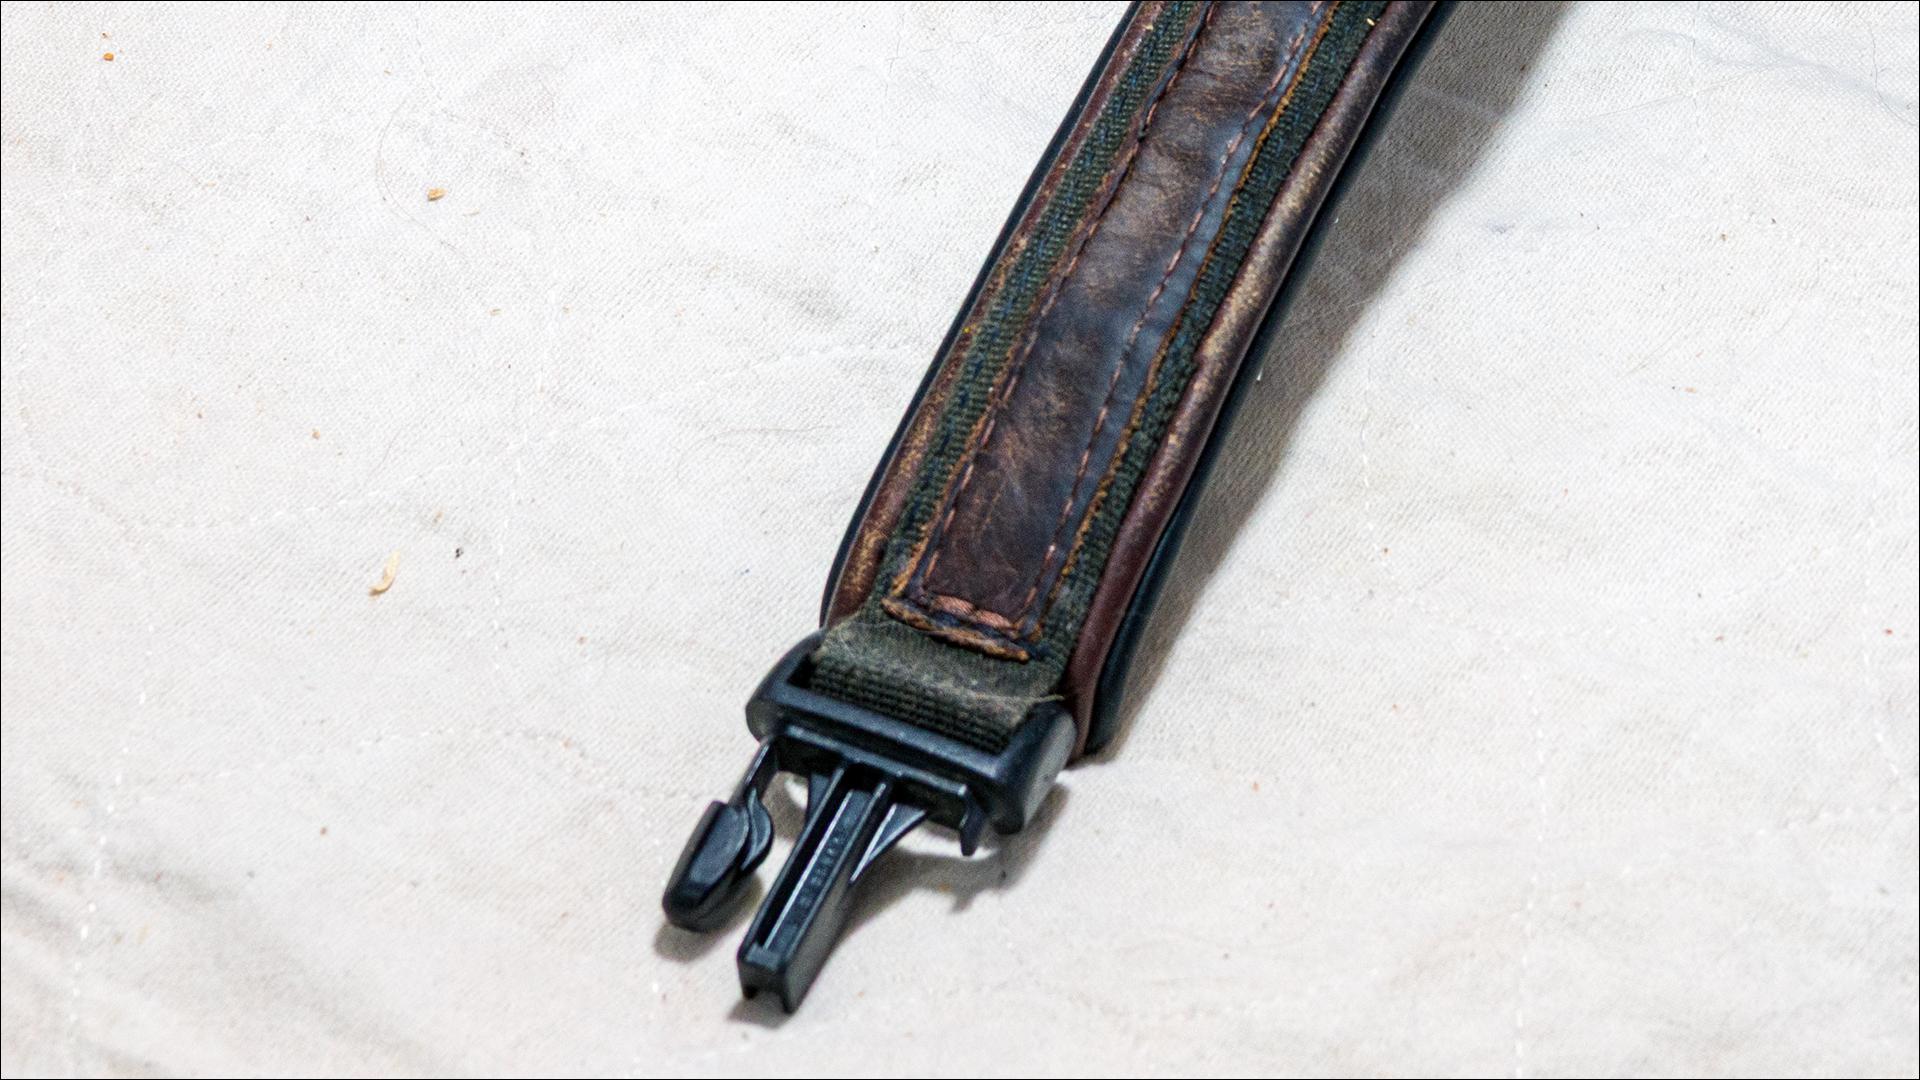
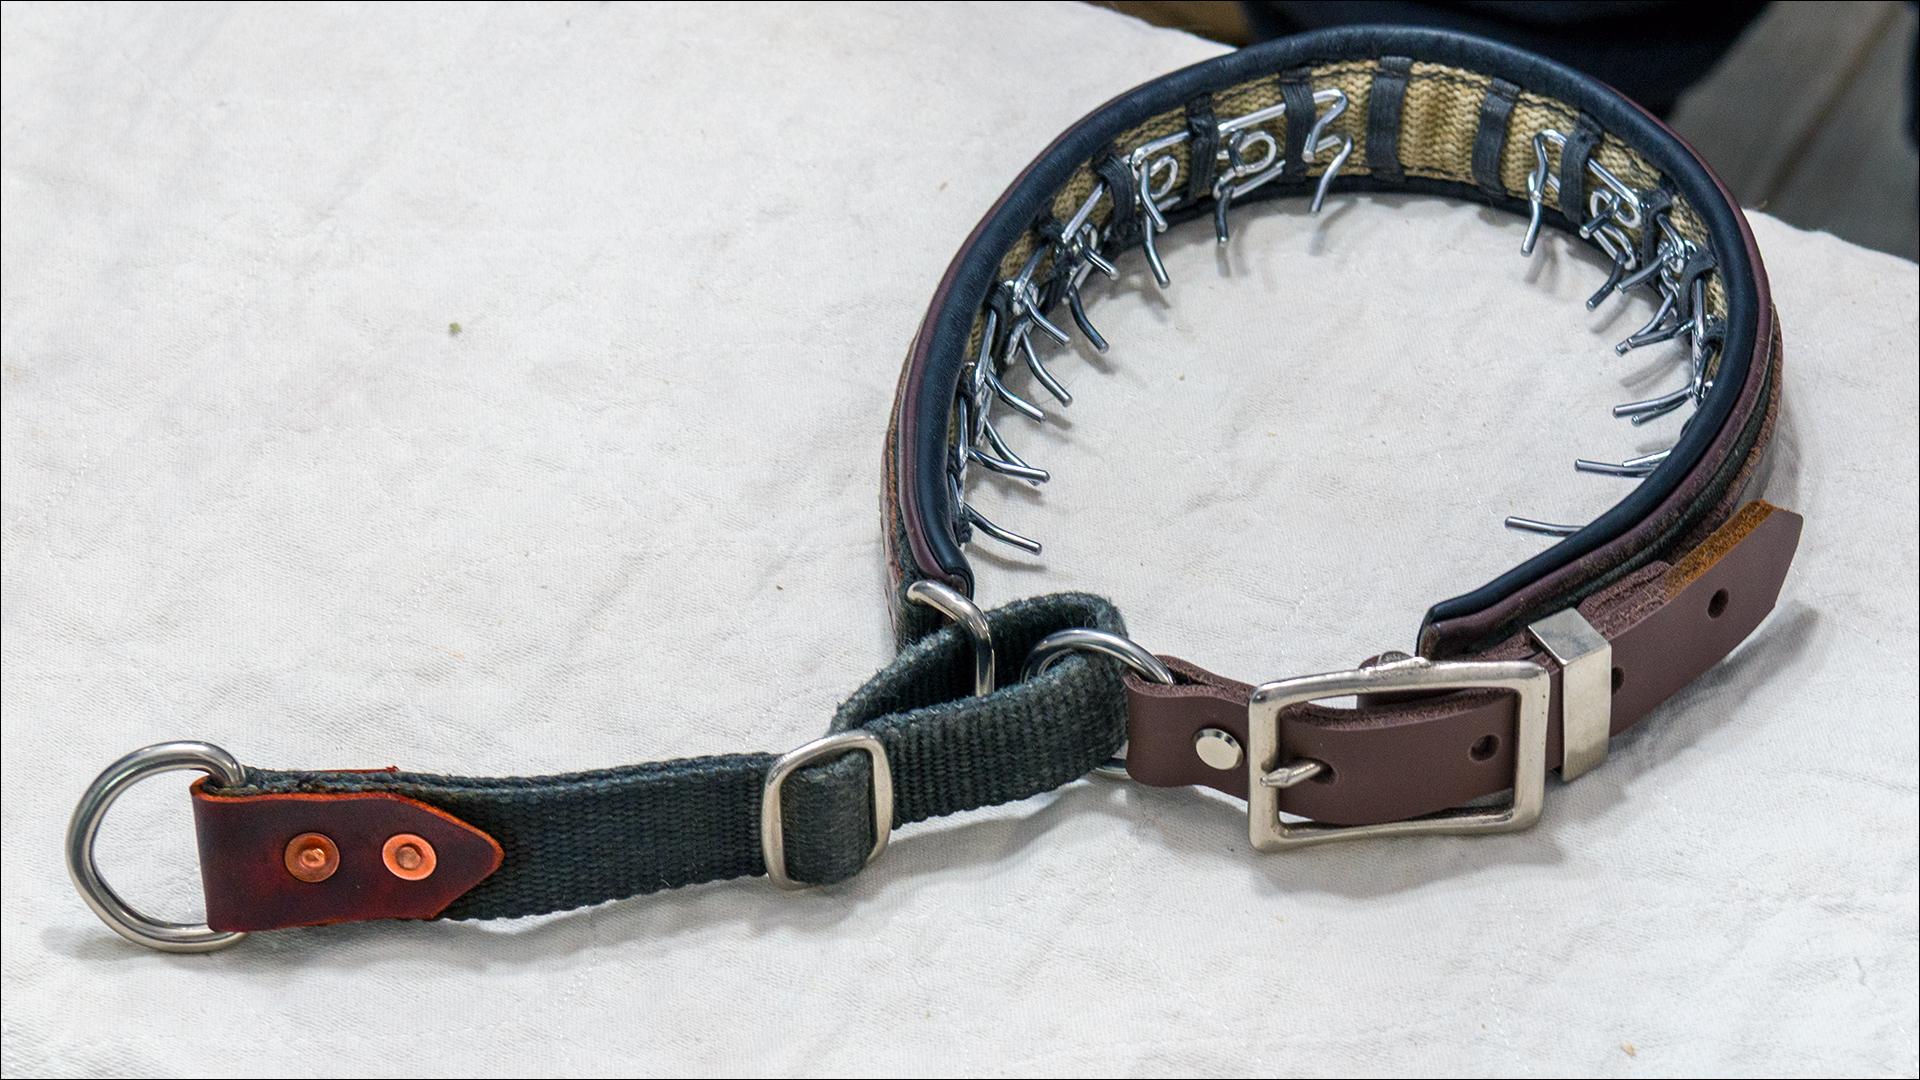
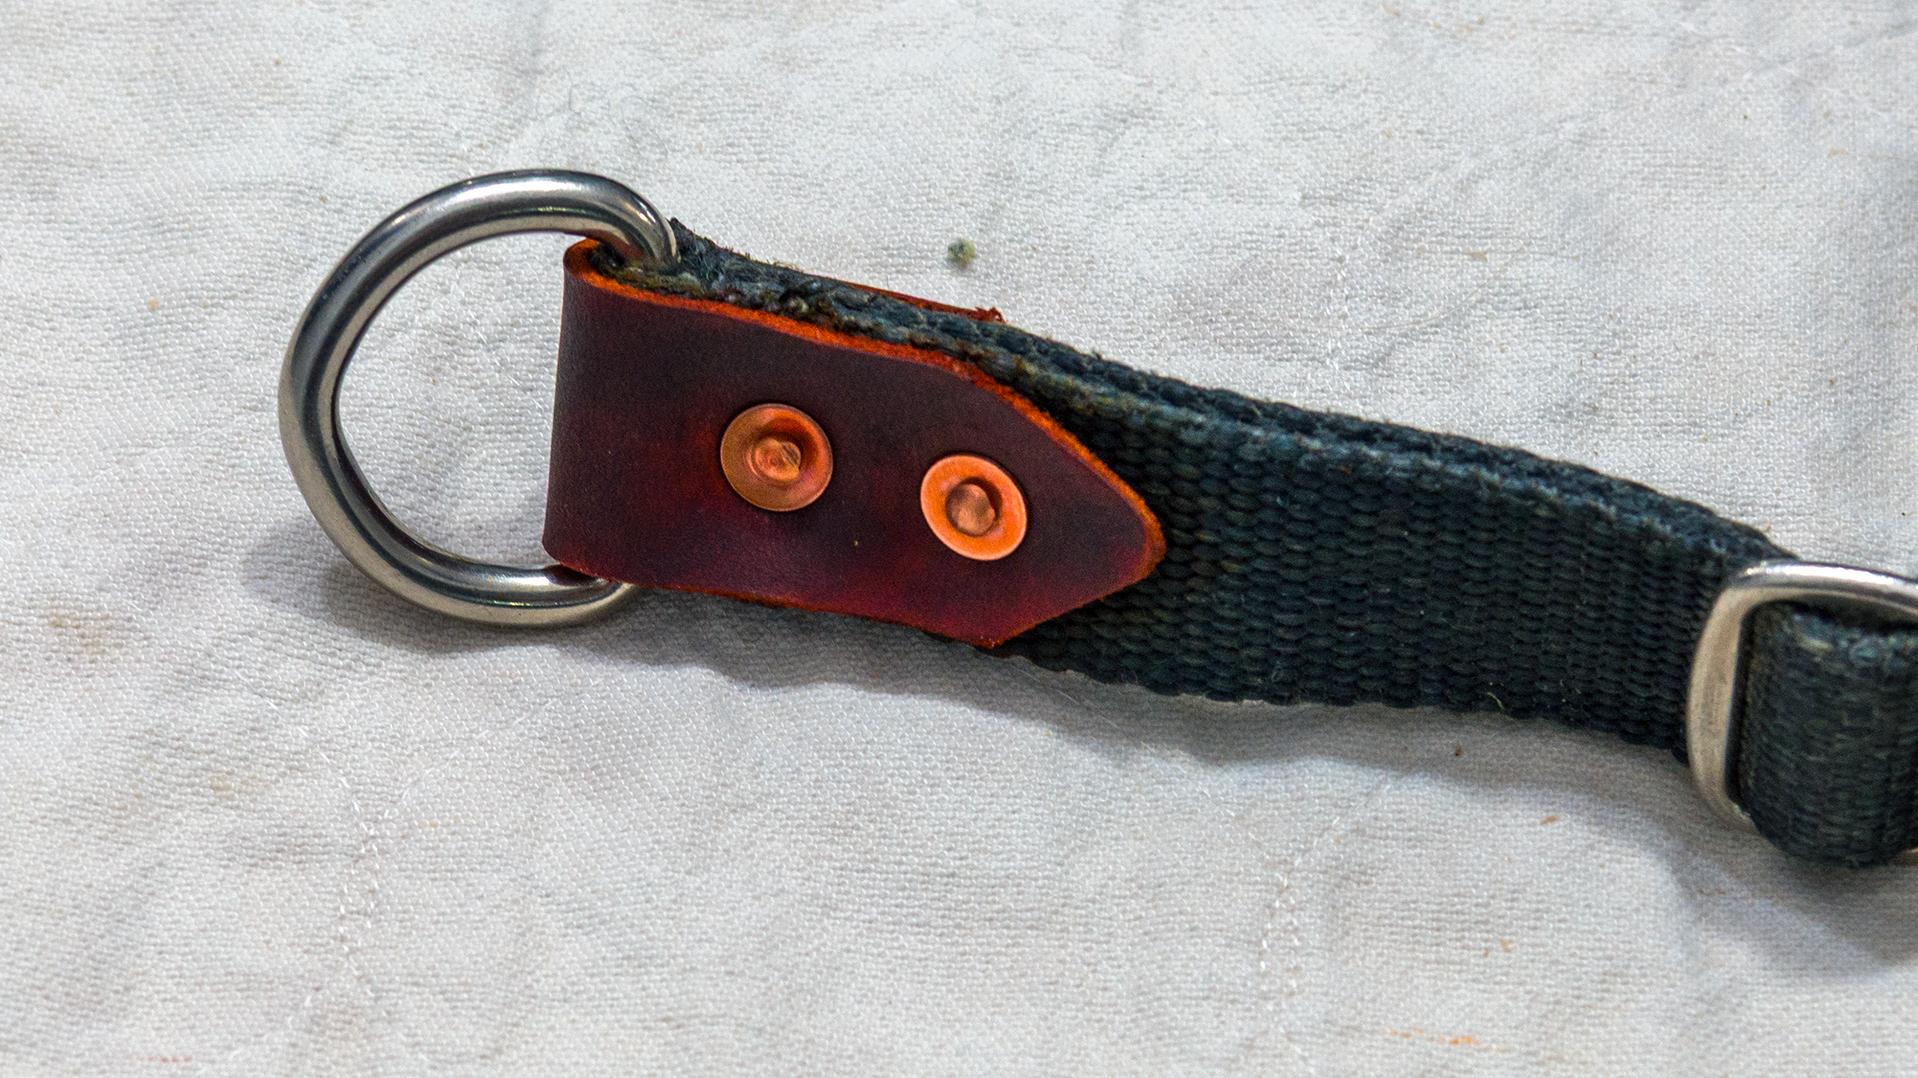
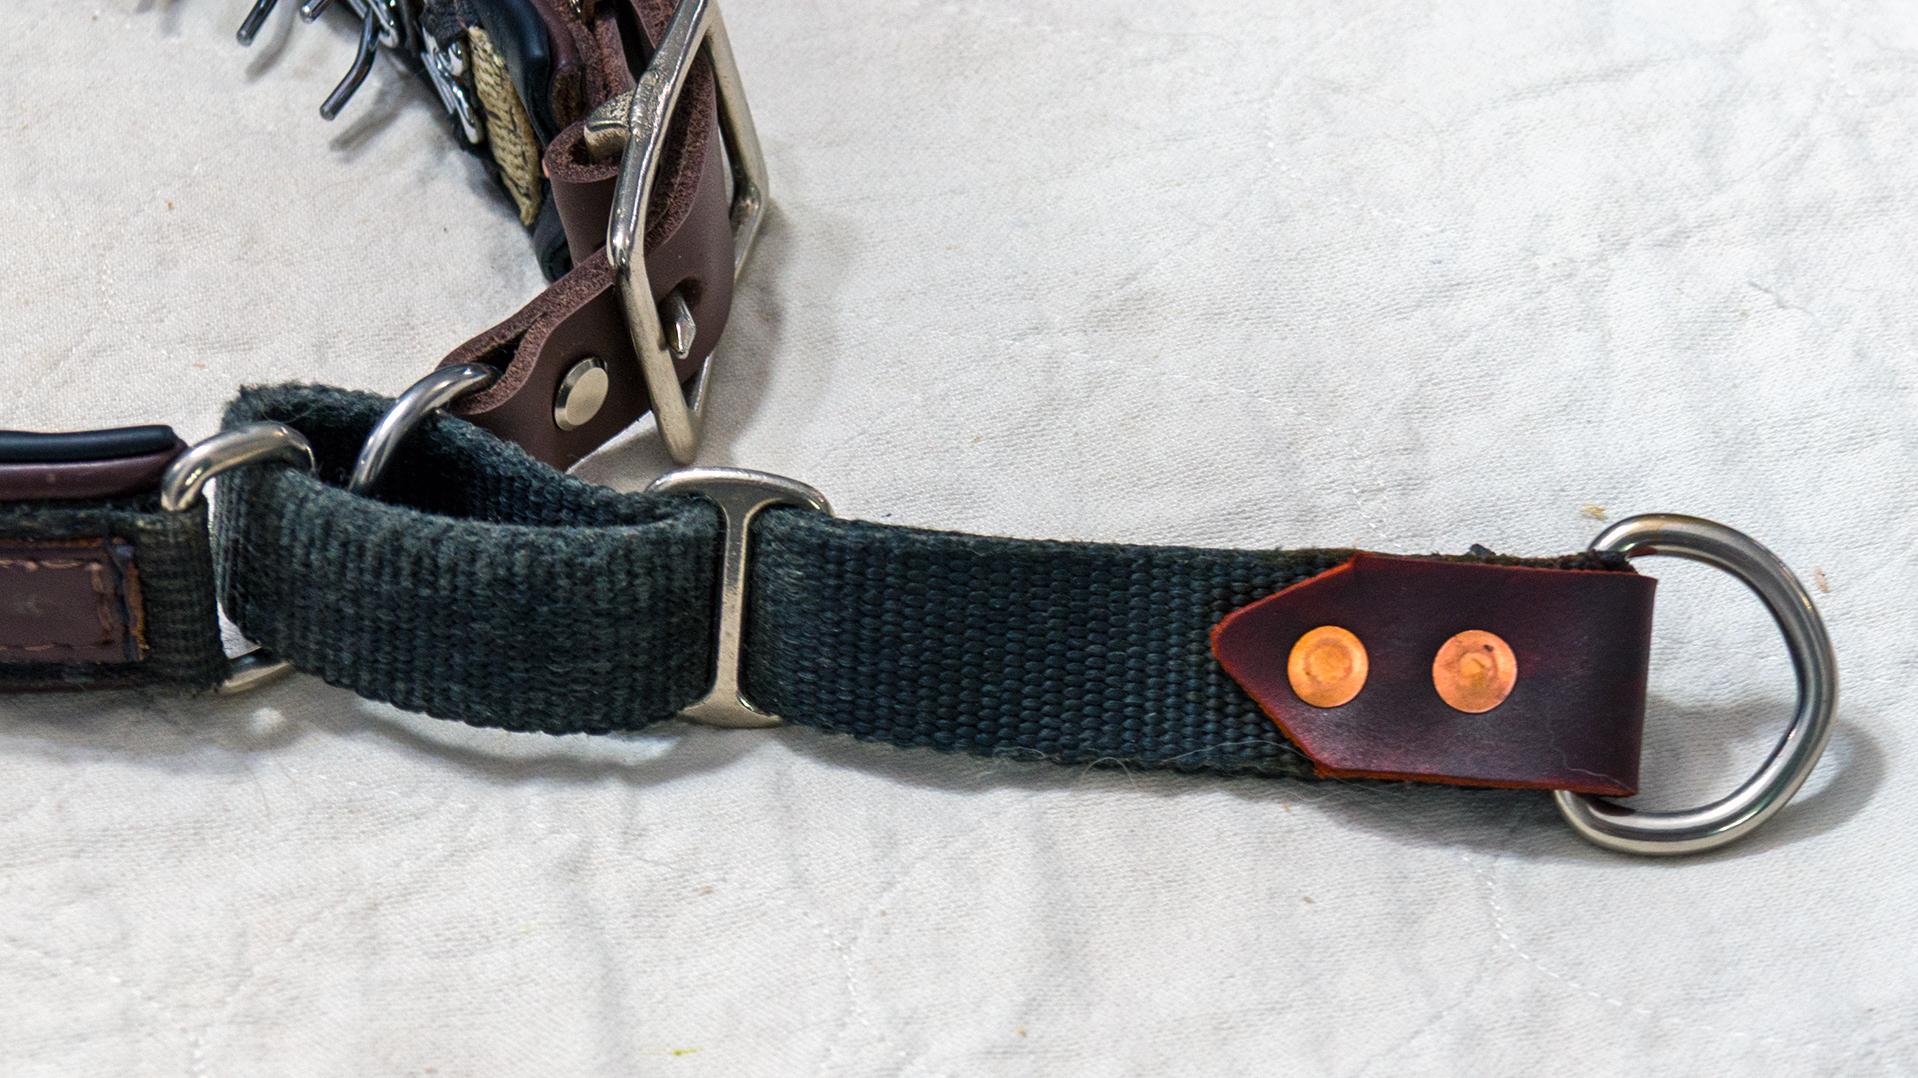
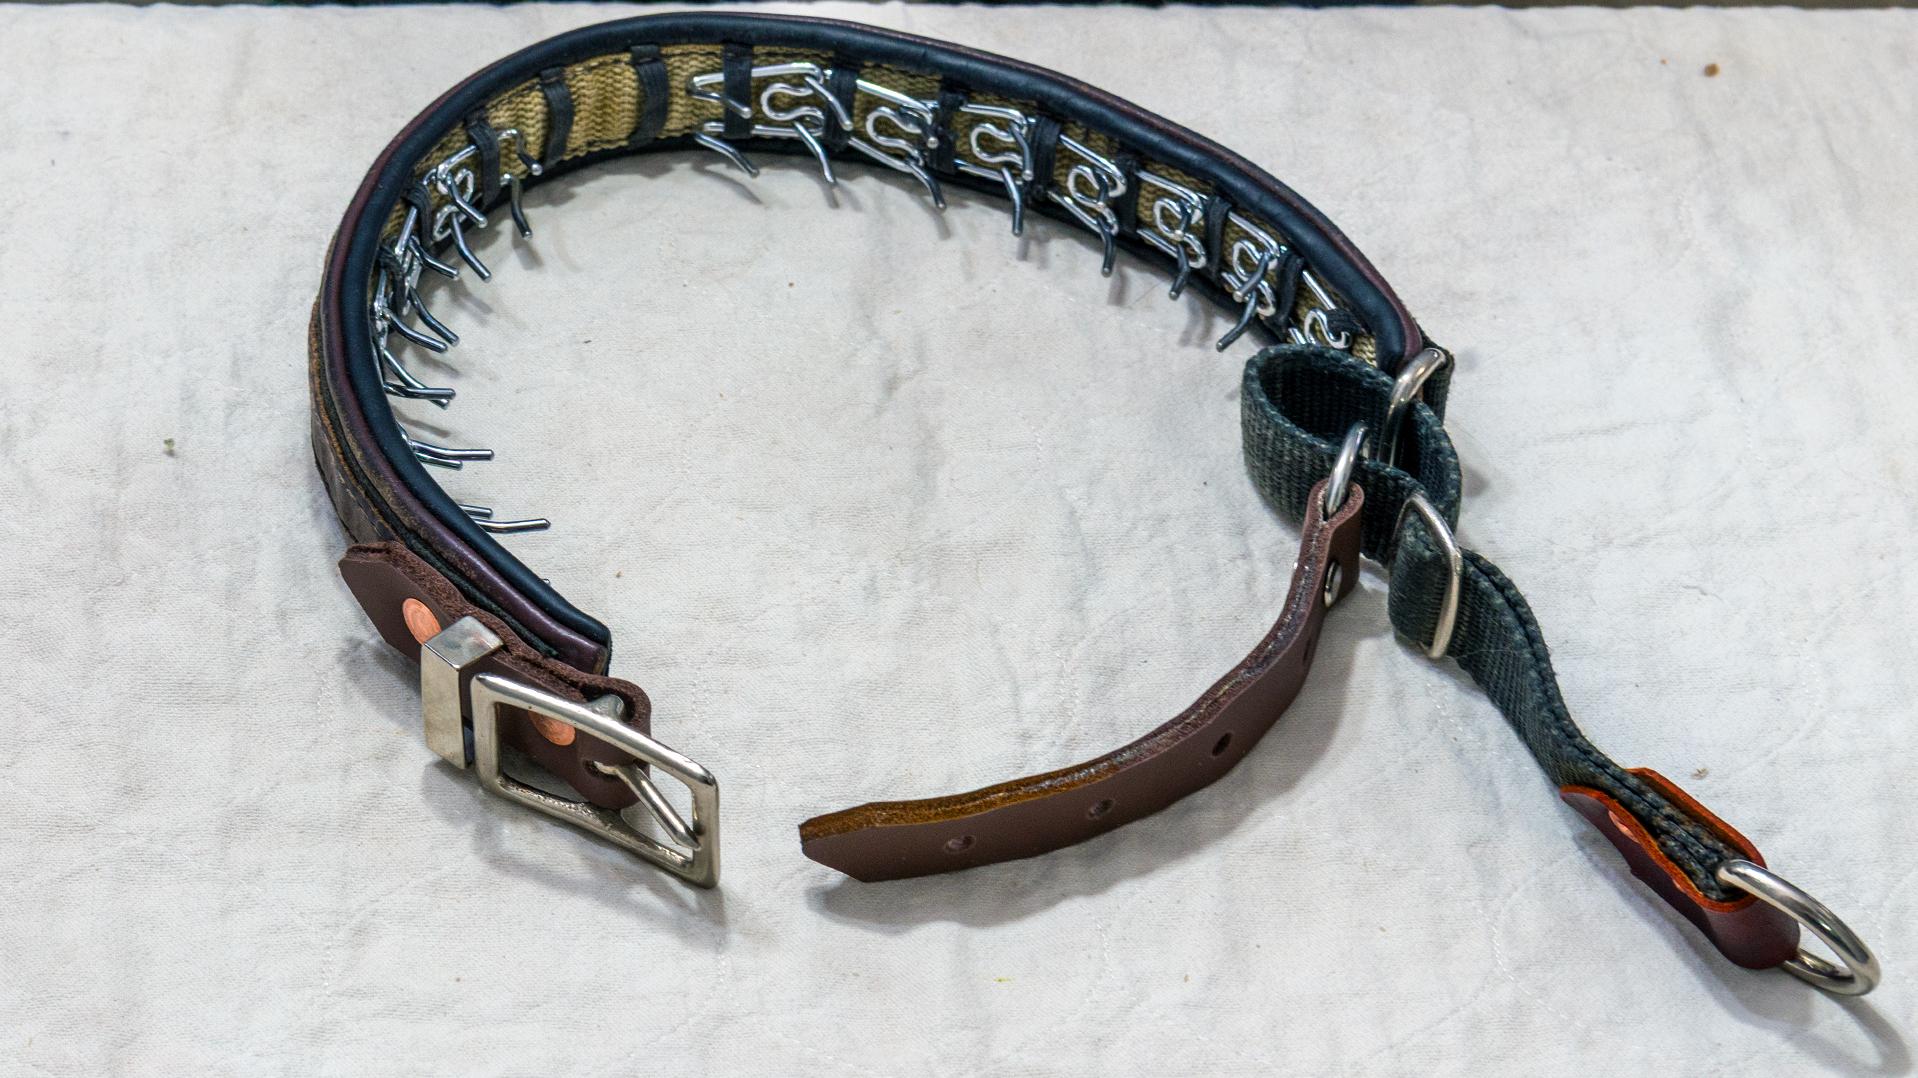
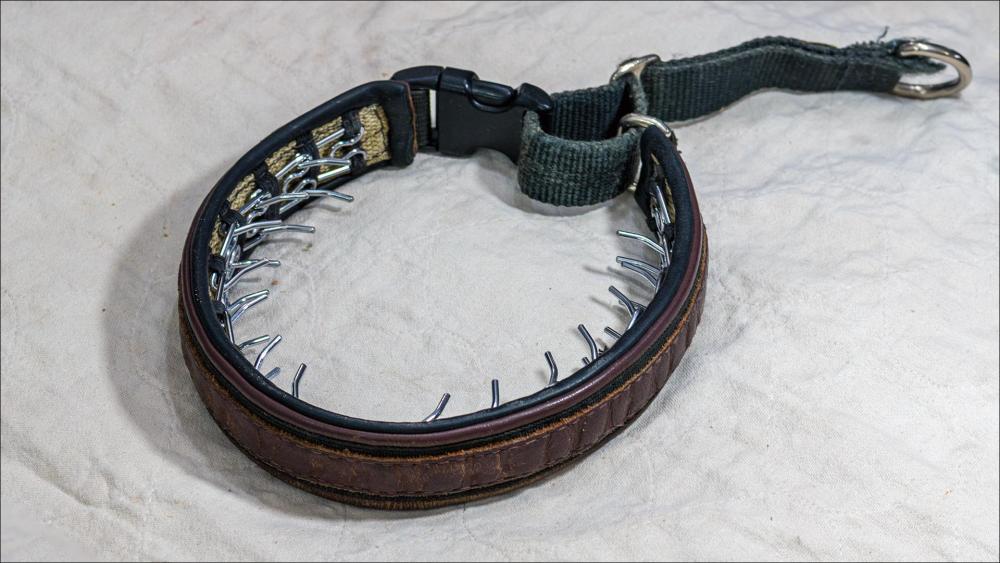
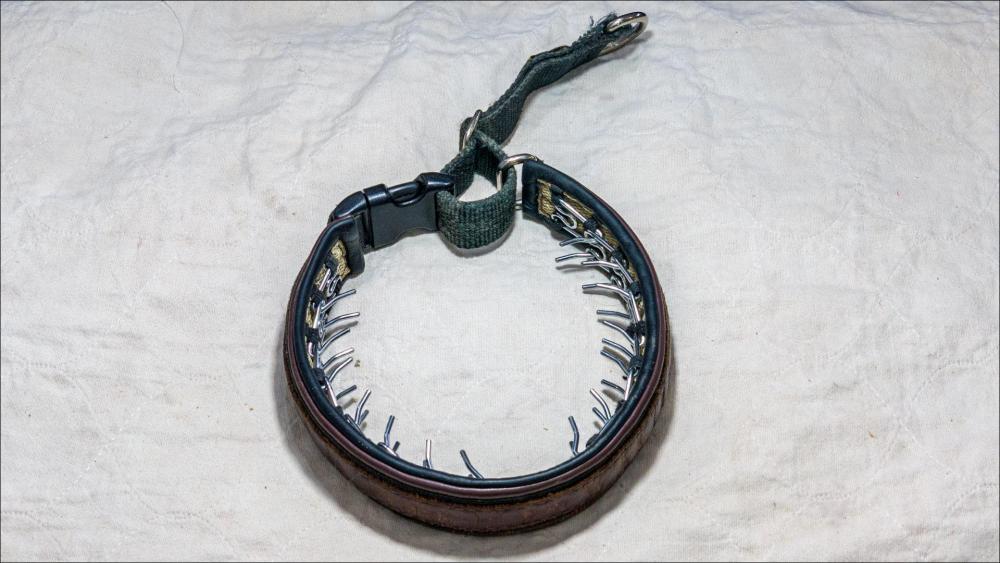
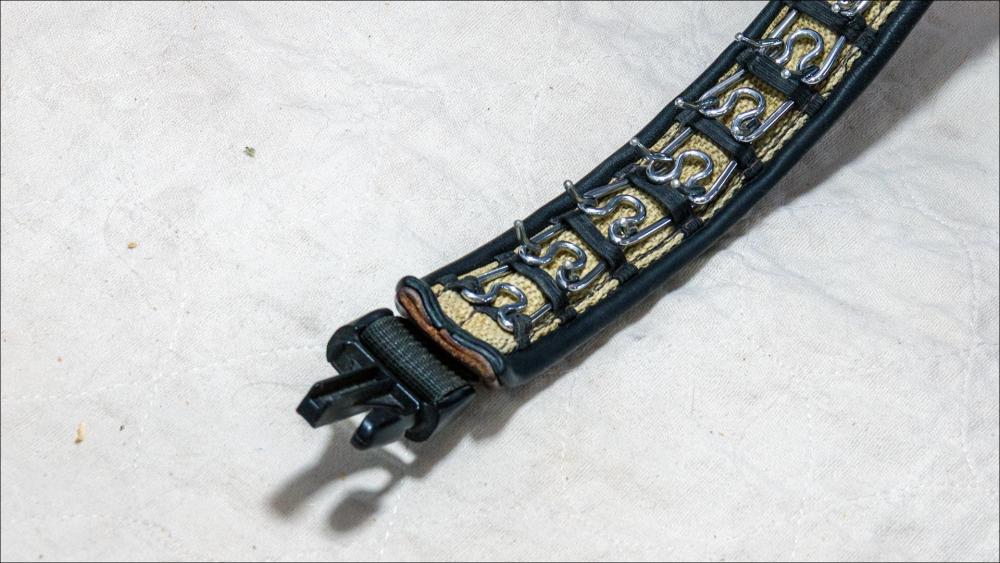
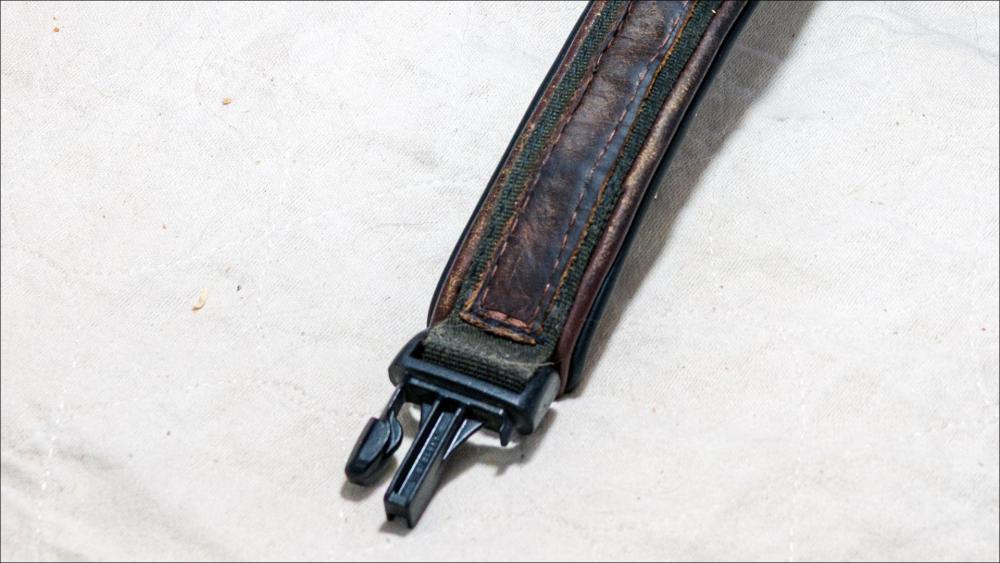
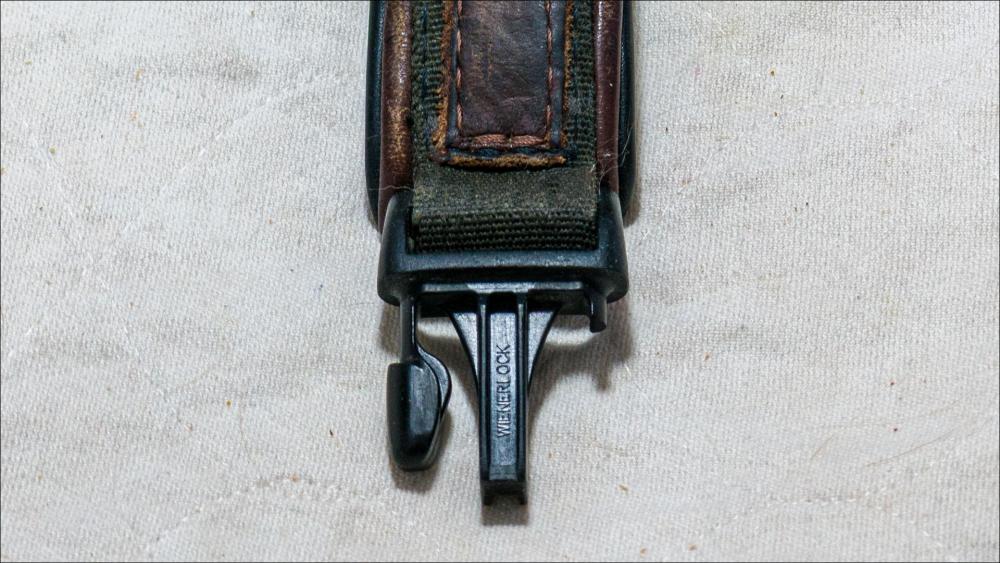
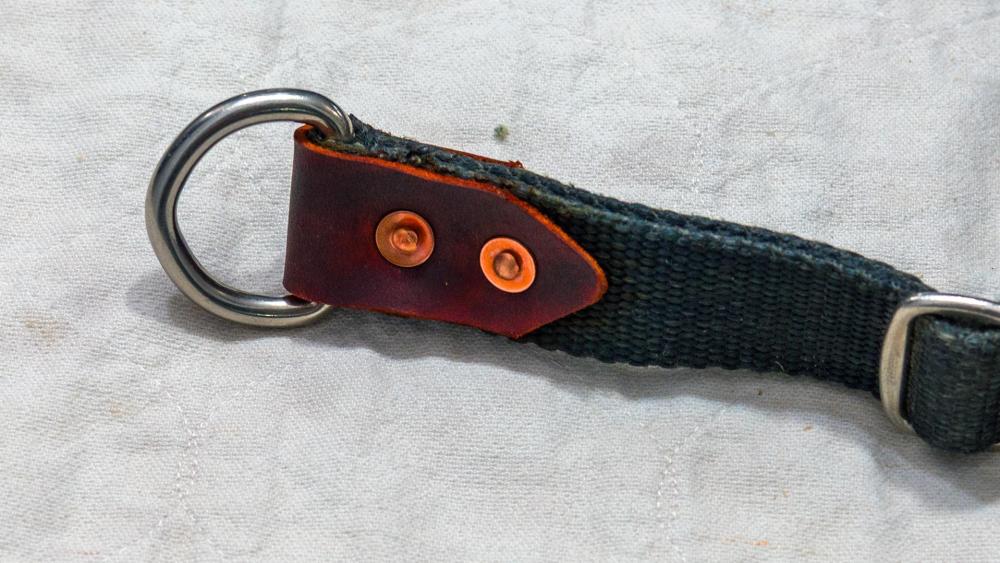
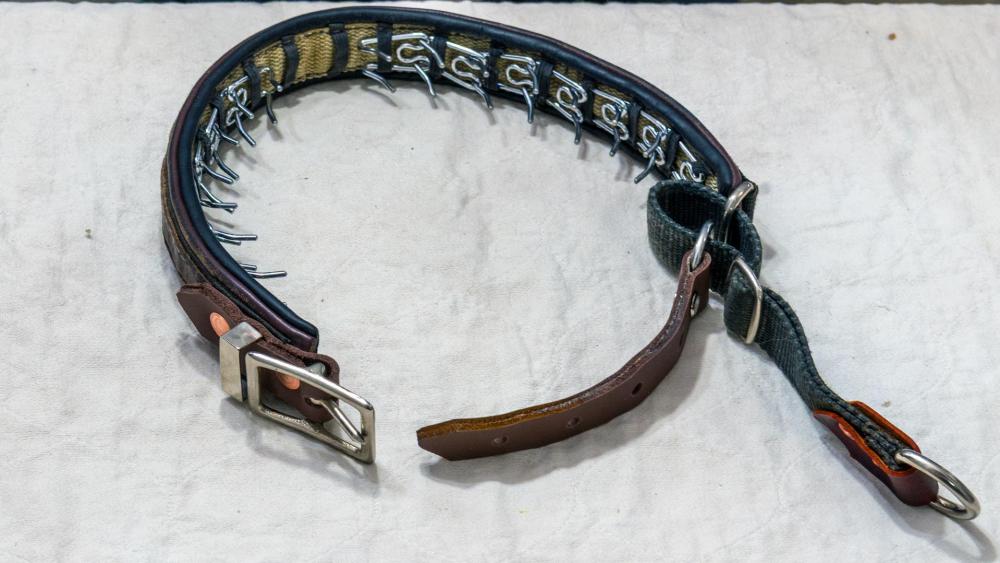
This collar was brought to me to see if I could make it functional / serviceable again. The collar is a US made product that is in my opinion: i) well constructed padded collar with good quality 4.4mm diameter metal parts (4.4mm diameter), ii) Good quality prong collar inserts, with no burrs on the prong tips which is critical when using a prong collar, iii) Decent quality nylon main strap, iv) Weak nylon used to connect the body of the collar to the metal square ring. v) Weak nylon used to connect the body of the collar to the plastic quick connector. vi) Frayed out nylon at the "D" ring that connects to the dog lead as will as some thread failure where the ends of the nylon were overlapped and sewn. vii) Use of a 10 cent 1" plastic quick connector which failed. Nothing worst then being stood there with a dog lead in your hand attached to a collar and no dog. Ask me how I know. viii) Weak thread used, appears to be V46 and V69. To replace the collar the owner was told it would be somewhere around $300 CAD that is why it landed on my doorstep. The first 5 photo's are of the collar as it arrived. The last 4 photo's are the collar almost completed but functional again. Any comments: kgg


-
Where are they made??? kgg
-
This depends on your particular needs. The two main differences between those models: i) LS-1341 has the standard (large) throat gauge while the LS-1342 has the smaller throat gauge for doing smaller items ii) LS-1341 does not have the adjustable vertical walking foot adjuster (big round knob on top of machine) like the LS-1342 Here is a link to Juki LS-1340 series machines that shows the differences ( https://www.juki.co.jp/industrial_e/admin/pdata/filedata/332/ls1340.pdf ) kgg
-
Personally I would not purchase a machine that has been used in an industrial setting as you are really dependent upon not only the machine having good bones but the competence of the person / company refurnishing it. The factory is getting rid of it for a reason. Look for a hobbyist owned machine or if you can afford it buy a new Juki LS-1341 or 1342 or buy a new clone. If you decide to go with a clone try and get one that is more like the older LS-341 rather then a hybrid clone and go through the specs carefully. kgg
-
To me I would say your concerns are justified. Looks to have been stored in a damp environment and poorly maintained. kgg
-
The 7mm is touch over 1/4" and would be close or above the capabilities of the walking foot machine you listed. Also you are going to be limited to a thread size maximum of V92. kgg
-
Selling Brother LS2 - getting a Sail rite LSZ
kgg replied to MarkWorsnop's topic in Leather Sewing Machines
Be aware of what some of the short comings of the Sailrite you are planning on getting: i) The Sailrite is made in China not Japan like like, I'm assuming, your older Brother. ii) The Sailrite is a walking foot not a unison feed like the brother you have. iii) Uses a domestic Singer Class 15 Bobbin. iv) Max thread size you can use is V92. vi) No safety clutch. vii) Requires special presser feet. viii) Stretch length varies as the thickness of material increases. ix) The Sailrite Ultrafeed LSZ is a "portable" walking foot sewing machine but with the rigid carrying case the term "portable" is a relative term. Sort of like the old "portable" microwaves that took two people to move across the kitchen. With the machine sat in it's rigid carrying case it turns into a very clumsy package weighting probably close on about 50lbs. Coupled that with the size of a very well constructed rigid carrying case (about 21" long x 14" high x 10" wide with only one top mounted carrying handle) and you are going to get a good workout. My experience of owning the Sailrite® Ultrafeed® LSZ, with the rigid carrying case which had their new "servo" motor, the shine of being able to move it more then a few feet very quickly dulled. I would suggest that you makeup a cardboard box about the same size and put say 40lbs in it. Then see if you can lift it with one arm or hold it on the bottom and then walk up a flight of stairs or across a parking lot. Maybe it may fit your needs but I would suggest trying one first because once you buy it's yours for better or worst. Buy Once, Cry Once kgg -
My kind of workplace, Not. China isn't much better. This is why most decent manufacturers can't compete. That said it is amazing what can be done with simple / simpler tools. kgg
-
Keep in mind that NO one machine will do everything that is why some of us have more then one or six machines. You need to figure out: i) your max budget dollars ii) what is the thickest thread you want to sew with, V69 (domestic), V92, V138, V207, V277, V346, V415? iii) what is the thickest you want to sew including the seams? iv) what are the articles you are planning on making the most? v) You need to read this article to help figure what would work for what you want to sew. kgg
-
Should I buy this Ferdinand 900b sewing machine?
kgg replied to Gael's topic in Leather Sewing Machines
With any sort of odd ball machines finding parts can be a chore and then add only one supplier of parts I would personally steer clear of the machine. That said if the price was dirt cheap, not $800, then maybe. kgg -
From the Thread Exchange website ( https://www.thethreadexchange.com/miva/merchant.mvc?Screen=CTGY&Category_Code=needle-systems-singer-148-to-231-SV-12#Models_178_to_211-GX ): Singer Model# 196-K 301 uses needle system 287 Equivalent to 287 H, 16X21, 16X269, 376, CANU 11:60 That will bring you to their selection of needles for that machine choose the correct needle size based on the thread size you are using. kgg
-
Save your money personally I think you will be disappointed with the abilities of the that machine it is not an industrial sewing machine. Those machines and their clones were meant as machines to repair sails when at sea. I have owned a few of the Sailrite machines and their clones. They are really meant for limited use in thin stuff. It will: i) leave marks in leather as the standard presser foot and feed dog are very aggressive. ii) uses a domestic Singer Class 15 small bobbin iii) thread size is limited to V92 thread iv) stitch length will vary as the thickness of the material increases and the list goes on. kgg
-
Are you using a speed reducer between the servo motor and the needle positioner? I would first replace the belt. kgg
-
I approached the problem with inline binders by installing 3mm brass inserts for mounting in a 3D printed table top. I think you could do something similar with the table top you have. ( drill / tap or drill and press in a nut) kgg
-
If I'm not mistaken the Techsew 2600 is a clone of the Juki DSC-246 a manual for the Juki can be downloaded here: https://www.juki.co.jp/industrial_j/download_j/manual_j/dsc240/index.html kgg
-
Just go to your local hardware store and get a V belt. The link belts don't provide the same amount of belt surface contact area as a V belt. Looking at your photo and the video of the machine on the Jiang Long site this machines appears to be a needle feed machine where the outer presser foot just goes up and down like a ordinary drop feed while the needle and the inner presser foot moves back and forth. What are the model numbers of the comparable machine?? Without knowing more about the spec of your machine or what it is a clone of you maybe be at the machines limit, probably around 8 oz. kgg
-
Start with basics first. i) Are you using needles that came with the machine. If so throw them in the bucket as they are more then likely to be of poor quality. ii) I am going to assume the machine takes system 135 needles. Are you using a 135 x 16 which is needed for leather? iii) What size of needle are you using? You may have to move up to a #22 needle for V92 in thick / tough leather. Reference chart ( https://www.tolindsewmach.com/thread-chart.html ) iv) have you checked to make sure the feed dog is set correctly. The presser foot tension just needs enough downward pressure to move stuff along. To much doward pressure and it's like creating a jam point. The drive belt needs some slack otherwise it puts to much strain on the bearings in the machine and in the servo motor. I would remove the belt and turn it over by hand and see if can feel anything funny. Is this a needle feed machine? kgg
-
I would first determine what the running length of the dies you want to use are and from that you can determine the required tonnage that will be needed. kgg
-
Advice on a singer 30-15 sewing machine and its needle/thread
kgg replied to Landry's topic in Leather Sewing Machines
Someone definitely Frankensteined that machine. The machines is a drop feed tailor machine made for fabric. This machine is not meant to sew leather. The .6mm thread that you normally use is equal to approximately V277 which will need a #25 ( 200 ) size needle which this machine will not take if you can find the correct 16x 257 needle system. If you want try and use the 134 or a 135 x 16 needle system the needle bar height will probably have to be adjusted and the needle to hook timing adjusted. You really need to install a new thread tension assembly and the other missing guide to get the thread tension and path correct so the machine to will sew properly. Here is a link to to a good needle size to thread size chart ( https://www.tolindsewmach.com/thread-chart.html ). Here is a copy of the parts manual and a correct tension assembly. kgg Singer 31K15, K17, K20, K22, K32, K45, K48.pdf
-
The leather and needle are lifting the presser foot like @Northmount has noted but also catching the thread as indicated by the loop being created at the needle. The 135x16 is the correct needle system for leather but what size of needle are you using? Here is a good chart for needle size verses thread size but in thick or tough material you should move up a needle size. If you are using a #20 needle go up to a #22 needle. The machines max needle size is a #22 and the max thread size is V92. I have owned a couple of Sailrite LSZ and clones and real life will show you with tough / dry / dyed leather you are at roughly the max sewing thickness that machine can handle. Also what I did find with those machines: i) is they can be really particular with the needle being installed as in that it almost has to be perfectly installed and any deviation especially in leather you can run into problems. ii) stitch length will vary as the sewing thickness increases. kgg