kgg
-
Posts
3,355 -
Joined
-
Last visited
Content Type
Profiles
Forums
Events
Blogs
Gallery
Store
Everything posted by kgg
-
Any advice on a solid 144w204 leather needle?
kgg replied to Teradee's topic in Leather Sewing Machines
If I'm not mistaken the Singer 144W204 uses the 7x3 needles which is the same as the 794 needles but check your manual. For sewing leather you would use a 794 LR needle in the appropriate size for the thread. I personally like the Schmetz brand of needles. You can buy needles from various sewing machine dealers that advertise here. kgg -
A couple of things: 1. If you measure your existing diameters of the motor pulley and the handwheel pulley you could go to the Pulley Calculator ( www.blocklayer.com/pulley-belteng ) and pug those values in with a rpm of 100 to determine your existing handwheel speed and then plug in the new handwheel pulley diameter. Example: Existing handwheel pulley size at 3.5 inches and a motor pulley size of 3 inches. The handwheel would be spinning at 85.7 rpm's with a motor speed of 100 rpm's. Changing the handwheel pulley size to 8 inches and keeping the existing 3 inch motor pulley. The handwheel would be spinning at 37.5 rpm's with a motor speed of 100 rpm's. 2. Other considerations as discussed in the topic by @chrisash i) shaft diameter my be 0.545 and the only way to be sure measure yours with a caliper. ii) be careful you don't throw off the balance the existing handwheel provides the topic 3. You may want to use a reducer pulley setup rather then changing the existing handwheel. If you installed a reducer pulley that has a 6" and a 2" pulley combo the speed would be reduced to 29 rpm's with a motor speed of 100 rpm's. In my opinion a lot less work to accomplish your speed reduction and the machine remains orginial. kgg
-
Thank you @toxo great information. kgg
-
What brand etc. is your bender looks a lot better then the one I referenced? Are those Aluminum forming forms, plastic or PLA or ???. Also what brand of punch etc? Looks at lot more convenient then trying to drill once the steel rule has been bent into shape. Thank you and the end result seems very good. Also as you need a new clicker die you can make it at your own leisure. For your press what are you using? I am thinking about using a hydraulic jack press probably like this one for $304 CA ( www.princessauto.com/en/12-ton-hydraulic-bottle-jack-shop-press/product/PA0009081597) as clicker presses are just too expensive. kgg
-
Since this is going to be your first machine I would suggest going to a dealer and see which class of machine would best suit your needs. If you are going to be doing 90 percent of items best suited for the Class 1341 machine then buy a Class 1341 and later on get a Class 441. As @TomE has outlined for thinner projects you have to make changes or install the presser feet and needle plates like what @RockyAussie and @Patrick1 have developed to accommodate sewing with thinner thread, closer to the edge and with thinner leather. kgg
-
I would definitely like to see some pics / video's. I agree the video in the advertisement is really thin probably soft metal as the original purpose is for the jewelry craft. I came across a video by Harry Rogers using this style of inexpensive bender ( www.youtube.com/watch?v=m3HjGaSs2dY) but see he has since upgraded to a more robust bender ( www.youtube.com/watch?v=CquWzzaQSZg&t=16s). kgg
-
For my needs the 1 meter lengths would be ideal. I plan on making my own dies probably using something similar to a Ring Bender ( www.amazon.ca/gp/product/B0BV5NSW8G/ref=ox_sc_act_title_1?smid=A2LM4S0G8N062T&psc=1 ) or a DIY bender. Thanks, if I can't find a supplier in Canada I just might have to import some. kgg
-
I am looking for a supplier of steel rule either Centre Face, Single Bevel or Centre Face, Double Bevel preferably in Ontario, Canada. I am looking for small lengths rather then the large coils. kgg
-
I have some of these which may give you an idea of the spring. kgg
.jpg.dd39d30b98122064b3a99b5ac157abe9.jpg)
-
In my opion the Cobra class 26 ($2390 US) is a Class 1341 machine using 135 x 16 needles capable of using V207 thread while the Cowboy 3200 is short arm (10.5") Class 441 using the much larger 794 needles capable of using V346 thread. The cost of a Cowboy CB3200 decked out like the Cobra class 26 would be ($2195 + $150 extra for a pedestal table stand = $2345 US). I would place the Cobra in the upholstery plus class of machines and the Cowboy in the saddlery class of machines. kgg
-
After reading the manual I think you are approaching the replacement of the timing belt the hard way. Here is the manual I am referencing for the Consew 255 RB-3 that may help, refer to Page 7 "REPLACEMENT OF THE TIMING BELT" s3.amazonaws.com/a.teamworksales.com/CONSEW+PDF/CONSEW+NEW/CONSEW+255RB-3+INSTRUCTION+MANUAL.pdf kgg
-
I found this article which may help. From Cowboy Way ( www.cowboyway.com/What/BullVest.htm )"What Is A Bull Riding Vest Made Of?" and go down to the section " Inside A Bull Riding Vest ". I did find some Ballistic Spectra Fabric Plain Weave 215 Denier 2.6oz/88gsm on Composite Envisions (comcompositeenvisions.com) at ( compositeenvisions.com/product/ballistic-spectra-fabric-plain-weave-215d-2-6oz-88gsm/ ). How thick the fabric needs too be is needed to provided adequate protection is the question. Probably very similar to what would be needed for a stab proof / resistant vest. As a note the stab proof vest and bullet proof vests may not be legal to own / use in your province or state. kgg
-
How thick is your leather that you are trying to skive. From the Techsew site ( www.techsew.com/en/techsew-sk-5-heavy-duty-leather-skiving-machine.html ) " The SK-5 is recommended for leather from 4-5oz and thicker. For thinner leather, we recommend the Techsew SK-4. " kgg
-
Where are you located so other machine options that are more common in your area can be suggested. kgg
-
The Techsew 4800 is a clone of the Juki LS-1342 and the Techsew 2750 is a clone of the older Juki LS-341. From Juki website ( juki.com/ls-1342-series ) "The vertical stroke of the walking foot and presser foot can be easily set and changed (LS-1342, LS-1342-7) The vertical stroke of the presser foot and walking foot (amount of alternating vertical movement) can be easily changed with the large dial mounted on the top of the machine head. The sewing speed is automatically regulated based on the vertical stroke setting. This ensures ideal sewing conditions at all times." kgg
-
I used the specifications for the PFAFF 335 from the pfaff industrial website which is for the newer model ( pfaff-industrial.com/en/portfolio/sewing-machines/cylinder-arm/pfaff335 ) which lists the needle system as 134-35LR and needle size from 80-100. Be careful with what you see as you need to know how thick and what type of leather as well as what modifications were made to the machine. Like @Wizcrafts said a used Consew 227R would be better. Another consideration would be a Class 341/1341 machine like a Juki 341 or 1341 or a clone. kgg
-
My understanding is that the Pfaff 335 can only handle V69 thread as it can only accommodate a #16 (100) needle and is best suited for thinner items. What are you planning on sewing? kgg
-
Sewing machines: One armed Bandits: i) Tippman Boss sold by Tipmmann directly ( tippmannindustrial.com ) ii) Cowboy Outlaw from dealers like Toledo Industrial Sewing Machines ( www.tolindsewmach.com ) iii) Weaver Master Tool Cub ( weaverleathersupply.com ) Pfaff Industrial sewing machine: Go to Pfaff site and look for dealers in your location ( pfaff-industrial.us/dealers/ ) Landis Equipment: Go to LandisInternational USA ( landisusa.com/us-en ) A lot of equipment can be had as used from industrial sewing machine repair/sales locations or online markets. I would recommend not going with a one armed bandit but rather a Class 441 machine either a brand name machine like a Juki, Alder or a clone machine like a Cowboy CB4500 or Cobra Class 4 to name a couple. kgg
-
Cobra Class 26 bobbin loading clarification...
kgg replied to Ripper70's topic in Leather Sewing Machines
To answer your question the bobbin thread should come off the bobbin in a counter clockwise direction. I think your best source would be the manual from Leather Machine Co. and Al Bane who seems to know his stuff about the Cobra machines. It also appears he has a close relationship with them. A good video by Al Bane about the bobbin is kgg -
Yes I prefer the Schmetz needles and never have had problems with them in any of my machines but have had problems with other manufactures needles in the past. I'm sure other people find other manufacturers needles just as good as well. Schmetz is a manufacturer of needles for a wide variety of both domestic and industrial sewing machines. All the sewing machine manufacturers (clone or brand name) have recommended a needle system and a min / max needle size that works for their machines. So as long as your needles are the same needle system and in this case 135x16 (DPx16) or 135x17 (DPx17) from a #18 to #24 needle they will fit quite a number of machines whether they are flatbed or cylinder bed configuration. When you order your needles also order a brand name spool of thread either bonded nylon or bonded polyester depending on what you are sewing. kgg
-
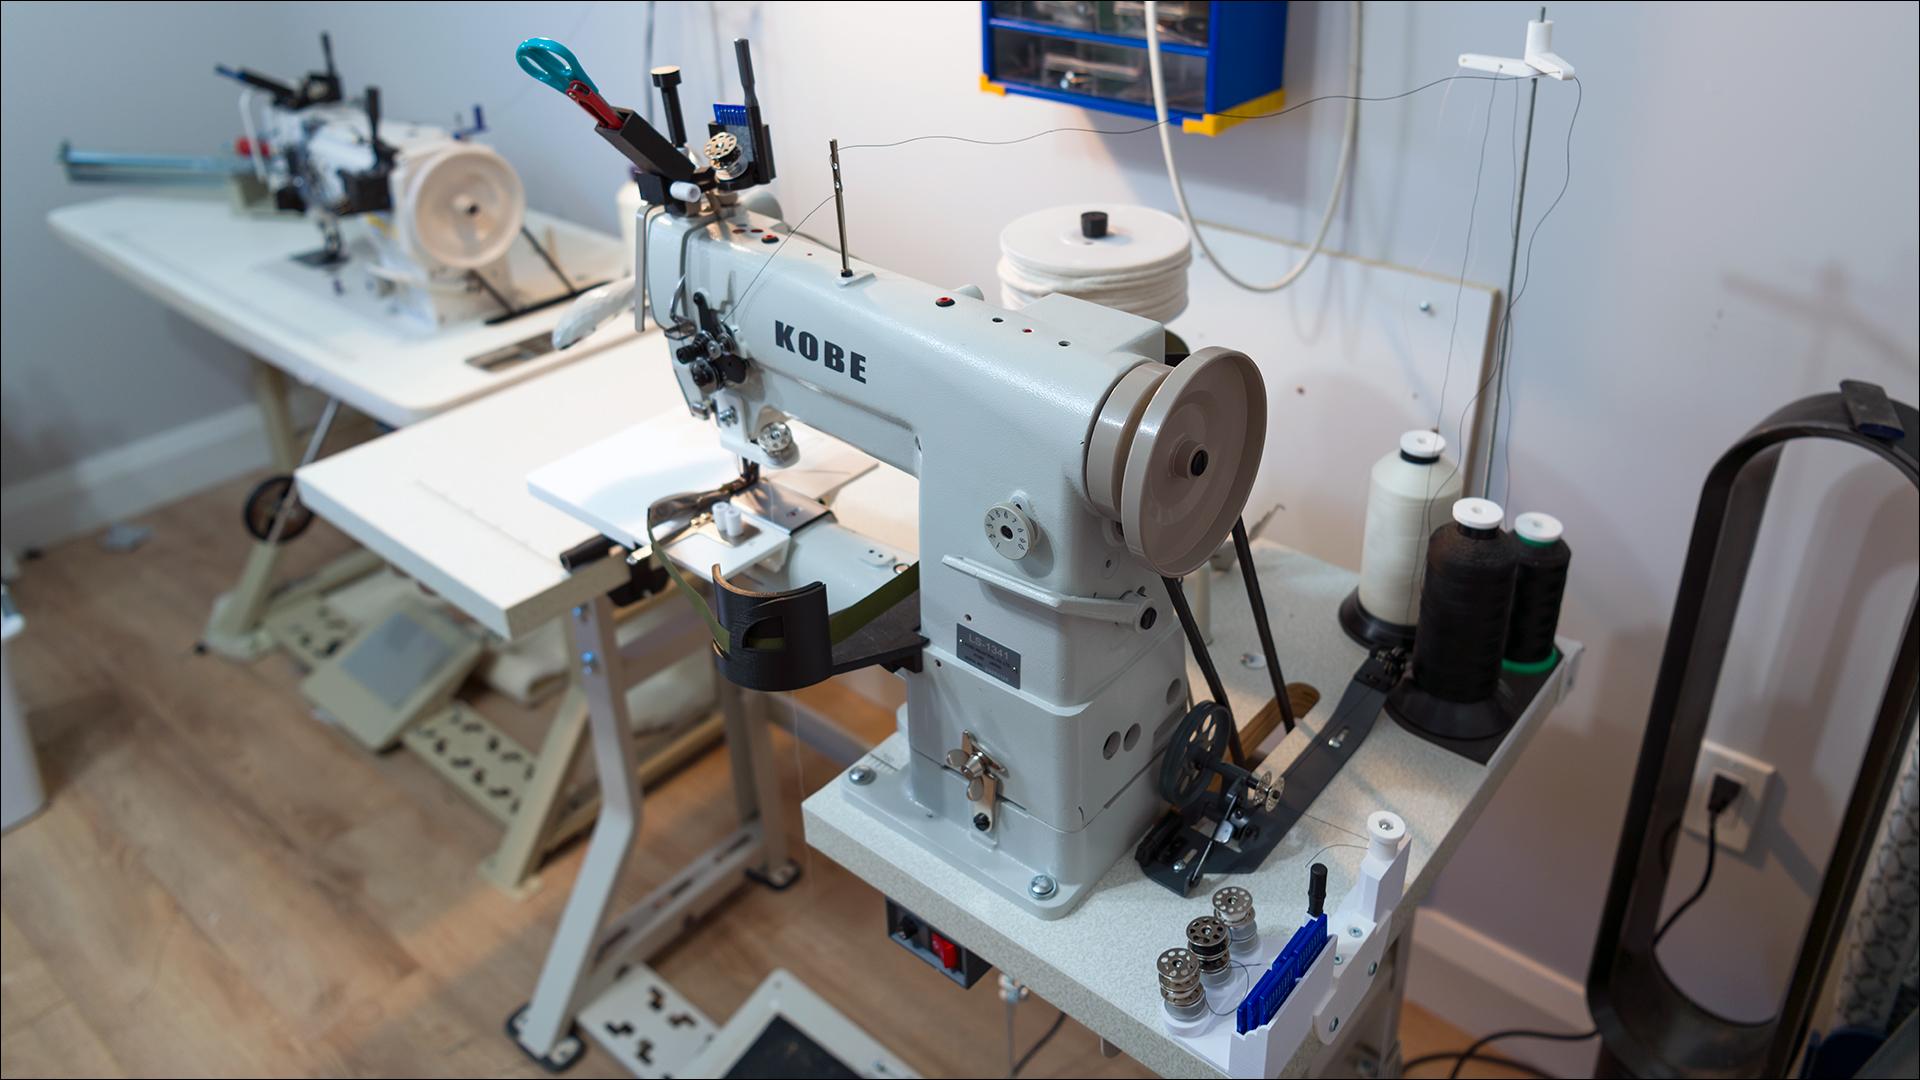
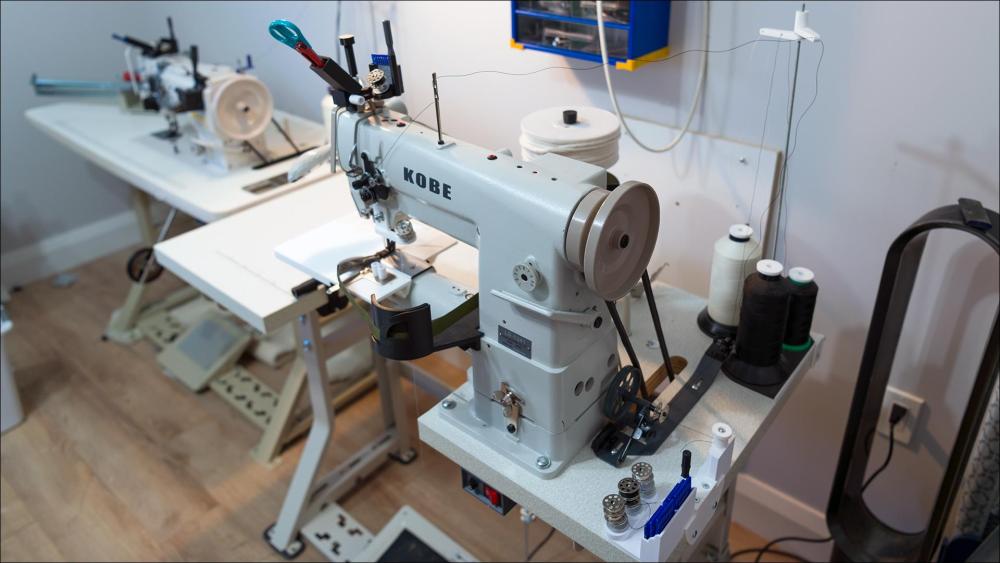
I think the printing on your pack of needles is probably a bit blurry and it says DP x17 which is the same as 135 X17. The 17 denotes that the needle is used for fabric. Your machine requires 135x16 ( leather) or 17 (fabric) needles otherwise the needle will be too short or long to allow the hook to pickup the top thread properly which will give you skipped stitches if it does manage to pickup the top thread. When you measure the height of the spool, a 1 lb spool is about 7 inches tall from the base to the top. So you need the guide hole on the thread stand to be about 17.5 inches above the base of the spool of thread to allow for the thread to properly unwind / unkink. The problem I find with the commercial thread stands is that this can give a fairly serve angle from the thread stands guide hole to the first thread guide pin. I like to keep my top thread as close to horizontal to the top hole of the first guide pin on the top of the machine. The example is of a Kobe LS-1341 (setup for binding) which is the same as your Techsew 2750 that are clones of the older Juki LS-341 just different clone name. kgg
-
For leather you should use the 135x16 needles as they are designed to pierce / cut through leather where as the 135x17 are for fabric where they separate the fibers rather then cut through them. The needle size for V92 should be a #19 / 120 or #20 / 130 needle. A good thread size to needle size chart can be found at ( www.tolindsewmach.com/thread-chart.html ). You may find in thicker / tougher leather or multi layers of fabric you may have to go up another needle size above the recommended. This is so the hole that the needle punches is large enough not to allow the thread from being grabbed by the material which will affect how the loop is formed. If the loop isn't formed properly the hook can't catch it. A good source for needles can be found at Wawak.com. I personally find the Schmetz needles to work the best in may machines. Also the quality of thread can play an important role. Buy a brand name thread like A&E (made in Canada and the USA) as the consistency / quality is always dependable where as the cheap Chinese stuff is just a frustration generator with overall poor quality. Also I find the 1 LB spools of thread have less problems then the 4 or 8 oz spools. Remember you need 2 1/2 times the height of the thread spool too the thread stand thread guide hole. kgg
-
Any chance of posting a couple of photo's or a short video showing: i) How you have the machine threaded. ii) How you have the needle inserted in the needle bar. iii) Are you using 135x16 or 135x17 needles? iv) What are you sewing Fabric or Leather? v) How thick is the item you trying to sew? vi) What size of thread? vii) What size of needle? kgg
-
Does the skipped stitches happen on a turn or on straight runs? Have you checked the Hook timing? For future reference here are two video's of checking and setting the timing on a Class 441 machine: i) By UWE using a Cowboy: ii) By Al Bane using a Cobra: kgg
-
Couple of questions: i) What size of needle are you using? ii) What size of thread are you using? iii) How thick is the leather? iv) Is the hook worn blunt? If the hook has been worn back from use it will need to be adjusted as in retiming the machine to advance the hook. kgg