


kgg
-
Posts
3,350 -
Joined
-
Last visited
Content Type
Profiles
Forums
Events
Blogs
Gallery
Store
Everything posted by kgg
-
Local (Oklahoma City) Tandy Leather Store
kgg replied to Brokenolmarine's topic in Leatherwork Conversation
I agree regardless of the items being sold whether it's a vehicle or a cheap widget. I purchased a Honda Fit about 2 years ago, no trade, from a dealer about 2 1/2 hours away not because there isn't a Honda dealer closer but the difference in price was $2000 and they delivered the vehicle to me. I can get sewing machines and leather / material in Ottawa which is about 3/4 hours travel but after shopping there I just felt like I needed to take a shower. So I drive west to Toronto for machine related items and east to Montreal for leather / material related items which are both about 3 1/2 hours from me. kgg -
My opinion is that if you use the same belt to go from 10 to 11 or vise versa there should probably be no problem but going down to the 8 may cause belt ride over / skipping etc do to the spacing / sizing of the lugs on the belt. Clogged or lugged belts are great as there isn't any slippage but the downside it has to be matched properly to the teeth of the gear or pulley. kgg
-
Yes you can reduce the size of the motor pulley but the improved gain may not be worth the trouble. You may be better to change the intermediate speed reducer configuration. If you know the size of the existing pulley's you could do the calculations fairly easily by going to the Pulley Calculator online. Go down to the Multiple Pulley Sets - RPM Reduction ( https://www.blocklayer.com/pulley-belteng ) section and enter your values. Base on the results you can determine is the slight gain in speed reduction and increased torque worth the effort. kgg
-
Thank you. Got a couple of projects just itch'n to do. kgg
-
Nice setup, you should be pleased when you get your CB4500 machine from Bob. I went with a KOBE TSC-441 as I have been pleased with the before and after sales service of the machines I have purchase from them. I will do the drive to pick the machine up since they are only 3.5 hours away so it will only cost me some time (free) and maybe $60 in gas in my Honda Fit. kgg
-
My journey on deciding / selecting a 441 class machine to add to my collection. I wanted to use and have the ability to use heavier thread in thicker / tougher material then what a 1341 class cylinder arm would allow for. Initially I thought of getting one those one armed bandits that can handle what I thread and thickness I wanted. I thought long and hard and almost bought one but it finally came down too one question for me. Would I be pleased with a one armed bandit and get the use out of the machine. The answer for me was a NO just too much work for me, a short fat guy. I then moved onto looking at the class 441 machines. First I looked at the 9" cylinder arm machines. The downside for me of those machines was the 9 inch arm which in reality has a shorter work surface then 9 inches. With my luck I would need a 1/4" more usable space. Then I moved onto the big boys 25 inch cylinder arm machines but decide against those as I figured the length of the cylinder arm was just overkill for what I would ever want to sew. I eventually decided on a 16 1/2 inch cylinder arm class 441 machine with a 1hp servo motor, 3:1 speed reducer and a non-pedestal stand. The machine will arrive shortly. kgg
-
The actual piece of metal, spring, that the thread goes under to get tension is probably bent away from the bobbin case from applying to much tension on the tension screw or poor metal being bend away from the bobbin case body. Sometimes happens when to large a thread is used or the screw is over tighten. Try to re-straighten the spring but you are probably going to have to get a new one or make one. If this is a fairly common problem for the "Tinkers Delight" and some people just make a new out of better metal. kgg
-
I am assuming you mean the caution light is for your motor as most of the Juki dnu-1541 don't have a caution light unless you have a DNU-1541-7 with the box of electronics mounted on top of the machine. Since you have oiled and cleaned the machine I would go back to basic's to narrow the problem down. 1) what size of needle are you using for what size of thread? 2) thread path from the thread spool to the needle is it correct? 3) thread caught inside the bobbin case holder? 4) With the machine threaded up and some material under the presser feet i) remove the drive belt from the machine to the motor ii) turning the handwheel towards yourself does the machine sew I would say your problem lies with the motor so check that the motors power cord. Is it in good condition and fully plugged in to a good wall receptacle? The connection from the motor to the on/off switch or the control box in good condition? Also most motor arrangements have a built in fuse which may not be fully seated or faulty. A couple of photo's of your thread path and motor setup could be helpful. kgg
-
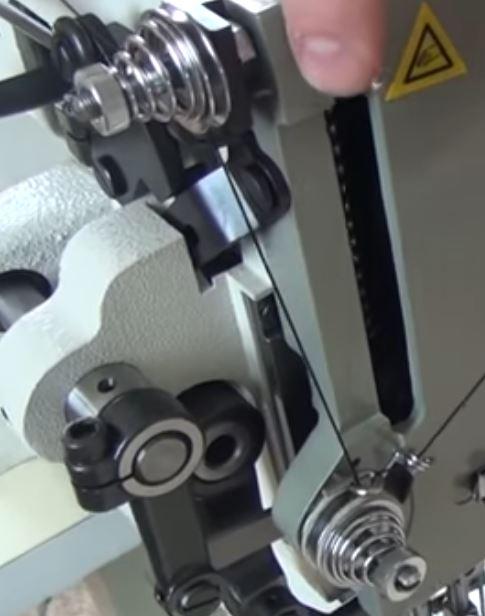
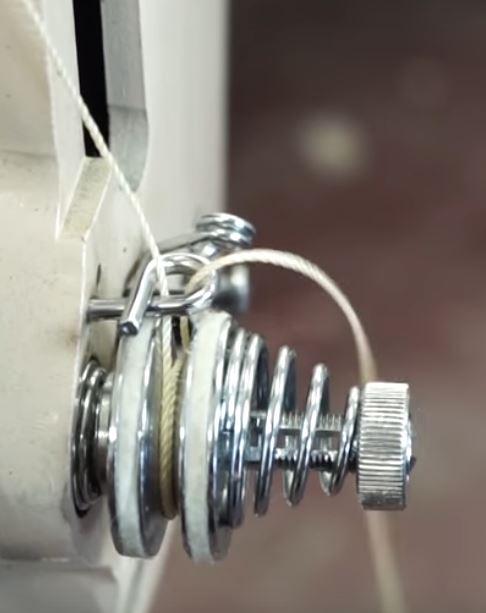
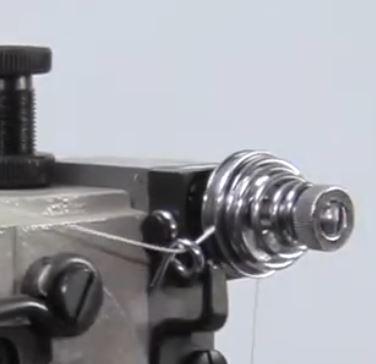
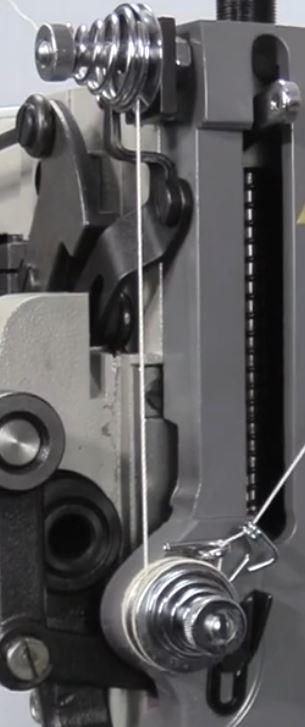
I find it interesting that similar machines to the Juki TSC-441 heavy duty sewing machines there are variations of how the top thread path to the needle varies. I wonder what are the pro's and cons are??? 1. Juki TSC-441: i) I couldn't find good photo's for the Juki TSC-441so the info is from the Juki instruction manual. The top thread goes through the top tension eyelet and through the tension disc's then down to the lower tensioner disc and then the thread wraps around 1 1/2 times the disc of the lower tensioner and exits the lower tensioner eyelet before going to the check spring. There is a) no wrapping around the top tensioner and doesn't exit the eyelet before going onto the lower tensioner. b) doesn't go through the lower tensioner eyelet before being wrapped 1 1/2 times. 2. Cowboy: photo 1 and 3 ( https://www.youtube.com/watch?v=rCppWRvkyfAi) i)The top thread goes through the top tension eyelet and through the tension disc's then down to the eyelet of the lower tensioner and then the thread wraps around 1 1/2 times the disc of the lower tensioner and exits the lower tensioner eyelet before going to the check spring. There is no wrapping around the top tensioner and doesn't exit the eyelet before going onto the lower tensioner guide. 3. Cobra: photo 2 and 3 ( https://www.youtube.com/watch?v=HoPadkFEEJ4i) The top thread goes through the top tension eyelet and wraps around the tension disc's then and exits through the top tension eyelet before going to the lower tensioner eyelet and then wraps around 1 1/2 times (their are a couple of video's showing the thread wrap 2 1/2 times ) before going back through the lower tensioner eyelet before going through the check spring. 4. Techsew: photo 3 and 4 ( https://www.youtube.com/watch?v=stGYaZ7GjPgi) The top thread goes through the top tension eyelet and through the tension disc's then down to the lower tensioner disc and then the thread wraps around 1 1/2 times the disc of the lower tensioner and exits the lower tensioner eyelet before going to the check spring. There is a) no wrapping around the top tensioner and doesn't exit the eyelet before going onto the lower tensioner. b) doesn't go through the lower tensioner eyelet before being wrapped 1 1/2 times. kgg
-
The price's you are quoting seem way out of line. In a nut shell yes there is quite a bit of difference in quality of bobbins. The variation in the actual dimensions can be huge to the point that when you are winding a bobbin the bobbin will wobble. So that bobbin is probably doing something similar when in the bobbin case and causing bobbin thread problems. The worst I have found are the solid aluminum ones while the best are the genuine Juki bobbins. The actual size of a M bobbins is 10.7 mm in width and 24.9 mm in diameter. When I get a new machine I always order extra Juki bobbins. I have never paid anywhere close to the prices you listed. kgg
-
I missed the one for the 441 class. kgg
-
Those table tops are for your LS-341 / LS-1341 and clone machines like the CB341 and Techsew 2750. kgg
-
I think these two machines are basically the same so it probably is going to come down to two factors: 1) Price: the cost of the machine plus whatever the shipping cost is going to be to your location. i) COBRA Class 4 S Heavy Duty Stitcher With Standard Package at $2,995.00 and Cowboy CB4500 Heavy Leather Sewing Machine at $2995.00 ii) Shipping to your location ???? iii) Are both offering the same accessories / table / servo motor???? 2) Service: This is probably the most important factor. Who do you think or feel comfortable dealing with to provide the best service both before and after the sale regardless of price??? I think you might just have to flip that coin. kgg
-
Appears you have a 441 class clone and what you have circled is an accessory plate and their are various versions available with some having a lot more tapped holes. Their function is to allow for the mounting of accessories like edge guides, binding attachments etc. kgg
-
I think a cylinder arm sewing machine similar to a Juki LS-341 or the newer LS-1341 or a clone machine with a flatbed attachment would probably be your best option. The flatbed attachment will give you more versatility. However this will depend on what size thread you want to use and most importantly the thickness of your projects including your seams. To get a better response let us know. These machines are made for repairing items thus the name patcher. Tese are typical operated by hand or treadle. The Singer 29K58 is a short arm with a small bobbin machine. Parts may become difficult to find. You would be better off looking for the Singer 29K71, 72 or 73. Does this have a clutch motor or a servo motor? The clutch motors can be hard to master particularly for a beginner while the servo motors the learning curve is short, few hours versus days. kgg
-
Much nicer winding of the bobbin. kgg
-
Glad I could be of some help. kgg
-
I did read that post that you are referencing and was disappointed in seeing that comment. It reminded me of well it was good enough for my great grand pap attitude. Without people like RockyAussie, Patch1 and others helping to push the boundaries too get the most versatility out of machines we would still be using treadles and machines without reverse. To me it was a little closed minded but each to their own. kgg
-
New Roller foot conversion for juki 1341 etc
kgg replied to localcraftsman's topic in Leather Sewing Machines
Looks very interesting. It appears they have removed the center and outer presser feet and installed the roller foot where the outer presser would have mounted. I can see this working in thinner material. The down side is the conversion causes the material to be moved rearward by the feed dog and the needle. I wonder about possible needle deflection. Let use know how it works out it may save the cost of another machine for some folks. kgg -
This I would say is a result of them being hammer in place as the pressure isn't even. I wouldn't bother with the vice grip style they are hard on the hands, they are OK for a couple of installations at a time. I would recommend getting a hand press similar to the $65 CAD ($48 USD) (https://www.aliexpress.com/item/1005003298489931.html?spm=a2g0o.productlist.main.7.7ecb668b0rxmrC&algo_pvid=a103c9f6-b6d3-4d87-811f-6cc6b107cbdf&aem_p4p_detail=202302140711464414124834585850004428326&algo_exp_id=a103c9f6-b6d3-4d87-811f-6cc6b107cbdf-3&pdp_ext_f={"sku_id"%3A"12000025083060504"}&pdp_npi=3%40dis!CAD!60.5!30.24!!!!!%4021021a7216763875063051915d0747!12000025083060504!sea!CA!3463193163&curPageLogUid=F9OhT1WdXLvW&ad_pvid=202302140711464414124834585850004428326_4&ad_pvid=202302140711464414124834585850004428326_4 ) and a set of dies. I have one similar and it works pretty good. kgg
-
Nicely done repurposing old equipment. The only suggestion I have is if you can move the thread guide out about twice the distance from the bobbin and lower the guide hole down closer to the center of the bobbin it will fill the bobbin more evenly. kgg
-
Another one is the Craftplus Tipping Machine at $1000 ( https://www.ivan.tw/products/craftplus-tipping-machine ) kgg
-
New Sewing Machine GA441 Sewing Machine
kgg replied to Tim Schroeder's topic in Leather Sewing Machines
Nice clean thread path so it should be good and your results are good. kgg -
The 3L may fit but it is going to depend on the profile of the pulley on the Singer. Check the profile designation on the old belt. The object is to get the belt to fit well down in the grove to get the proper transfer so you may have to go to a narrower 3V. kgg
-
New Sewing Machine GA441 Sewing Machine
kgg replied to Tim Schroeder's topic in Leather Sewing Machines
The possible down side of moving the thread guide to the inside of the face-plate is the thread may rub on the cutout in the front of the face-plate. By moving it to the inside you did change the angle of the thread to the needle guide, making it less restrictive. A photo of the front of the face-plate would be nice to see. kgg