nylonRigging
-
Posts
486 -
Joined
-
Last visited
Content Type
Profiles
Forums
Events
Blogs
Gallery
Store
Everything posted by nylonRigging
-
1st I heard of this . Was sitting at machine tonight and was going to toss snips in trash . Tried it tonight on a dull Eagle .99 cent snips . Ran the channel side of old needle back-forth over edge and they Snipping Again . learn something new everyday ....thanks .
-
- - -

-
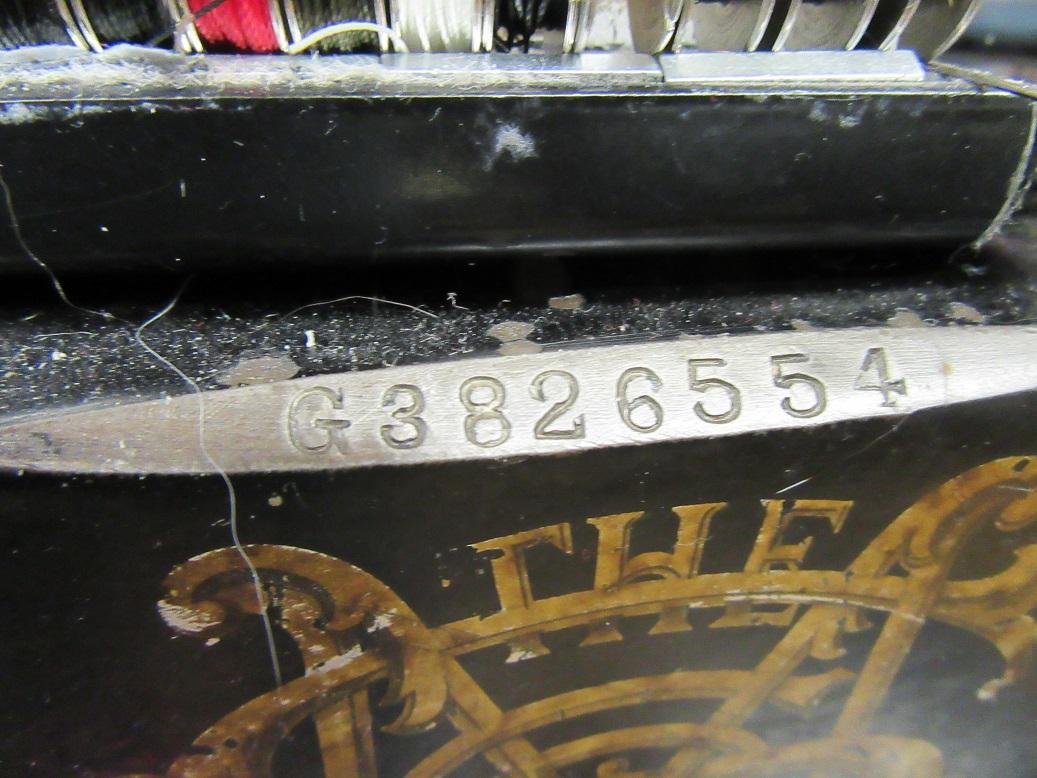
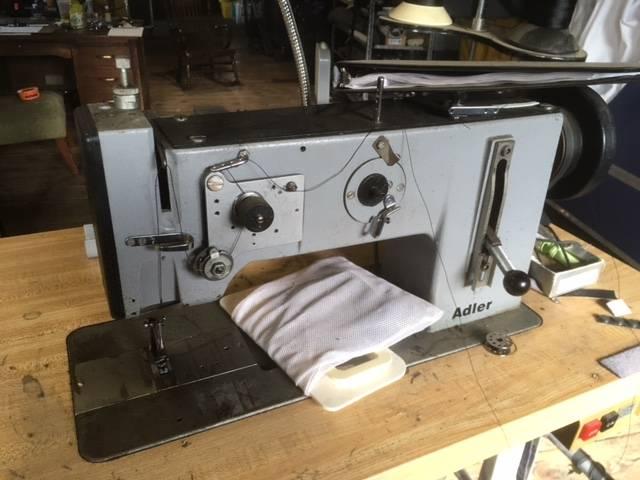
What am I looking at here ??? . I not really a follower of Adler machines, because of the extra expense of buying parts here in the US. , but this one popped-up here Locally, so I looking for some Adler fanboy advice. Any guess of Model, and year of production ?? I have minimal information given. ( Just this crappy Pic.) . and say's ..." it been in storage for the last 4 or 5 years " . .....thanks - -
-
Mitsubishi question to the vendors of this forum
nylonRigging replied to DrmCa's topic in Leather Sewing Machines
this one a DB170 .. the green color is just a Teflon coating . The only bitch I have about the old Mitsubishi's are the smaller bobbins . . -
Mitsubishi question to the vendors of this forum
nylonRigging replied to DrmCa's topic in Leather Sewing Machines
I would not know as this particular machine has never sewn leather, but if It was sewing thin leather I am positive the dogs would leave deep track marks on the underside . This machine is tuned for heavy nylon with the extra heavy set of feed dogs with raised needle plate and 135x17 needle . It also servo has a extra small pulley wheel and speed control, if needing it can punch real slow RPM . For these Mitsu DB's and other similar builds, there is a 'fine' tooth dog set that you can get also for delicate items . There are a lot of easy common obtainable parts and these parts like DB mitsu. bottom feeds and there parts cross over to a boatload of other machines under many names. Also the OP stated that , ..." It stitches perfectly on a broad range of fabrics, and I am happy with this. But there is still a problem! " He might or might not be using on leather or not ??? . he probably using mostly on synthetics . But if the OP was using on thin leather and that leather panel was getting a lining to hide the tracks. then would not be a problem. some Bottom feeds can actually lay down some nice stitching when you tune them for a specific need. also they can get into really tight places with using and narrow feet . . -
Mitsubishi question to the vendors of this forum
nylonRigging replied to DrmCa's topic in Leather Sewing Machines
I not a subscribing vendor of the site, but your DB bottom feed should look all trim like this Mitsu. DB . that looks really Macgyver'ed-up for sure . This one, I turned the needle bar 45 deg. to put the set screw in foreword position, from it being on the R-side . - -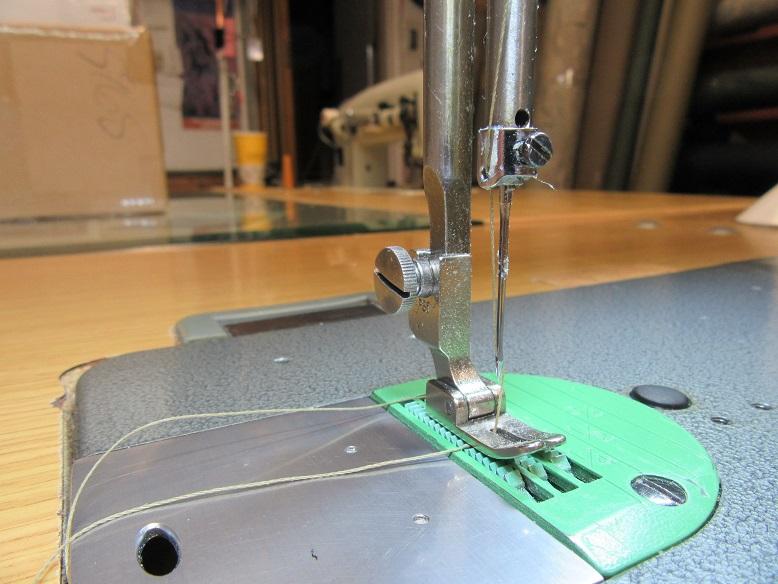
-
Those are meant to be disposable, so the Riveting is always cheaply done. Snip until there dull and just toss in the can and grab another sharp snip . There not made to resharpen, but lightweight and fast, and if you have a bunch of machines, then it easy way to got, just throw one of them on every machine . I always buy couple dozen a year of ( eagle Brand ) snip's . Buy them bulk-packs off Ebay and there only 1-$ each & free shipping . The Snip's link that ( joon1911 ) posted, from goldstartool , right now are the Best bang for the buck-$ .
-
What type of stitch gives the greatest pull strength?
nylonRigging replied to lod's topic in How Do I Do That?
exactly what ( chuck123wapati ) is saying. the seam for your application is major consideration . Just running a straight double-needle run on a double felled seam, is strongest for your description . on the opposite end of the spectrum for weakest seam, it would be a butt seam It also Not the ..." pull strength". like in your thread title. You are dealing more with a ' shear loading ' and not a straight pull, for the breaking point on the thread type strength rating . Shear Loading multiples 'greatly' the structural breaking point on thread, because the greater force on the Seam sewn is pulling lateral on both sides of the thread and seam . . -
In a way, It is kind of like leather. as in soft and hard . Punching Nylon webbing is same. It Not necessarily how 'thick' a nylon webbing is, ..but It all really depends on just how tight 'dense' a weave is milled to . With the Adler 69 . I think you can do it with using 138 and using a type 13 webbing and be GTG with it in 2 layers . the type 13 nylon webbing, is a little softer weave ( not to say loose) but it not as hard to punch threw as some of the other heavier tight weaves of webbing out there . .
-
also.. Running different sizes of thread on your Nylon webbing for a Belt, is going make it less stiff or make more ridged depending on thread size. When your wearing and breaking the belt in to you body. Running heavy thicker thread and highs tension over time It will stay stiff ridged longer . I just did up a new 1.75" wide, 2-layers of type-13 a couple days ago for myself . Nylon heavy square weave webbing for belt, I usually just use 69 for just putting it together . If it a Belt for daily carry and adding stiffness rigidness. I run #207 or 277 down both side and two straight runs down the inside . For making less ridged and more softer after the break-in wear, then use 138 or go smaller size thread . Instead of just straight runs, you can trick it up a little bit also and do things like Diamond pattern and things down the center area in different color tones. .
-
90% of all Internet reviews ( like that ) are worthless and Shilled ...LOL .. also Every machine Links straight back to Amazon Sales . yes, was Rated 'Best' internet Shoe Cobbler by using intense research consisting of: ..." it has a high-gloss paint, with all metal construction ". .
-
Tough Neighborhood ??? ... LOL -
-
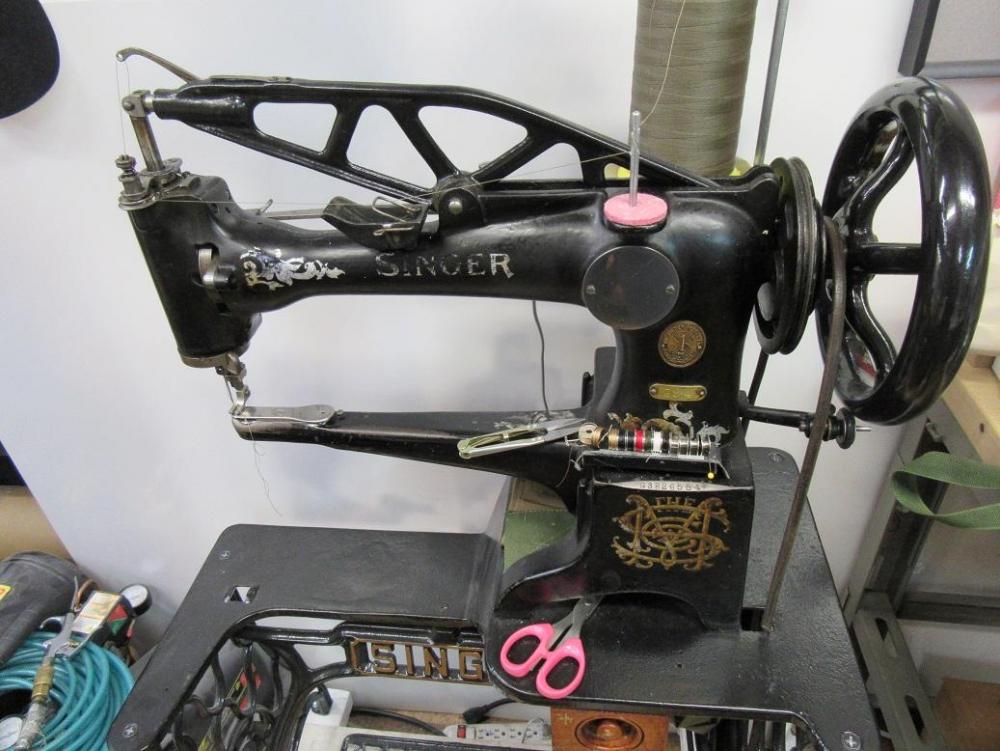
Ya the 269's cam 'fly wheel' underside horizontal is some type of lightweight composite, ( not sure exact materials ? ) .. but I been told a few times by tech's that Singer was Way Ahead of there time back then when designing that lightweight wheel . People don't think much these days on all the high-tech. lightweight composites out in year 2020 at there fingertip's for prefabbing an idea . from Poly's, Ti , carbon fiber ...etc. ' . but back then It must have been a huge hurtle to get over with a wheel that large diameter and weight, spinning that fast on the stitch cycle, and then trying to stop the weight inertia . That is what Singer came up with and a huge % of them are still spinning and stitching today 60-70 years latter. .
-
There are several of old 269's sitting around here in the NW. US. area . so parts are not to hard source. the NW was a pretty big outdoor gear, clothing manufacturing area at one time, we are blessed with a lot of old machines around and some good repair Tech's that are still breathing. the old 269 run fast and 'loud' , I don't think you can get them to cycle the stitch run slower ( guessing 1700 rpm ? ) I think that what factory recommends. my 269w is a ( 28 stitch) . the pneumatic set-up on it is pretty standard simple also. it just a single peddle, with heal-Down for pressfoot Up, and then tap the toe to top of peddle to start the cycle . Has good high lift on foot . and mine is using 135x5 needle, with 69E . Good machine is you not doing high volume production. The only pain in the ass with it I ever had, was always the thread cutter and it always was giving me fits. So it is No More and parts are laying in the drawer . .
-
Sewing thread polyester vs bonded nylon
nylonRigging replied to kgg's topic in Leather Sewing Machines
I used to buy a lot of Nylon #69 and some #227 off Superior Thread Co. . I liked the quality of there nylon they sold, it was always nice and smooth thread and came of the rolls nice to. They used to have and mail-out, a specific color sample and thread size chart/card, they would send you for only Nylon/poly thread buying. Nylon is strong good for abrasion, and also in the terms of for specific application of static and dynamic, stretch is specified as very good thing. Looks like in this Vid. , Dr. Bob is a pedaling his goods for sale, to the neighborhood Quilting Bee . but.. Not making fun of quilting, as my Mom can kick my ass when sewing Quilts and crochet an Afghan. . -
Confused about binding attachments
nylonRigging replied to Rylando's topic in Leather Sewing Machines
Raised feed dog and Raised needle plates, My go to, would be Tennessee Attachment, If anyone has them prefabbed.and in-stock for your model and all same design heads they would . I would just call and ask one of the Binder tech's there. . not something you going to find in a general internet sales search . Unless it for like a common singer 111-211 design head, and they are easy getting on ebay and amazon . . -
Beginning Sewer looking for general advice
nylonRigging replied to MtlBiker's topic in Leather Sewing Machines
'Cordura' and they will legally vigorously protect their trademark . I think the name Cordura, people just thrown that out there generically for description, even though it might not be . Kenyon mill also makes good 1000 den. and heavy weight weave nylon fabric . They use the name 'K-kote' as the trademark . Their also Berry compliant, eastern mill US made good quality stuff, but I never found any of there 1000 den. that is supple/flexible as the Cordura brand can make. But thicker stiffer weave 1000 Den. nylon is good for a lot of things . Kenyon also has quality back coatings also like Cordura . I try to buy Cordura and Kenyon nylons for quality side of things, but I used to buy some imports like 'Kodra' brand . Ya, you definitely in a tight position for High-$ shipping up from US. to Montreal. As 'rule of thumb' good heavy weave 1000 Den. with heavy backcoat will weigh close to 1 Lb. per yard . Shipping-$$ always suck for fabric or leather also , This year alone 2020, I have probably have picked up close to 800 yrds of nylon and had it truck/shipped for pick up. . -
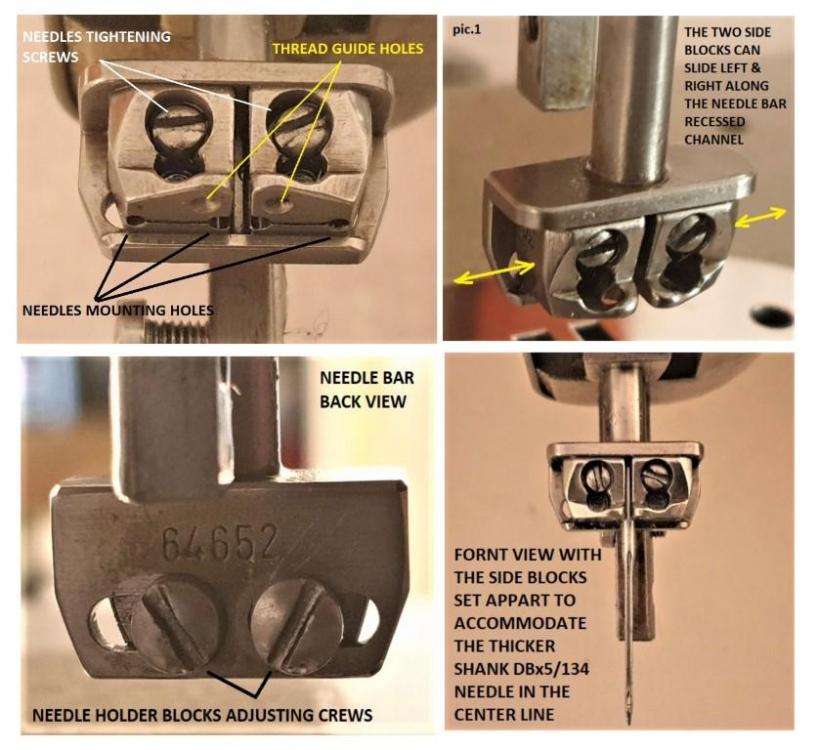
- - Might have your machine model have come with ( 2 ) factory needle clamp setups ? , single and a double . My Bernina 217 straight/zigzag combo machine as 2 thread tension assembly setup like your Pfaff model . and also the Bernina offered 2 different factory needle clamp setup's to quick change out for single/double needle stitching . ( I don't think ? ) that ( D 1 ) slot in the center of the Needle clamp is for a needle . space ( wide gap ) in between the 2 needle hole, It In No Way resembles a hole to place a machine needle into . That needle clamp in your Pic. looks like a double-needle clamp only . -


-
Confused about binding attachments
nylonRigging replied to Rylando's topic in Leather Sewing Machines
Not discussing 'brands' of binders or straight or 90 deg. . but on your Flatbed machine, you will want to ( really consider ) a raised dog and raised needle plate, for a better (full) adjustment range for getting your tape/binding to fold and flow . You will find that all binding will never track the same threw the throat, likewise when switching materials you are binding on. The increased adj. range that raised Dog/plate will give you is a HUGE advantage for getting that binder throat down low and into the Feet and material . . -
I got a old 1957 , 269W141 that is tuned nice and a solid tacker. I originally bought it for doing line-sets and bar-tacking the finger traps on Para gear . I picked it up about 15 years ago from a outdoor gear shop going out of business ( machine was bad Out of tune ) not finishing it's stitch cycle, but owner swore it was all complete and was still solid machine . So I took a gamble because the price was right . Had it worked over by a local Tech. and he went threw it and got it running like a top, and it still running strong today. They are handy machine to have when yo0u need it . Tackers are pretty intimidating 'to me' and they are a different animal for sure with flywheel and and timing stitch cycles, I NEVER would have jumped on buying the used Bar Tack if I did not have a good sew repair tech. at hand to set me straight. .
-
THIS.. keep them both . It nice ( never hurts ) to have 2 heads set-up with different gauge needle sets ready to go . and I keep two double needle setup just for outside and inside seam-bind . I still have an old 112 140 head that runs great and keeps on rolling, They almost run forever just keep them oiled good and clean, and they probably out-live you in life span . the Most you are going to have to do with those old 112's to keep them going is change about the bobbin assembly and shafts when the Hooks get so worn and you cant get anymore adjustment left, and 'maybe' change a belt. .
-
Beginning Sewer looking for general advice
nylonRigging replied to MtlBiker's topic in Leather Sewing Machines
Not familiar with the Name of 'tanker fabric' ? You want a heavy denier weight, heavy weave nylon or poly for those wood totes, but Cordura is way to nice to use for Firewood tote bags ....LOL like ( JJN ) say's above post. you should bump-up to at least a bonded 69 nylon or poly thread. Cordura is more expensive because, it trademark owned name. US milled. To say that Cordura is 'Good fabric'. is also an understatement . Their proprietary formula on the Urethane backing is outstanding quality also, and puts all the import 'faux' copies to shame. Sometimes I can't believe how supple the invista Brookwood 1000 den.nylon is when it comes off the roll and with sewing it. . -
I don't know about 500-$ ....LOL, I think your just being polite. is that 111 a needle feed or walk foot ? I myself like the old 111 needle feeds, .. walk foot is little more desirable to people for project machine. But the needle feeds can lay down some Nice stitching. I don't think he can get 500-$ for that set-up . . Not the way it looks in that Pic. ( my honest 1st impression ) that just pop in my head from looking at the Pics. of the machine , is Head, table top and frame, motor, thread stand, wiring...etc all looks ' pretty Rough '. looks to been abandoned and not used for many years. .. maybe ( 150-$ ) would be a good starting price if you were selling it on craiglist. That machine as it sits, is a Fixer-up project. maybe 150-$ if the Head sews and hook, bobbin assembly, dogs ..etc still solid shape. (for example) local here, I see a ( nice clean table set-up ) 111-W, the guy has been trying to sell, sitting here 2 years in Portland for 350-$ .. and it wont sell . and it is clean working set-up and 5x nicer shape than that machine Pic. .
-
One knob has to be the foot pressure + / - .. and the other ( i don't have that model juki ? ) . but could be foot height Adjust ? maybe remove front cover and look to see if obvious adj. something ? or look in the manual ? that another thing is ? have you adjusted your foot stepping height at all to step easily to negotiate the higher seams . Deflection . is when your needle is punching threw multiple layer, and it will plunge going off center slightly. It makes your bottom stitch look like crap and if bad enough deflection you can strike the needle plate . that's why needle plates are sold cheap and needle are sold by box's of 100 ....LOL Keep the needle sharp, and also you might want to bump up a size maybe at least a 135x17 ( 20 ) . You might be sewing great with a thinner blade and smaller eye . But when you jumping on top a seam that is 3X thicker than what you were just sewing. -
-
Also Add ; I was just back sewing and something else did just pop into my head . ( slight chance? ) maybe worth checking ? , that when you raise your foot to a height to engage that large step-up . maybe ? , your Tension Disk push-Pin, is just cut a little long, and you just barely tapping it on the high lift, and loosing a bit your top thread tension setting . It Something you Maybe ? not noticing till you pushing the upper end of you Foot lift. .