Search the Community
Showing results for tags 'sheath'.
Found 147 results
-
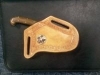
This is a knife sheath I just finished for a friend. All comments and critiques are welcome. What do ya'll think?
-
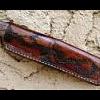
Hi everyone...newbie here. This is my first knife sheath, and maybe my 5 or 6th leather project in total. As a lefty, I wanted to carry this knife on my belt but typical...it came with a right handed sheath. this was actually supposed to be a prototype because I didn't think it was going to come out perfect (you know how it is, always *one* thing you would change) so I had chosen a piece of hide that was marked up and didn't make a basket weave pattern as I originally wanted to do. Some of the marks on the leather came from when I wet it and molded it...I clamped it in a vice wrapped in a shop rag and some of the cloth pattern transferred. Also, when using the eco-friendly dye with a sponge it came out foamy and it blotched...so I went with it and used an antiquing dye as well. So, halfway through the project I decided to make it look something akin to a worn in trusty old tool belt. Funny how that happens. I have to thank my girlfriend for the knife. A gift for this hunting season.
-
 So these are my first few projects. I have so much to learn but I'm pretty stoked on how my work is coming along. Thanks for looking. Any tips for me?
 -
A few sheaths made for a customer. Any suggestions on improvement will be great.
-
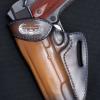
My most recent sheath, a Cowboy Cross Draw for a Marine KABAR. Used 8 oz leather for the main sheath and 6 oz for the belt loop. All metal hardware is located outside the main sheath so the blade touches nothing but leather when sheathed. Spacer/welt stitched into the seam to protect stitching from knife blade. Finished in Fiebings Medium Brown Stain with Dark Brown Highlights.
-
Greetings, Just finished designing a couple of cross draw knife sheaths for a Buck 119 and was looking for some input on them. Essentially I took the basic cross draw designs I've found and added a swell to the bottom of the sheath. A spacer piece of leather is stitched between the edges to protect the rivets and stitching from the knife blade. After this I cut the belt loop with a bit of a curve in it to sharpen the angle the sheath has on the belt and attached it to the swell with two Chicago screws. The snap closure is connected to the belt loop itself so the blade of the knife doesn't contact any metal while in the sheath. The coloring on the right hand cross draw didn't come out quite as sharp as I would have liked, but I definitely like the coloring of the left hand sheath. Any thoughts or suggestions welcomed.
-
 This is one of my latest projects, I've seen a lot of the Steampunk style leather items floating around and decided to try my hand at it. First attempt not so much, but this second attempt turned out pretty good though I'm open for any critique.
 -
Here's a couple of shots of a sheath I knocked out for a customers 8" Bowie knife yesterday. Hand sewn with waxed linen. Although, these were made before the edges were burnished and it got its topcoat of 50/50 resolene. Hope you like! Bro.Tim
-
From the album: Some of my work
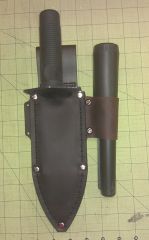
I designed and made a metal detecting sheath in an ambidextrous configuration to carry the popular style of diggers and pinpointers. Made from brown oil stoned leather. Hand stitched.© Blackriverlaser.com - 2013
-
My first knife sheath made from some off cuts I had kicking about. Should stop the blade blunting in my toolbox I hope. Any thoughts would be appreciated as I am still very new to this game !
-
 hiya...just finished this, very thick 5mm leather, hand-painted panels... hope you like! a
 -
 This was done for a friend who is ex military, designed to be worn on the right side but as you can see the blade is pointing forward, this was done at my friends request as this is how he wore and used his knife when in the forces.
 -
 Hiya, Just finished a custom belt and pouches for a Bushcraft student. Made to his design. In side each of the angle bottom cylindrical pouches is a goatskin drawstring bag to hold kindling and other items to be kept dry. Thanks!
 -
 Hi all, Here is a hunter knife I made nearly twenty years ago with a truck shock absorber leaf for the blade - heated and clamped on a flat surface until it cooled down to remove the curve, Cocobolo wood for the handle, and bronze from the local metal scrap dealer with some bits of stainless steel for the pommel and the guard. It is fully hand made but the use of an angle grinder at the beginning to roughly remove stock before using files. This was the first and only knife I ever made. I made the sheath with leather that I molded the same way I used when working in the disability field in developing countries to make the sockets of the prosthesis (I worked as a technical trainer with NGO's). The leather is sunk in a bucket of water, and once it is totally soaked it is regularly twisted, bent, knead, trampled, tortured , etc. (the inflicted torments to soften the leather is only limited by your imagination - as long as they do not damage it! ), until it becomes elastic, therefore moldable. Usually this procedure is over a period of approximately 18 to 24 hours but it depends on the quality of leather. The leather is then stretched over an exact wooden model of the knife blade and maintained in place with 2 to 3 cm wide rubber bands cut from inner tubes to let it dry. Once nearly dry the rubber bands are removed and the fiber of the leather, which must still be wet at this stage, is tightened back through rubbing it thoroughly with a smooth piece of wood (for instance the handle of a hammer). This rubbing operation removes also the remaining water. Once fully dry the leather that took the shape of the mold is hard and can be covered. If I have time I'll shot a video to be posted on YouTube one of these days. I covered it with snake skin (yellowish and black) that I brought back from the Philippines - I didn't met its first owner, thus I don't know which brand of snake this was, lizard skin (light brown), and even a bit of fish skin (the disk on top of the front part sheath), luckily without the smell. The rest of the sheath is a piece of plastic (rigid while elastic) covered with white lizard, and blue lamb skin for the fringes and other smaller parts. Front and back parts are hand sewn together, but as you can imagine I had to drill holes on a drill press - no chance using an awl for such a thickness unless you are Hulk or Superman . You can see more realizations on my website (www.crafts-design.com) but I'll soon post some of them - with explications about the making-of as a bonus when possible, at least those concerning leather work, on this forum. And I will also post soon an introduction about stitching clamps I make I intend to market - I have first to translate it from French. Fred
 -
 It looks a little beat up and I rushed it as an afternoon project. It's not one of my best pieces, but functional.
 -
-
 Just got my first sheath done. It was an extremely last minute Christmas order. Normally I would have said no, but a friend was really wanting it done. He didn't even expect me to make it in time like I told him I would. So, this has 8 oz front, back, and welt with a 5 oz backing to the lizard and a another guard spacer. That's one thick piece of leather. Did kangaroo basketweave too so it would cover the edges better, but that was a real pain getting through that thick chunk of leather two times per hole (not counting the bottom corner). Let me know what you think. I'll even take some criticism since it's the holidays There's a couple things I wish I could have taken some more time on, but all in all he really loved it and I'm proud of it.
 -
hi folks a sheath for a friend... how is possible to understand, he loves skulls! veg tanned leather hand carved, dyed and sewn... one of the first carving project I've made. comments are welcome, thanks for looking
-
Hey guys. This is a knife i made a few years ago. I wanted a new skinning knife and couldnt find one I liked, so I ended up making this one. I think it took almost 60 hours total. I used d2 tool steel and burl maple for the handle. I blued the blade and dyed the handle green to get the camo effect. The primers for the 30-06 round serve as the pins holding the handle on. The actual rounds are inlayed around the pins. Anyways the reason Im posting this is because it was the first time I did anything with leather. Since it was a custom knife I couldnt just get a sheath for it so I had to construct one. I wet molded it around the knife and did a simple tooling pattern. All in all Im pretty happy with it. Ive skinned a few deer with it so far and the sheath is still as good as the day i made it. Not pretty but funtional. Thanks for looking.....Dan
-
 Hello everyone, I haven't been on much at all over the past year, as we have been dealing with family medical issues, and I haven't done much leatherwork during that time, either. This past weekend I had a guy who lives down the road a bit ask me to make him a sheath for one of his JK Handmade Knives that was a one-off design. Here is how it turned out--I don't think it's too shabby for me being out of practice!
 -
 So, here's a few things I've been working on lately. First, a holster for a friends Colt .22 Auto. He wanted a high ride, lined, avenger style rig, molded just enough for good retention. I can't say I'm super stoked on this one. It looks ok, and will do the job just fine, but it's not as good as I was hoping for. Next is a sheath for another friend. He picked up this cool looking knife and it came with the cheapest leather sheath imaginable. I just couldn't stand looking at that thing so I made this for him. Then I made myself a simple holster for my Ruger 22/45. I did the black with "vinegaroon" or "vinegar black". Thanks for looking! Jason
 -
 I've been sketching and working a lot lately on a couple of new projects. Here is a prototype for a bushcraft style knife leather sheath for Fällkniven F1. The sheath is fully ambidextrous and customisable. Possibility for both horizontal and vertical carry. Modular design if user wants to add a fire steel or utility pouch. Buckles so the knife would be easy to add and remove from a belt or a bag. The straps can be removed and exchanged if necessary or replaced with cord or strap directly through the sheath. 2,5 mm vegetable tanned full grain leather, brass hardware, my first try with saddle soap polished edges. Fully modular design if user wants to add a fire steel or utility pouch. Any feedback greatly appreciated!