All Activity
- Past hour
-
Thanks for the link. I glued the whole thing because I over build everything and I don’t know any better. On my next liner I’ll try making the liner smaller and only glue the edges and see if that turns out better.
-
Hand Tool Organization Tips, Tricks, Methods, etc.
mbnaegle replied to mbnaegle's topic in Leather Tools
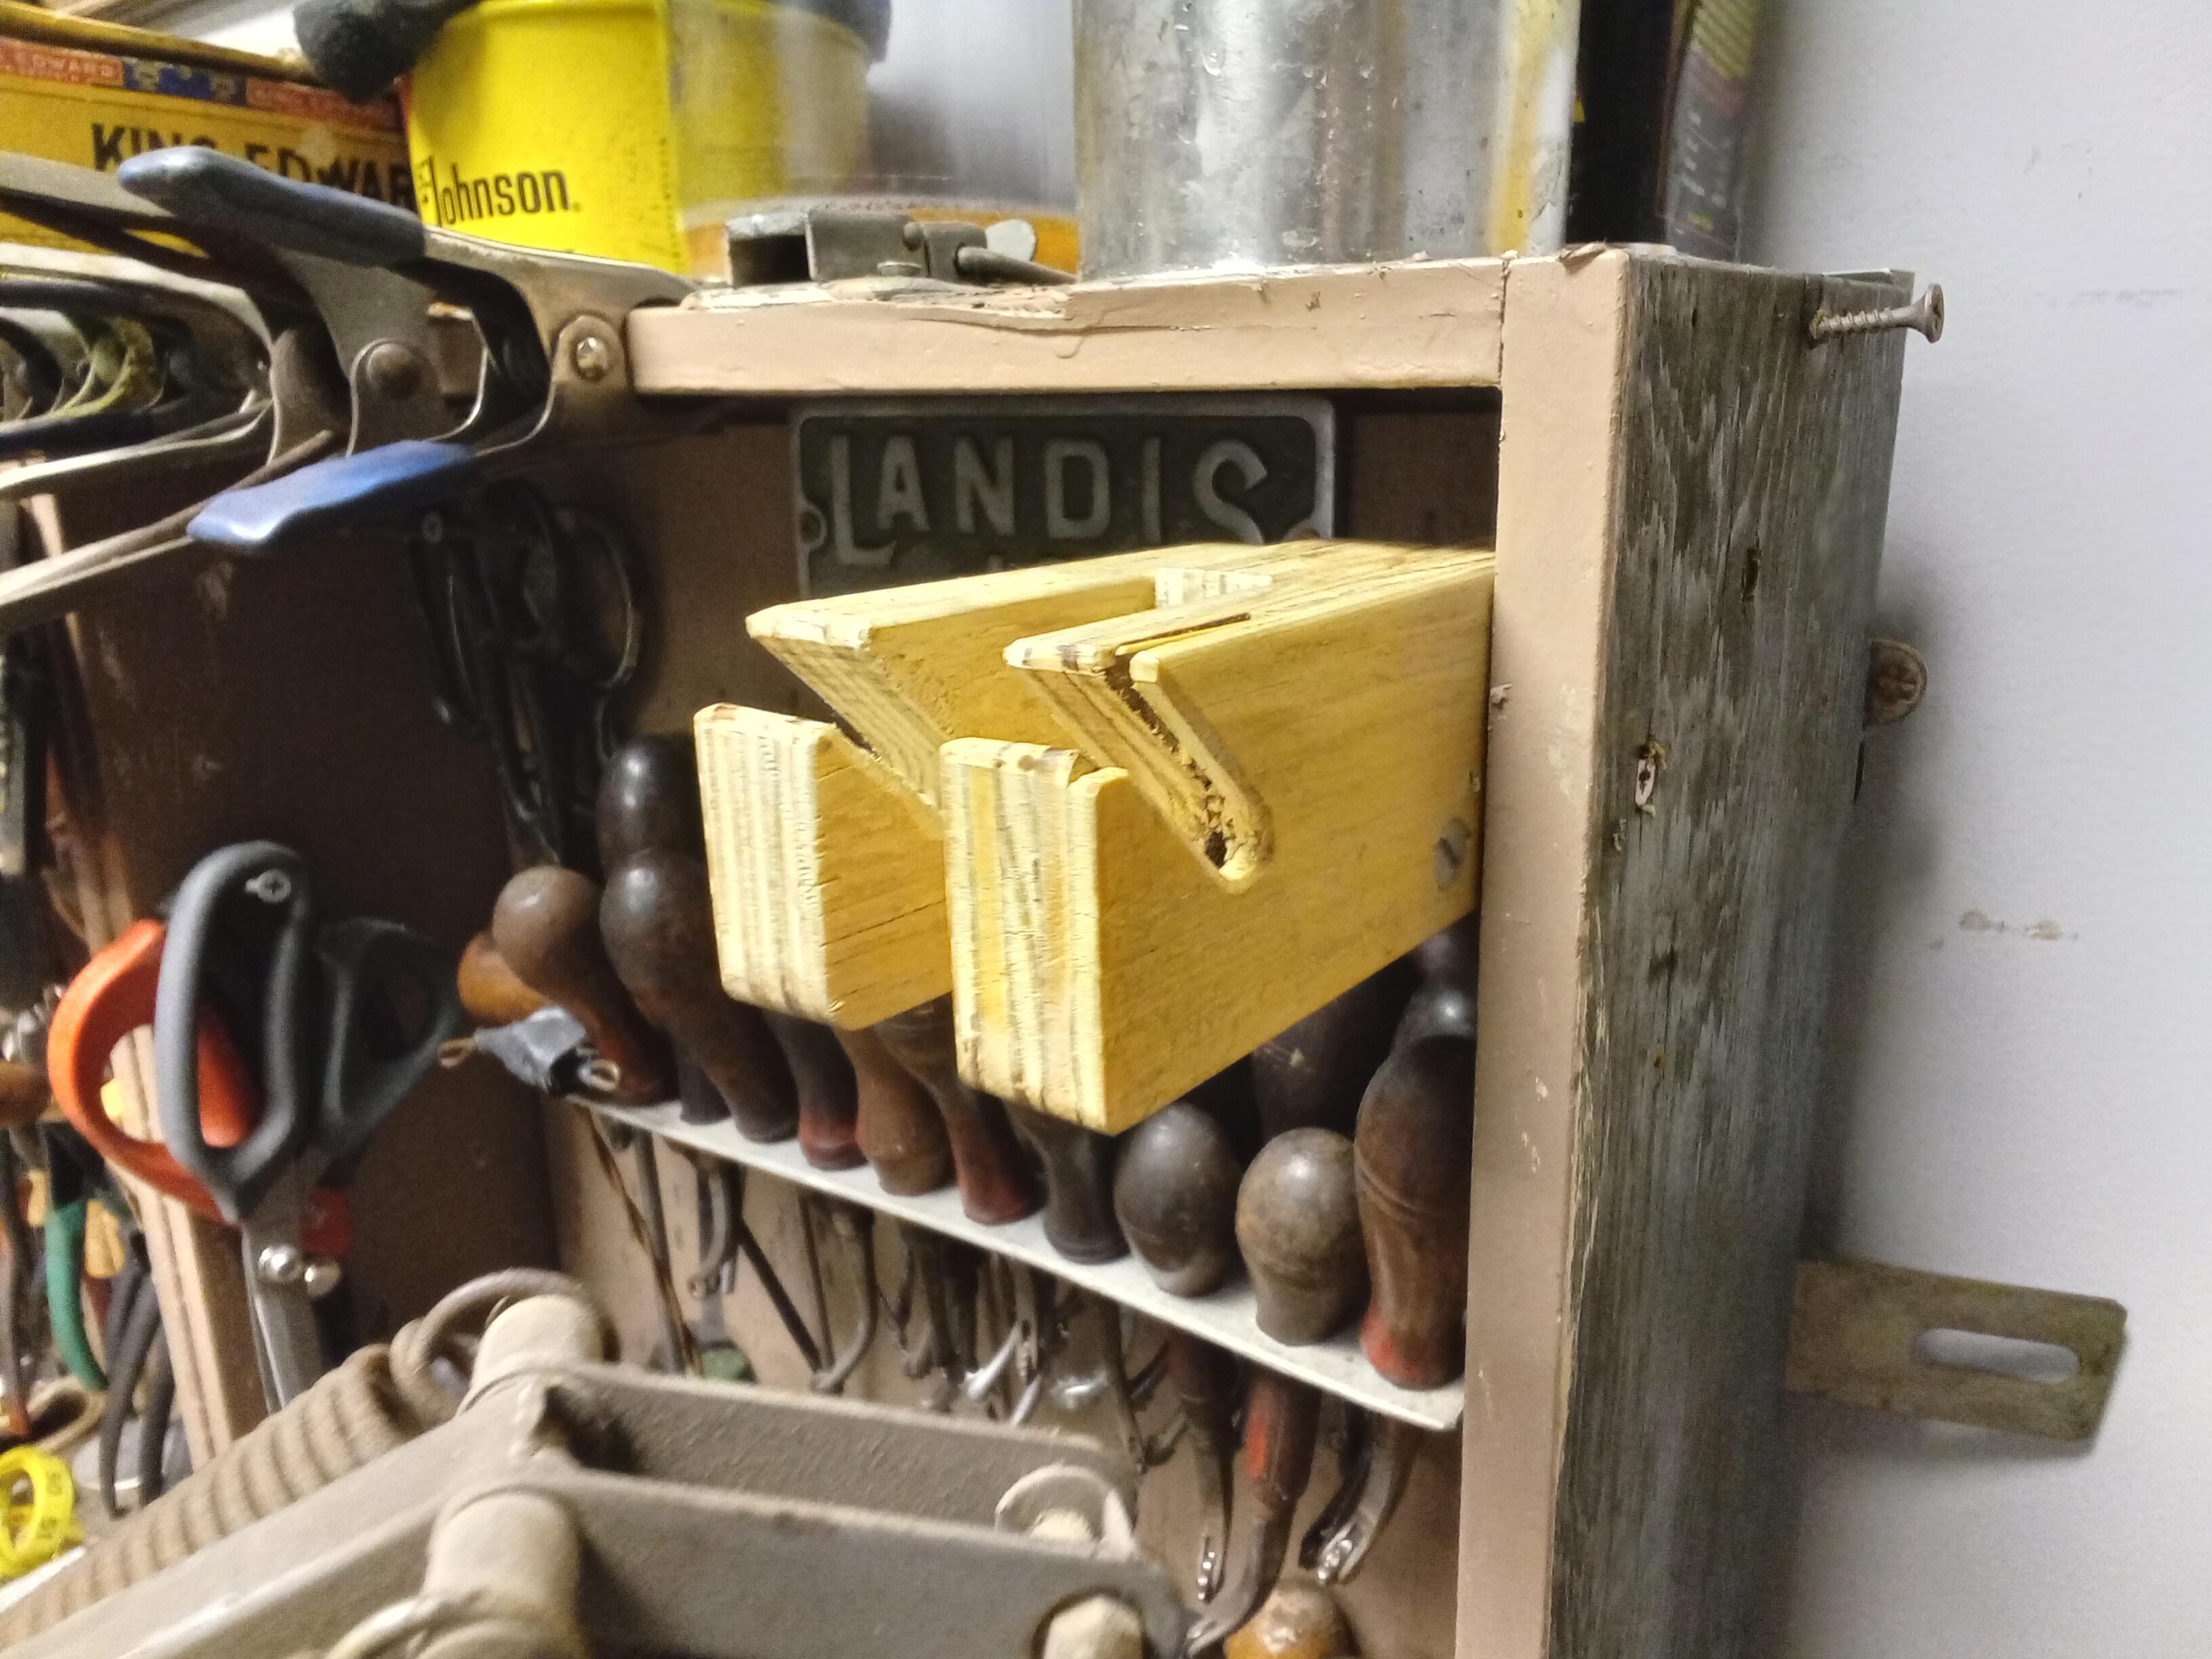
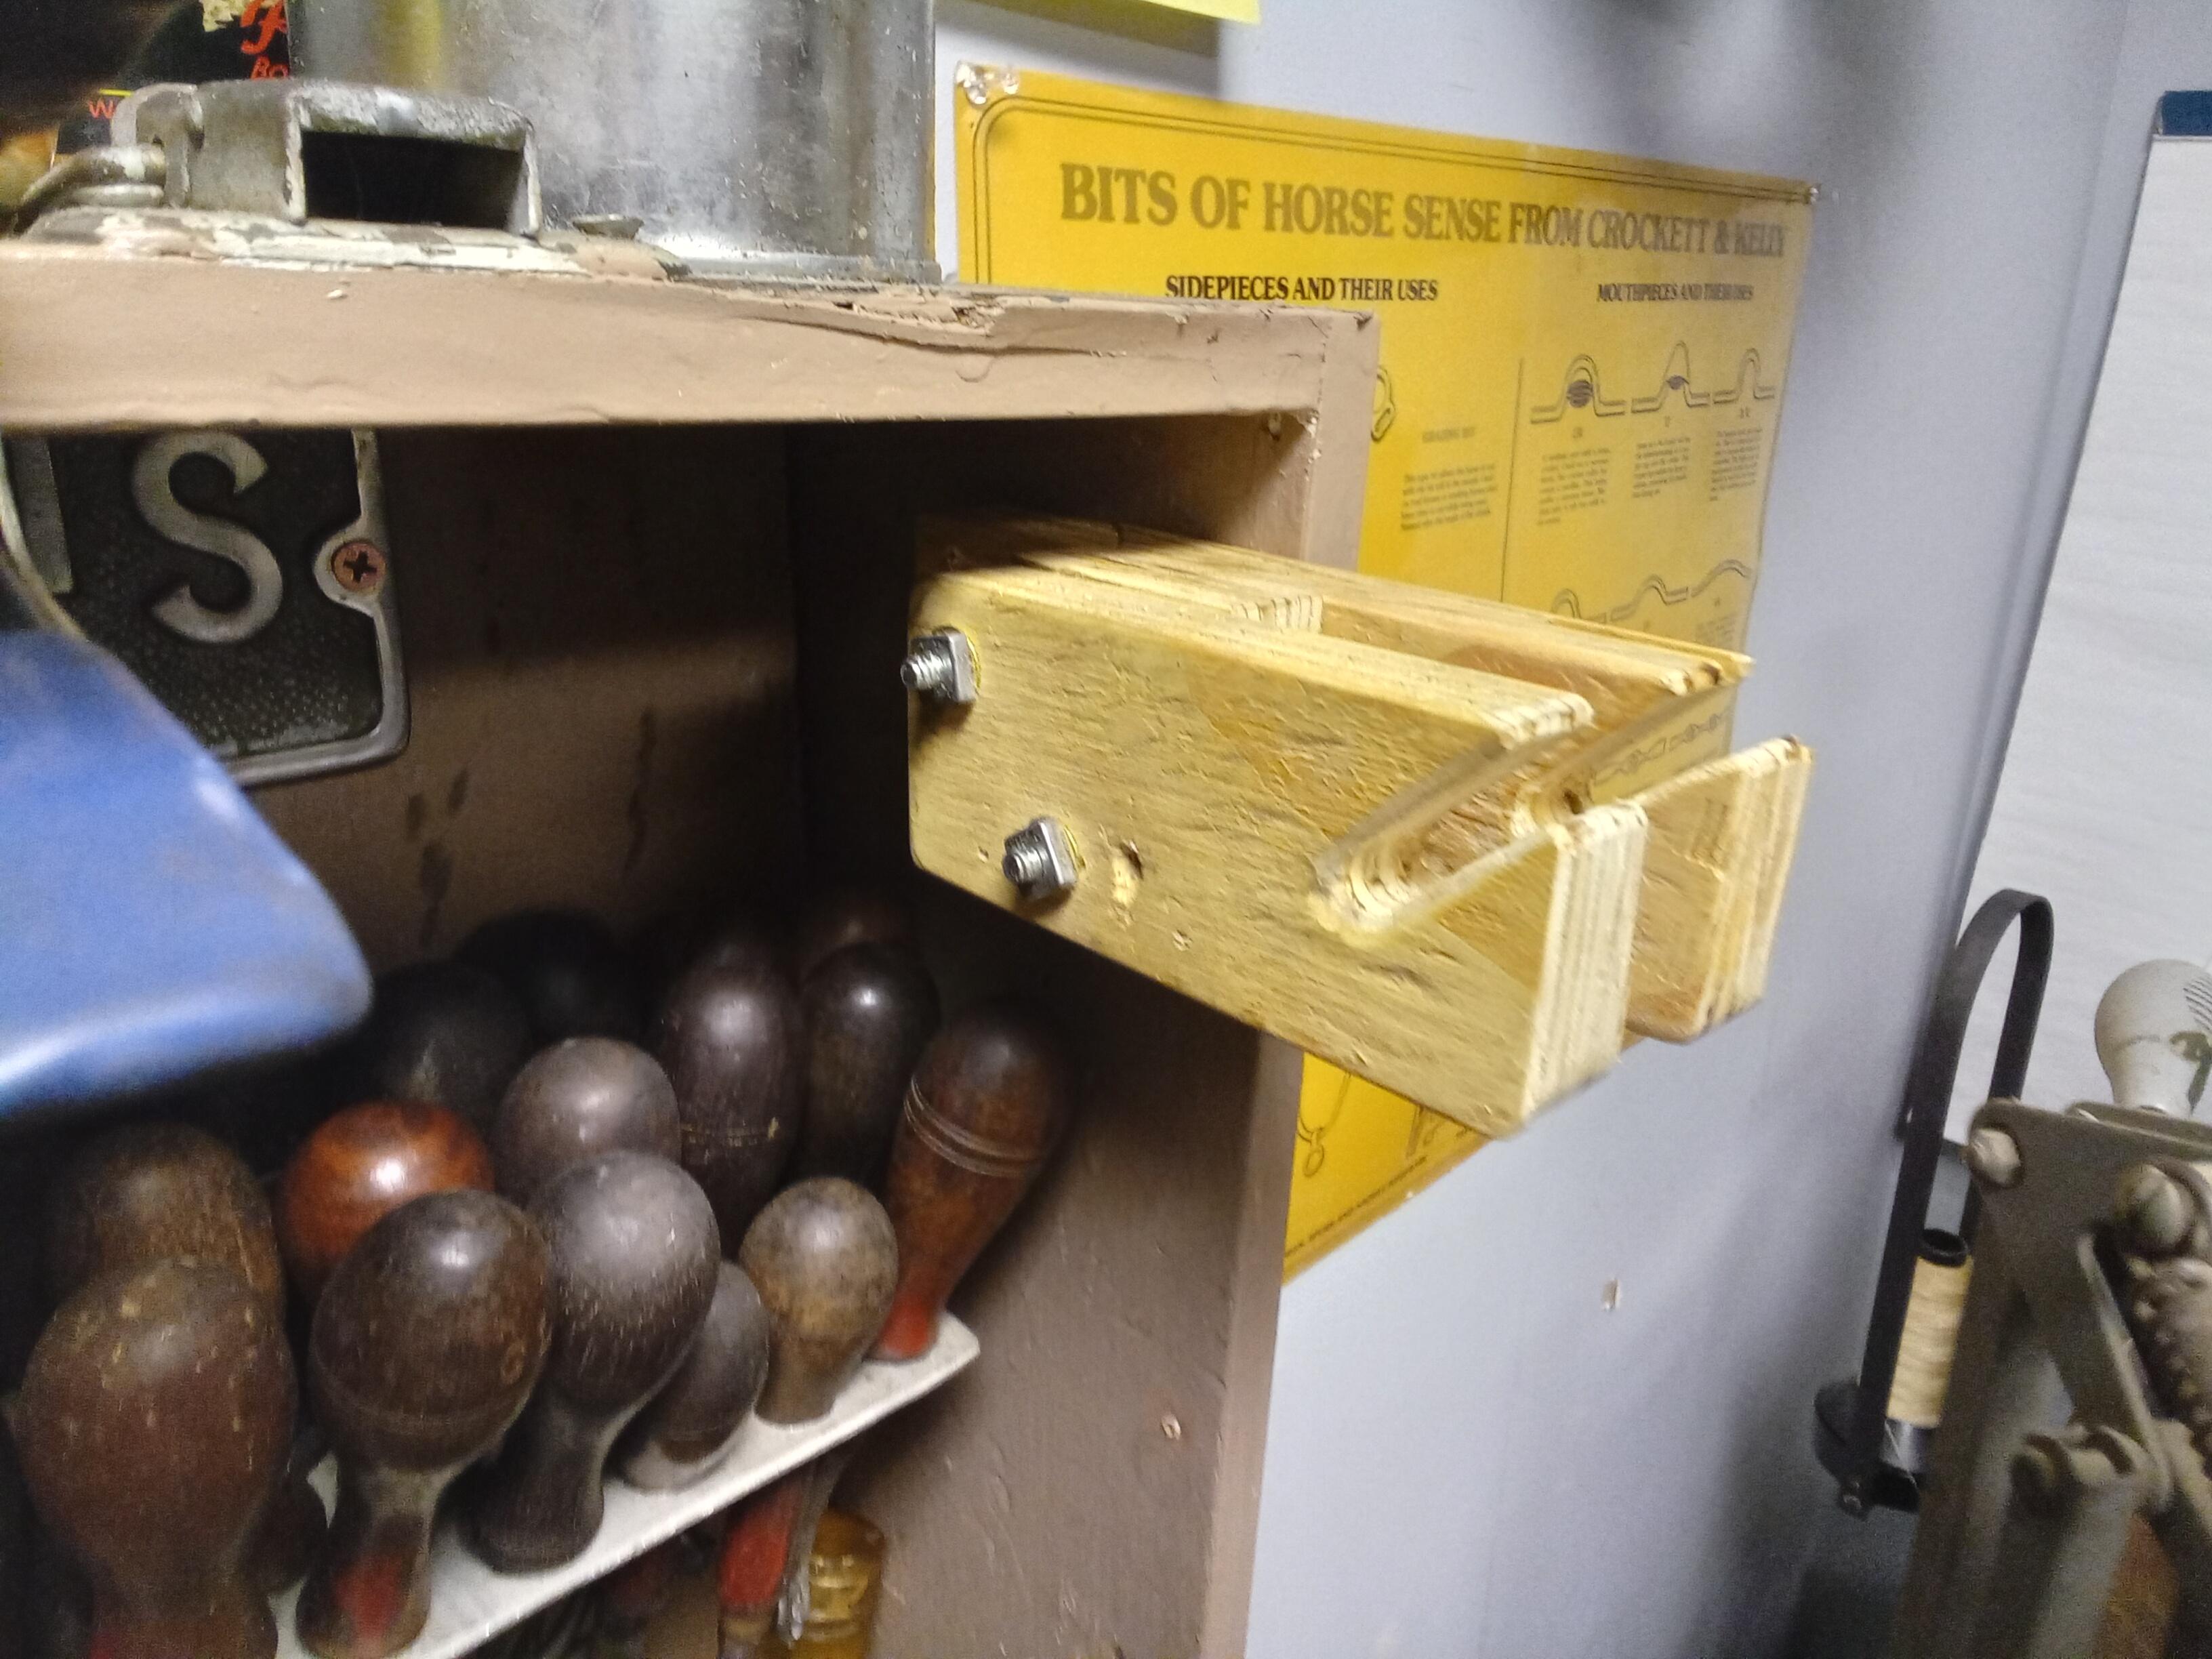
Made a prototype draw knife holder tonight and am really pleased with how it turned out. Easy to drop a knife in and pull it out, keeps the blade angled back so its less likely to nick you, and also takes up less space. Its a simple lamination of 3/4" plywood bolted together and the slots in the front were cut with a drill and a band saw. Now to make a few more.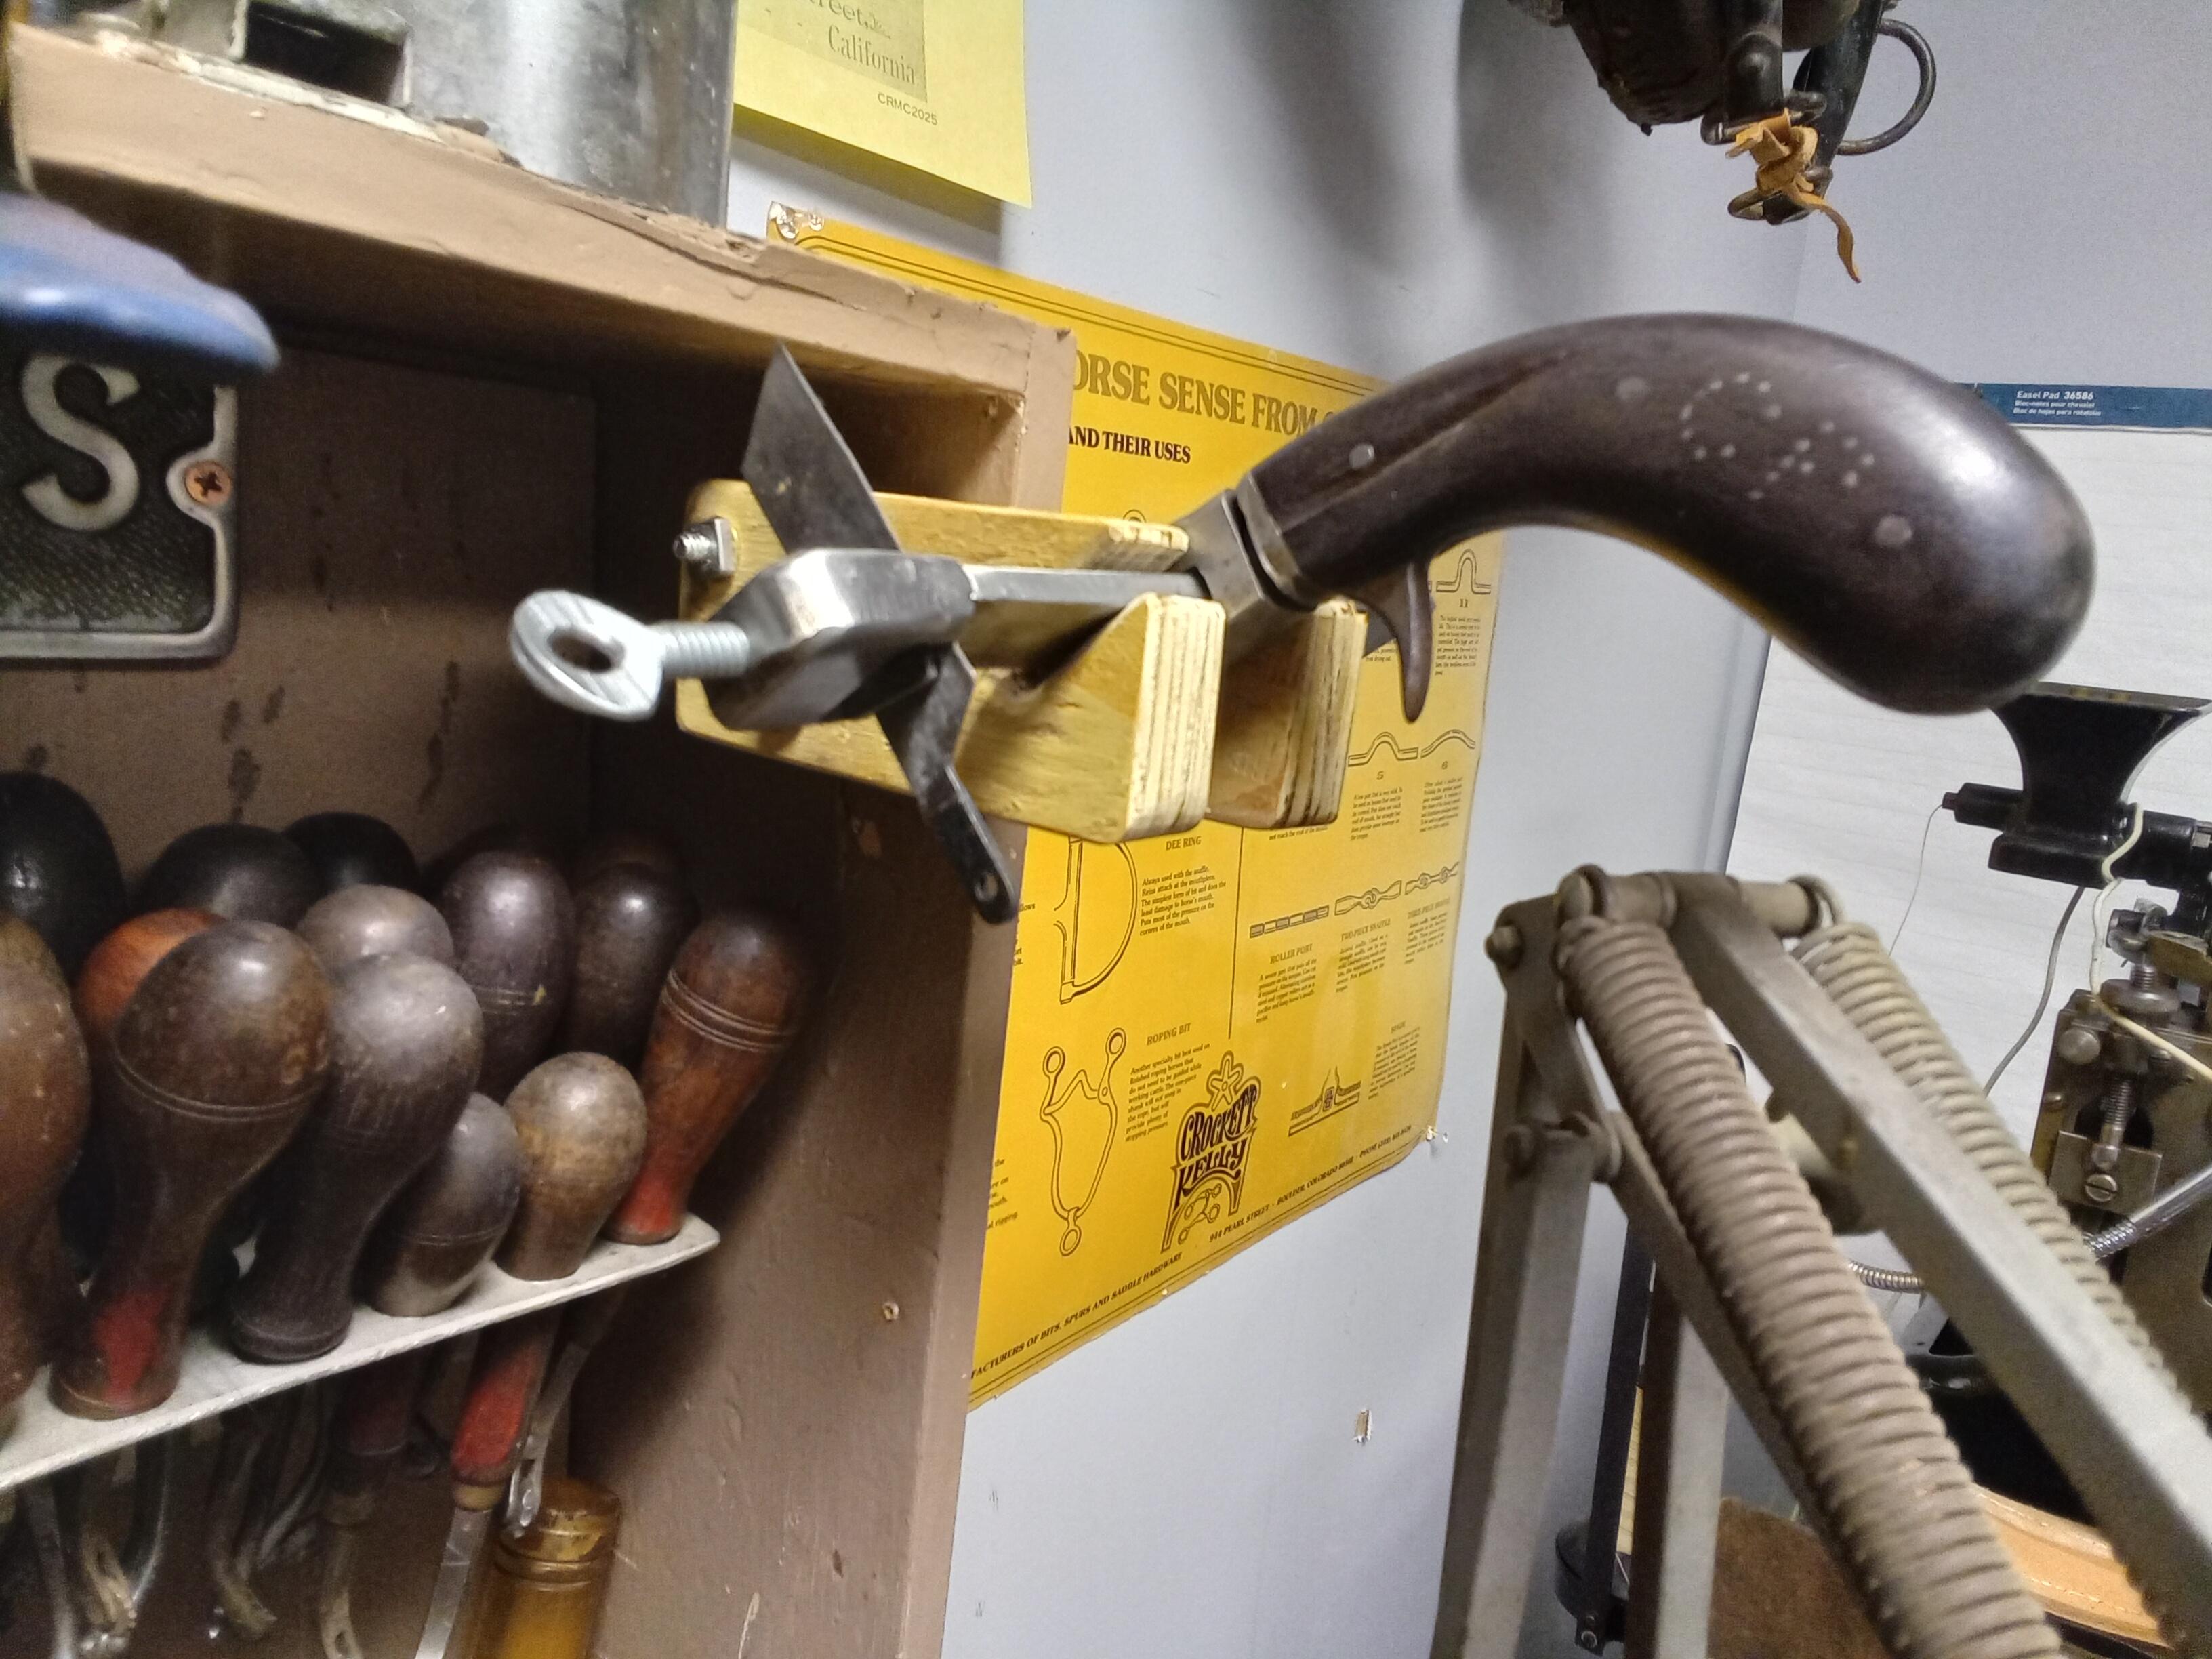

- Today
-
It is possible to get the spines separate from the binders, but you have to buy more than one: https://www.amazon.ca/GORGECRAFT-Mechanism-Replacement-Notebook-Organization/dp/B0D9Y52Q42/ref=sr_1_19?dib=eyJ2IjoiMSJ9.8NrSbrqYITZvlCynqNpfPu-exYO4tl-IF9ia6PXcoSTyTXvV9nWv0Xg7qkbIn10tvLbazE6xn9rSz4gOWUj9uicoIo2jF7m3urxkAgkzQeartloL-wr6CyUEXhiVsETdikB4Jo2w1ROuR7SDmiIapV9R0fAZAqORWOWArg80HKt5ss7_WrAXfUKW39pJqJSUxhEw-5m3O2jY7dN3kHUOYJAUfGhnMf8Y0stERUwBkXdTyVEhiwIr1yN-5AkwEMEPElTQHUcHt9RJJ9cdv1PUsoniPYwqr992Kcw5u_LlTd4.38BT56S29bq3XSbAMNincPJPxD0uWs3bIAd9EIpxxV4&dib_tag=se&hvadid=605132128236&hvdev=c&hvlocphy=9221298&hvnetw=g&hvqmt=e&hvrand=2623142170463263152&hvtargid=kwd-324338471741&hydadcr=19050_13435280&keywords=3%2Bring%2Bbinder%2Bspine&mcid=a6b31fa6d8d2328ebe33b33d7487becb&qid=1747362180&sr=8-19&th=1 Given how many different sizes there are, I'd double check that I picked the right one before placing an order! The British sized paper is different from North American sizes! Somewhere I have a leather notebook holder which holds an 8 1/2 by 11 pad. I'll see if I can find it so I can tell you how the inner liner is attached. I'm pretty sure it's not glued, and like I said, the inner liner has to be slightly smaller to allow the holder or binder to fold without wrinkles. I know for sure the plastic ones aren't glued. When they fall apart from age, the cardboard stiffener isn't attached to the plastic.
-
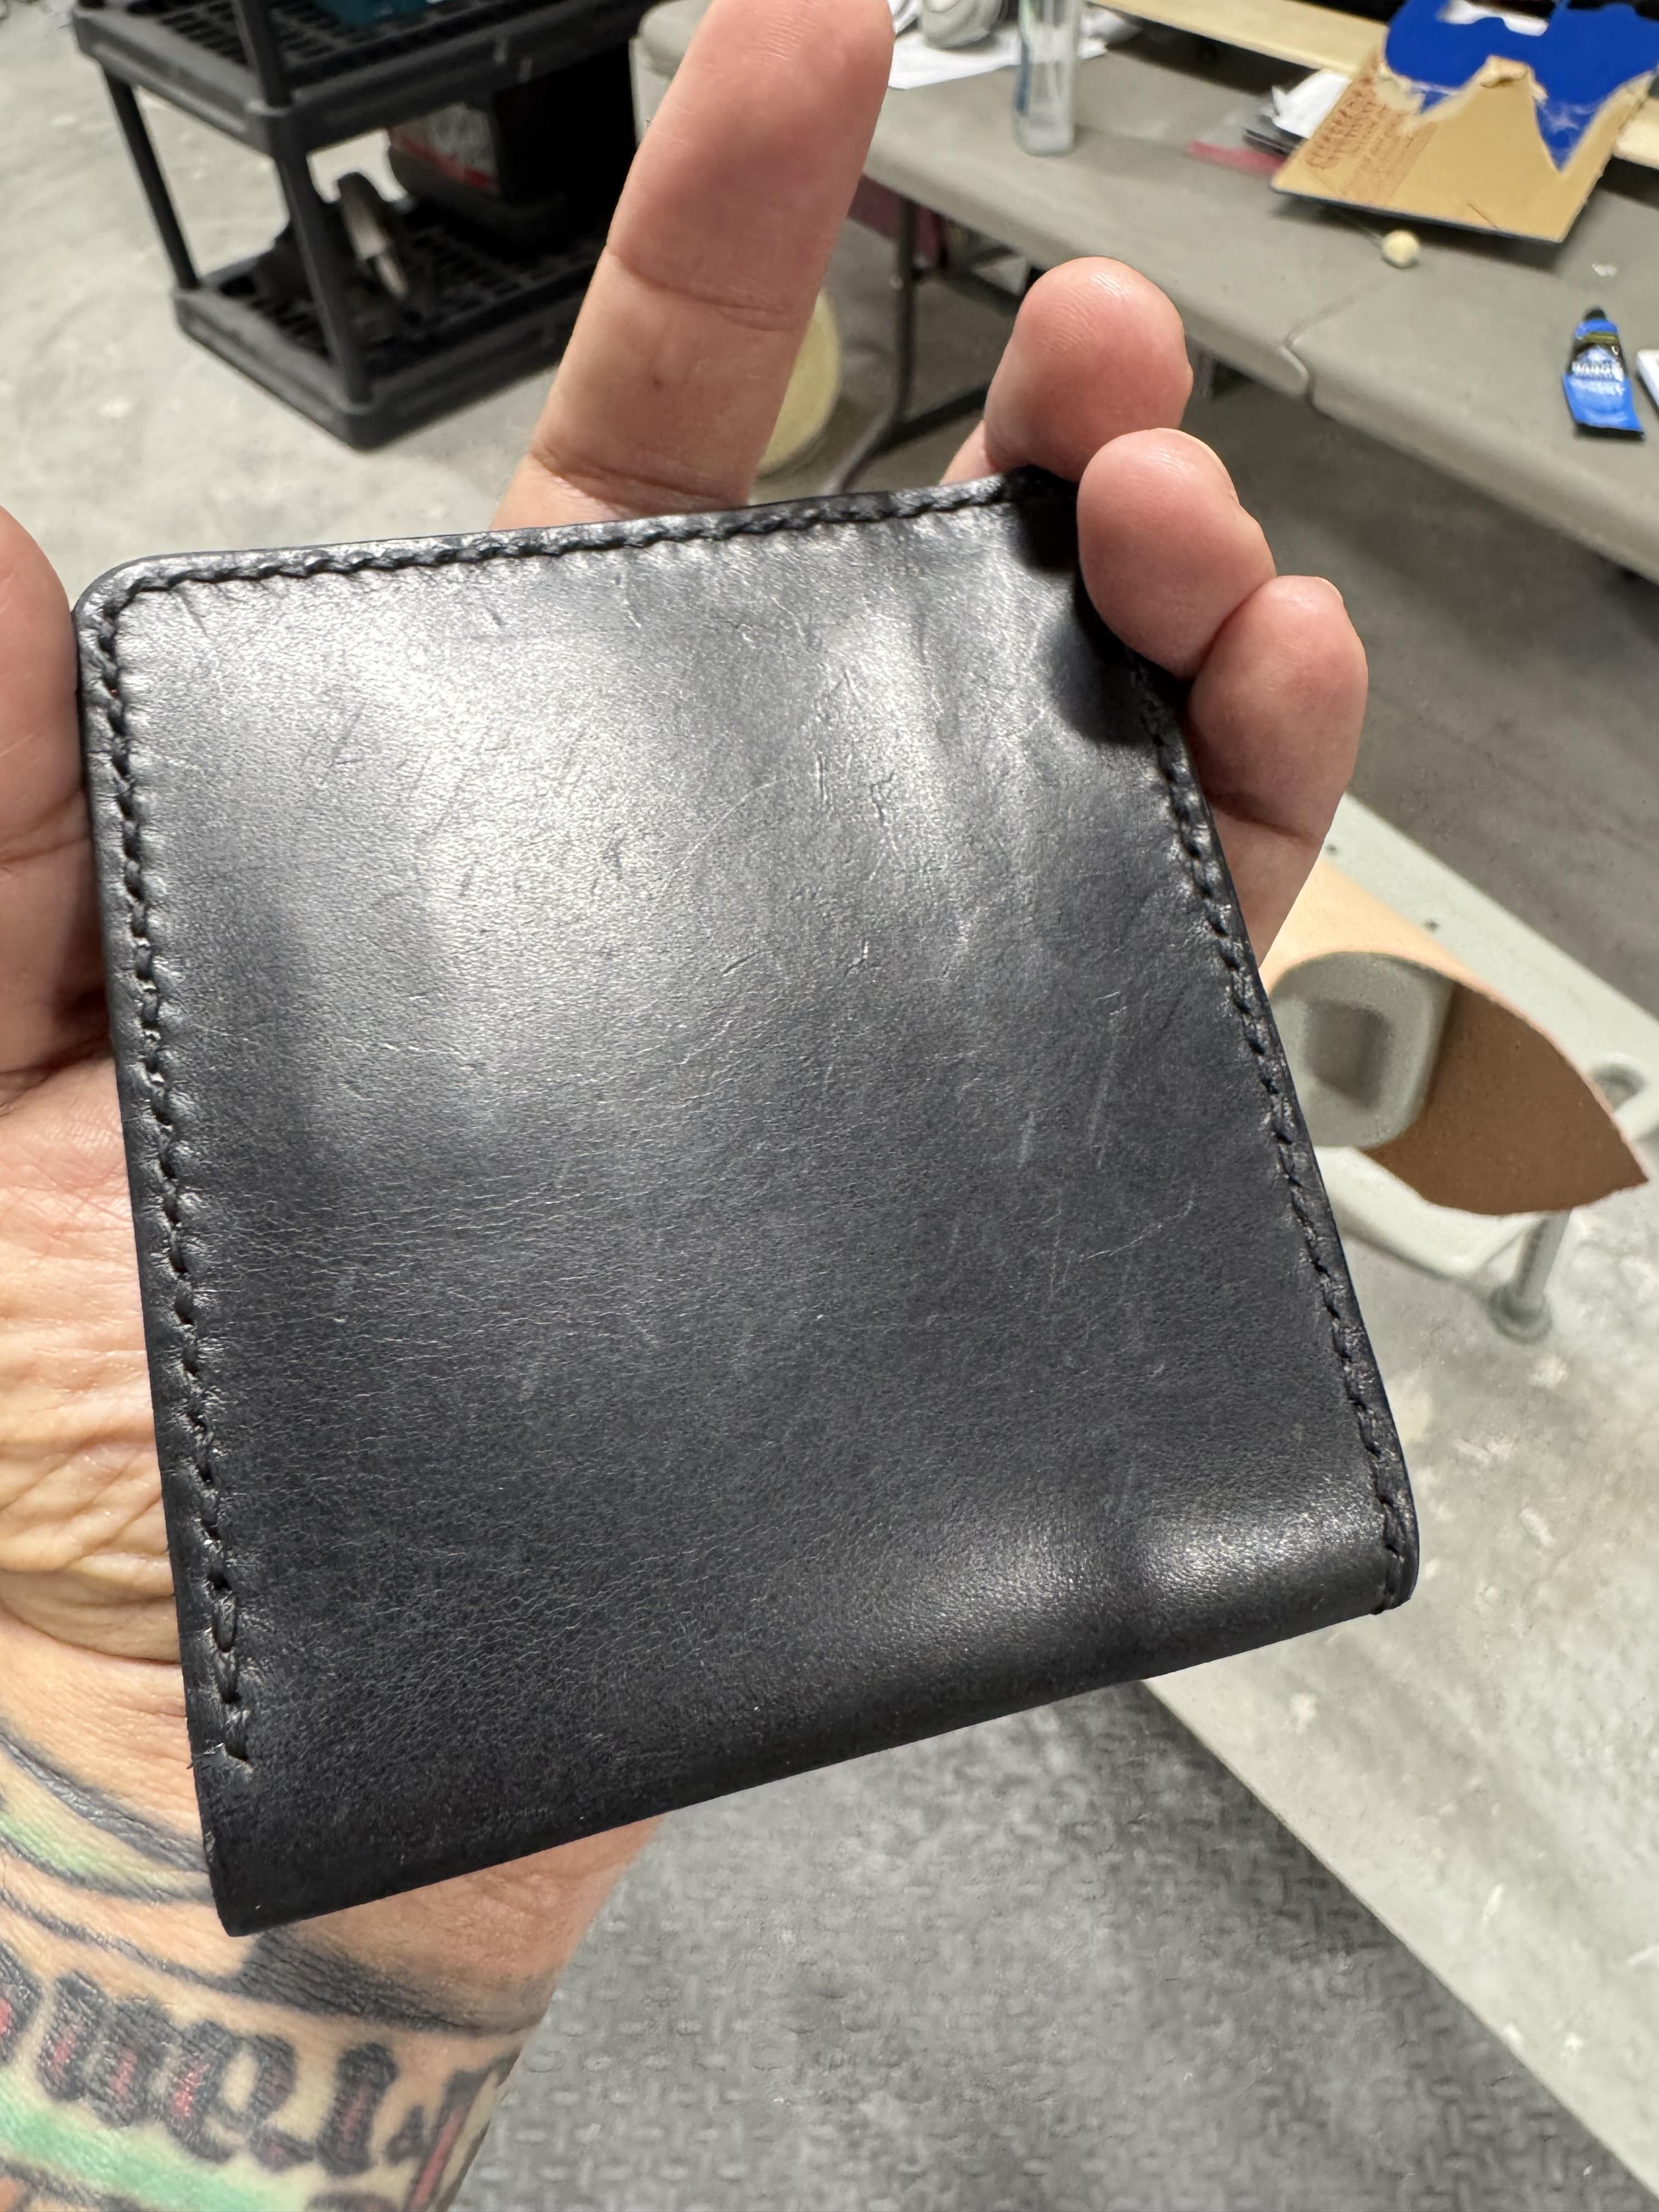
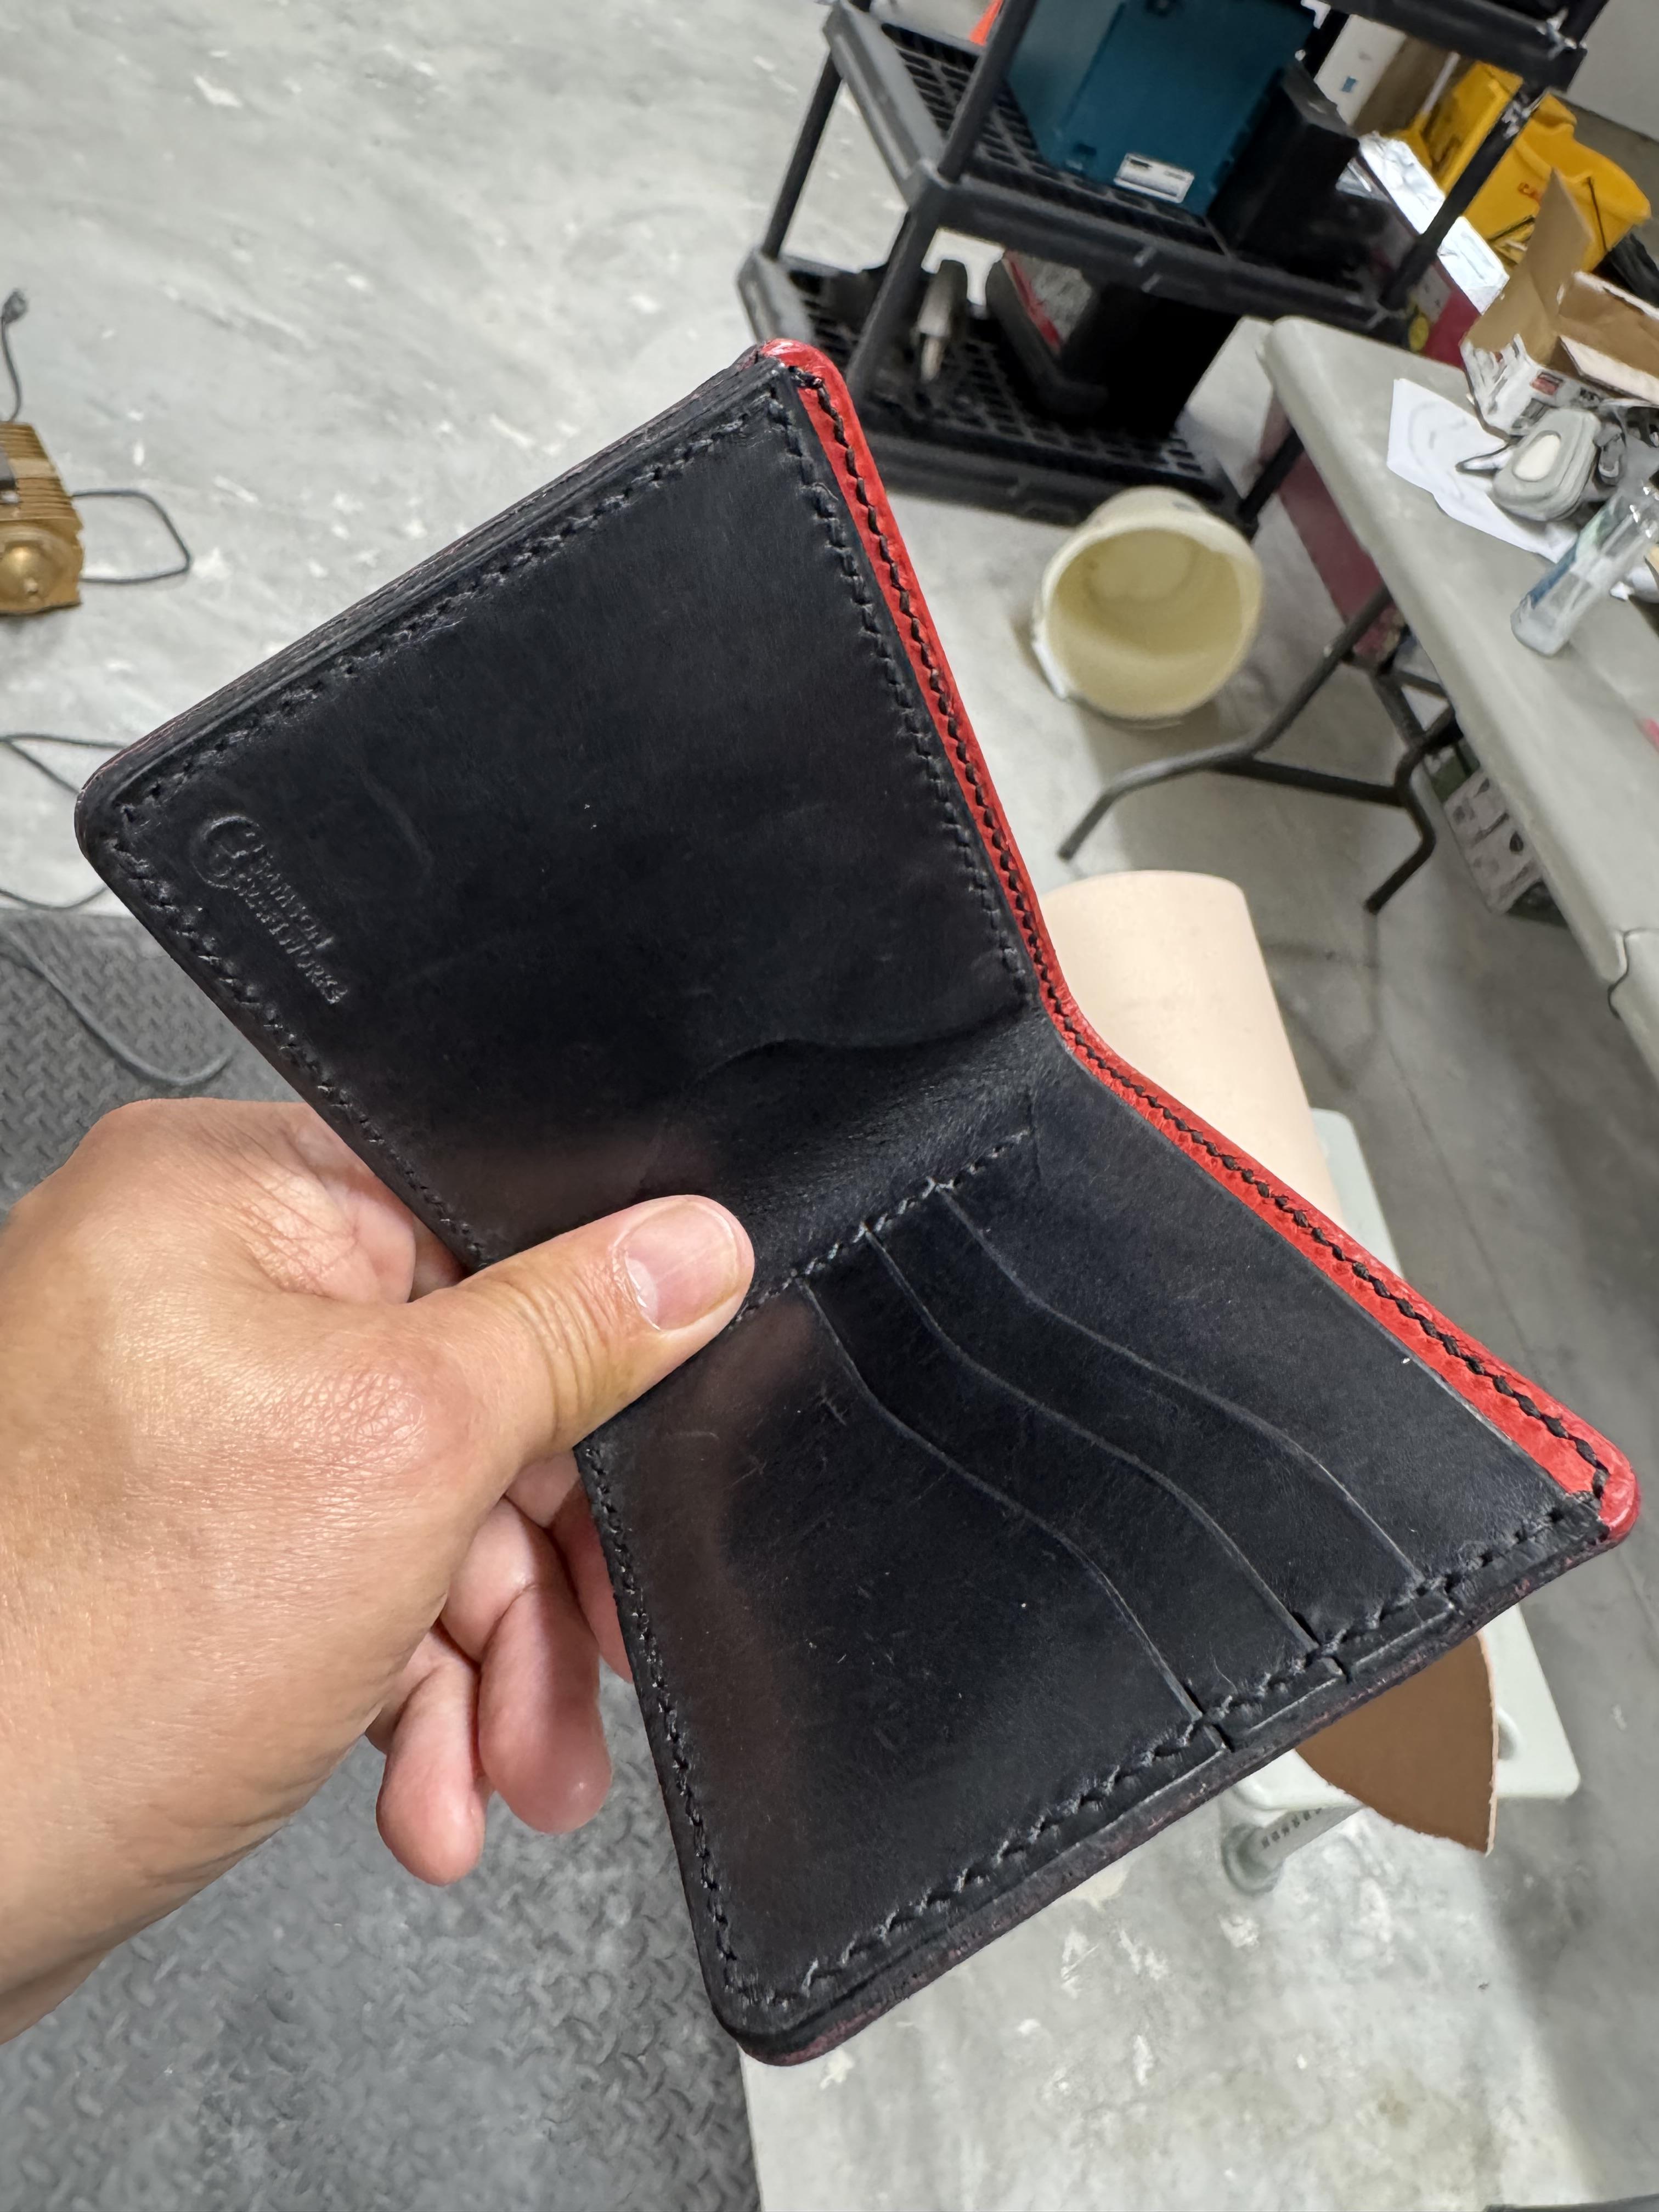
I made my first "real" wallet recently, and I noticed that there are some small marks on it. Is there a good way to remove them? If it were shoes, I would polish them.
-
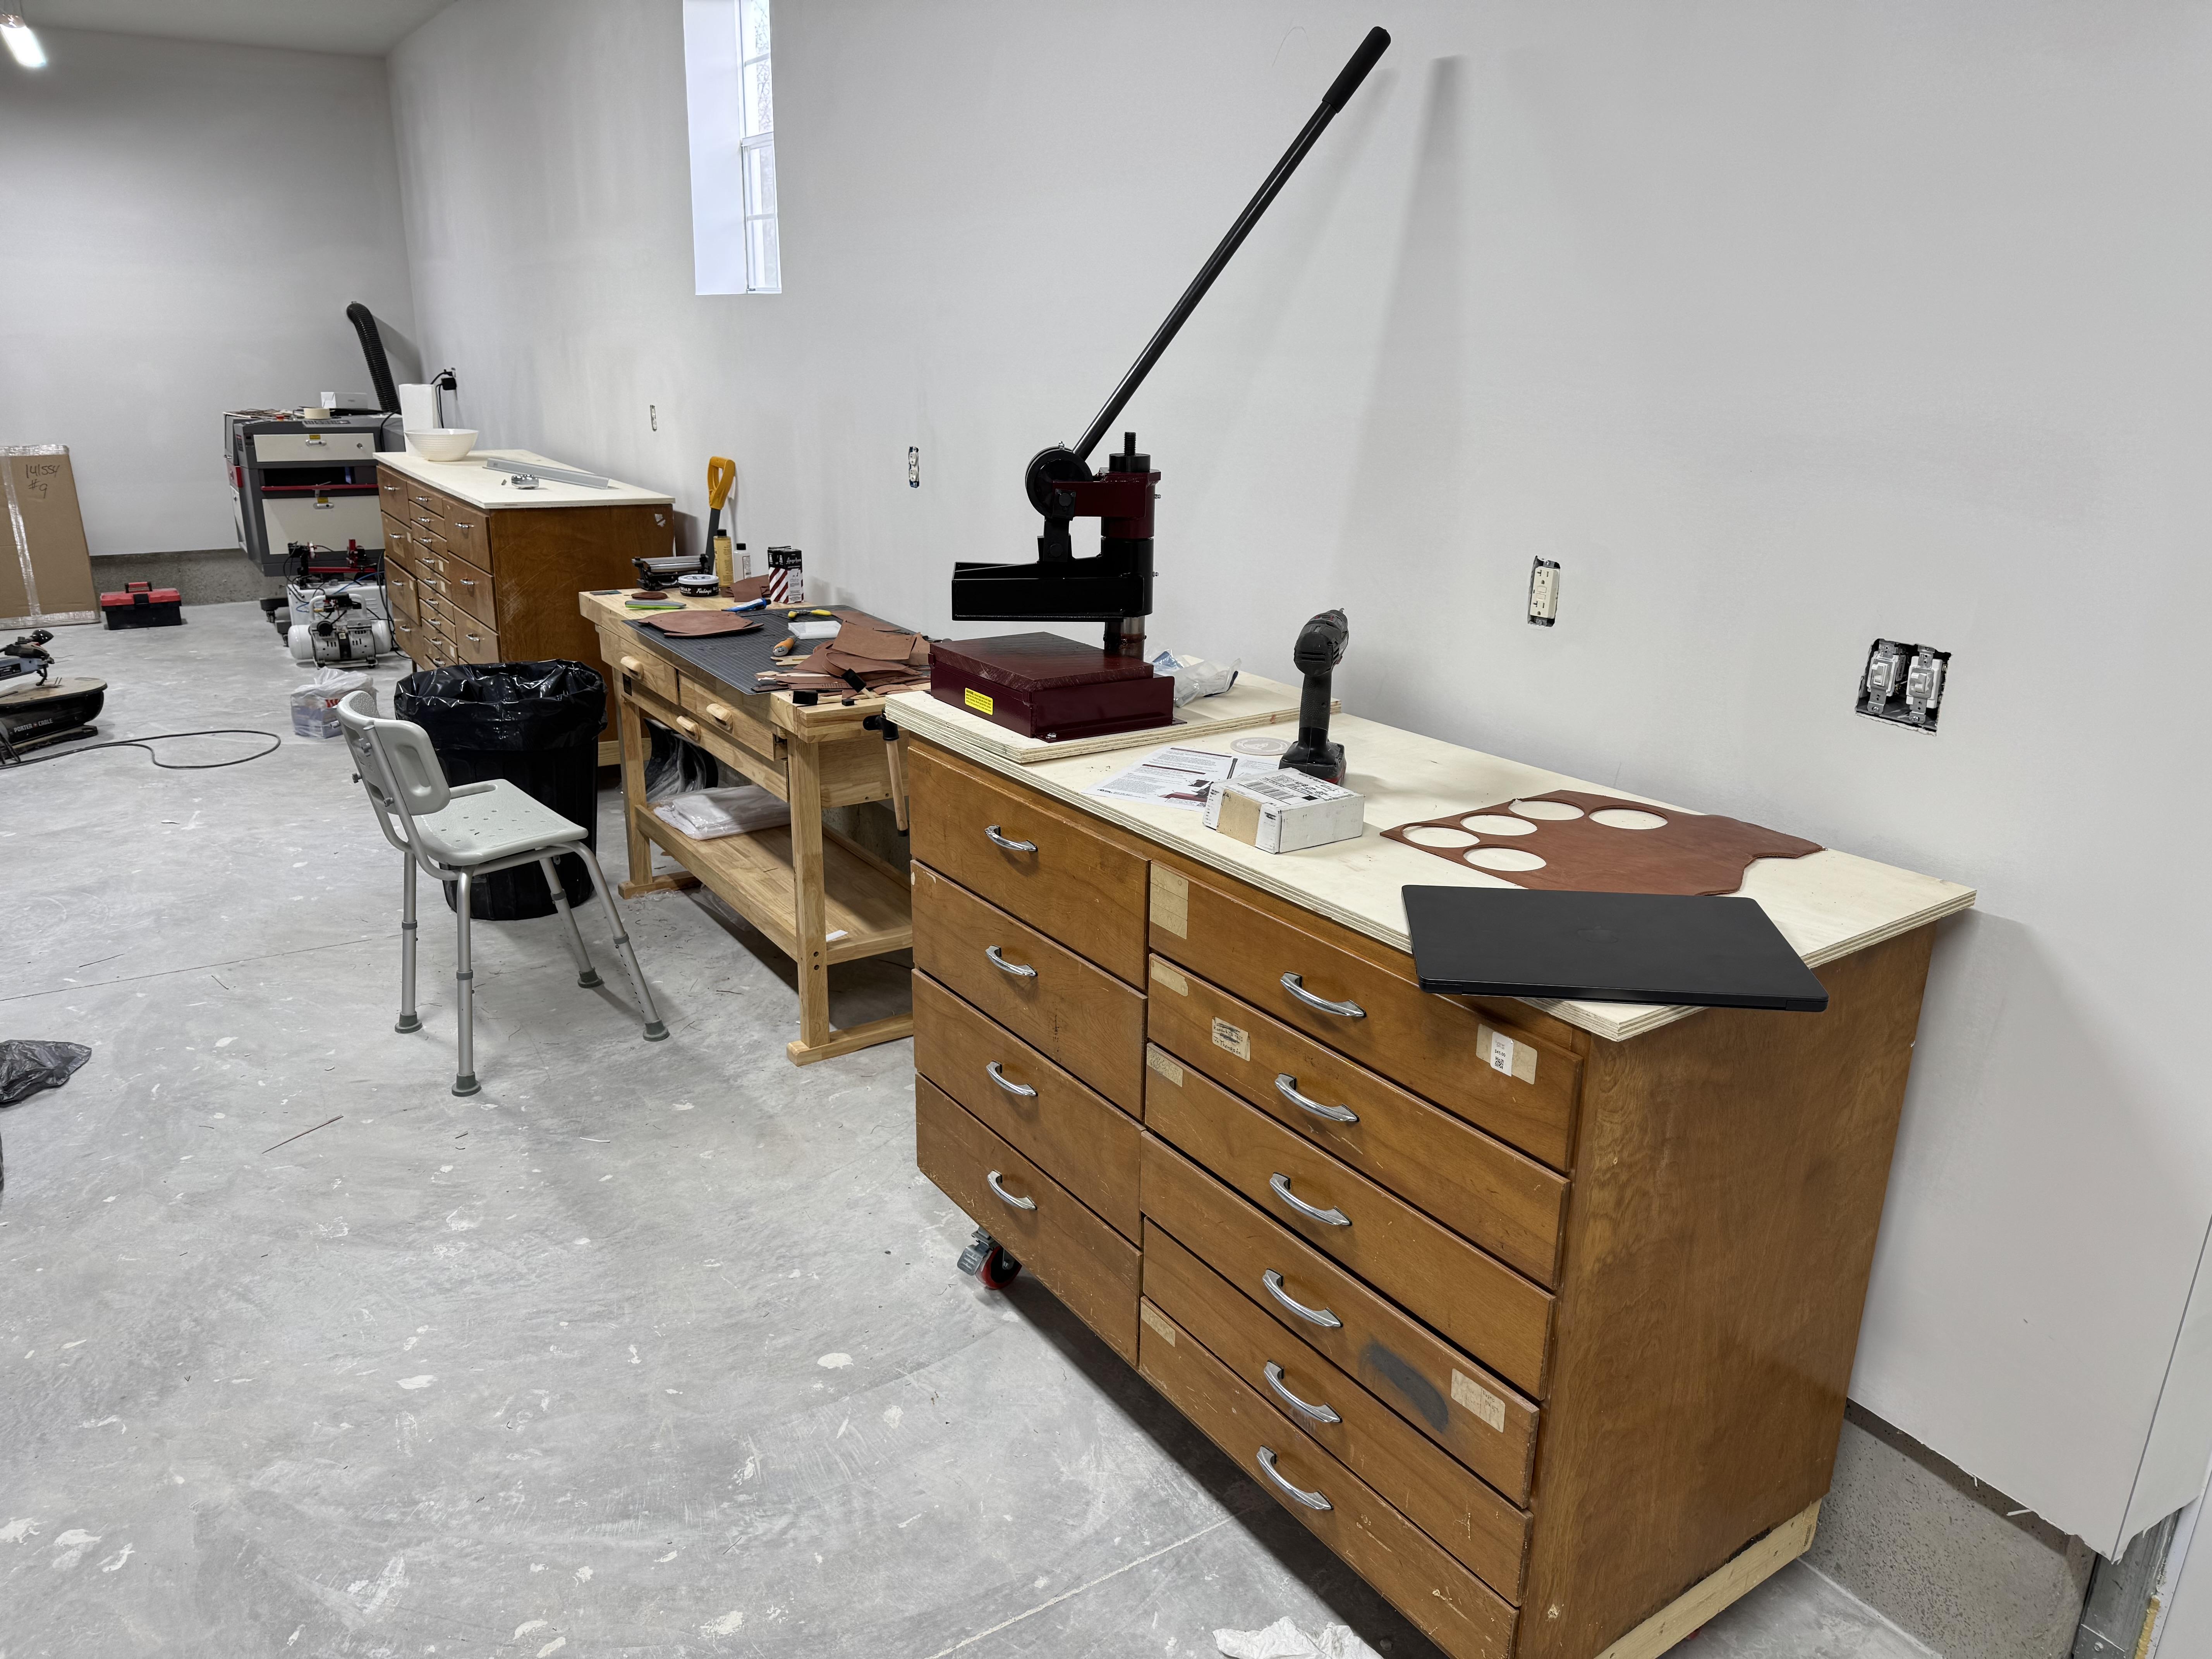
Welcome to the forum Bunch of nice gals and guys here. All willing to share with you Very nice set-up you have there. It'll soon be mussed up!
-
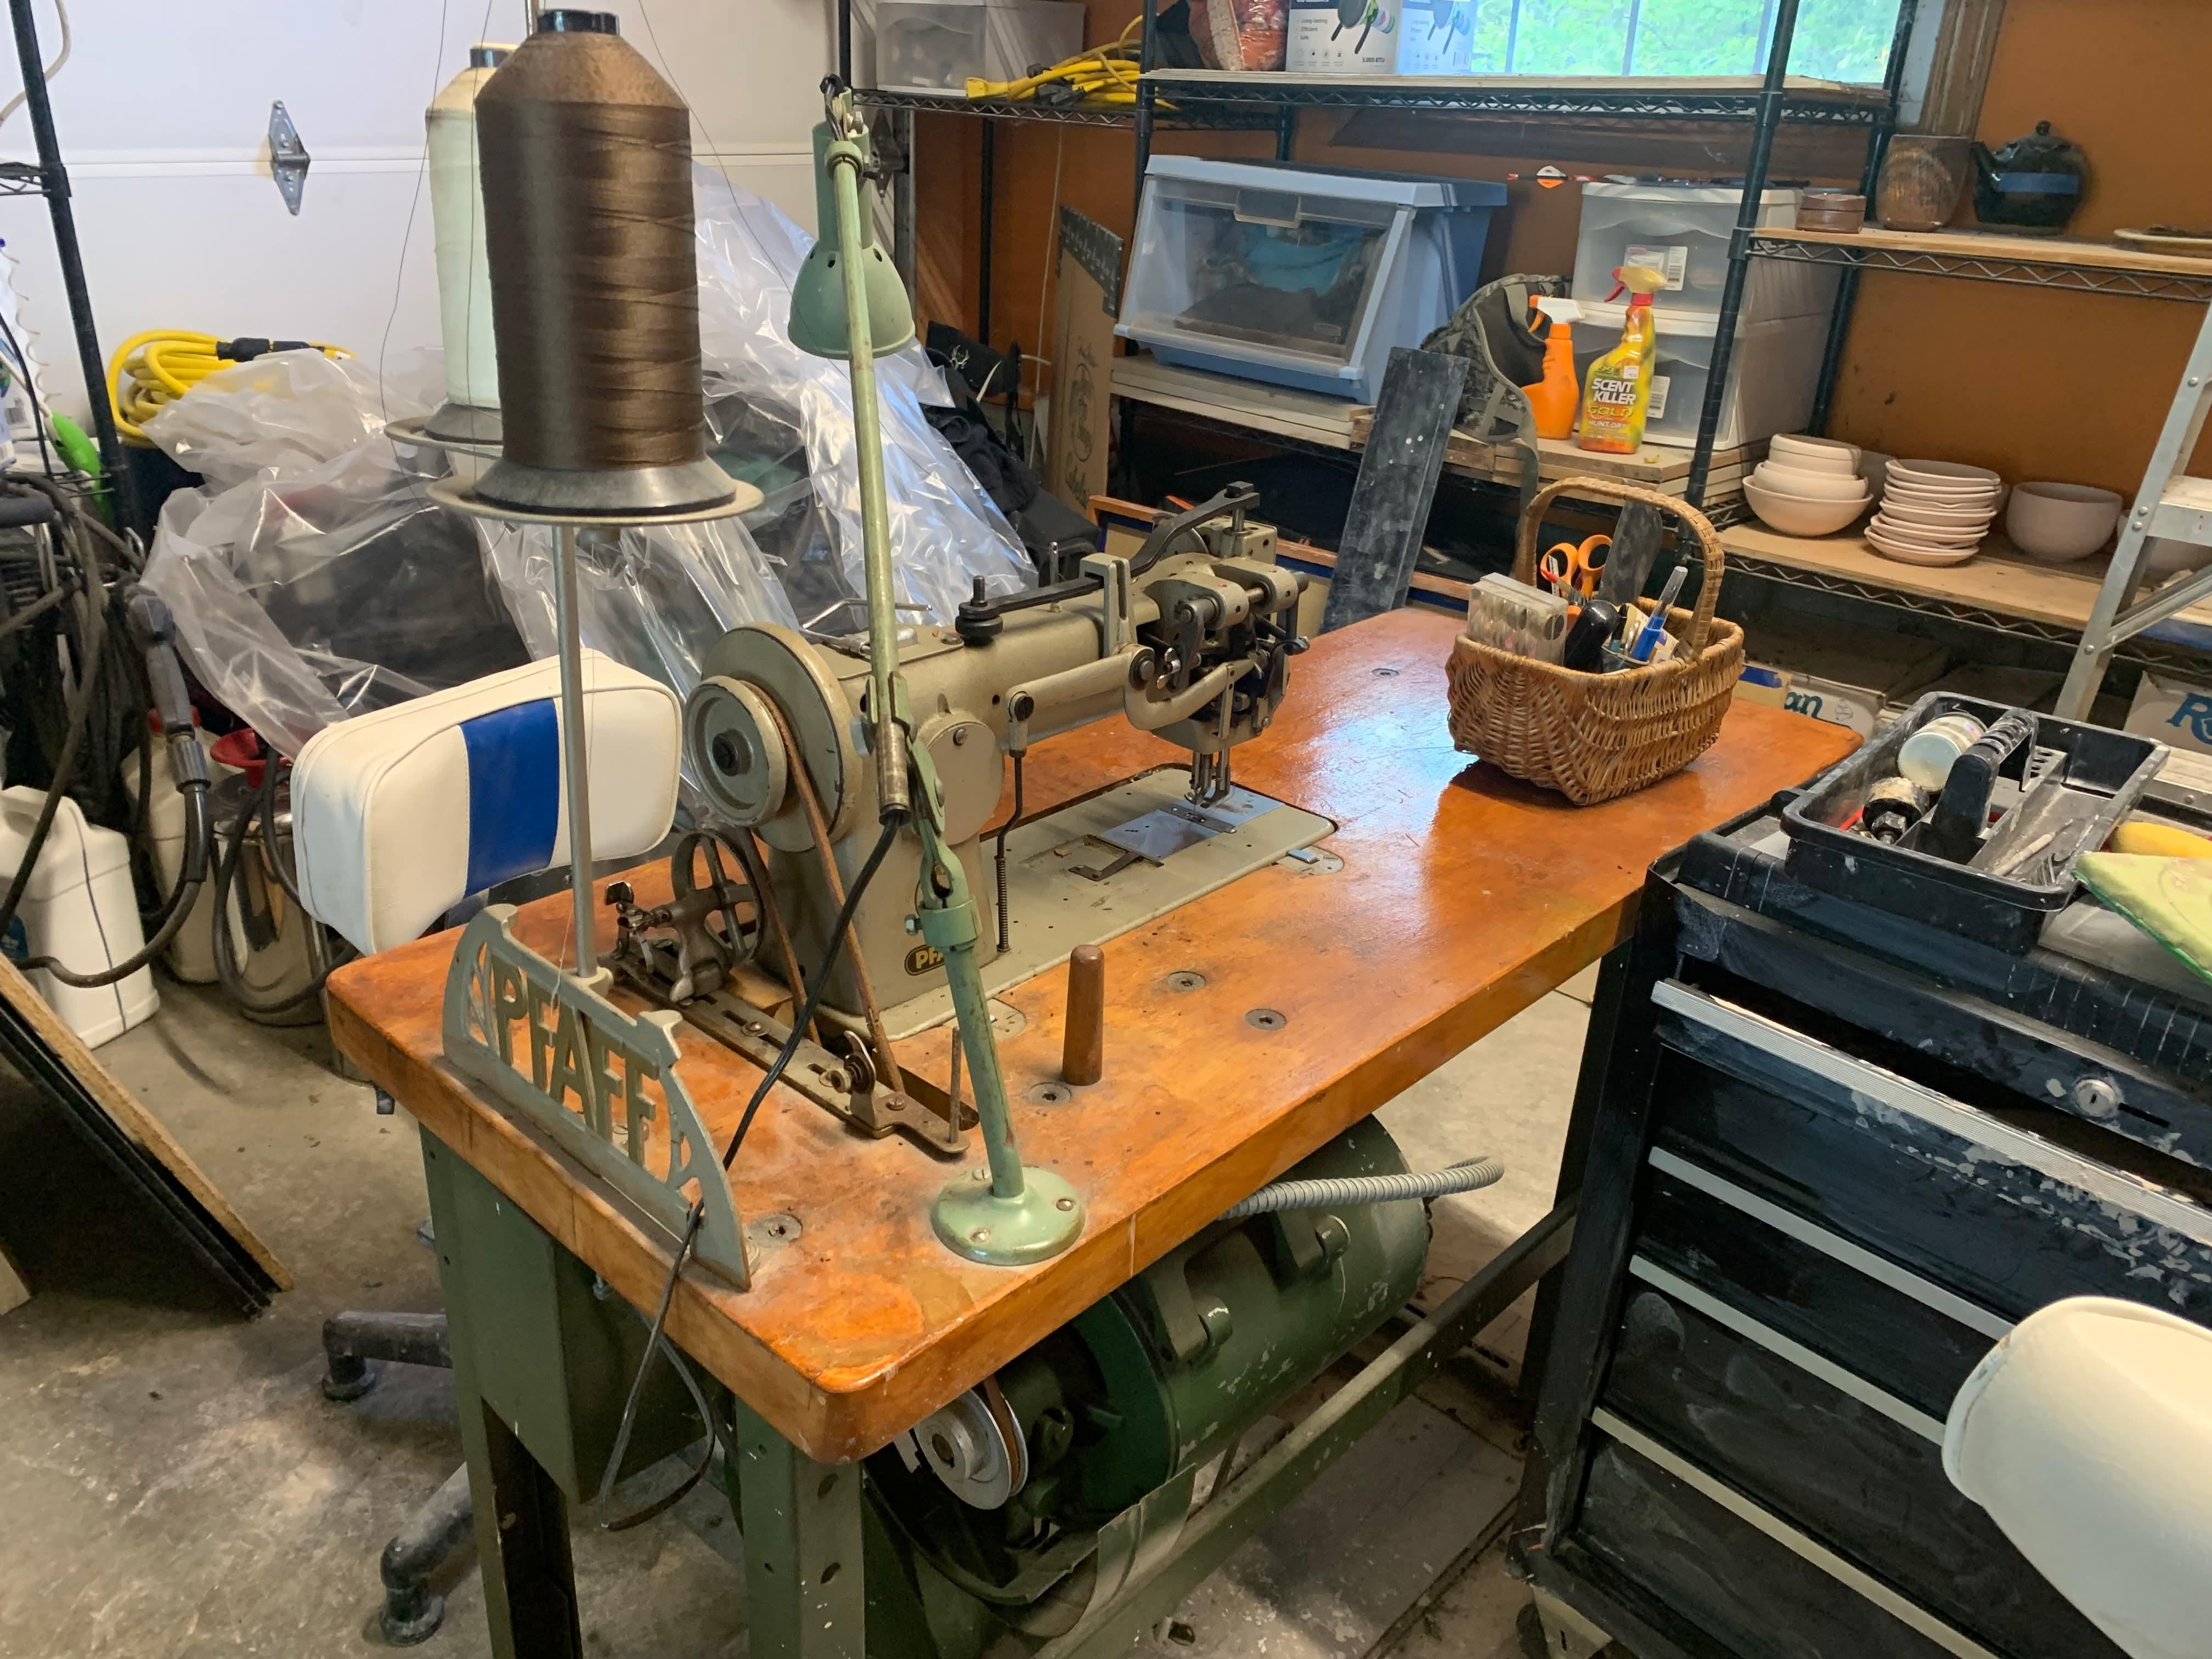
I had the good fortune of stumbling on a Pfaff 145 in my area for sale that is in great working condition for $650. I am picking it up Saturday, and im pretty stoked. It has the original clutch motor, and from what I've read, to make it ready for sewing leather it is advisable to switch out the clutch motor for a servo motor. Does anyone have any advice for all the materials I will need besides the motor (and if anyone can point me to a reputable motor, that would be awesome)? Thanks!
-
Hi all, My name is Eric and I live in the state of Michigan. I just started playing around with leatherworking less than a year ago. I bought the tools and leather about two years ago, and it just sat in my basement. I finally finished building my workshop this year, and have stocked it with a clicker press, skiver, and splitter. I started out making small things like keychains and bookmarks, and just recently made a wallet. My next project is going to be a tote bag. My wife is also crafty and we are hoping to hit the craft show circuit when our skills are up to par.
-
 Airickjay joined the community
 -
Good job I like your deluxe versions.
-
Thank you, he was pretty excited when I sent him the pictures. As to the construction I used side cutters to remove the rivets on the binder rings that attached them to the cover. There were tubes that the rivets went through that I used a Dremel to trim them flat to the bottom of the binder assembly. Then I put it together like you described, but with leather and plastic instead of plastic and cardboard. The cover on the donor binder was a heavier single sheet of plastic so I cut it into 3 pieces a front, back, and spine. I trimmed the edges of the plastic to be about a quarter inch from the edge of the leather, and left a half inch gap between each cover piece and the spine so it would fold easier. Then I glued them to the leather cover with contact cement and then glued the liner to that. That is part of the wrinkle problem was the same size liner as the cover and glueing the liner completely to the cover. I used #9 copper rivets to attach the rings to the cover. After I folded it, which was challenging I covered it with a towel and left my smaller piece of marble on it overnight then did the same thing to the other side the next day and mostly won the battle the keep it closed. Yes it is 8 1/2 x 11 paper sized. I figured you could get rings by themselves but I’m not sure where. Forgive my run on style of writing I hope this answered your questions and helped.
-
Hello folks, I’m about to order some contact adhesive again and am debating between the above mentioned options from Renia. Although I’m pretty set on one of the above, I’m open to good alternatives. It’s gonna be used for sheaths, the odd holster, belts, hopefully the odd saddle and such. So it’ll have to withstand some wet moulding. Although the wet moulding I do would be more on the “light” to “medium” side. I will also say upfront that I contacted Renia and they recommended one of the above mentioned ones. So some would wonder why I still ask this question. Well, I’d like to know what experience those of you who used some or all of these contact adhesives made. I’d like a really strong bond with some resistance to water. I was a bit concerned people would get annoyed with me for asking this question, when I already got a recommendation from the manufacturer. I’ll take my chances anyways . These glues aren’t cheap and I personally don’t think it hurts to try and find out more about what and why people ,who actually used them, prefer one glue over the other. I appreciate you taking the time to read my post and possibly even give some feedback. It’s greatly appreciated.
-
 What would the cost of shipping be to Texas?
 - Yesterday
-
If you have Stohlman's book How to Make Holsters, the pattern for Hi-Point .22 on page 19, or for 9mm Luger on page 27 should work. The Ruger Mk II is very similarly shaped to both. This book also has concise instructions on how to make pistol patterns. Of course, you would need access to the pistol. Would you be able to go to the pistol club to draw the outline of the gun? Not sure how NZ's laws work. Or, the owner might draw the outline for you, avoiding breaking any hinkey laws, and gives you the basis for a simple fold-over pattern. If you know how to make a knife sheath with this method, you can make a pistol holster the same way.
-
 Jim190 joined the community
 -
There should be a couple of tabs that stick up about 3/16" on top of the bottom roller bearings and these serve as reference marks for your blade position, separate from how high or low the roller itself sits. If you are splitting softer leathers, you would want the blade just touching the tabs, but if you are splitting harder denser leathers (shoe soles for example), you'd want maybe 1/16" or up to 1/8" gap between the tabs and the blade edge. This is because those denser leathers don't bend up over the blade as easily as they cut. If the blade is set too far forward, the material binds up as it cuts and puts extra pressure on the blade, while if it's too far back it might split easily but not accurately as the material can float and bend too much as it's cutting. You might have to do some trial and error, but it's not something you'll mess with often unless you are doing really precise work, and typically you just have to find a general area for the type of material you are seeing (softer or denser) and put the blade back at that same position whenever you take it off to sharpen. Most of the time I'll start with the blade shaving-sharp and adjusted all the way forward, and if the material dosn't want to go through or tires to bend the blade, I know to move it back a little and try again. Once you have the blade locked in place, then you can adjust the bottom roller using the studs and nuts under the bottom roller that go through the springs. Ideally, you want the roller as close to the blade as you can get it without the two touching. Some guys set it by looking at the visible gap between them and others will use paper or a feeler gauge to see that they are not hitting. This can be a little tricky since these rollers have the heavy saw-tooth like serrations, but it's better to error on having too much of a gap then to risk the two hitting. Too much of a gap just means it might "eat" really thin materials, which most don't use the 6" crank splitters for anyway. It's also worth noting that the bracket that the blade bolts too (the piece on yours that was broken and brazed) often has slots where it mounts to the frame. This is for balancing the blade to the top roller so that it splits evenly right to left, and can also help fine tune it to split 10 oz. when you set the dial to 10oz. I'll typically split one wide piece, or a small piece on either side at the same time, measure the result and adjust if as necessary, but afterwards you need to re-adjust the gap between the bottom roll and the blade. For many of these adjustments you'll have to go in circles checking and adjusting things over again, but each round it's closer to splitting easily and accurately. My experience with most splitters is that whatever dial or read-out the machine has to set thickness is a general reference, and you'll want to use a drop gauge or similar measuring tool to check your work and adjust the split thickness to compensate accordingly, because different materials compress differently than others as they feed through the machine. Adjusting the spring pressure on the bottom roller can also help with this. To be clear, I don't have any Landis literature to cite, but just experience working with different fixed blade and band knife splitters in general. I find the principals of blade position, feed roll position, and other adjustments all work the same. The parts, movements, and methods just vary between different models and manufacturers.
-
Verdigris, also known as "grave mold", is caused by contact with animal fat, mink oil , neets foot oil, tallow, etc. Dry vegetable tanned leather will not be effected.
-
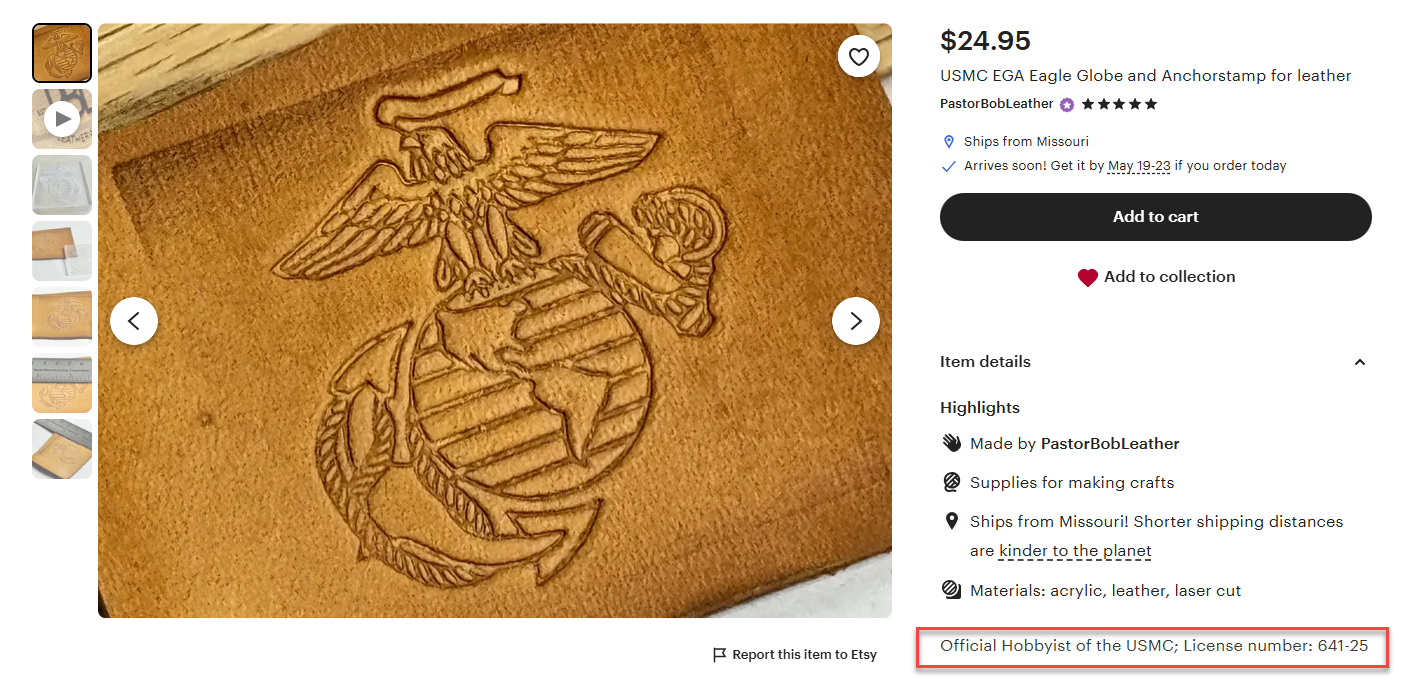
Really? You did two for the Space Force but none for the Coast Guard? I'm insulted. Just out of curiosity, when you getting licensed by the Marines, did they place any orders? /dwight
-
Yep , very nice and a clever design
-
Well the sharp part I think I've got down but the space between the roller and blade I'm just guessing at. Right now I have it set to about the width of a credit card. Should I open that up?
-
Those are all really awesome!
-

Ode to the US Military, Veterans, and POW/MIA
chuck123wapati replied to PastorBob's topic in Show Off!!
Making the Marines great again!!! You rock, my friend, god bless!! -
Cows identifying as ducks now, hilarious! I've been needing to lose some weight but instead I think I'll just identify as skinny and see how that works out.

-

-
Thanks for the inspiration and gently holding me acountable! I am now officially licensed to sell the USMC related items.
-
Very nice. I would think with only slight modification, it could service the motorcycle community as well, especially the large Harley / Indian bikes. Connect it to the saddlebag guards.
-
That is some awesome work! I'm sure your friend is very pleased with it! Back in my teens, I had a summer job making binders in a factory, and knowing exactly how a binder is put together, I am curious as to how you converted a plastic binder to leather. A binder is made of 3 layers - an outer plastic layer, an inner cardboard layer of 3 pieces - one for the spine and two for the covers, then an inner layer of plastic. The rings are attached with 2 rivets that go through all 3 layers. So, I'm curious to know how you were able to remove the rivets? Or did you leave them and the outer layer of plastic in place and just cover them with leather? What size is the binder - does it take 8 1/2 x 11 paper? Asking because I've often thought of doing something similar! It's also possible to buy the rings separately, but of course, that would be more expensive than repurposing them from a plastic binder, which was likely just lying around the house! Edit: I think I know why the leather of the inner liner bunched up. The same thing happens with the inner liner of a wallet when you fold it. To prevent it, the inner liner has to be slightly smaller than the outside of your piece. I'm unsure of exactly how much, but if you fold the piece in half before doing your final cutting and stitching, you will likely be able to see how much you need to cut away for a good fit.
-
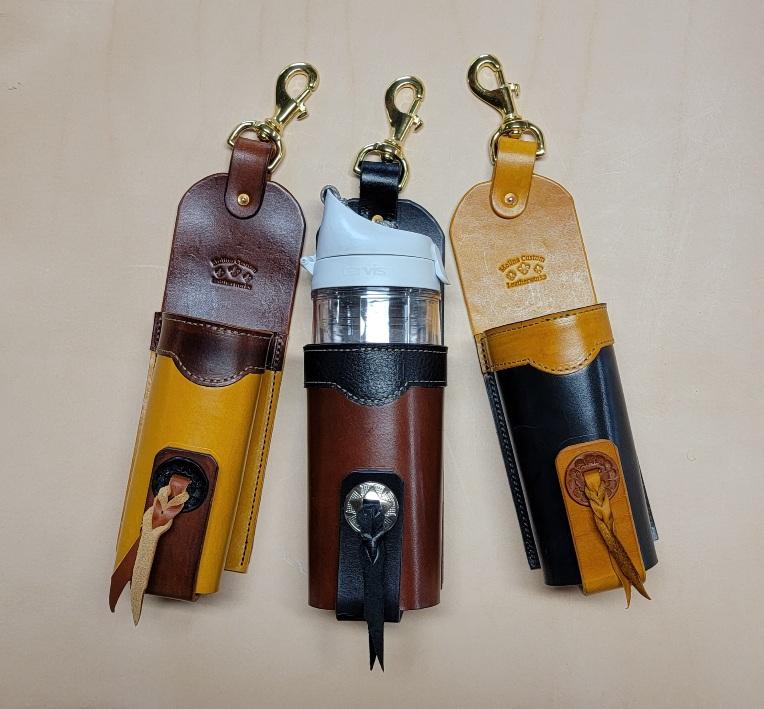
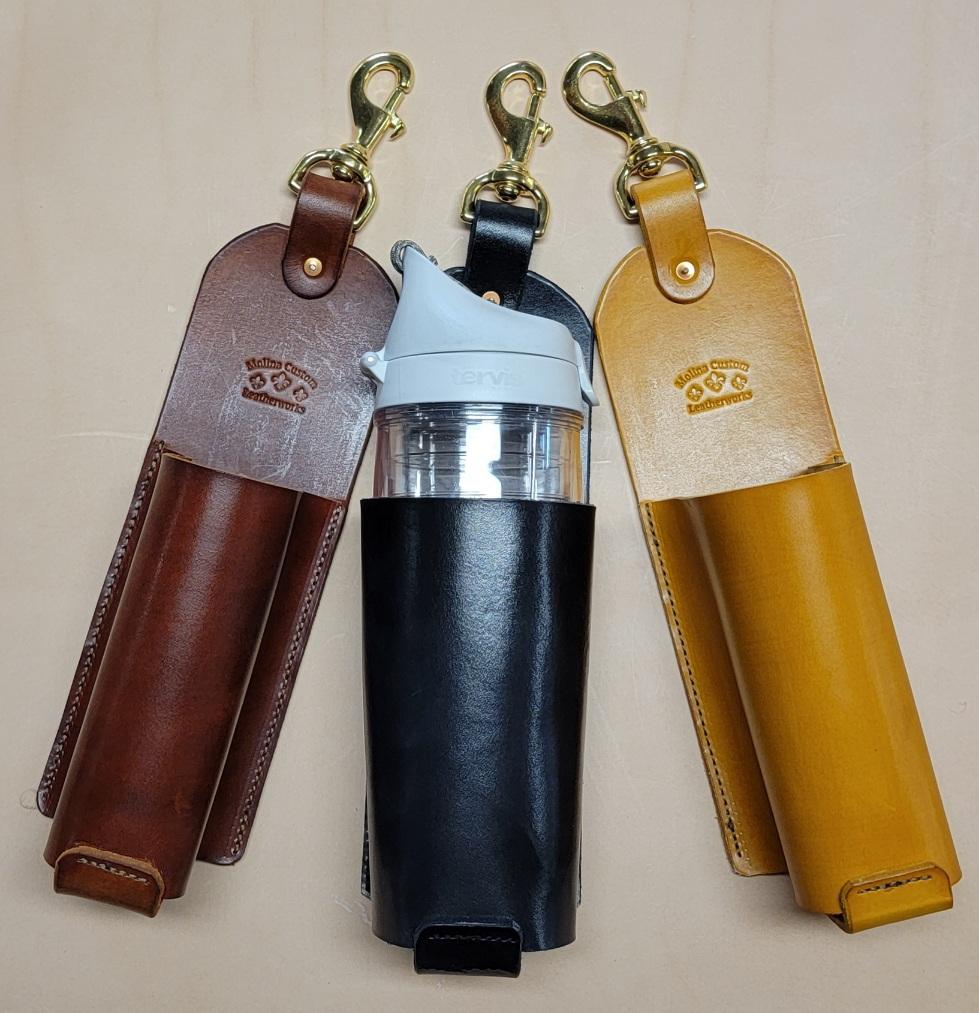
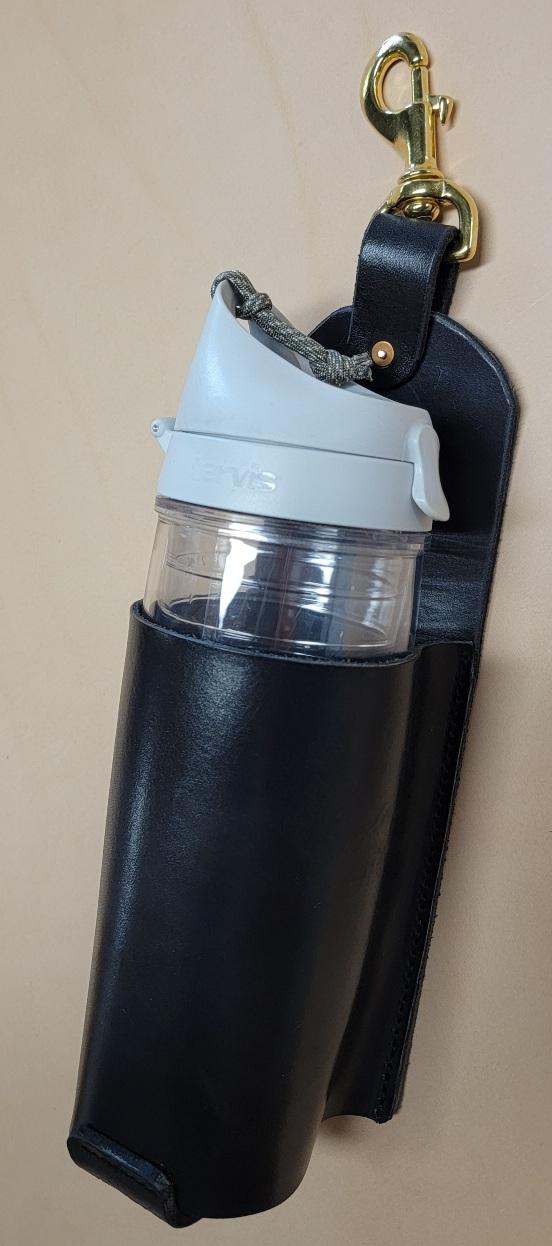
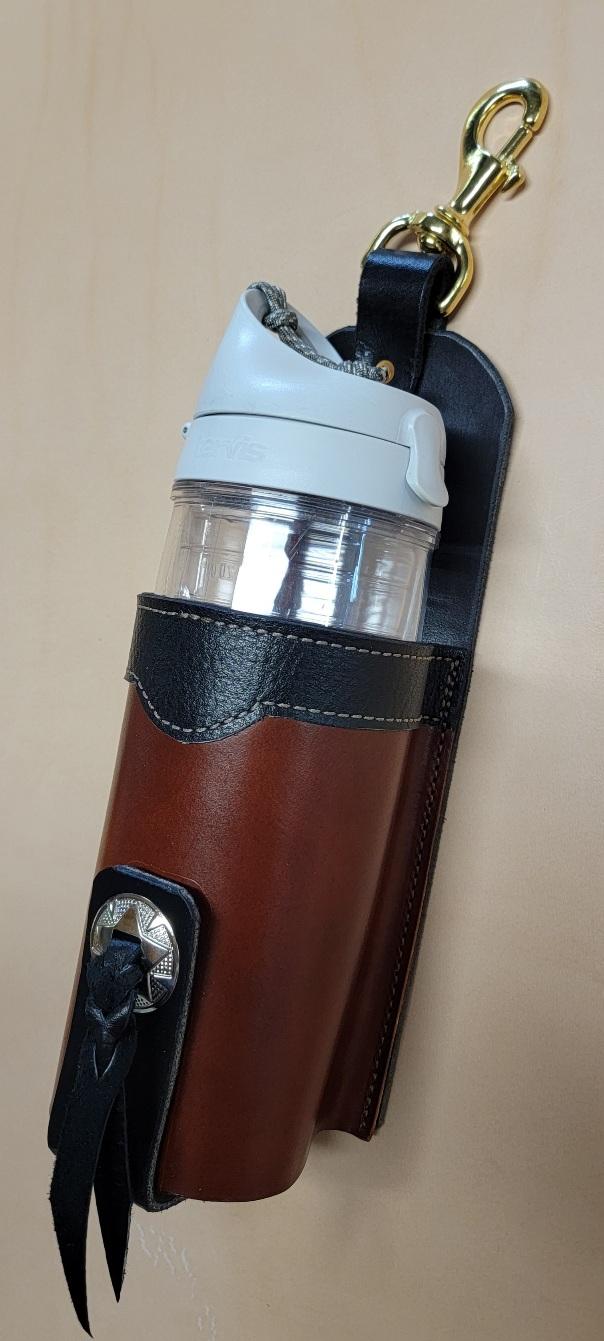
I saw a drink holder on a few websites so come up with my own design. It's targeted towards the horse community to clip on a saddle. It's made with 10oz vegtan except for the face panel which is a more pliable 5oz. I made two versions, the standard version and a deluxe version.