

All Activity
- Today
-
 Frequency equals speed of light divided by wavelength: https://en.wikipedia.org/wiki/Frequency#In_wave_propagation Conversely, wavelength equals speed of light divided by frequency. Taking a car key fob with a frequency of 315MHz as an example: wavelength = 299792458 m/s divided by 315000000 Hz = 951.7 mm --> the holes in your faraday cage (mesh) need to be significantly smaller than 951 mm to block this frequency. Taking the other end of the spectrum at mm-wave RFID (24.125 GHz): 299792458 m/s divided by 24125000000 Hz = 12.4mm --> mesh holes need to be significantly smaller than 12 mm to block this frequency. In practice, any fine mesh or solid conducting foil will block (or rather: attenuate) all relevant frequencies.
 -
Not wanting to butt in here but if @Alisha is still interested OP location is listed as Location:Waddy Ky Best of luck. ~JL
-
My German supplier sells narrow belt leather (8mm up to 20mm) in lengths of 50m up to 160m depending on the width. This can be obtained from a hide by circular cutting. The downside is that the further you get to the center of the hide, the more the belt twists. The thinner the leather, the less noticeable the twist I guess and for piping I suppose it matters even less. https://www.lederhuis.com/leather_straps/endless_lace_harness_leather.php I don't know where you're from, but you could try searching for similar stuff in your area and skive it down to the thickness you want, or try to find a supplier with a strap/belt cutting machine that can and is willing to circular-cut a hide of nappa for you.
-
It's looking like @KyLeatherMan has abandoned this ad. I'd hate to archive it if the machine is still available. But we don't want a lot of junk ads either. Let's see if the poster responds to this tag ...
-
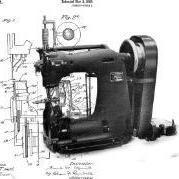
Here's a manual for a machine like a 337 205RB-1.pdf
-
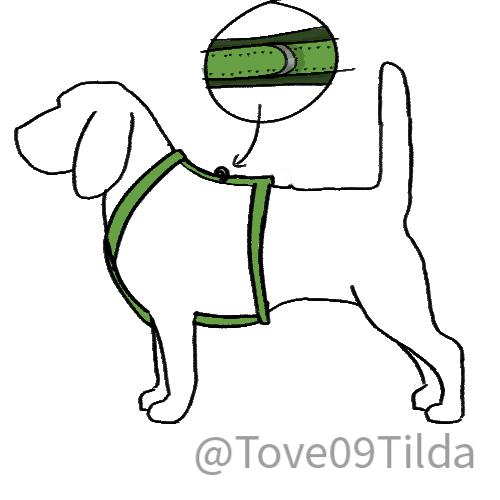
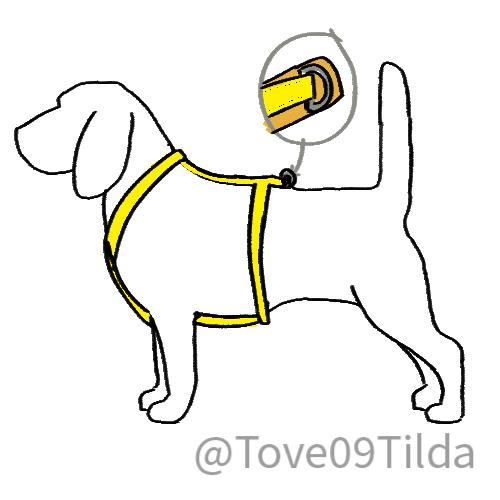
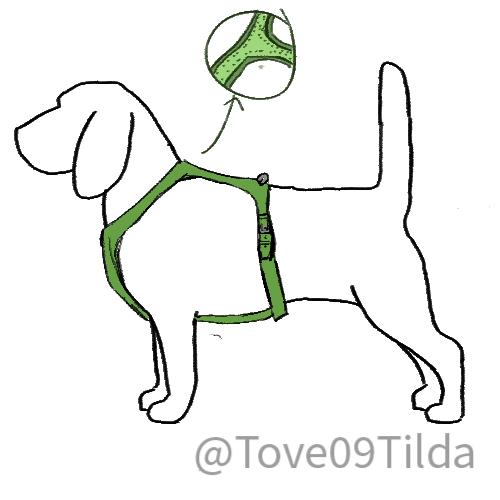
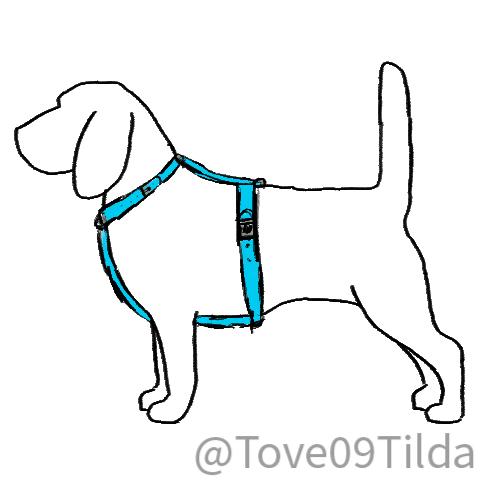
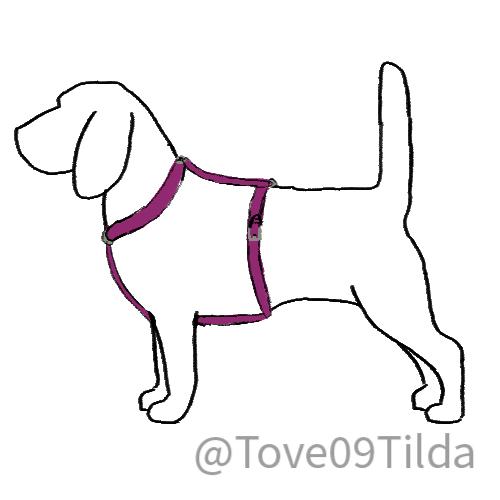
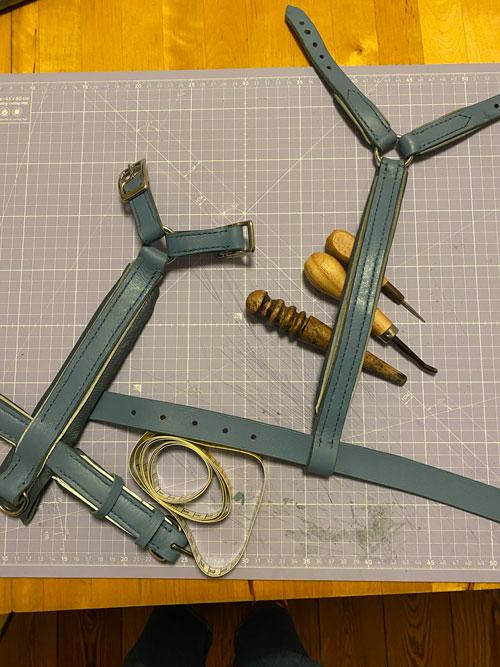
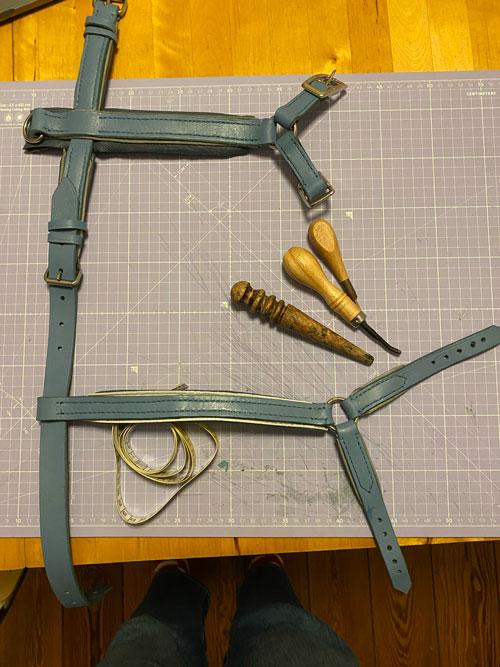
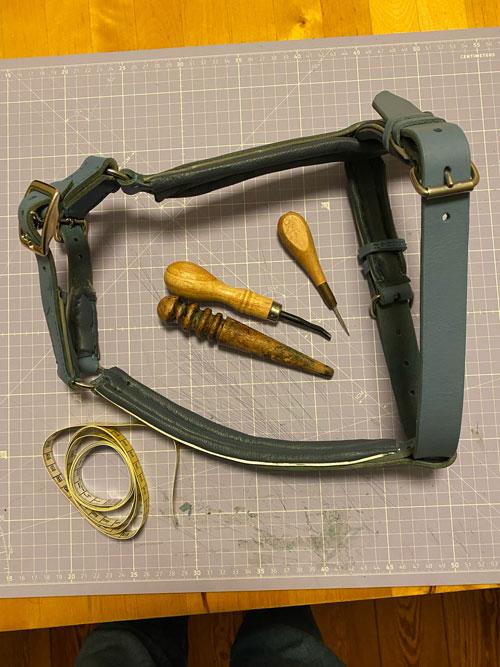
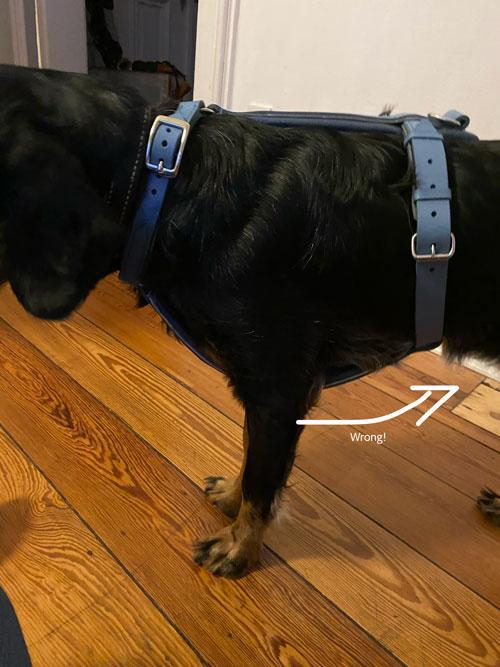
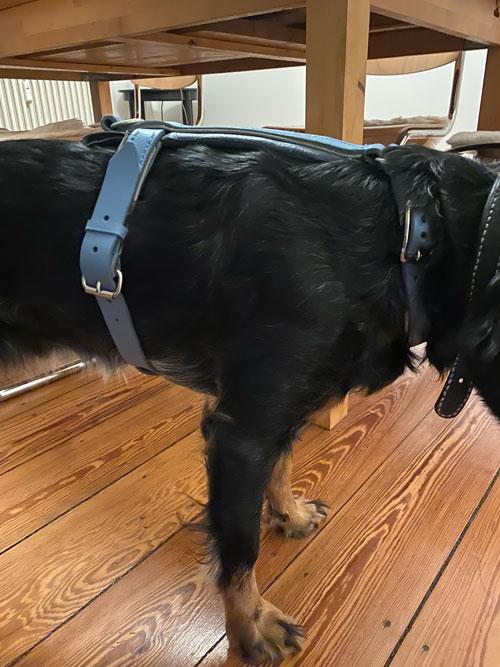
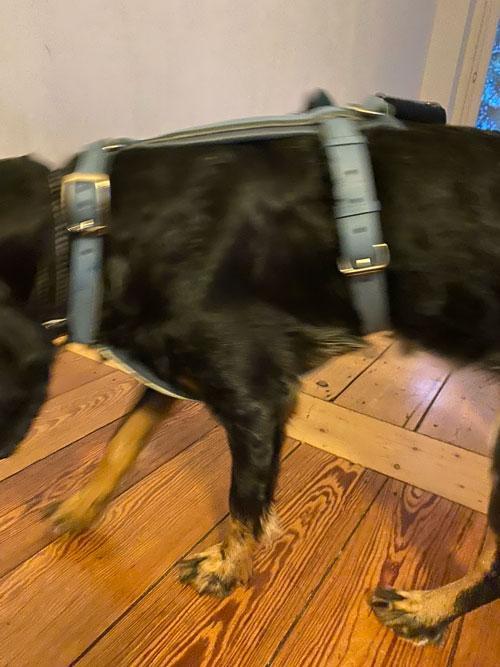
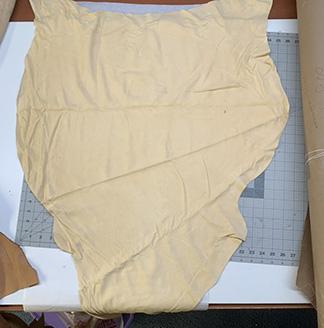
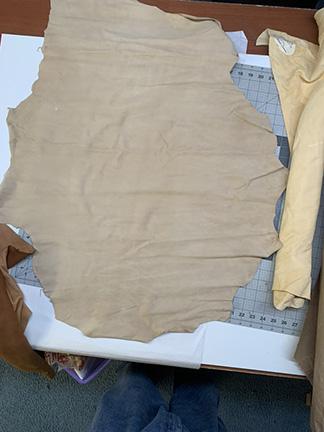
 Part 4 – Construction of a Y-Harness In this part, we focus exclusively on the construction of a Y-harness. Other harness styles may be explored in the future, but for now, we deliberately stay with one system to avoid mixing design logic. Before touching leather, we need to look at design options. Construction choices directly affect movement, adjustability, pressure distribution, and long-term comfort, so these decisions must be made first. 4.1 The Chest Piece The chest piece is one of the most critical components of a Y-harness. It determines how the harness settles on the sternum, how much freedom the shoulders have, and how forces are distributed when the dog moves or pulls. There are four viable construction options. Three of them are showcased as sketches. 4.1.1 Slip-In (Over-the-Head) Figure 1 - over-head harness This design is slipped over the dog’s head and has no buckles on the neck. Characteristics: No adjustability after construction Cannot be worn over thick winter coats Requires very precise measurements To avoid excessive rigidity, the two neck straps are sewn into O-rings, allowing slight independent movement on each side. Use when: The dog has stable measurements year-round Minimal hardware is desired The harness is intended for everyday, low-adjustment use Avoid when: The dog is still growing Seasonal coat changes are significant 4.1.2 Buckled Neck (Split Neck Piece) Figure 2 - Split-neck harness This follows the same structural logic as the slip-in design, but the neck is split into four segments, usually with buckles on both sides. Characteristics: High adjustability Can be worn over coats More hardware and additional weight This is the most forgiving option in terms of fit and is especially useful when measurements sit close to design limits. Use when: Adjustability is required The harness must fit across seasons Fine-tuning is needed without rebuilding 4.1.3 Floating Padding Under O-Rings This option is ideal for very sensitive dogs or dogs prone to pressure reactions. Here, the padding for the neck strap chest strap dorsal strap is cut from one continuous piece. ⚠️ Important: The O-rings must float above the padding. They must not be stitched through the padding, or pressure points will be reintroduced. Use when: Skin sensitivity is a concern Even pressure distribution is a priority Controlled movement without hard contact is desired 4.1.4 Triangular Chest Piece (No O-Rings) Figure 3 - Harness with no O-Rings/ Triangular intersection points This design eliminates O-rings entirely. The chest piece is constructed as a fixed triangular unit. Characteristics: Very static Minimal self-adjustment Requires extreme precision Because there is little margin for error, patterning with thick paper or cardstock is strongly recommended before cutting leather. Use when: The dog has very stable conformation Maximum stability is desired Reduced adaptability is acceptable 4.2 D-Ring Positioning D-ring placement determines how forces travel through the harness and how the dog experiences leash pressure. 4.2.1 Back Position (Standard) The D-ring is placed behind the torso strap, centered on the dorsal strap. Figure 4 - Over-head harness with D-Ring in the Back Benefits: Even force distribution Minimal interference with gait Best option for everyday walking This is the default and safest choice for most dogs. 4.2.2 Training Position (Rear-Shifted) An additional D-ring is placed slightly behind the dog’s center of gravity. Figure 5 - Over-head harness with two D-rings Effect: Pulling becomes mechanically uncomfortable The dog is gently discouraged from leaning into the harness ⚠️ Important: This position should only be used temporarily. Limit sessions to a few minutes Always switch back to the back D-ring or a collar afterward With young dogs, allow breaks of 5–10 minutes Prolonged use can alter posture and movement patterns. 4.2.3 Center Position The D-ring is sewn centrally on the harness, closer to the midline. Figure 6 - Overhead harness with a D-Ring in the middle of the dorsal Use when: Balanced leash handling is required Minimal directional pull is expected Trade-off: Reduced freedom for self-centering Can amplify asymmetries if the leash is frequently loaded to one side Okay — now we know what to take into account. I already apologise for my sketching skills, but for the purpose of explaining the construction logic, they are sufficient. 4.3 My Decision for Tova You have seen the measurements, so you already know that she is a bit of a hard case. I decided on a split neck, as my little lady needs to wear coats as soon as temperatures drop. Tuscan Setters are not made for bad German weather. We also do not always have the option to place the harness under the coat, so adjustability was essential. I also chose a single D-ring in the back, as she is not very pully and we do not use a harness for training purposes. I decided to extend the padding so the D-ring does not sit directly on her back. 4.4 Construction Now we leave theory and move into more interesting territory. 4.4.1 The Leather The first step was choosing the leather. It took me half a year to find the ideal hide. The leather is of Italian origin and was sold as dead stock, which allowed me to purchase it at a fair price. It is 4 mm thick, hard temper, with a resin back. This means there is little to no stretch, but it also limits its use: this leather is suitable for dog gear only and must not be used for equestrian equipment. The size is half a double bend butt. For padding, I used 0.8 mm calf nappa. 4.4.2 Thread This may offend some traditional leatherworkers, but I strongly recommend polyester thread. A harness—especially one worn daily—is constantly exposed to the elements. Linen thread requires extensive care after every wet walk, and unless you are willing to do that consistently, it will not serve you well. Get yourself some beeswax and rewax your thread occasionally. It can also be used later to seal stitching or edges. 4.4.3 Edges When working with gear exposed to weather, simply beveling the edges is not enough. I recommend sealing edges before stitching straps to padding, as they become difficult to access afterward. You can burnish with water or beeswax, but I recommend edge paint. I burnished first and then applied clear edge paint to make the edges as waterproof as possible. 4.4.4 Straps You have two options here, and for this project I ended up using both. A strap cutter is strongly recommended. If you do not have one, use a saddler’s compass along a straight edge to mark your strap width and cut by hand. This takes longer and leaves more room for error, but it works. Always cut at least one extra strap. You never know, and it will save you time and frustration. 4.4.5 Fittings This is the point where you gather your hardware. When using O-rings, check that they still allow enough movement once all straps are added. If not, choose one size larger at most. Always read your supplier’s specifications regarding breaking points and maximum load. Also keep in mind: brass is usually the better choice for larger dogs. 4.4.6 The Neck Piece I work best top-down, front-to-back, so I started with the neck piece. I used: ¾-inch straps 6 mm Plastazote 0.8 mm calf leather I selected the best end of the strap, cut an egg point, and punched five holes at ½-inch spacing. From the third hole, I measured the required length, added 2½ inches for the turn, and marked stitching ⅓ inch from the edge until the padding ended. The padding was closed with an egg point. I repeated this process twice and paid close attention to symmetry. Left and right straps must be as identical as possible. For the buckles, I placed them in the middle of the straps, skived the turns, and also skived the overlapping ends at the O-rings. I chose not to pad this section, as the leather layers were already quite thick. Sewing was fiddly due to the short seam length, but once finished, the piece already resembled a collar with two O-rings and buckles on either side. This is the moment for the first fit check. Make sure the neck piece sits correctly before continuing. 4.4.7 Dorsal Strap Next came the dorsal strap, made from a one-inch strap. I skived 2½ inches from the best end after squaring it, added the O-ring, bent the turn, and marked the stitch start with my thumbnail. For measuring the total length, I temporarily pinned the turn with bulldog clips—pure laziness instead of tacking. From the folded O-ring to the previously calculated length, I marked the strap and added another 2 inches for the D-ring. Stitch marking was again done ⅓ inch from the edge. I skipped 1⅓–1½ inches where the torso strap would pass through and marked only up to the D-ring turn. After gluing the padding, I checked the length again. At this stage, adjustments are still easy. If you are unsure, hair ties and bulldog clips are useful before committing to stitch marks. Once everything looked correct, I saddle-stitched the entire piece. 4.4.8 Chest Strap This part was a pain. Construction is similar to the dorsal strap, with the difference that a loop is created for the torso strap to pass through. When checking length on the dog, use a temporary strap or webbing of the same width as the torso strap to ensure nothing is being pulled backward. Watch your dog closely during fitting. My chest strap was too long, and Tova made that very clear by rounding her back. 4.4.9 Torso Strap This strap ties everything together, so precision is crucial. If this fails, the entire construction fails. Always check for symmetry. I started with the buckle side, which required little measuring. I took a one-inch strap of suitable length, squared both ends, and threaded it through the gap left in the dorsal strap. After deducting 2½ inches for buckle turns and punching holes, I measured the distance between the dorsal strap and the buckle hole on both sides until they matched exactly. I marked where the strap met the dorsal strap on both sides—this is essential for padding placement and stitch marking. I glued and stitched one side before inserting it into the gap, then stitched the other side. At this point, the strap is fully locked in place. Do not forget the loops and at least one running loop. Sew these fairly tight, as they will loosen over time. If you cannot block them traditionally, block them with the straps themselves, a ruler and bone folder, or even a boxy highlighter—whatever gives you the right shape. For the final strap, I cut the egg point first, punched five holes at one-inch spacing, and then did a full test fitting before beveling or finishing anything. I threaded the strap through the chest loop, attached it to the buckles, and put the harness on Tova to find the correct position for the third hole on the opposite end. I marked that point, punched one hole, tested again, then completed the remaining holes and egg point. I prefer 2½ inches from the first hole, but adjust as needed. 4.5 Testing, Testing, Testing After a brief moment of thinking “I am a god of leatherwork,” it was time for reality. As soon as I put the harness on, something was wrong. The torso strap was being pulled back into the belly area. The dorsal was correct, so the issue had to be the chest strap—it was a full four inches too long. In picture 2 you can clearly see the discomfort. Even with careful testing, mistakes happen. Luckily, it was too long, not too short. I removed the torso strap, identified where the chest strap should meet it in the correct position, opened the seams at the O-ring, and removed approximately 3½ inches from the harness, including padding and piping. After re-sewing, testing began again. First, I let Tova move freely without a leash—walking, jumping, and running after treats while I observed the harness in motion. When no issues appeared, I added a leash. The pull test was… difficult. Tova decided it was far more enjoyable to walk perfectly and stare at me lovingly. So back to throwing treats. Once nothing shifted and the harness consistently re-centered itself—even when pulled to the left—it was time for a real walk. In motion, the harness moves exactly as intended. I could not ask for a better fit. 4.6 Notes on Construction 4.6.1 Knives This project can be done with a box cutter, but blades must be changed frequently. As soon as they start to drag, replace them. I used a quarter-moon knife and kept a strop with extra-fine jeweller’s rouge next to my workspace, stropping regularly during work. 4.6.2 Stitching I used a short sword awl, but any suitable awl will work. Do not use diamond chisels. We want the holes to swell closed again after stitching, which requires piercing stitch by stitch. My personal recommended stitch density: 7–8 SPI for medium to large dogs 10–12 SPI for smaller dogs Use blunt saddle or harness needles matched to your awl and thread. I used size 3 needles (S + N Systems) and 0.7 mm polyester thread. 4.6.3 Piping Piping is optional. If you do not feel confident adding it, skip it. For those who do: I used 2 mm leather cord as the core Reflective tape was glued around it That is the entire technique. Just make sure you glue the correct side of the tape—I checked this with my phone flashlight before committing. ----- This build is not meant to be replicated line by line. It is meant to be understood. Measurements change, dogs change, materials change — but the construction logic stays the same. If you work slowly, test often, and let the dog’s movement guide your decisions, this type of harness will always show you where it needs adjustment. And once it does, it will settle exactly where it belongs. I’m curious to see what you will make of this guide — and what ideas, variations, or entirely different harnesses might grow from it. Have fun with the process, test your assumptions, and let your dog be your best feedback. Cuddle your dogs, and create something that both of you will truly love
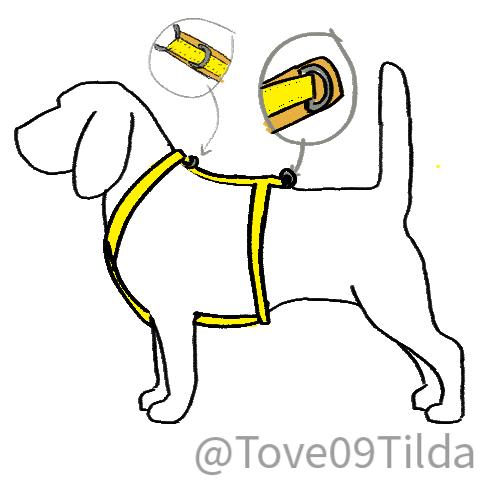
-
 bolt belts joined the community
 -
 shummiclaire joined the community
 -
what machine is it a Pfaff 337? There are at least 2 way different Pfaff 337 out there. We need more details. Butt IIRC one of then has no walking foot. Looking up the 335 may help you.
-

Cobra NP4 Leather Skiving Machine - bad presser foot mechanism?
NeilMott replied to NeilMott's topic in Leather Machinery
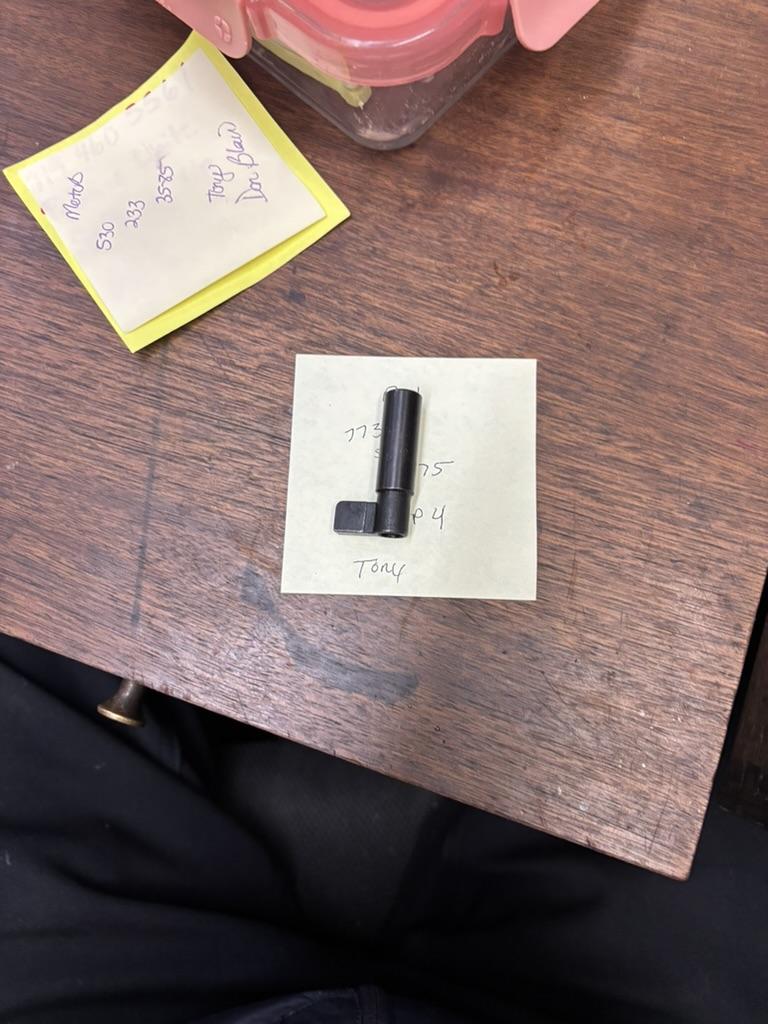
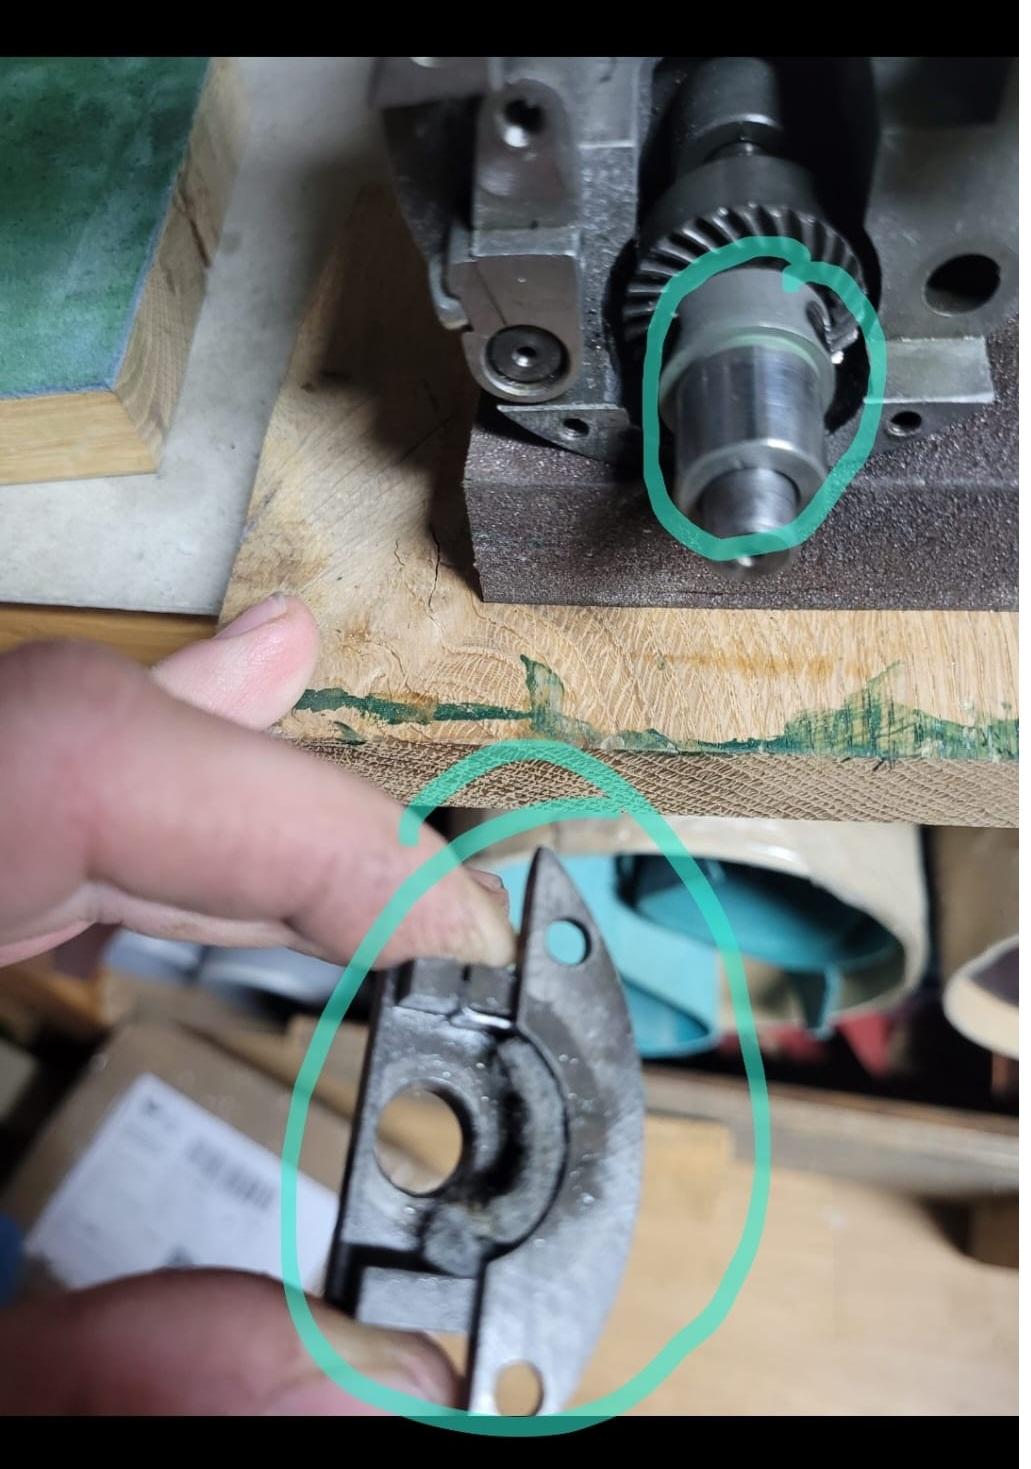
Given what I've taken apart, the guy at LMC thinks it's this part that's bad (bent) They're mailing me this top part of the assembly. They said it's not uncommon that this part can get damaged in shipment, bending the internals. I find that hard to believe given how stout the box is along with the hard styrofoam holds things in place, but they are really trying to make this right. IMG_2648.heic 81A4F93A-A33A-4006-84C7-1EC5A763FF36.heic 81A4F93A-A33A-4006-84C7-1EC5A763FF36.heic
-
 Thais joined the community
 -
@Allergic I'm going to move this over to the Leather Sewing Machine sub forum. But it seems pretty cryptic. Maybe you could flesh it out a little for us?
-
I am just now timing my machine. I am not very confident about the correct cartridge .
-
 BrettR joined the community
 -
This is an old thread but hope some of you can help me with your trade knowledge, as I was recently searching for the same answer you all have been discussing. I use 9mm cap x 7mm post double capped rivets - solid brass from OTB (407D) supplied by Mennonite’s in Canada, who get them from Weaver. I used to get them in the boxes labeled “Ohio Travel Bag, manufactured in Belgium”. Then my supplier provided the same rivets in plastic bags marked made in Taiwan. The quality was the same so didn’t question it. Now I am also ordering 9mm cap x 9mm post double capped rivets solid brass OTB (409D), from the same supplier which I did in the past, and the rivets were the same quality- a solid post with no crimp and quality brass. Now my supplier says weaver is providing him with a new rivet for the 409D, which is a bit higher shine, has a crimp in the post and a hole in the top of the post. Anyways, I assume these are not Ohio Travel Bag, and am worried about the quality (as I have used cheaper solid brass rivets in the past, which my supplier called “economy” that tarnished very quickly and were poor quality). I am going to do some testing of these new 409D rivets, but was wondering if any of you know the story on Ohio Travel Bags current quality rivets, or if any of you have suggestions on the best quality rivets in the market. Short story long, thank you for reading this far if you have, and I would appreciate any advice or suggestions you have on quality solid brass rivets. FYI I am in Canada. Thanks in advance for the leather craft community helping me out. kindest regards, Brett
- Yesterday
-
 Hello, I'm a hobbyist looking for insight from those of you who have used tubular rivets in your leatherwork. My work is focused on attaching veg tan leather straps to canvas bags. I am not currently in a high volume production environment. Double cap rivets (set with hand tools) have proved to be unreliable (I accept that the issue is my skill in setting the rivets). 11mm tubular rivets, with caps, is what I have in mind. Who offers the best setter, tubular rivets, and caps for a hobbyist in a low volume production environment? Thank you for sharing your recommendations, insight and experience. JackLeather
 -
An image I found does show a possible stirrup. It's pretty basic, made out of wood and covered with leather, much like the saddle.
-
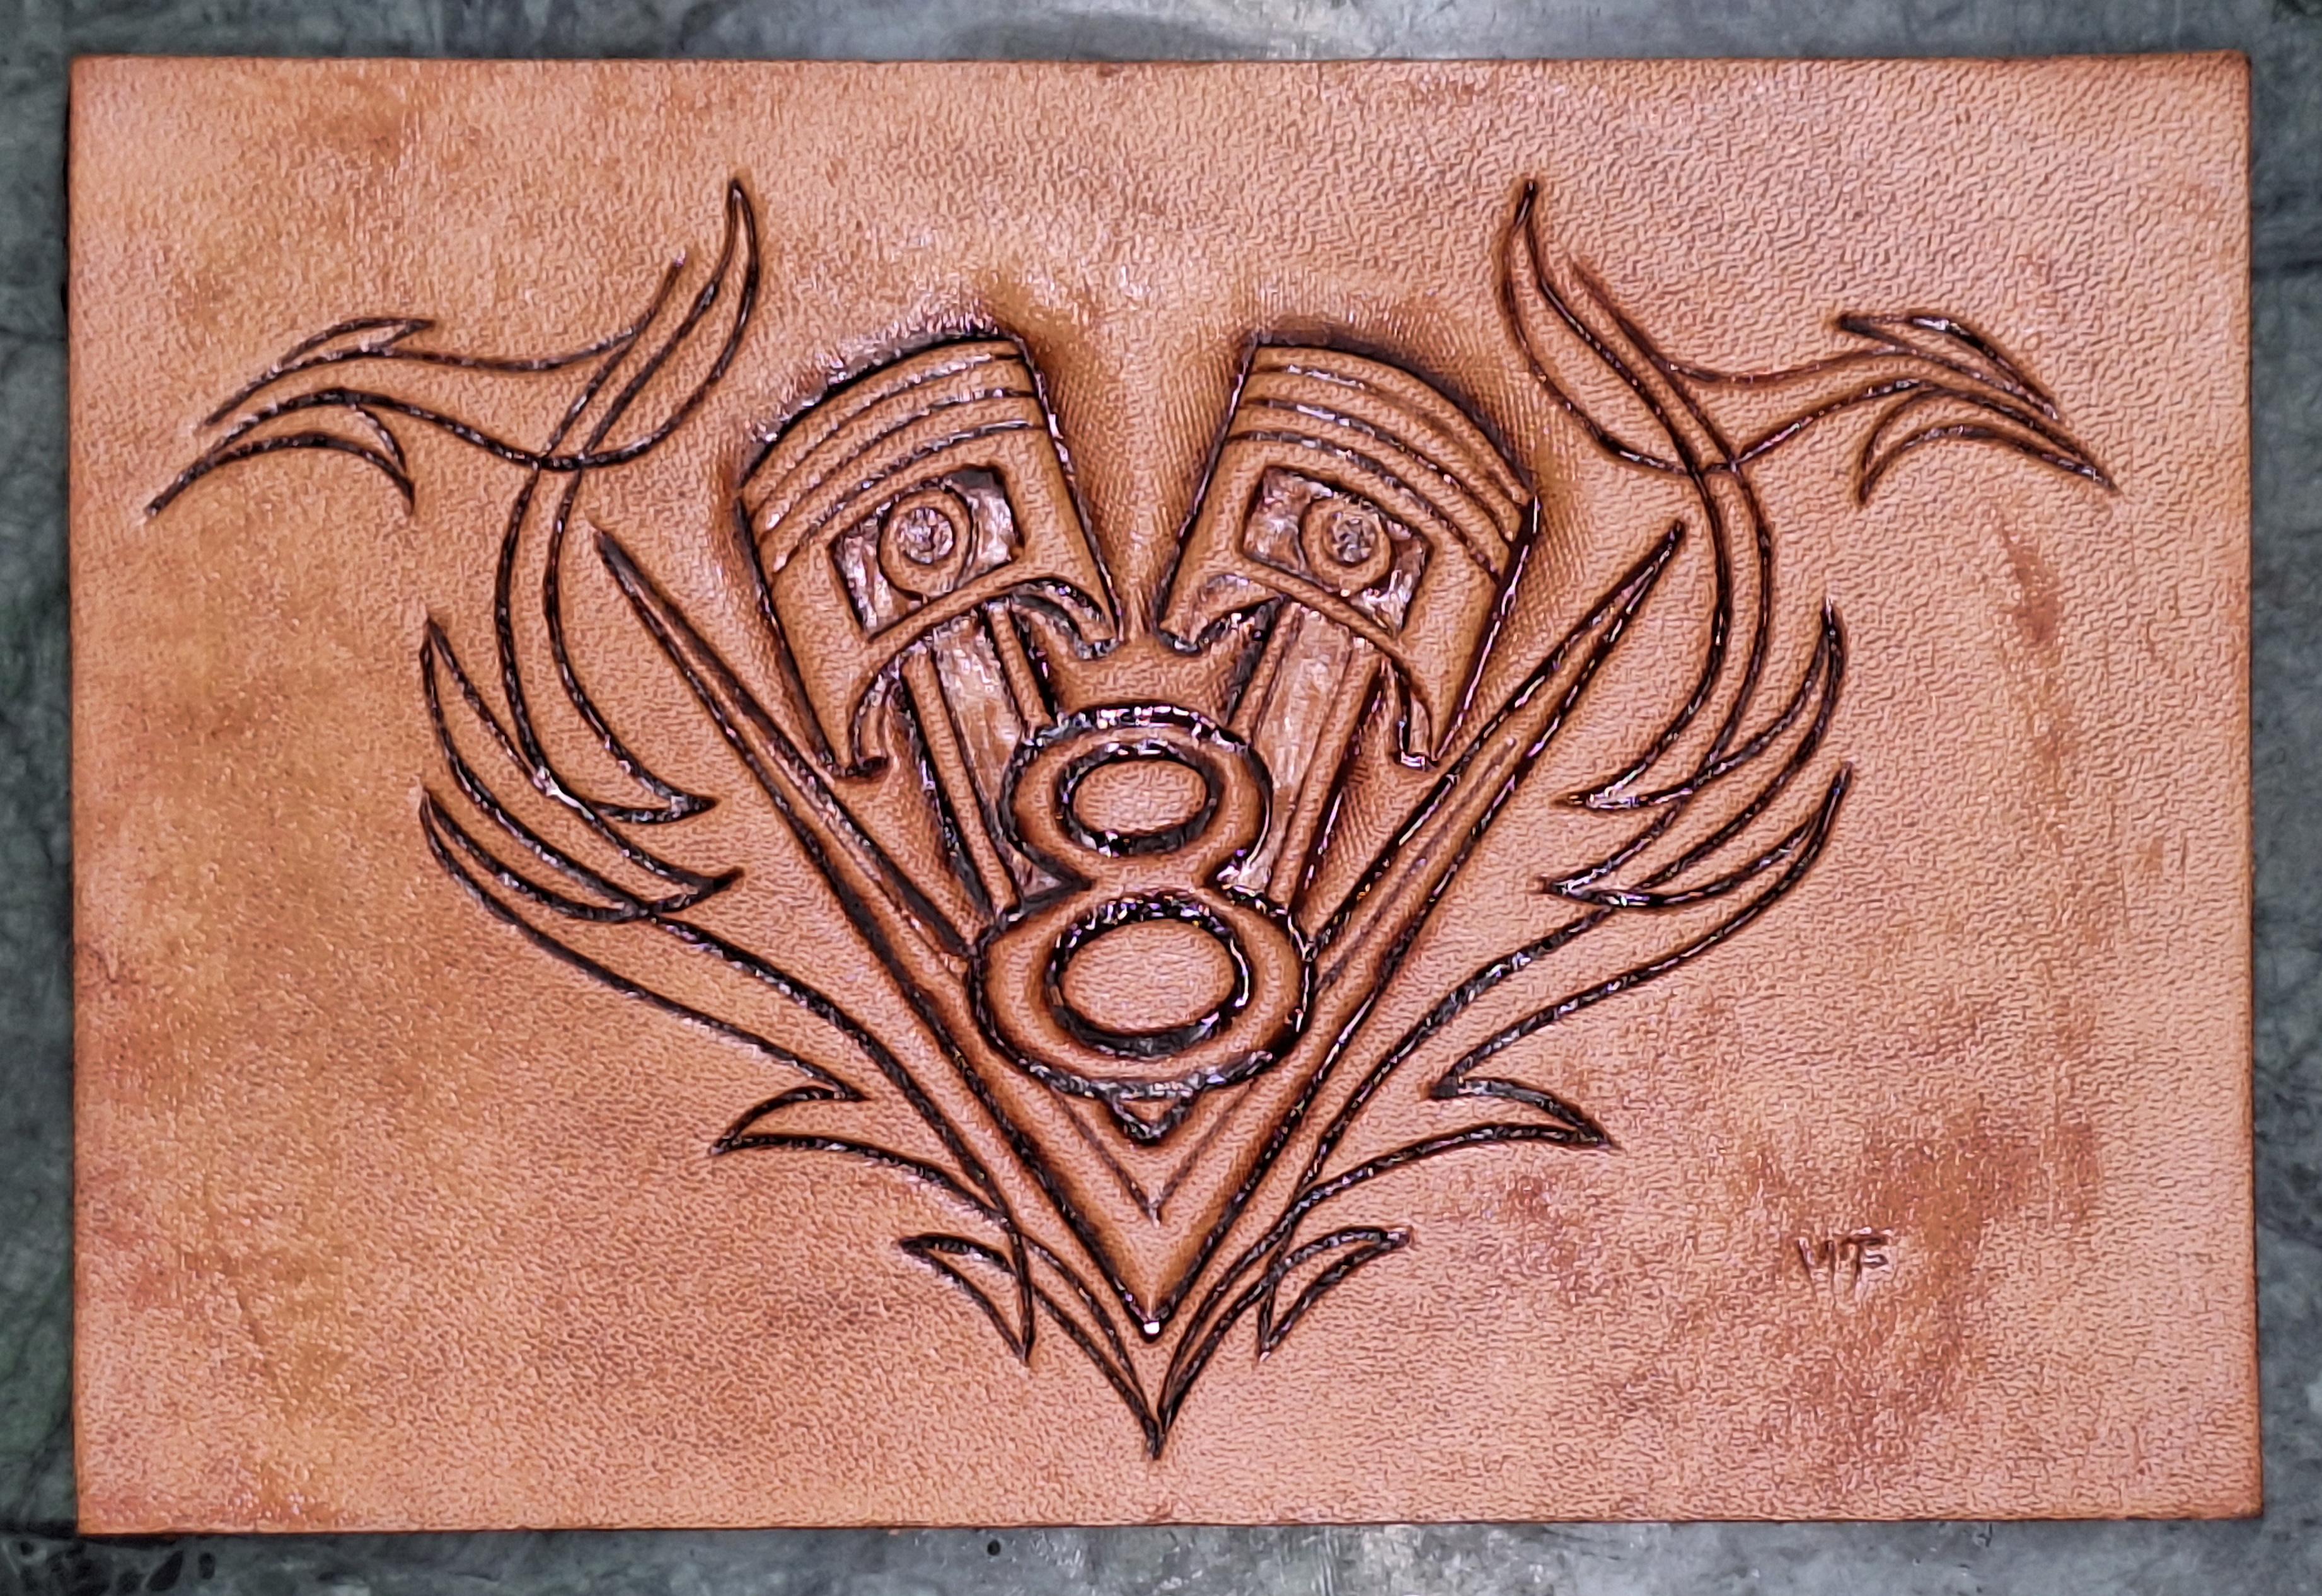
Another trading card V8 theme and old school pinstriping. Pretty happy how it does on leather. Still drying down.
-
Nice soft pig skin. 5 sq.ft. $20.00 plus shipping
-
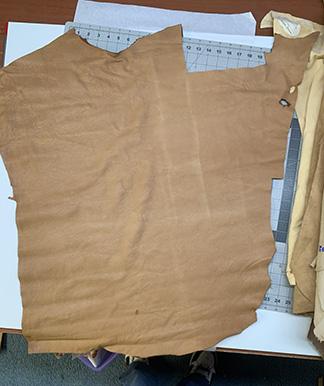
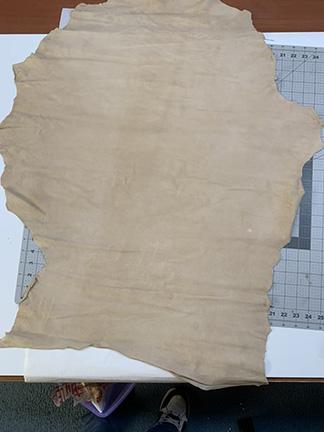
Approximately 4 sq.ft. Great for gloves and small clothing accessories etc. Approximately 4.5 sq.ft. Great for gloves and small clothing accessories etc. Almost 5 sq.ft. GARMENT CHAMOIS LEATHER. Great for gloves and other small clothing accessories.etc $20 each or all three for $55 plus shipping. These are good grade chamois. Wrinkles can be pressed out easily. These are not intended for polishing your car but could be used for that.
-
 @DieselTechI was using a light maul and using just enough force to make a reasonable impression. I was getting the edge impressions no matter how I used it, light or harder. @JDFredI was thinking about that, but I'm glad you did something to improve it. I will certainly try it, although I'm surprised I have not heard anyone else complaining about it. The tool, as it comes, has sharp corners. I will also see what other tool makers are producing as an equivalent. Thanks for your replies.
 -
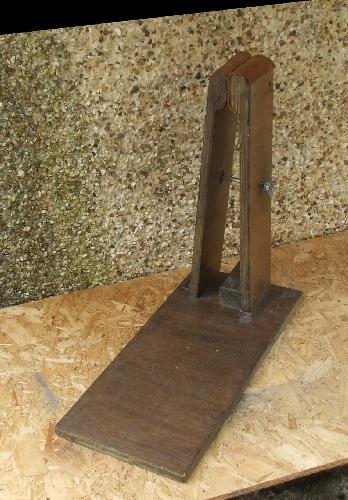
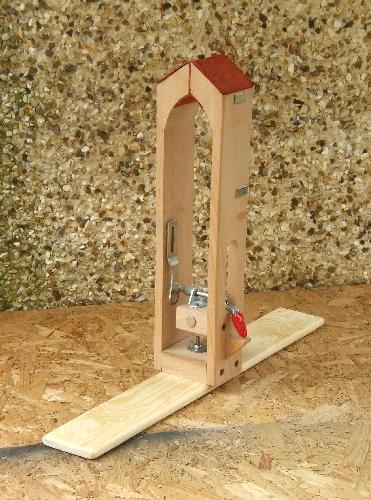
@revilop I would advise you to get a stitching clamp. It'll make things easier, your sewing will improve greatly being able to have something to hold your work in. A clamp can cost as little as $10, but is worth its weight in uranium Or you can make your own from scraps of wood. When I started in this lark 25 years ago I made my own clamp, and still use it My ancient home-made one; My bought in one, more transportable cos it comes apart easily & is smaller;
-
Thanks for your feedback! 🙂 Just to clarify, the seam on a rolled collar is intentionally smoothed rather than seamless, and the stitches can sometimes be slightly hidden or recessed. This is a traditional English saddlery technique — skiving down close to the stitching and smoothing the edges ensures comfort, even on the inside seam. With a dog’s fur and proper finishing, it shouldn’t cause any irritation. Skiving takes a lot of patience, as you have to get as close as possible to the stitch line without cutting into it, while maintaining a clear and even edge.
-
Thanks for the insight. Yep that's about what I found when looking for other examples of squaw saddles. Same concept, only this one appears to be more geometrically square and the cantle and swells seem to be slightly more "western" in nature. The brass tacks seem to be unusual, but it would make sense that they were traded for. I wonder what the stirrups would have looked like? I imagine they would be similar concept to western saddle stirrups with the straps wrapping around the sides of the tree, only being exposed instead of under a leather seat (I imagine some kind of loose blanket padding was used between the saddle and the rider?).
-

Want to get started on this craft
wizard of tragacanth replied to revilop's topic in Getting Started
Is your thread waxed or un-waxed? Is it Linen or Nylon? Linen is more difficult because it can bunch up behind the leather when pulled through a hole. I recommend Nylon/Poly. I'm wondering if your thread has enough wax on it, or if you are un-twisting the thread as you are stitching in the air while turning your work around. Stitching in the air is not a problem if you maintain the twist in your thread. Can you see the cords separating just as you are about to complete the stitch? To prepare the thread for use, use the same motion that you would if you were waxing it. Grasp one end of the thread with one hand and draw the thread between two fingers of the other hand. The tension and pressure on the thread consolidates the cords. Nick -
I put the saddle into Grok. The information from AI can be suspect but you'll have to do more research to determine if what Grok put out is reliable. This is Grok's result; Based on the photos you shared, this appears to be a Plains Indian woman's saddle from the 19th century, commonly referred to historically as a "squaw saddle" (though that term is now considered outdated and derogatory toward Native American women). A more accurate and respectful name is "prairie chicken snare saddle," named after the shape of the high pommel, which resembles snares used for catching prairie chickens. These saddles were used by tribes like the Blackfoot, Sioux (Lakota), Piegan, Nez Perce, and Crow in the Great Plains and Rocky Mountain regions. ### Key Features Matching Your Item - **Structure**: It's a frame saddle with wooden sidebars (bars) covered in rawhide or leather. The high pommel (front) and cantle (back) are typically made from bent elk or deer antler (softened in water and shaped), forming an arched, U-shaped loop with an open hole at the top. This design provided stability for riders and allowed for securing loads when used as a packsaddle. - **Decorations**: Yours has brass tacks or studs along the edges, which were a common embellishment on Native American gear from the period, often traded from Europeans. While basic versions were undecorated, variations included tacks, beads, or quillwork for aesthetic or status purposes. - **Stirrups and Straps**: The attached leather-covered wooden stirrups and rigging straps (for cinching to the horse) are typical. The overall worn, aged leather suggests heavy use and antiquity. - **Size and Use**: These were lightweight (around 20-25 inches long), all-purpose saddles for women, children, or older men. They doubled as riding saddles for long journeys and packsaddles for hauling buffalo meat, camp gear, or attaching to a travois (a drag sled). They were quick and inexpensive to make compared to pad or full wood saddles. These saddles became widespread in the mid- to late 1800s during the buffalo hunting era but fell out of common use after 1850-1870 as tribes adopted more Western-style saddles. Women in these cultures were often the saddle makers, using local materials like antler, cottonwood, and buffalo rawhide stuffed with grass or hair for padding. If this is authentic (which it looks to be from the craftsmanship and patina), it could have collectible value—similar examples from Crow or Blackfoot origins have sold at auction for $1,000-$5,000 or more, depending on condition and provenance. I'd recommend consulting a Native American artifacts expert or museum (like the Museum of the Plains Indian) for authentication, as reproductions exist. For visual comparison, here are some examples of similar saddles:
-
Hello everybody, I am looking for the feed dog eccentric and the end support for the hook shaft. For an Adler 169. I am guessing that the parts are similar for Adler 269. Attached photo. On this second 169 I have, the machine was initially equipped for binding so it lacked the eccentric. So the end support of the hook shaft is thicker compared to the one for up and down movement. I can let this part go if somebody is interested. I can buy the parts from DA, new. But they cost a small fortune. So I thought asking around here, maybe somebody has them and can sell them cheaper...maybe. Thank you!!! M.
-
Awesome
-
I can see how the front arch of the saddle might be used as a handhold by a passenger, while the horse is being led by someone else, a workaround for someone that doesnt know how to ride a horse.


.thumb.jpg.be873fe3cafed424774b187cfb1a470f.jpg)
