All Activity
- Past hour
-

Flatbed Table Attachment For Adler 69 Machines
Fabio replied to Uwe's topic in Leather Sewing Machines
This is a very old post, but I'll give it a try! It's a really beautiful project! Is the metal plate available for purchase somewhere, or is it custom-made? -
Damn nice IMO.
-
Thats a good holster!
-
 egrgte joined the community
 -
 Cmon man dont overthink this lol. There are no problems with nfo its been used for centuries on holsters with guns of all types of bluing. But you can use almost any oil, as time and human history have proven. I use a light brushing of nfo then a good helping of Feibings Golden mink oil for conditioning and water resistance. Olive oil is also used regularly also so use it if you want. Boot waterproofings and dressing aree relly good for any leather gear, used outdoors or inside. This is off the net and provided by Artificial intelligence if you have decided to believe that over actual written human history. AS you can see, NFo is less acidic than the leather you are putting it on. "The pH range of neatsfoot oil is typically between 5.5 to 7.5, which is slightly acidic to neutral. This characteristic helps in conditioning and preserving leather." "The pH of vegetable-tanned leather typically ranges from 3.5 to 5.5, which is slightly acidic. This acidity helps preserve the leather and contributes to its durability and aging characteristics." Free acidity is a defect of olive oil that is tasteless and odorless, thus can not be detected by sensory analysis. Since vegetable oils are not aqueous fluids, a pH-meter can not be used for this measure. Various approaches exist that can measure oil acidity with good accuracy. ALso, The acidity of olive oil refers to the level of free fatty acids present, which is an important quality indicator. Extra virgin olive oil must have a free acidity of less than 0.8%, while virgin olive oil ranges from 0.8% to 2%, and higher acidity levels indicate lower quality oils
 - Today
-
@cmunch To be in compliance with the rules, we really need a picture of this. Looking forward to seeing what else you list.
-
 Happy New Year to you. 🙂
 -
Thank you!
-
 When I made holsters many years ago, I didn't typically apply any type of oil to them, however as I'm getting back into it, I'm thinking of applying a very, very light coat of 100% pure Neatsfoot oil on both the inside and outside of my lined holsters, not enough to soften the leather any, but just enough to add a touch of moisture to ensure that the leather doesn't crack. My concern lies in the fact that Neatsfoot oil is mostly or entirely comprised of various types of acids, and seeing as how even mild acids can damage a firearm's bluing, I'm hesitant about applying Neatsfoot oil to the inside of a holster for nice gloss blued guns. Yes, I would be applying Resolene to the inside of the holster after applying the oil, but I'd still be a bit concerned about the gun coming into direct contact with the oiled leather as the Resolene is worn over time. Have any of you ever seen this cause a problem for bluing? I know many of you probably make holsters primarily for modern guns with indestructible finishes like Nitron, Tenifer and the like, but any advice would be appreciated. I'd be interested in hearing the opinion of Mr. Lobo, since I know you have applied Neatsfoot Oil to your holsters since the days of brand-new gloss blued guns, therefore I figured you could be able to tell me if you ever saw any issues with nice blued Colts and Smiths in holsters that have been conditioned with Neatsfoot oil. Also, any recommendations for alternatives to Neatsfoot oil that aren't acidic are appreciated. I know some use Extra Virgin Olive Oil, which is relatively PH neutral, and I've also considered using the Bickmore Exotic Conditioner that I use on my boots, although I've never heard of it being used on a holster. Thank you in advance for any advice.
 -
 Good call, thanks
 -
Well done!
- Yesterday
-

Is the Pratie State Leatherworkers guild still in existence?
rleather replied to Timmmm's topic in Leatherwork Conversation
This is what I found on the international leathercrafters guild list. Linda Zavala Pres 2327 Calwagner St Melrose Il 847 363 5738 Meet 2nd Sunday 130pm. I do not know how current the info is,but good luck. -
Hey guys, I spent New Year’s Eve on a last practice before my internship at a saddlers workshop. Since I only own dogs and got a new toy (what my friends jokingly call my little leather splitter), I decided to make a flat and a rolled collar. Both were made to measure for my mum’s dog. I’m still waiting on my new creaser, which might arrive tomorrow, so all decorative lines are missing for now. # Italian leather with steel hardware. The blue hide is dead stock and no longer available. I originally bought it for my dog’s new harness, but I had already planned to use some for dog collars. When my mum and I discussed the collar, she mentioned a whole hide of flower-print fashion leather (1.5–2 mm) that I was gifted by my grandparents. Since I was already working on some reflective piping for my dog’s new harness, we decided to use this leather for a colorful twist on the plain blue design. This project really tested my patience — I had to cut a 2-inch strap three times due to mistakes! Just when I was ready to give up, I finally got it right. If you look closely, you can still see my maker’s marks on the back side of the pull. The pink stitches are purely decorative and inspired by the beautiful work of Windsor & Hanly Bridles from England. The stitching ended up being the most fun part of the project! For my first rolled collar, I’m quite happy with how it turned out and learned a lot in the process. My mum already wants another one as soon as I’m back from my internship, and I’m planning one for my dog too. I used 10 mm dog leash rope for the core, as my mum’s dog is fairly large. Both collars measure 46 cm from the third hole. On my bench right now are a half-checkered/martingale collar and a harness, which I hope to finish by Tuesday evening. All in all, these were fun last projects before trying to convince the pros that I’m worth their while. The rolled collar, in particular, was a great stress test.
-
 I live in Aurora Il and I’m trying to find the Prairie state leather workers guild but I don’t seem to have any working website. I e seen the Facebook page but I did t see a single piece of anything made or meeting or anything. Any help for any local groups would be appreciated
 -
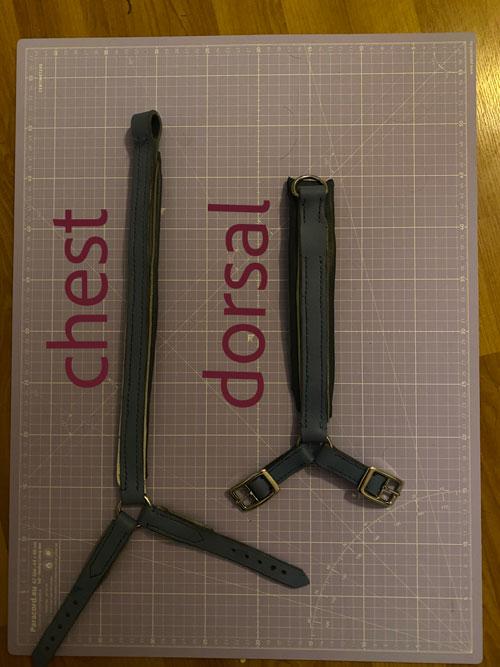
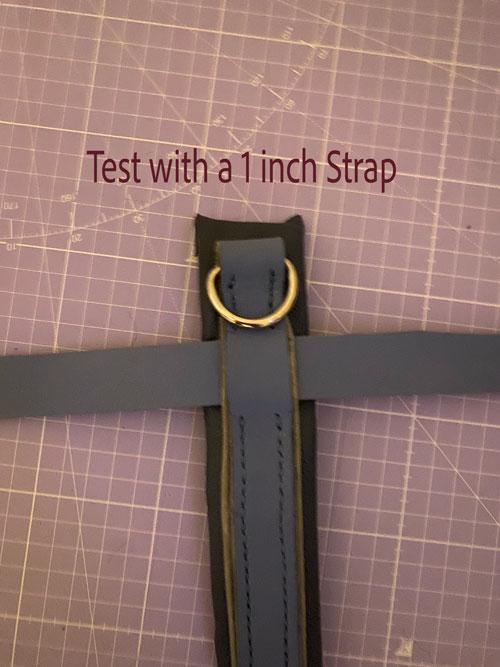
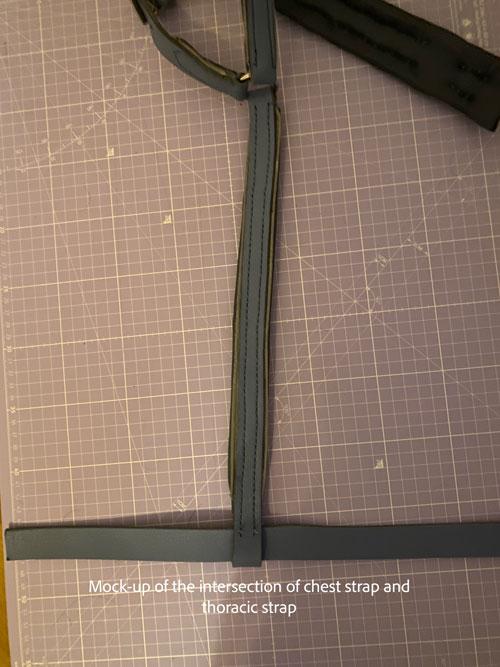
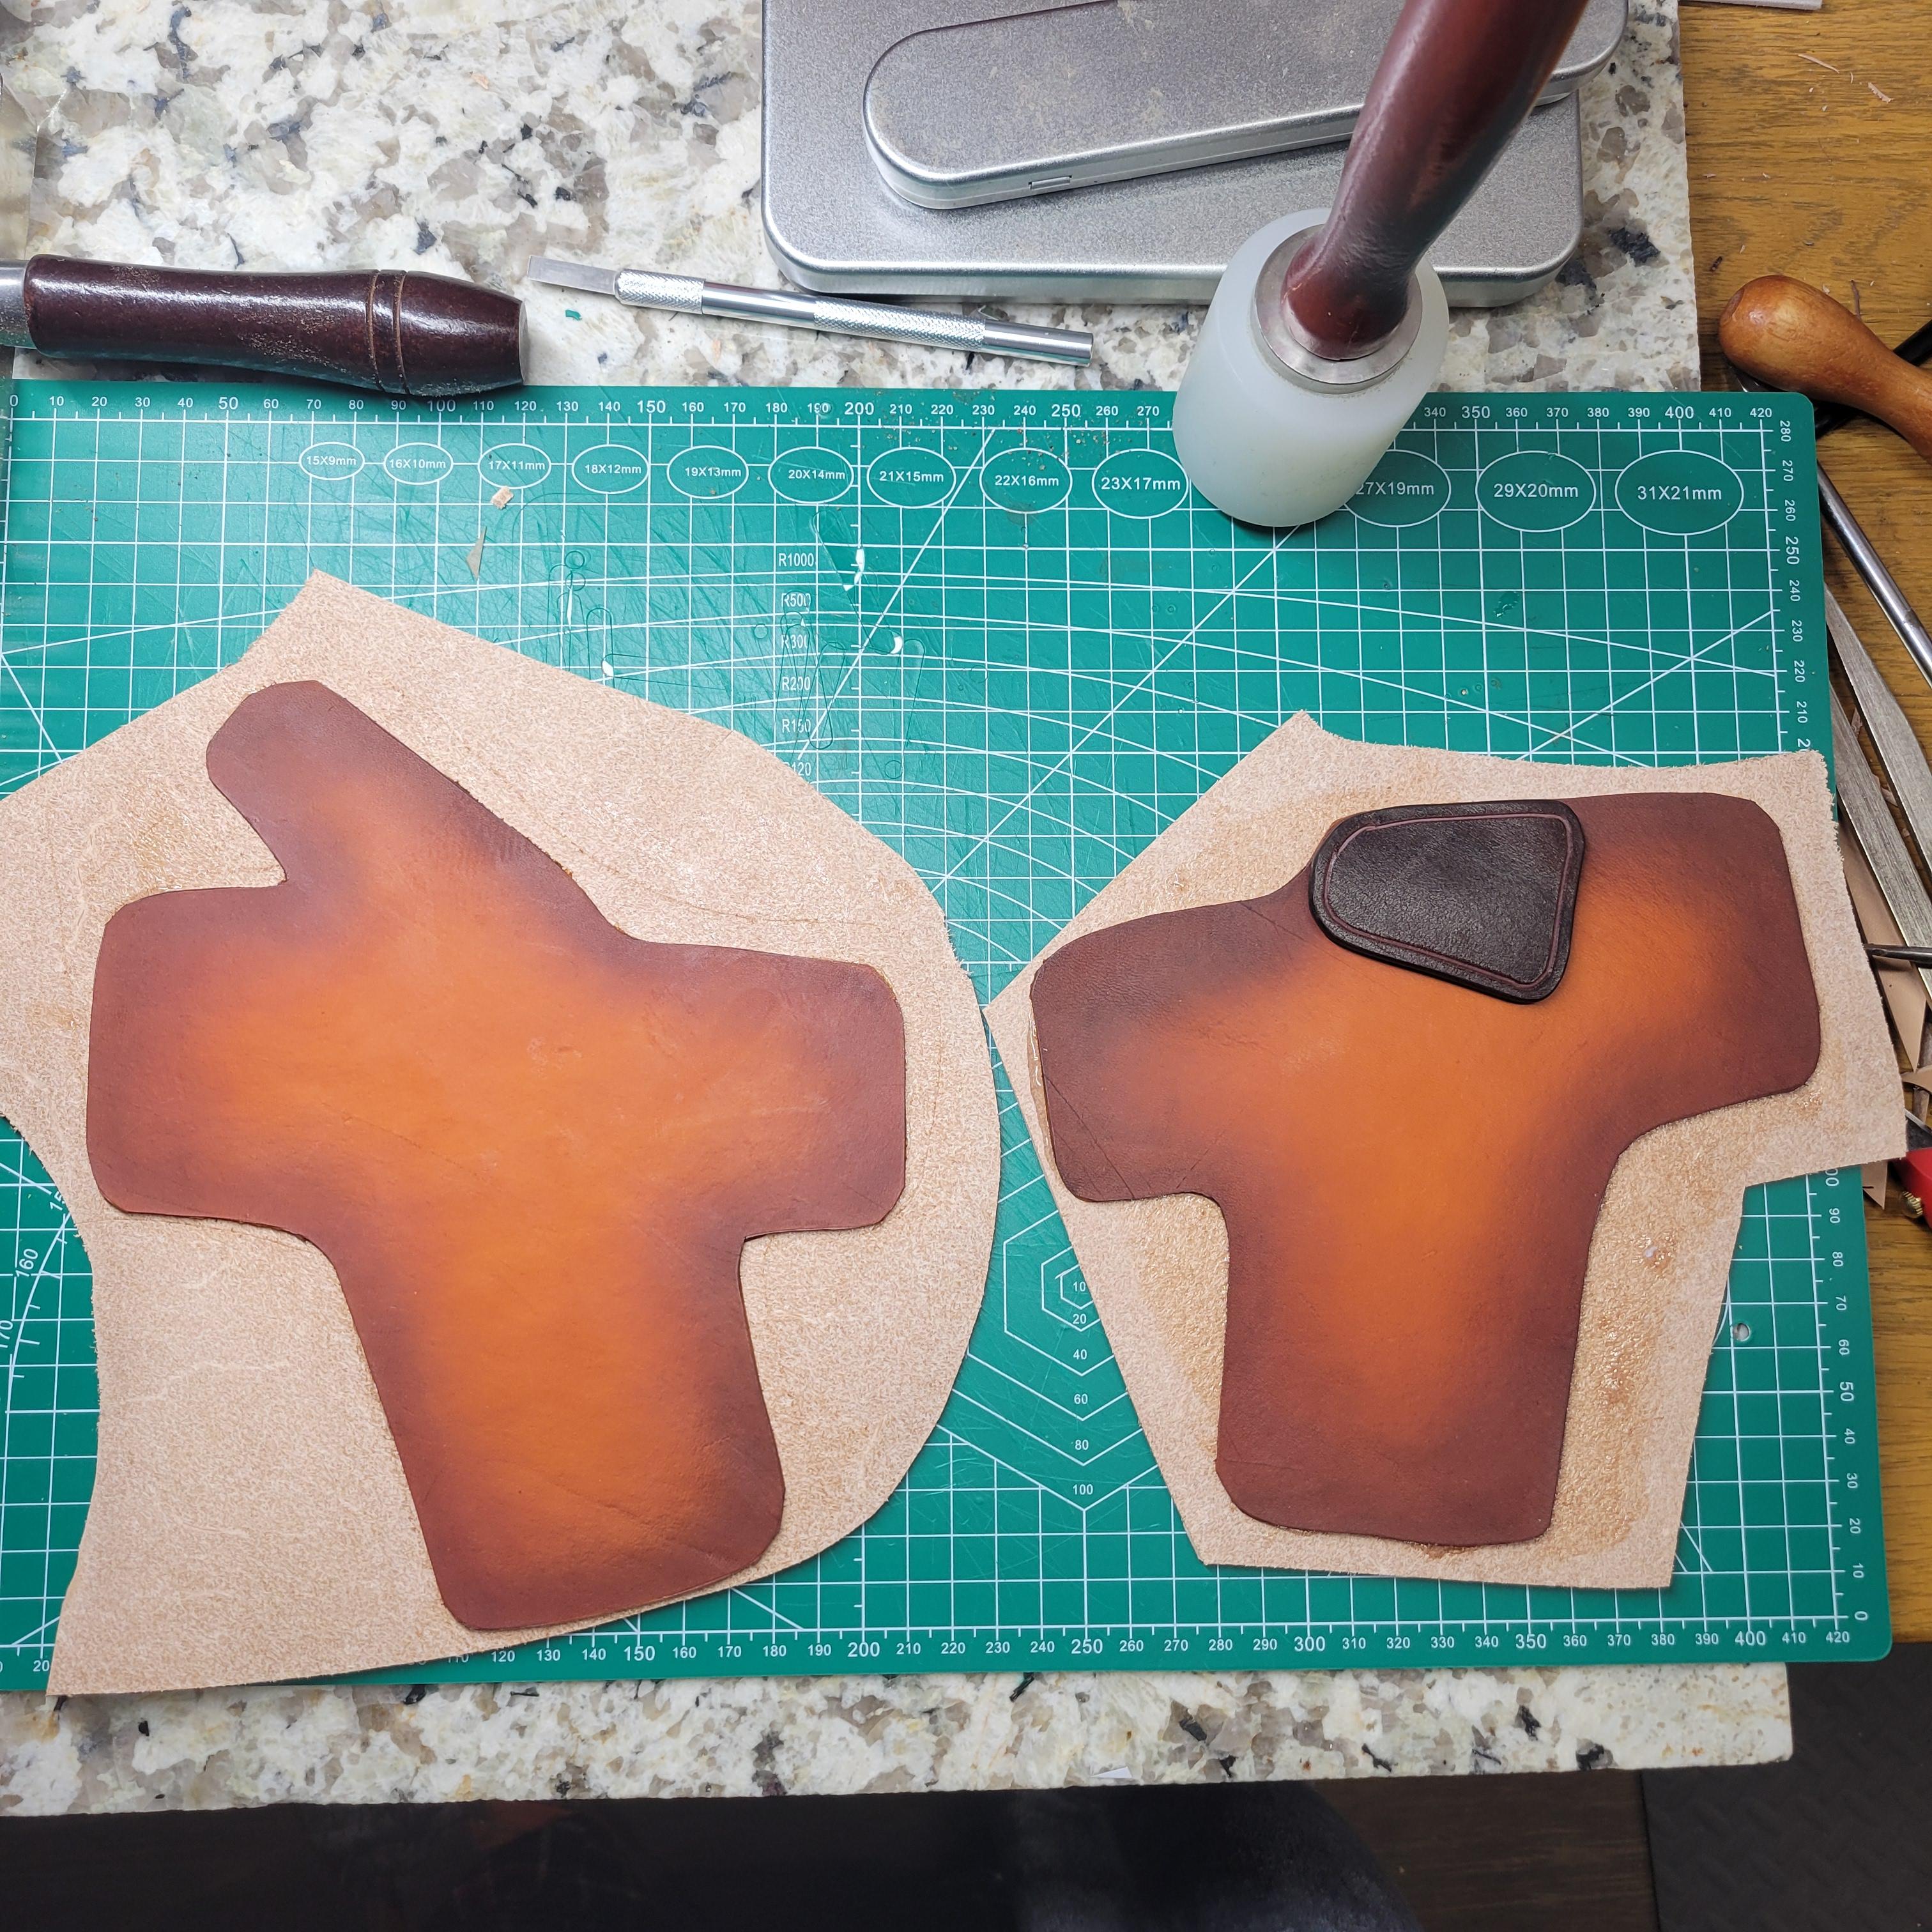
 I can only recommend trying that out. We measured my mums dog today and damn! He looks so easy to get a harness for, but when you look at the measurements he is even more of a challenge than Tova. Hope you had a nice new years eve and good start into the new year. ----------------------------------------------------------------------------- Part 3 - Measurements to design In the previous part, we took our measurements. By now, you should have three values for each measurement. For the next steps, we will work with the average of those values. This helps smooth out small inconsistencies and gives us a realistic baseline for design decisions. Measurements alone, however, do not build a harness. Before we translate numbers into leather and straps, we need to talk about harness types—because not every set of measurements works for every design. The goal of this part is not to rank harnesses as “good” or “bad”, but to understand: what each harness type is designed to do where its anatomical limits are and which measurements matter most for each design Only then can we choose the right harness for the dog in front of us. Overview of Common Harness Types 1. The Y-Harness For a long time, this was my go-to harness for most dogs—and in many cases, it still is. However, while researching for this guide, some findings surprised me and made it clear that even the Y-harness is not universally ideal. A typical Y-harness consists of: two neck pieces forming the Y-shape one chest strap one dorsal strap one torso (thoracic) strap, usually opening on the left and right Its main advantage is that, when correctly designed and fitted, it can: keep straps away from the shoulder joint distribute pressure relatively evenly allow good shoulder extension Its biggest risk lies in incorrect vertical placement of the chest and neck straps, which can interfere with shoulder and elbow movement—especially in dogs with long forelimbs or narrow chests. This harness type is highly sensitive to accurate measurements and will be used later in this part as a full worked example. 2. The Chest Strap Harness Chest strap harnesses use a horizontal strap across the chest rather than a Y-shape. They can work well for: dogs with longer legs dogs where the elbow-to-floor distance is large dogs whose anatomy causes Y-straps to sit too high or too low However, they are more prone to: restricting stride extension if placed too low pushing into the shoulder if strap width is poorly chosen This makes leg length and elbow movement critical measurements for this design. 3. Tactical / Working Harnesses These harnesses are commonly used for working dogs, such as guide dogs or service dogs. They are typically: heavier wider more rigid designed to distribute load over a larger surface Their priority is stability and load bearing, not minimal interference. As a result, they are rarely suitable for: young dogs dogs with sensitive shoulders dogs expected to move freely at speed For leatherworkers, these designs require special attention to weight, padding, and strap width, as poor choices can quickly lead to restriction. 4. Step-In Harnesses Step-in harnesses are easy to put on and popular for small dogs. Biomechanically, they often: cross the shoulder area sit close to or directly over the scapula restrict shoulder rotation They may “measure fine” in circumference but still significantly alter movement, especially at the trot. 5. Vest Harnesses Vest harnesses distribute pressure over a large surface area and are often marketed as comfortable. In practice, they: limit skin movement restrict shoulder and spinal motion trap heat hide poor fit behind padding They can be appropriate in very specific cases, but from a biomechanical perspective, they leave little room for precise adjustment. ——————— Now that we have talked about the different harness types, we now need to figure how our measurments translate into each type. 2. Translate Each Measurement Into Design Parameters Take each measurement from Part 2, and show its relevance for each harness type: Measurement Y-Harness Chest Strap Tactical Step-In Vest Elbow-to-floor Determines lowest safe chest strap Determines strap height Safety, clearance Clearance Clearance Shoulder blade width Limits dorsal strap width Limits dorsal or back strap width Width of harness back panel Step-in strap clearance Shoulder padding placement Chest width (elbow-to-elbow) Determines chest strap width Same Same Same Same Torso circumference Stability & snug fit Stability & snug fit Load distribution Fit & security Fit & surface contact Neck circumference Neck straps placement Often secondary Often critical Critical for step-in Neck padding Now, let’s check how that looks for Tova. Here are her measurements. Neck 38.3 Elbow to floor 26 Torso 57 Chest 27.5 Elbow to Elbow 14.5 Back 22.5 They already tell us that she has realtivly long legs in comparision to her Torso. So anyting with a low strap or a step- in is not a good fit. Also she has quite narrow shoulders, this rules out any design requiring a wide dorsal part, so no teactical or vest harness as they would rub and restrict her movement. She also sports a moderate chest width this limits our options for chest straps quiets a bit when we want to avoid intereference with elbow extension. Her Torso gives enough space for a Y-harness or a chest harness, but a vest is too much coverage for her specific anatomy. In .Conclusion: Y-Harness: well-suited if straps are carefully sized and positioned as it allows free shoulder and elbow movement. Chest Strap Harness: possible, but strap height must be checked against elbow-to-floor to avoid interference. Step-In Harness: unsuitable, likely restricts shoulder rotation and interferes with stride. Vest Harness: unsuitable, shoulder clearance too narrow; could rub and restrict movement. Tactical / Working Harness: borderline — width and rigidity may cause pressure points; careful custom adjustment required. Using her measurements like this, we can already rule out designs that don’t fit her biomechanics and focus on the ones that do. Next, we’ll translate these numbers into exact strap lengths and widths for a Y-harness. Step 1: Determining Strap Widths As mentioned in Part 2, Tova has very little space between her shoulder blades. This immediately tells us that any strap wider than 1 inch on the dorsal strap would risk rubbing or restricting her shoulder movement. Because I also plan to pad the harness with plastizote and leather, the final effective width needs to account for that padding. For the best fit: Dorsal strap: 1 inch (carries the most pressure, so slightly wider is okay with padding) Other straps (neck, chest, torso): 3/4 inch (enough clearance and room for padding without restricting movement) Tip: Always measure the space between shoulder blades at full stride — you want straps to move with the dog, not press into the anatomy. This simple width plan ensures the harness is comfortable, safe, and functional while still allowing you to add padding where needed. Step 2: Determining Strap Lengths For each strap, length is calculated not just from raw measurements, but also considering clearance for movement, leather thickness, and adjustment. 1. Neck Straps Measurement: Neck = 38.3 cm Calculation: Start with the neck circumference. Add ~2–3 cm for padding and to allow one finger gap. Add extra 2–3 cm if you plan to include a buckle or adjustable closure. Result for Tova: ~43–44 cm for the full neck piece, I also calculated the buckles and O-Rings into the measure. I decieded for buckles left and right as with her measures the harness does not work as an overhead slip harness and I wanted to have more possibilities for adjusting the harness. I also added 4 inches to both parts of the neck piece for a more easy to work buckle turn. Tip: Ensure straps sit in front of the sternum and do not push into the shoulders. 2. Chest Strap Measurements: Elbow-to-elbow = 14.5 cm, Chest = 27.5 cm, Elbow-to-floor = 26 cm Calculation: Base length = distance between attachment points on neck pieces. Add clearance to sit ~2–3 cm above the elbow path. Include padding allowance (~0.5 cm per side). Result for Tova: ~32–33 cm total length plus 4 inches for buckle turns. Tip: Test fit loosely first; the strap should never touch elbows during stride. 3. Dorsal Strap Measurement: Back (shoulder blade distance) = 22.5 cm Calculation: Length = distance from top of neck straps to thoracic strap. Add 1–2 cm for padding and stitching. Result for Tova: ~24 cm plus 4 inches for turns Tip: Keep it centered along the spine; do not widen — your max measure is really your maximum width measure! 4. Torso / Thoracic Strap Measurement: Torso circumference = 57 cm Calculation: Base length = circumference just behind the forelimbs. Add ~3–4 cm for adjustability. Result for Tova: ~60–61 cm plus 4 inches for turns and I split the part into a shorter part with straps, and a longer one with buckles and looping. Tip: Strap should stay above elbow range, snug but not tight. 5. Sketch up the design Having a clear overview of what you want to do is key, so I can only advise you to make a sketch and take note of your measures. After that you can start on making a road map of the order in which you want to build your harness and get an overview of what you will need. I for example will need 2 x O-rings 1 Dee- ring 4 buckles (2 roller, 2 belt) 3 straps of leather (2x 3/4 inches and 1x 1 inch) 6mm plastizote padding leather (leather cord, reflective tape -> I decided to include reflective piping) looping 1/16 inch wide. I also decided I will post my WIP. You might've noticed, that I wrote this guide a bit in advance and am a bit further along in the construction process. As I splitted the neck piece I now have two pieces. Actually, that was really nice for stitching! This is how it looks without the torso strap, as I am still waiting on some buckles and my new adjustable creaser. This is how the strap around the torso will be joined with the dorsal, padding is still missing to avoid any sliding. And here you can see that I decided for a loop (full leather thickness!, skive started behind the point where both layers meet) to keep flexibility when the leather softens, but I will add some "restruction" by possibly adding some padding left and right, but I will test it's performance on "bare bones" before. I tested the harness progressively during construction. For full-motion testing, I used flat rope in place of the thoracic strap so I could confirm fit and movement before cutting final leather. This made it easy to adjust geometry without locking in strap lengths too early. Part 4 will go more in depth with construction.
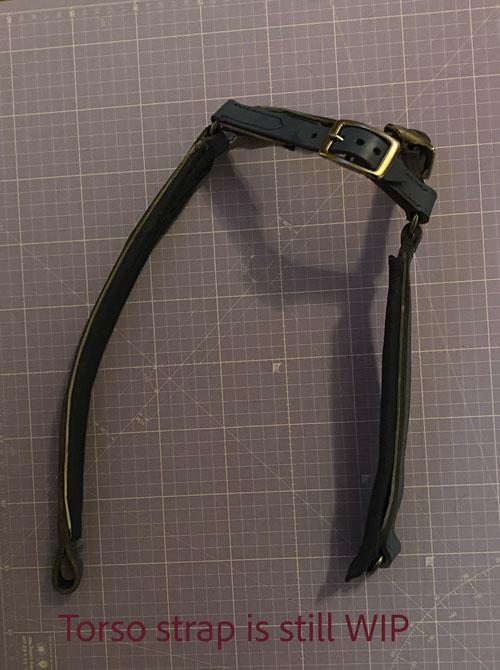
-
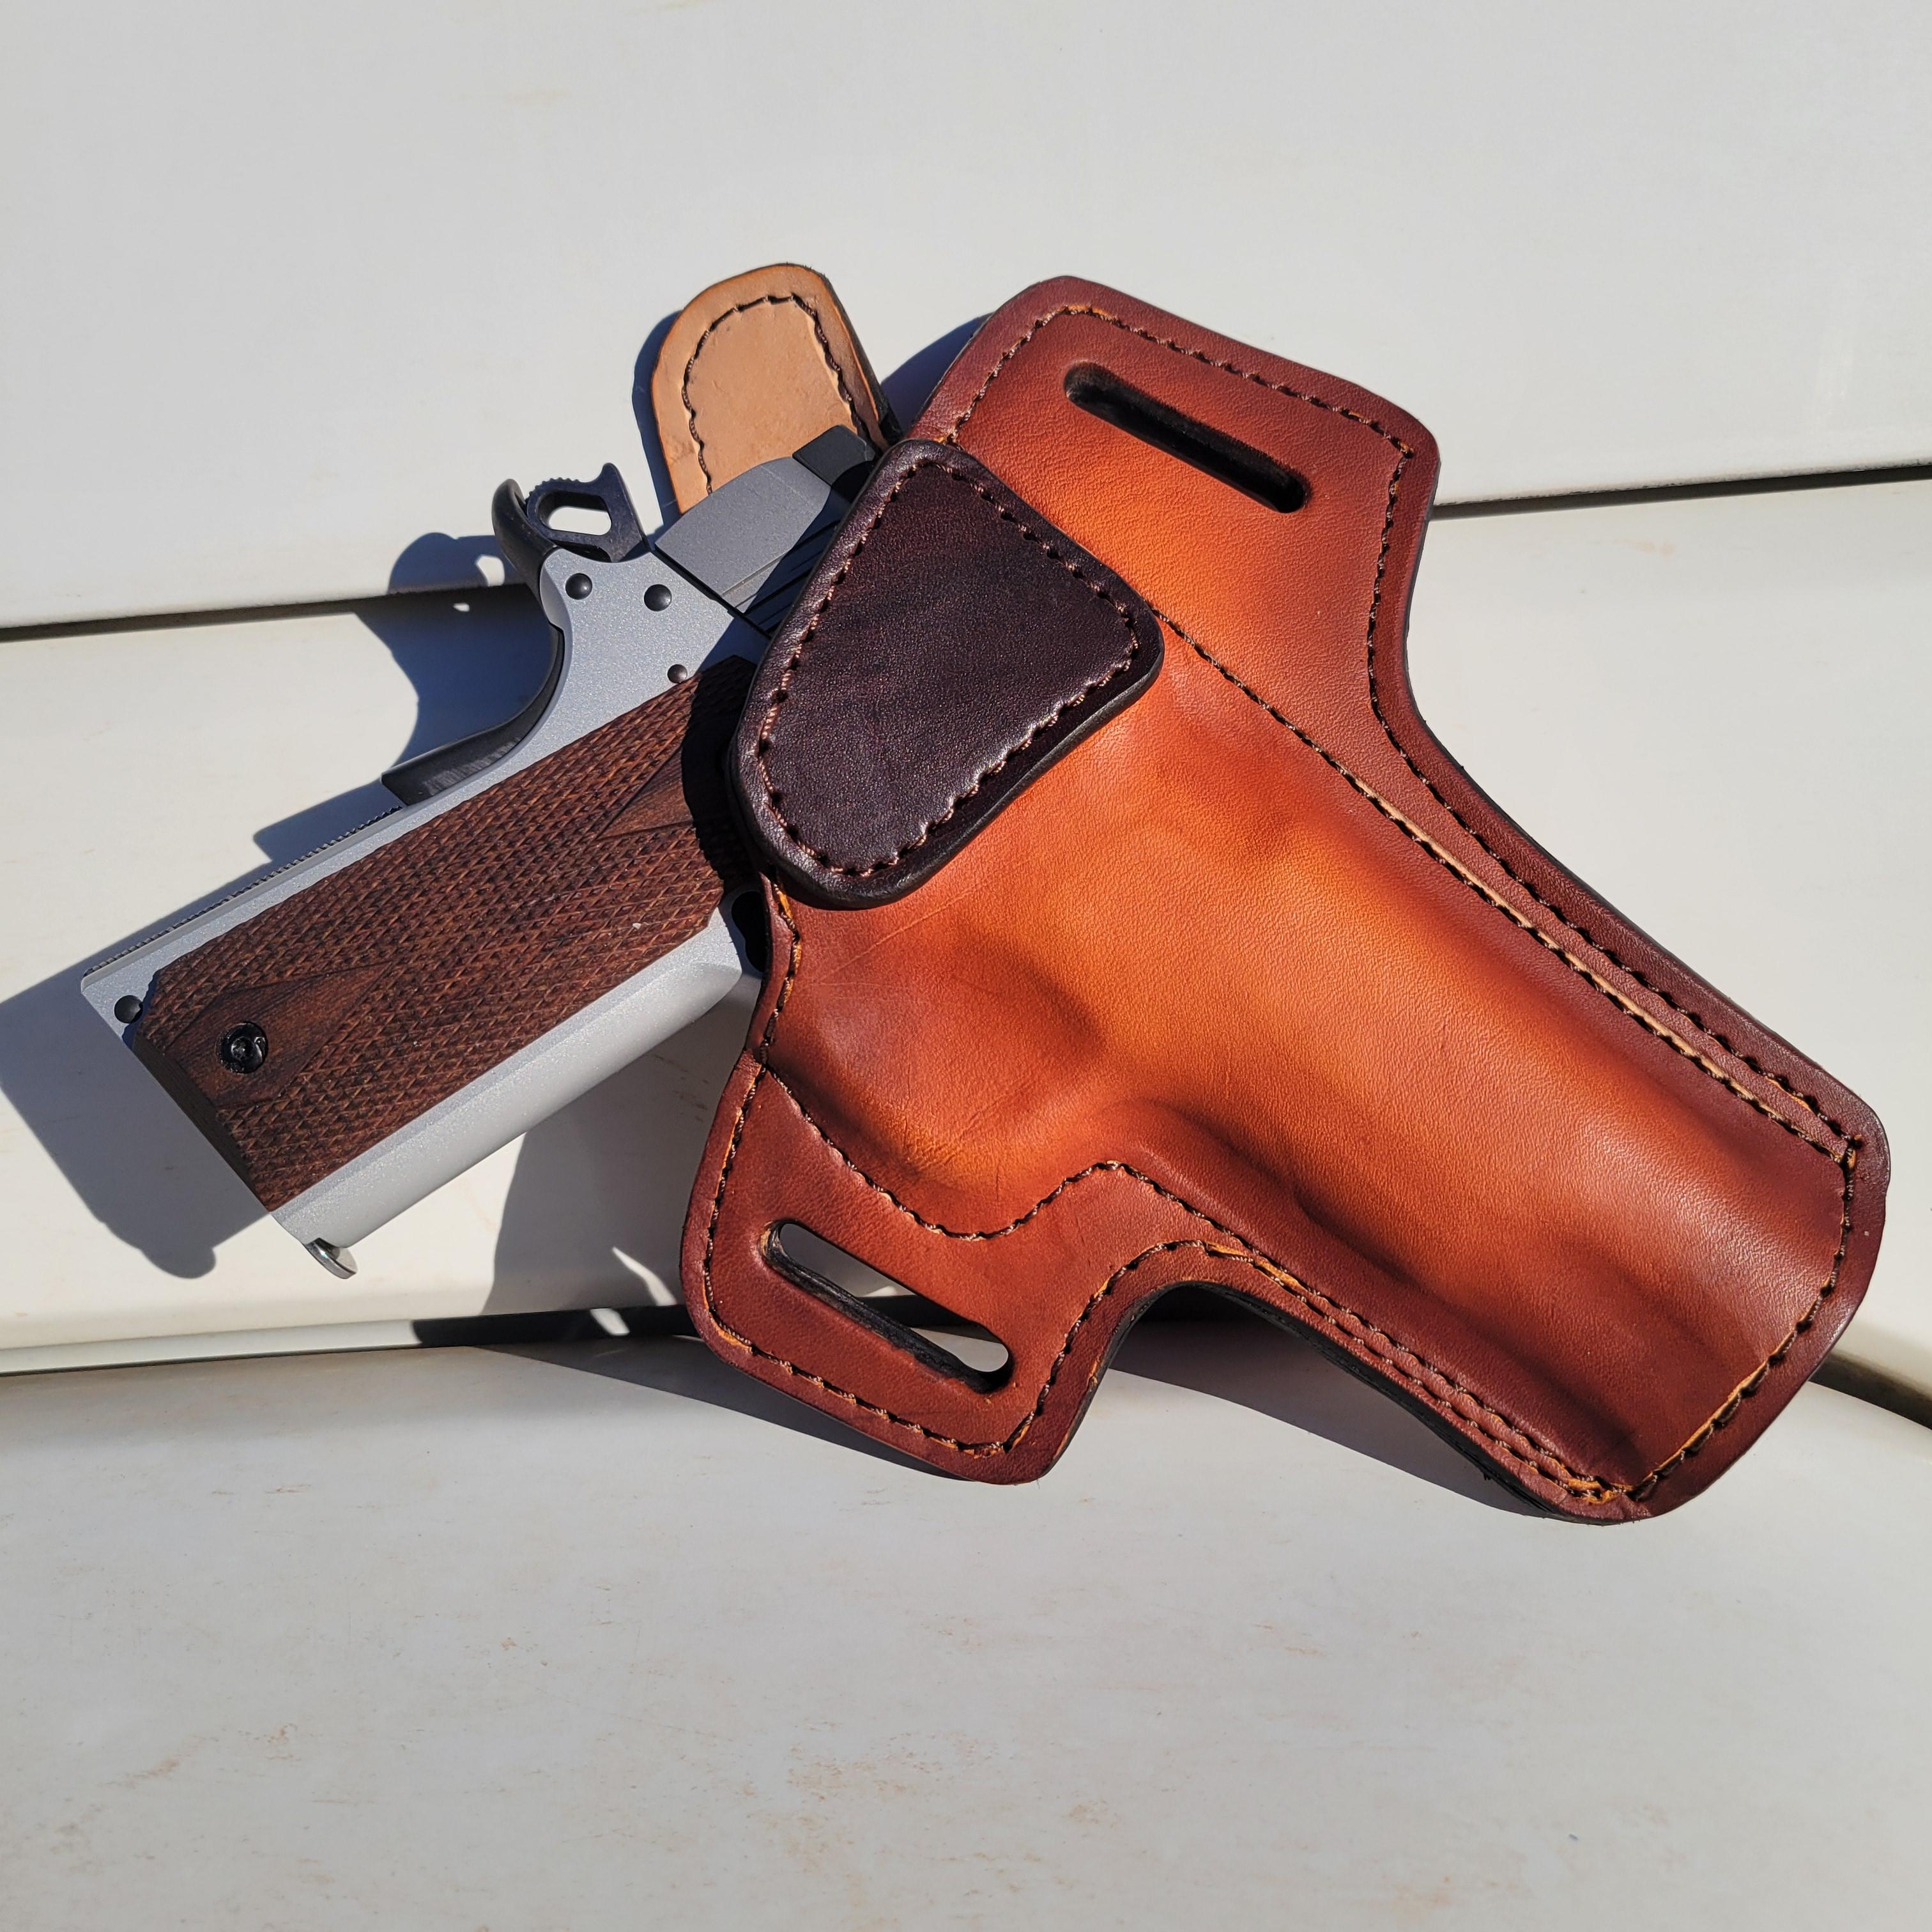
Really trying to get better at making holsters, this is my fourth and I think I'm starting to finally be happy with the results. The coloring is intentional with the slight fade, airbrushing the dye on has made it much easier to achieve. I do leave the liner natural other than a resolene coating.
-
 @Bunker85Hu Might want to specify where you'll ship. We have a global reach. Nice looking tools. Thanks for listing them here.
 -
afair there is type of hemming or binder tape that is water-soluble. Meant for dress makers to hold a hem whilst sewing then it dissolves in the wash. Could something like this be used?
-
 thas-oke happy new year
 -
Yeah I think there has been few guys or gals thru here that has purchased some of their tools.
-

Help Wanted: Leather Tooling Artist
Goldshot Ron replied to BaroqueLeatherGal's topic in Help Wanted
What would you expect for turn around times once an artist receives the materials? The items you posted, are these die cut or does the artist hand cut the leather (the browband)? Do you send along a desired pattern or drawing; or, do you expect the artist to design a pattern, submit it to you for approval? Oh yes, hardware: does that come as part of the construction package? Thanks, Ron -
I have not been able to do my 2025 Oct report yet. Will get to int sometime this month hopefully.
-
My 2 cents worth: Problem 1: Yes I agree oiling first will change the color of the leather however you are going to dye it anyway. The upside to dying first is the dye will penetrate deeper in the leather and allow the dye to go deeper as well. Problem 2: If you convert to airbrushing for both the oiling and dying you will, depending on the size of the piece, get a more even streak free dye covering. Also you will use less oil and less dye in the process. Which method of how you are applying the oil and dye to the leather?? Rag, sponge, brush etc.. kgg
-
As kgg mentioned, I've tried stitching with a sheet of copy paper under difficult materials. This made the stitching easier, but I had trouble removing all the bits of paper afterward. Perhaps something thinner that would dissolve in the water like tissue paper (the kind people wrap gifts in) or aluminum foil or wax paper or mineral oil or flour and water or cornmeal (ew!) or any of your favorite spices from the kitchen cabinet. Spitballing here, have not tried any of these 🙃
-
I struggle getting a highly diluted color across a wide background. Streaks appear where strokes overlap. If I leave my leather without color when I put on a coat of oil, the leather takes on a slightly pink/flesh color. Not a good look for my pieces.